2014 JEEP GRAND CHEROKEE buttons
[x] Cancel search: buttonsPage 91 of 220

Types of Voice
Commands
AvailableSteering Wheel Buttons
to Press:Radio Mode Media ModeClimate
ControlsNavigation Phone Mode APPS
Uconnect
®
Voice Command (VR)
ButtonAM/FM &
Satellite
Band ControlMedia
Devices
ControlTemperature
ControlDestination
Selection and
View- Yelp
®
GENERAL
Uconnect
®Phone
Pick Up Button----Call Initia-
tion, Call
Management,
Pre-defined
Voice Text
Reply-
ELECTRONICS
89
Page 100 of 220
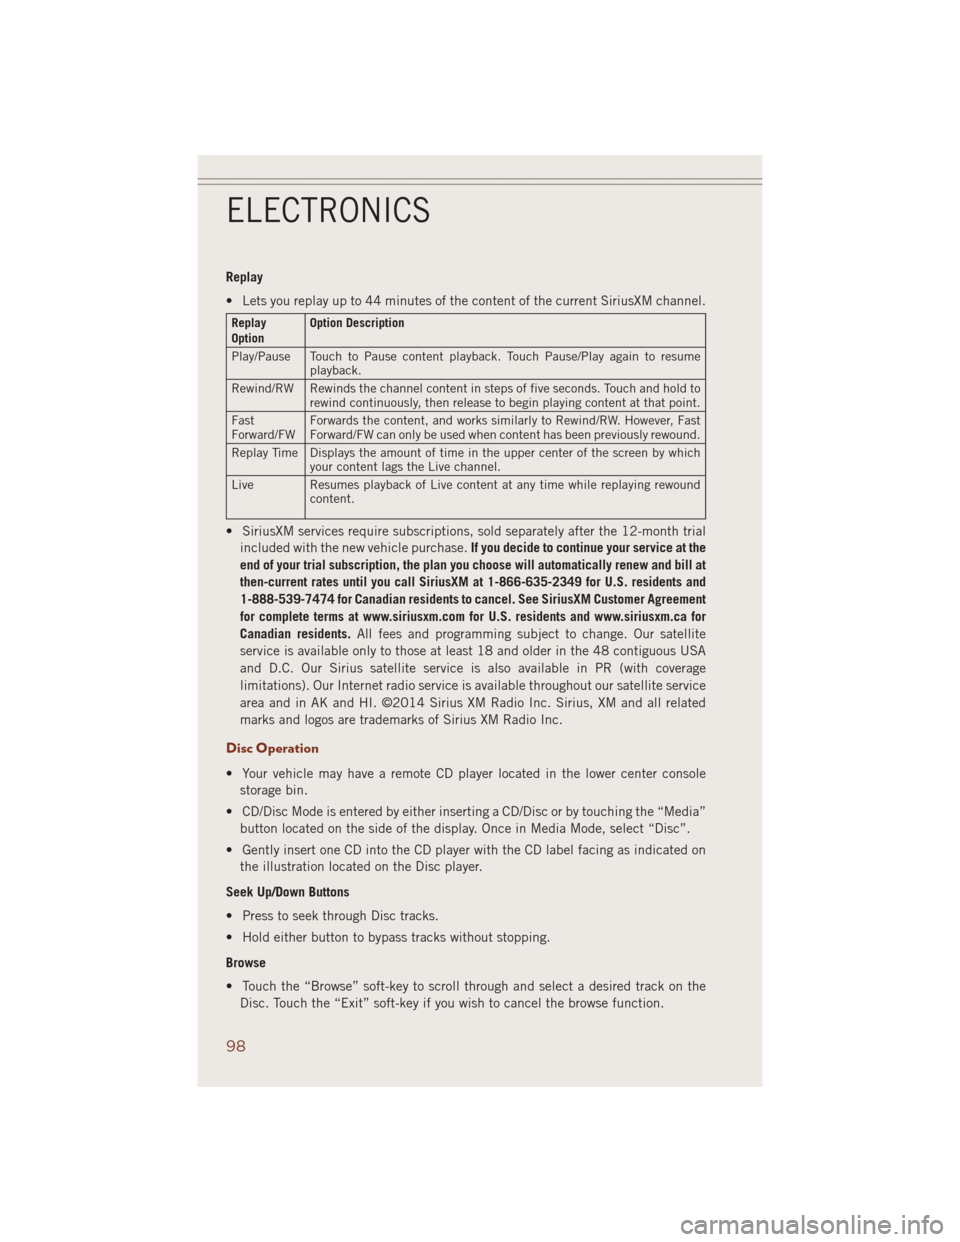
Replay
• Lets you replay up to 44 minutes of the content of the current SiriusXM channel.
Replay
OptionOption Description
Play/Pause Touch to Pause content playback. Touch Pause/Play again to resume
playback.
Rewind/RW Rewinds the channel content in steps of five seconds. Touch and hold to
rewind continuously, then release to begin playing content at that point.
Fast
Forward/FWForwards the content, and works similarly to Rewind/RW. However, Fast
Forward/FW can only be used when content has been previously rewound.
Replay Time Displays the amount of time in the upper center of the screen by which
your content lags the Live channel.
Live Resumes playback of Live content at any time while replaying rewound
content.
• SiriusXM services require subscriptions, sold separately after the 12-month trial
included with the new vehicle purchase.If you decide to continue your service at the
end of your trial subscription, the plan you choose will automatically renew and bill at
then-current rates until you call SiriusXM at 1-866-635-2349 for U.S. residents and
1-888-539-7474 for Canadian residents to cancel. See SiriusXM Customer Agreement
for complete terms at www.siriusxm.com for U.S. residents and www.siriusxm.ca for
Canadian residents.All fees and programming subject to change. Our satellite
service is available only to those at least 18 and older in the 48 contiguous USA
and D.C. Our Sirius satellite service is also available in PR (with coverage
limitations). Our Internet radio service is available throughout our satellite service
area and in AK and HI. ©2014 Sirius XM Radio Inc. Sirius, XM and all related
marks and logos are trademarks of Sirius XM Radio Inc.
Disc Operation
• Your vehicle may have a remote CD player located in the lower center console
storage bin.
• CD/Disc Mode is entered by either inserting a CD/Disc or by touching the “Media”
button located on the side of the display. Once in Media Mode, select “Disc”.
• Gently insert one CD into the CD player with the CD label facing as indicated on
the illustration located on the Disc player.
Seek Up/Down Buttons
• Press to seek through Disc tracks.
• Hold either button to bypass tracks without stopping.
Browse
• Touch the “Browse” soft-key to scroll through and select a desired track on the
Disc. Touch the “Exit” soft-key if you wish to cancel the browse function.
ELECTRONICS
98
Page 101 of 220
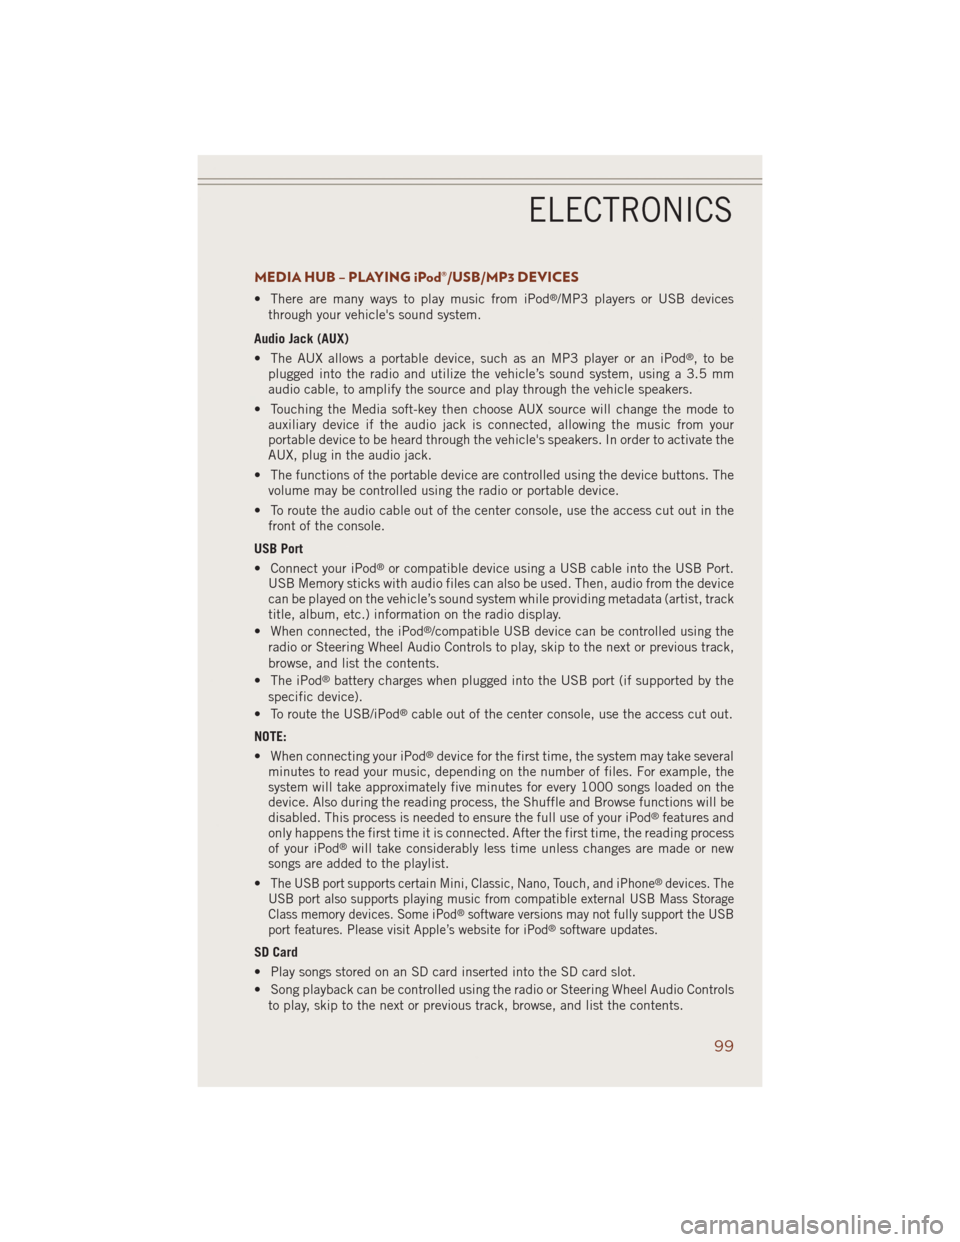
MEDIA HUB – PLAYING iPod®/USB/MP3 DEVICES
• There are many ways to play music from iPod®/MP3 players or USB devices
through your vehicle's sound system.
Audio Jack (AUX)
• The AUX allows a portable device, such as an MP3 player or an iPod
®,tobe
plugged into the radio and utilize the vehicle’s sound system, using a 3.5 mm
audio cable, to amplify the source and play through the vehicle speakers.
• Touching the Media soft-key then choose AUX source will change the mode to
auxiliary device if the audio jack is connected, allowing the music from your
portable device to be heard through the vehicle's speakers. In order to activate the
AUX, plug in the audio jack.
• The functions of the portable device are controlled using the device buttons. The
volume may be controlled using the radio or portable device.
• To route the audio cable out of the center console, use the access cut out in the
front of the console.
USB Port
• Connect your iPod
®or compatible device using a USB cable into the USB Port.
USB Memory sticks with audio files can also be used. Then, audio from the device
can be played on the vehicle’s sound system while providing metadata (artist, track
title, album, etc.) information on the radio display.
• When connected, the iPod
®/compatible USB device can be controlled using the
radio or Steering Wheel Audio Controls to play, skip to the next or previous track,
browse, and list the contents.
• The iPod
®battery charges when plugged into the USB port (if supported by the
specific device).
• To route the USB/iPod
®cable out of the center console, use the access cut out.
NOTE:
• When connecting your iPod
®device for the first time, the system may take several
minutes to read your music, depending on the number of files. For example, the
system will take approximately five minutes for every 1000 songs loaded on the
device. Also during the reading process, the Shuffle and Browse functions will be
disabled. This process is needed to ensure the full use of your iPod
®features and
only happens the first time it is connected. After the first time, the reading process
of your iPod
®will take considerably less time unless changes are made or new
songs are added to the playlist.
•
The USB port supports certain Mini, Classic, Nano, Touch, and iPhone®devices. The
USB port also supports playing music from compatible external USB Mass Storage
Class memory devices. Some iPod
®software versions may not fully support the USB
port features. Please visit Apple’s website for iPod®software updates.
SD Card
• Play songs stored on an SD card inserted into the SD card slot.
• Song playback can be controlled using the radio or Steering Wheel Audio Controls
to play, skip to the next or previous track, browse, and list the contents.
ELECTRONICS
99
Page 111 of 220
NOTE:
All phone oriented voice commands are accessible by first pressing the Phone Pick
Up
button, not the Voice Command button. To end a call, simply press the
Phone Hang Up
button. In some vehicles, the Phone Pickupbutton
serves the dual purpose of ending calls as well.
Voice Command (VR) User TIPs
• To hear available commands, press the Uconnect
®Voice Command button and
say “Help”. You will hear available commands for the menu displayed.
• At any time, you can say the words “Cancel” or “Help”. These commands are
universal and can be used from virtually any menu. All other specific commands
can be used depending upon the active application.
• You can interrupt the system prompts at any time by pressing the Uconnect
®Voice
Command button while the system is speaking. After the beep, you can say a
command.
• You can chain commands together for faster results. Say “Call Joe Doe mobile”,
for example.
• For best performance, adjust the rearview mirror to provide at least ½ inch (1 cm)
gap between the overhead console (if equipped) and the mirror.
• Always wait for the beep before speaking.
• Speak normally, without pausing, just as you would speak to a person sitting a few
feet/meters away from you.
• Make sure that no one other than you is speaking during a Voice Command period.
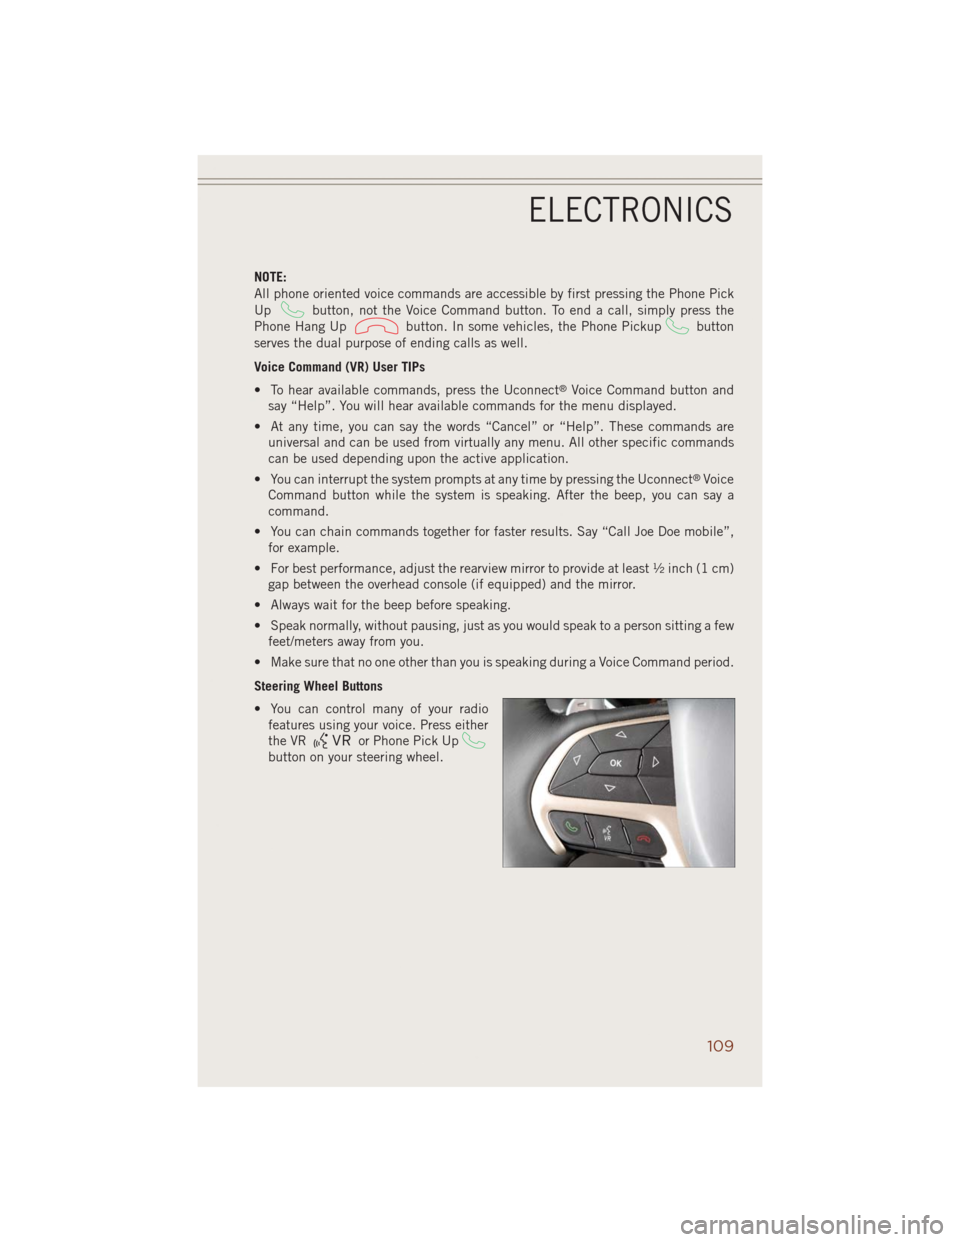
Steering Wheel Buttons
• You can control many of your radio
features using your voice. Press either
the VR
or Phone Pick Up
button on your steering wheel.
ELECTRONICS
109
Page 112 of 220
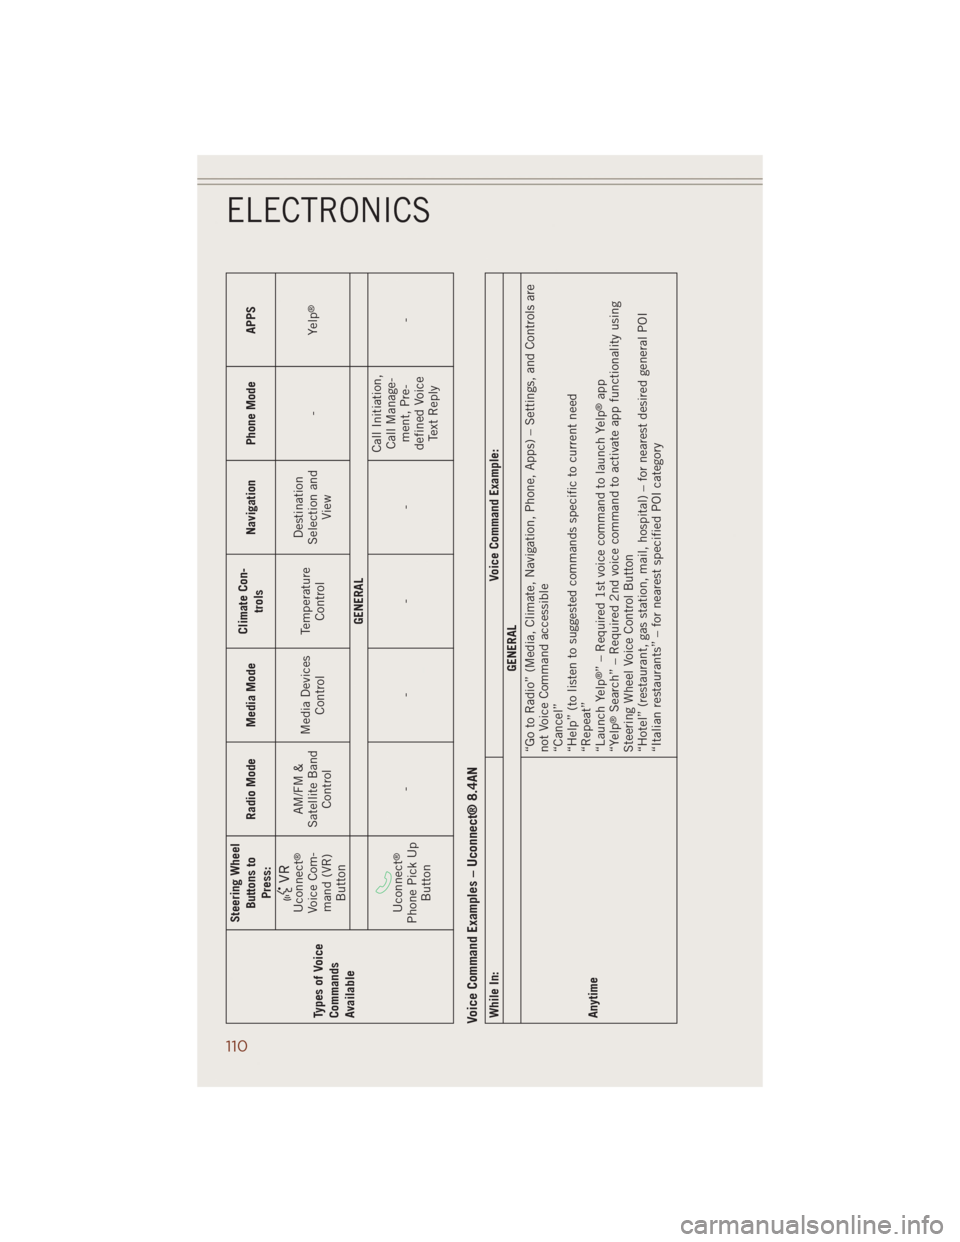
Types of Voice
Commands
AvailableSteering Wheel
Buttons to
Press:Radio Mode Media ModeClimate Con-
trolsNavigation Phone Mode APPS
Uconnect
®
Voice Com-
mand (VR)
ButtonAM/FM &
Satellite Band
ControlMedia Devices
ControlTemperature
ControlDestination
Selection and
View-Yelp
®
GENERAL
Uconnect
®
Phone Pick Up
Button----Call Initiation,
Call Manage-
ment, Pre-
defined Voice
Text Reply-
Voice Command Examples – Uconnect® 8.4ANWhile In: Voice Command Example:
GENERAL
Anytime“Go to Radio” (Media, Climate, Navigation, Phone, Apps) – Settings, and Controls are
not Voice Command accessible
“Cancel”
“Help” (to listen to suggested commands specific to current need
“Repeat”
“Launch Yelp
®” – Required 1st voice command to launch Yelp
®app
“Yelp
®Search” – Required 2nd voice command to activate app functionality using
Steering Wheel Voice Control Button
“Hotel” (restaurant, gas station, mail, hospital) – for nearest desired general POI
“Italian restaurants” – for nearest specified POI category
ELECTRONICS
110
Page 117 of 220
• Push the BACK/LEFTbutton to access the information screens or sub-menu
screens of a main menu item.
• Push theOKbutton to access/select the information screens or sub-menu screens
of a main menu item. Push and hold the OK button for two seconds to reset
displayed/selected features that can be reset.
Compass Calibration
This compass is self-calibrating, which eliminates the need to set the compass
manually. When the vehicle is new, the compass may appear erratic and the EVIC will
display “– –” until the compass is calibrated.
You may also calibrate the compass by completing one or more 360 degree turns (in
an area free from large metal or metallic objects) until the “– –” message displayed
in the EVIC turns off. The compass will now function normally.
PROGRAMMABLE FEATURES
EVIC Programmable Features
The EVIC can be used to view or change the following settings. Push the UPor
DOWN
button until System Setup displays, then push the RIGHTbutton.
Scroll through the settings using the UP or DOWN buttons. Push the OK button to
change the setting. Push the BACK/LEFT
button to scroll back to a previous
menu or sub menu.
• Radio Info • Trip Info
• Fuel Economy Info • Tire Pressure
• Cruise Control Info • Vehicle Info
• Digital Vehicle Speed • Stored Warning Messages
• Screen Setup
Uconnect® Customer Programmable Features
• The Uconnect®system allows you to access Customer Programmable feature
settings such as Display, Clock, Safety/Assistance, Lights, Doors & Locks, Auto-On
Comfort & Remote Start, Engine Off Operation, Compass Settings, Audio, Trailer
Brake, Phone/Bluetooth
®, Suspension and SiriusXM Setup and System Informa-
tion through soft-keys.
ELECTRONICS
115
Page 119 of 220
UNIVERSAL GARAGE DOOR OPENER (HomeLink®)
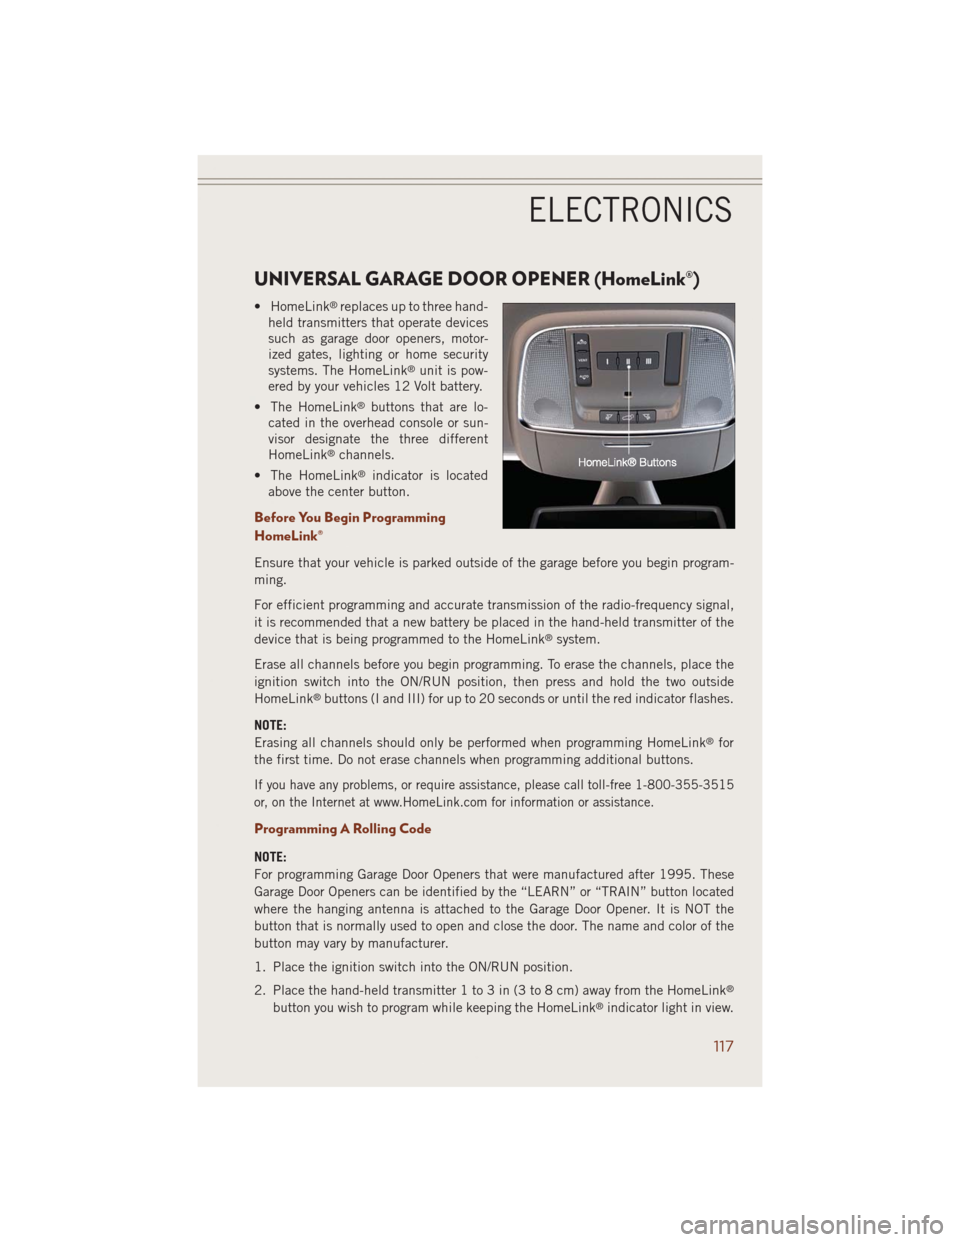
• HomeLink®replaces up to three hand-
held transmitters that operate devices
such as garage door openers, motor-
ized gates, lighting or home security
systems. The HomeLink
®unit is pow-
ered by your vehicles 12 Volt battery.
• The HomeLink
®buttons that are lo-
cated in the overhead console or sun-
visor designate the three different
HomeLink
®channels.
• The HomeLink
®indicator is located
above the center button.
Before You Begin Programming
HomeLink®
Ensure that your vehicle is parked outside of the garage before you begin program-
ming.
For efficient programming and accurate transmission of the radio-frequency signal,
it is recommended that a new battery be placed in the hand-held transmitter of the
device that is being programmed to the HomeLink
®system.
Erase all channels before you begin programming. To erase the channels, place the
ignition switch into the ON/RUN position, then press and hold the two outside
HomeLink
®buttons (I and III) for up to 20 seconds or until the red indicator flashes.
NOTE:
Erasing all channels should only be performed when programming HomeLink
®for
the first time. Do not erase channels when programming additional buttons.
If you have any problems, or require assistance, please call toll-free 1-800-355-3515
or, on the Internet at www.HomeLink.com for information or assistance.
Programming A Rolling Code
NOTE:
For programming Garage Door Openers that were manufactured after 1995. These
Garage Door Openers can be identified by the “LEARN” or “TRAIN” button located
where the hanging antenna is attached to the Garage Door Opener. It is NOT the
button that is normally used to open and close the door. The name and color of the
button may vary by manufacturer.
1. Place the ignition switch into the ON/RUN position.
2. Place the hand-held transmitter 1 to 3 in (3 to 8 cm) away from the HomeLink
®
button you wish to program while keeping the HomeLink®indicator light in view.
ELECTRONICS
117
Page 120 of 220
3. Simultaneously press and hold both the HomeLink®button you want to program
and the hand-held transmitter button.
4. Continue to hold both buttons and observe the indicator light. The HomeLink
®
indicator will flash slowly and then rapidly after HomeLink®has received the
frequency signal from the hand-held transmitter. Release both buttons after the
indicator light changes from slow to rapid.
5. At the garage door opener motor (in the garage), locate the “LEARN” or
“TRAINING” button. This can usually be found where the hanging antenna wire
is attached to the garage door opener motor. Firmly press and release the
“LEARN” or “TRAINING” button.
NOTE:
You have 30 seconds in which to initiate the next step after the LEARN button has
been pressed.
6. Return to the vehicle and press the programmed HomeLink
®button twice
(holding the button for two seconds each time). If the device is plugged in and
activates, programming is complete.
NOTE:
If the device does not activate, press the button a third time (for two seconds) to
complete the training.
7. To program the remaining two HomeLink
®buttons, repeat each step for each
remaining button. DO NOT erase the channels.
Programming A Non-Rolling Code
NOTE:
For programming Garage Door Openers manufactured before 1995.
1. Turn the ignition switch to the ON/RUN position.
2.
Place the hand-held transmitter 1 to 3 inches (3 to 8 cm) away from the HomeLink®
button you wish to program while keeping the HomeLink®indicator light in view.
3. Simultaneously press and hold both the HomeLink®button you want to program
and the hand-held transmitter button.
4. Continue to hold both buttons and observe the indicator light. The HomeLink
®
indicator will flash slowly and then rapidly after HomeLink®has received the
frequency signal from the hand-held transmitter. Release both buttons after the
indicator light changes from slow to rapid.
5. Press and hold the programmed HomeLink
®button and observe the indicator
light. If the indicator light stays on constantly, programming is complete and the
garage door (or device) should activate when the HomeLink
®button is pressed.
6. To program the two remaining HomeLink
®buttons, repeat each step for each
remaining button. DO NOT erase the channels.
ELECTRONICS
118