2014 JEEP GRAND CHEROKEE ad blue
[x] Cancel search: ad bluePage 110 of 220
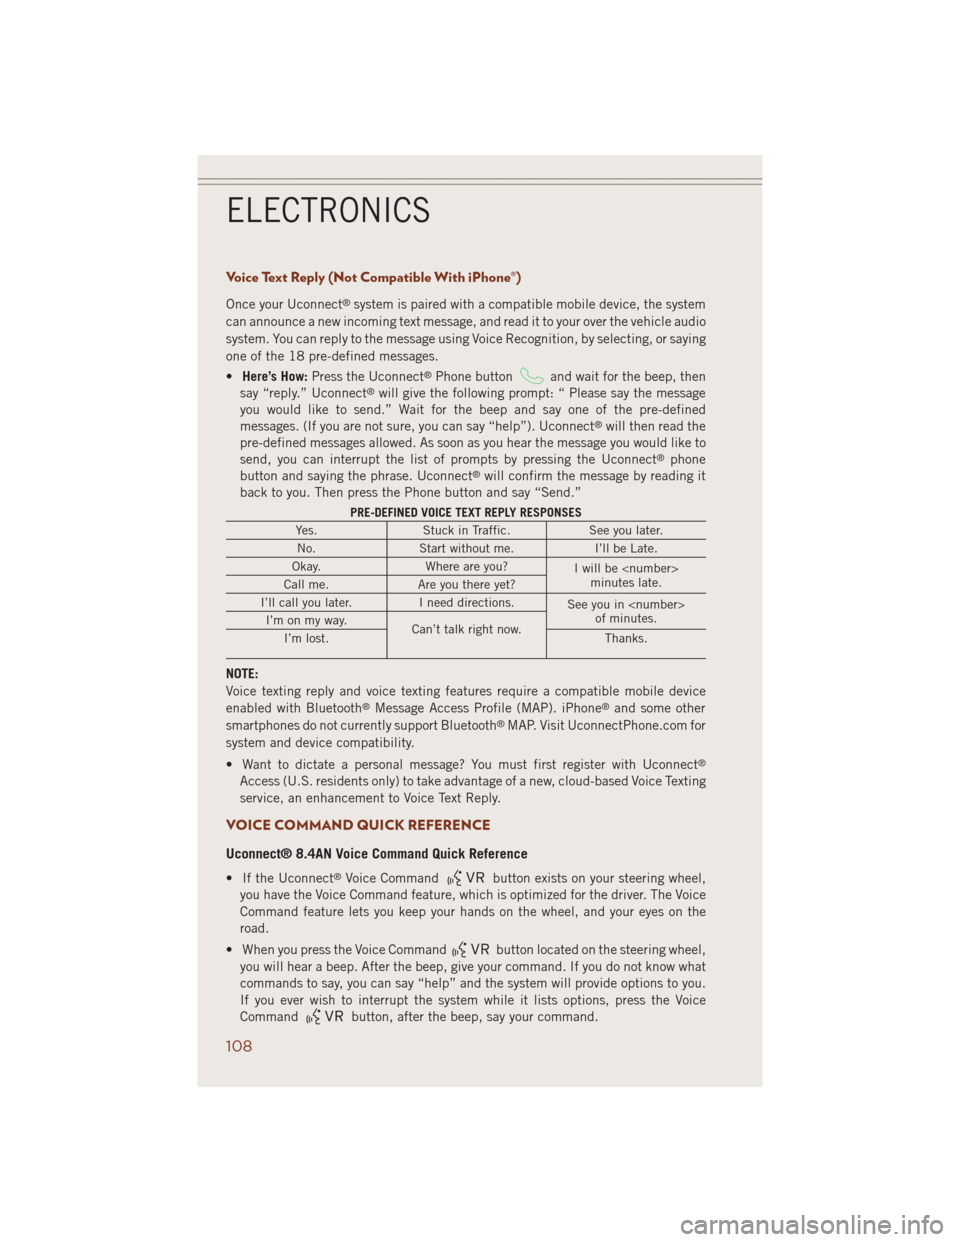
Voice Text Reply (Not Compatible With iPhone®)
Once your Uconnect®system is paired with a compatible mobile device, the system
can announce a new incoming text message, and read it to your over the vehicle audio
system. You can reply to the message using Voice Recognition, by selecting, or saying
one of the 18 pre-defined messages.
•Here’s How:Press the Uconnect
®Phone buttonand wait for the beep, then
say “reply.” Uconnect®will give the following prompt: “ Please say the message
you would like to send.” Wait for the beep and say one of the pre-defined
messages. (If you are not sure, you can say “help”). Uconnect
®will then read the
pre-defined messages allowed. As soon as you hear the message you would like to
send, you can interrupt the list of prompts by pressing the Uconnect
®phone
button and saying the phrase. Uconnect®will confirm the message by reading it
back to you. Then press the Phone button and say “Send.”
PRE-DEFINED VOICE TEXT REPLY RESPONSES
Yes. Stuck in Traffic. See you later.
No. Start without me. I’ll be Late.
Okay. Where are you?
I will be
minutes late.
Call me. Are you there yet?
I’ll call you later. I need directions.
See you in
of minutes.
I’m on my way.
Can’t talk right now.
I’m lost. Thanks.
NOTE:
Voice texting reply and voice texting features require a compatible mobile device
enabled with Bluetooth
®Message Access Profile (MAP). iPhone®and some other
smartphones do not currently support Bluetooth®MAP. Visit UconnectPhone.com for
system and device compatibility.
• Want to dictate a personal message? You must first register with Uconnect
®
Access (U.S. residents only) to take advantage of a new, cloud-based Voice Texting
service, an enhancement to Voice Text Reply.
VOICE COMMAND QUICK REFERENCE
Uconnect® 8.4AN Voice Command Quick Reference
• If the Uconnect®Voice Commandbutton exists on your steering wheel,
you have the Voice Command feature, which is optimized for the driver. The Voice
Command feature lets you keep your hands on the wheel, and your eyes on the
road.
• When you press the Voice Command
button located on the steering wheel,
you will hear a beep. After the beep, give your command. If you do not know what
commands to say, you can say “help” and the system will provide options to you.
If you ever wish to interrupt the system while it lists options, press the Voice
Command
button, after the beep, say your command.
ELECTRONICS
108
Page 113 of 220
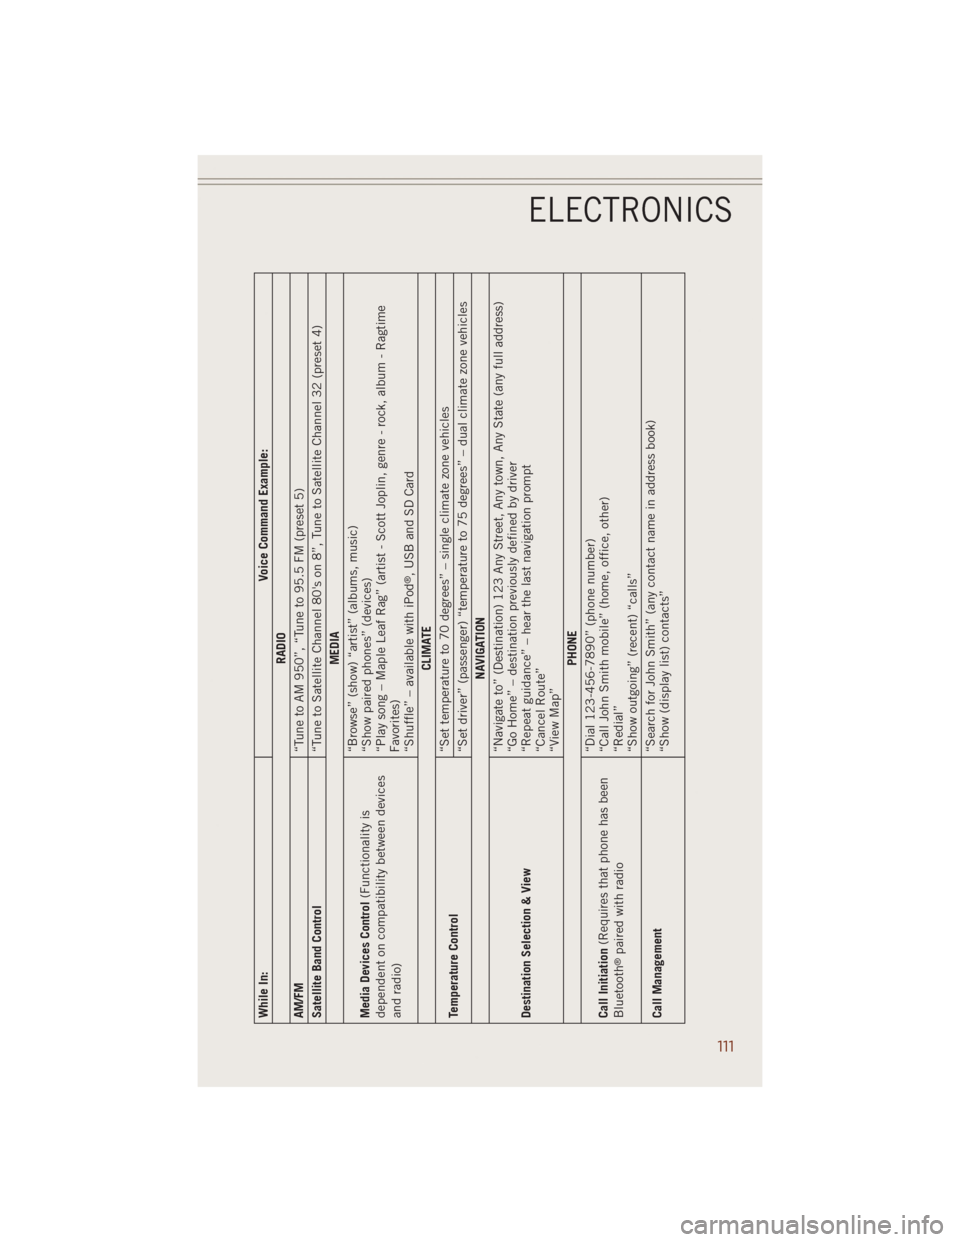
While In: Voice Command Example:
RADIO
AM/FM
“Tune to AM 950”, “Tune to 95.5 FM (preset 5)
Satellite Band Control
“Tune to Satellite Channel 80's on 8”, Tune to Satellite Channel 32 (preset 4)
MEDIA
Media Devices Control(Functionality is
dependent on compatibility between devices
and radio)“Browse” (show) “artist” (albums, music)
“Show paired phones” (devices)
“Play song – Maple Leaf Rag” (artist - Scott Joplin, genre - rock, album - Ragtime
Favorites)
“Shuffle” – available with iPod
®, USB and SD Card
CLIMATE
Temperature Control“Set temperature to 70 degrees” – single climate zone vehicles
“Set driver” (passenger) “temperature to 75 degrees” – dual climate zone vehicles
NAVIGATION
Destination Selection & View“Navigate to” (Destination) 123 Any Street, Any town, Any State (any full address)
“Go Home” – destination previously defined by driver
“Repeat guidance” – hear the last navigation prompt
“Cancel Route”
“View Map”
PHONE
Call Initiation(Requires that phone has been
Bluetooth
®paired with radio“Dial 123-456-7890” (phone number)
“Call John Smith mobile” (home, office, other)
“Redial”
“Show outgoing” (recent) “calls”
Call Management“Search for John Smith” (any contact name in address book)
“Show (display list) contacts”
ELECTRONICS
111
Page 114 of 220
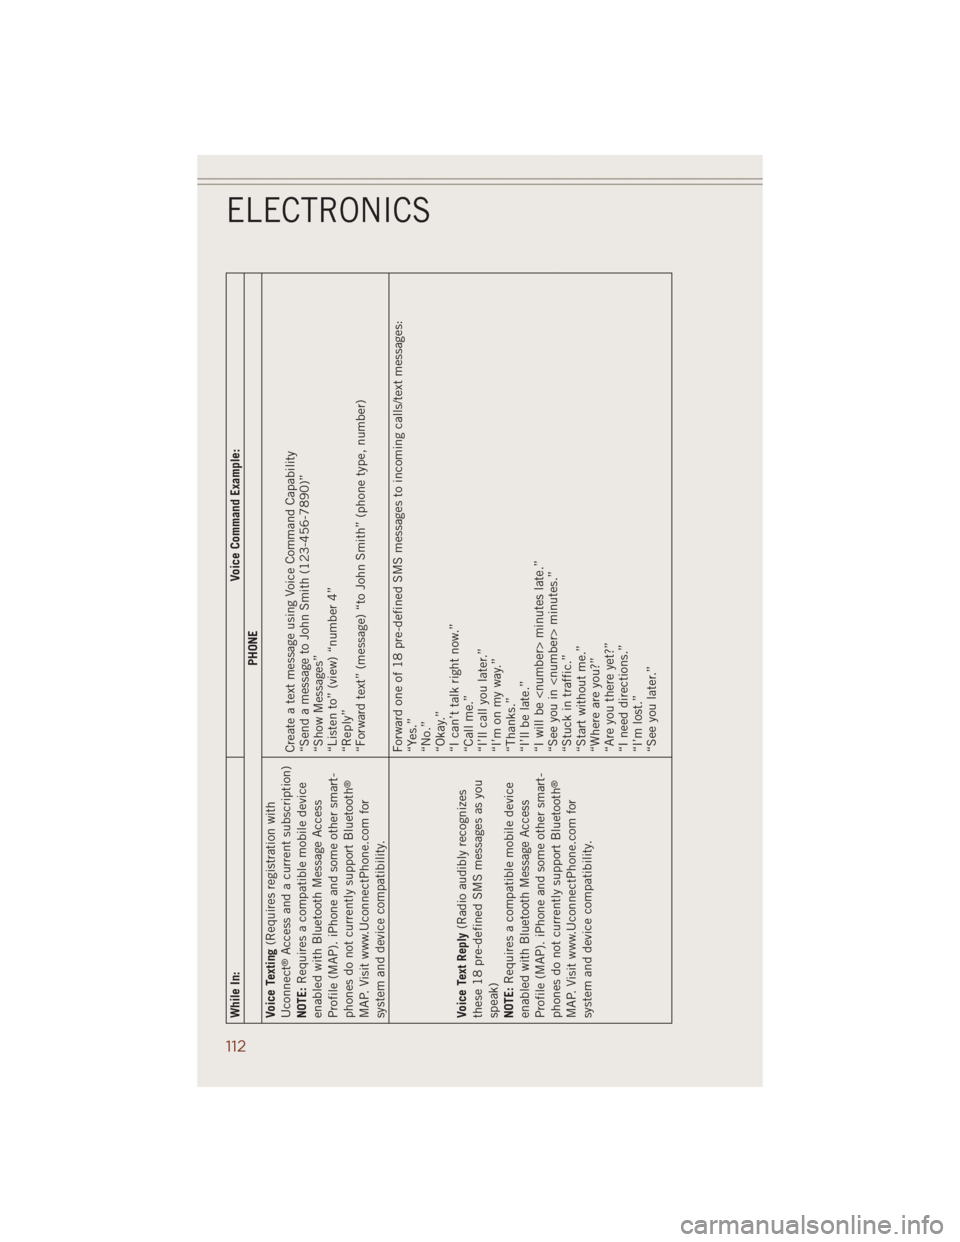
While In: Voice Command Example:
PHONE
Voice Texting(Requires registration with
Uconnect
®Access and a current subscription)
NOTE:Requires a compatible mobile device
enabled with Bluetooth Message Access
Profile (MAP). iPhone and some other smart-
phones do not currently support Bluetooth
®
MAP. Visit www.UconnectPhone.com for
system and device compatibility.Create a text message using Voice Command Capability
“Send a message to John Smith (123-456-7890)”
“Show Messages”
“Listen to” (view) “number 4”
“Reply”
“Forward text” (message) “to John Smith” (phone type, number)
Voice Text Reply(Radio audibly recognizes
these 18 pre-defined SMS messages as you
speak)
NOTE:Requires a compatible mobile device
enabled with Bluetooth Message Access
Profile (MAP). iPhone and some other smart-
phones do not currently support Bluetooth
®
MAP. Visit www.UconnectPhone.com for
system and device compatibility.Forward one of 18 pre-defined SMS messages to incoming calls/text messages:
“Yes.”
“No.”
“Okay.”
“I can’t talk right now.”
“Call me.”
“I’ll call you later.”
“I’m on my way.”
“Thanks.”
“I’ll be late.”
“I will be
“See you in
“Stuck in traffic.”
“Start without me.”
“Where are you?”
“Are you there yet?”
“I need directions.”
“I’m lost.”
“See you later.”
ELECTRONICS
112
Page 117 of 220
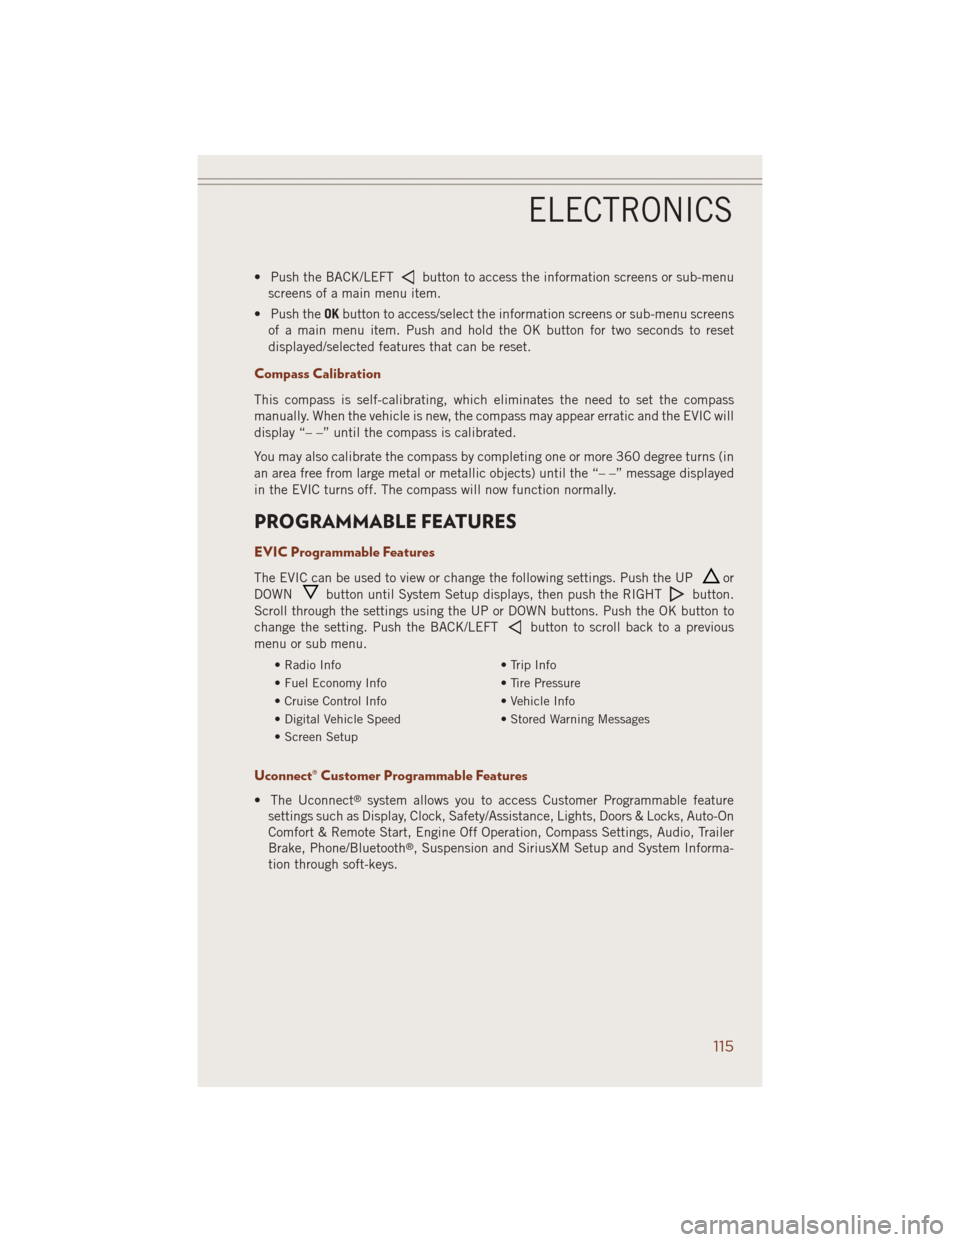
• Push the BACK/LEFTbutton to access the information screens or sub-menu
screens of a main menu item.
• Push theOKbutton to access/select the information screens or sub-menu screens
of a main menu item. Push and hold the OK button for two seconds to reset
displayed/selected features that can be reset.
Compass Calibration
This compass is self-calibrating, which eliminates the need to set the compass
manually. When the vehicle is new, the compass may appear erratic and the EVIC will
display “– –” until the compass is calibrated.
You may also calibrate the compass by completing one or more 360 degree turns (in
an area free from large metal or metallic objects) until the “– –” message displayed
in the EVIC turns off. The compass will now function normally.
PROGRAMMABLE FEATURES
EVIC Programmable Features
The EVIC can be used to view or change the following settings. Push the UPor
DOWN
button until System Setup displays, then push the RIGHTbutton.
Scroll through the settings using the UP or DOWN buttons. Push the OK button to
change the setting. Push the BACK/LEFT
button to scroll back to a previous
menu or sub menu.
• Radio Info • Trip Info
• Fuel Economy Info • Tire Pressure
• Cruise Control Info • Vehicle Info
• Digital Vehicle Speed • Stored Warning Messages
• Screen Setup
Uconnect® Customer Programmable Features
• The Uconnect®system allows you to access Customer Programmable feature
settings such as Display, Clock, Safety/Assistance, Lights, Doors & Locks, Auto-On
Comfort & Remote Start, Engine Off Operation, Compass Settings, Audio, Trailer
Brake, Phone/Bluetooth
®, Suspension and SiriusXM Setup and System Informa-
tion through soft-keys.
ELECTRONICS
115
Page 118 of 220
• Touch the “Controls” or “Apps” soft-key located near the bottom of the screen,
then touch the “settings” soft-key to access the Settings screen. When making a
selection, scroll up or down until the preferred setting is highlighted, then press
and release the preferred setting until a check-mark appears next to the setting,
showing that setting has been selected. The following feature settings are
available:
• Display • Clock
• Safety & Driving Assistance • Doors & Locks
• Auto-On Comfort • Engine Off Options
• Compass (Uconnect
®5.0) • Audio
• Phone/Bluetooth®• SiriusXM Setup
• Lights • Trailer Brake
• Suspension • System Information
• Units • Voice
NOTE:
Depending on the vehicles options, feature settings may vary.
EVIC Reconfigurable Screen Setup
The following settings allow you to change what information is displayed in the
instrument cluster as well as the location that information is displayed.
Trip A
• Press and release the UP or DOWN arrow button until the Trip A icon is highlighted
in the EVIC (Toggle left or right to select Trip A or Trip B). Press and release the OK
button to display the Trip A information.
Trip B
• Press and release the UP or DOWN arrow button until the Trip B icon is highlighted
in the EVIC (Toggle left or right to select Trip A or Trip B). Press and release the OK
button to display the Trip B information.
Fuel Economy
• Press and release the UP or DOWN arrow button until the Fuel Economy icon is
highlighted. Press the RIGHT arrow button and the next screen will display the
following:
• Average Fuel Economy/Miles Per Gallon (MPG Bargraph)
• Range To Empty (RTE)
• Current Miles Per Gallon (MPG)
ELECTRONICS
116
Page 203 of 220

FUSES
POWER DISTRIBUTION CENTER
The Power Distribution Center is located in the engine compartment near the battery.
This center contains cartridge fuses and mini fuses. A description of each fuse and
component may be stamped on the inside cover, otherwise the cavity number of each
fuse is stamped on the inside cover that corresponds to the following chart.
Cavity Cartridge Fuse Micro Fuse Description
F03 60 Amp Yellow Rad Fan
F05 40 Amp Green Compressor for Air Suspension -
If Equipped
F06 40 Amp Green Antilock Brakes/Electronic
Stability Control Pump
F07 40 Amp Green Starter Solenoid
F08 40 Amp Green Emission sensors
(Diesel engine only)
F09 40 Amp Green Diesel Fuel Heater
(Diesel engine only)
F10 40 Amp Green Body Controller / Exterior
Lighting #2
F11 30 Amp Pink Trailer Tow Electric Brake -
If Equipped
F12 40 Amp Green Body Controller #3 /
Interior Lights
F13 40 Amp Green Blower Motor Front
F14 40 Amp Green
Body Controller #4 / Power Locks
F17 30 Amp Pink Headrest Release - If Equipped
F20 30 Amp Pink Passenger Door Module
F22 20 Amp Blue Engine Control Module
F23 30 Amp Pink Body Controller #1
F24 30 Amp Pink Driver Door Module
F25 30 Amp Pink Front Wipers
F26 30 Amp Pink Antilock Brakes/Stability Control
Module/Valves
F28 20 Amp Blue Trailer Tow Backup Lights -
If Equipped
F29 20 Amp Blue Trailer Tow Parking Lights -
If Equipped
F30 30 Amp Pink Trailer Tow Receptacle -
If Equipped
F32 30 Amp Pink Drive Train Control Module
F34 30 Amp Pink Slip Differential Control
F35 30 Amp Pink Sunroof - If Equipped
F36 30 Amp Pink Rear Defroster
MAINTAINING YOUR VEHICLE
201
Page 204 of 220

Cavity Cartridge Fuse Micro Fuse Description
F37 30 Amp Pink Rear Blower - If Equipped
F38 30 Amp Pink Power Inverter 115V AC -
If Equipped
F39 30 Amp Pink Power Liftgate - If Equipped
F40 10 Amp Red Daytime Running Lights
F42 20 Amp Yellow Horn
F44 10 Amp Red Diagnostic Port
F46 10 Amp Red Tire Pressure Monitor -
If Equipped
F49 10 Amp Red Integrated Central Stack /
Climate Control
F50 20 Amp Yellow Air Suspension Control Module -
If Equipped
F51 10 Amp Red Ignition Node Module / Keyless
Ignition / Steering Column Lock
F52 5 Amp Tan Battery Sensor
F53 20 Amp Yellow Trailer Tow – Left Turn/Stop
Lights - If Equipped
F56 15 Amp Blue
Additional Content
(Diesel engine only)
F57 15 Amp Blue Transmission
F59 10 Amp Red
Purging Pump (Diesel engine only)
F60 15 Amp Blue Transmission Control Module
F62 10 Amp Red Air Conditioning Clutch
F63 20 Amp Yellow Ignition Coils (Gas), Urea Heater
(Diesel)
F64 25 Amp Natural Fuel Injectors / Powertrain
F66 10 Amp Red Sunroof / Passenger Window
Switches / Rain Sensor
F67 15 Amp Blue CD / DVD / Bluetooth Hands-free
Module - If Equipped
F68 20 Amp Yellow Rear Wiper Motor
F70 20 Amp Yellow Fuel Pump Motor
F71 30 Amp Green Audio Amplifier
F73 15 Amp Blue HID Headlamps Right
F74 20 Amp Yellow Brake Vacuum Pump -
If Equipped
F76 10 Amp Red Antilock Brakes/Electronic
Stability Control
F77 10 Amp Red Drivetrain Control Module/Front
Axle Disconnect Module
F78 10 Amp Red Engine Control Module / Electric
Power Steering - If Equipped
MAINTAINING YOUR VEHICLE
202
Page 205 of 220

Cavity Cartridge Fuse Micro Fuse Description
F80 10 Amp Red Universal Garage Door Opener /
Compass / Anti-Intrusion Module
F81 20 Amp Yellow Trailer Tow Right Turn/Stop Lights
F82 10 Amp Red Steering Column Control Module/
Cruise Control
F83 10 Amp Red Fuel Door
F84 15 Amp Blue Switch Bank/Instrument Cluster
F85 10 Amp Red Airbag Module
F86 10 Amp Red Airbag Module
F87 10 Amp Red Air Suspension – If Equipped/
Trailer Tow / Steering Column
Control Module
F88 15 Amp Blue Instrument Panel Cluster
F90/F91 20 Amp Yellow Power Outlet (Rear seats)
Selectable
F92 10 Amp Red Rear Console Lamp - If Equipped
F93 20 Amp Yellow Cigar Lighter
F94 10 Amp Red Shifter / Transfer Case Module
F95 10 Amp Red Rear Camera / Park Assist
F96 10 Amp Red Rear Seat Heater Switch /
Flashlamp Charger - If Equipped
F97 25 Amp Natural Rear Heated Seats & Heated
Steering Wheel - If Equipped
F98 25 Amp Natural Front Heated Seats - If Equipped
F99 10 Amp Red Climate Control / Driver
Assistance Systems Module
F100 10 Amp Red Active Damping - If Equipped
F101 15 Amp Blue Electrochromatic Mirror/Smart
High Beams - If Equipped
F103 10 Amp Red Cabin Heater (Diesel engine only)
F104 20 Amp Yellow Power Outlets (Instrument
Panel/Center Console)
CAUTION!
•When installing the integrated power module cover, it is important to ensure the
cover is properly positioned and fully latched. Failure to do so may allow water to get
into the integrated power module, and possibly result in a electrical system failure.
•When replacing a blown fuse, it is important to use only a fuse having the correct
amperage rating. The use of a fuse with a rating other than indicated may result
in a dangerous electrical system overload. If a properly rated fuse continues to
blow, it indicates a problem in the circuit that must be corrected.
MAINTAINING YOUR VEHICLE
203