Page 67 of 220
Uconnect® 5.0
Setting The Time
1. Press the “MORE” hard-key on the right side of the display, next press the
“Settings” soft-key and then the “Time” soft-key.ORPress the “Settings”
hard-key on the right side of the display, then press the “Clock” soft-key. The Time
setting screen is displayed and the clock can be adjusted as described in the
following procedure.
NOTE:
In the Clock Setting Menu you can also select “Display Clock”. Display Clock turns
the clock display in the status bar on or off.
2. Touch the “Up” or “Down” arrows to adjust the hours or minutes, next select the
AM or PM soft-key. You can also select 12hr or 24hr format by touching the
desired soft-key.
3. Once the time is set press the “Done” soft-key to exit the time screen.
Uconnect® 5.0
ELECTRONICS
65
Page 75 of 220
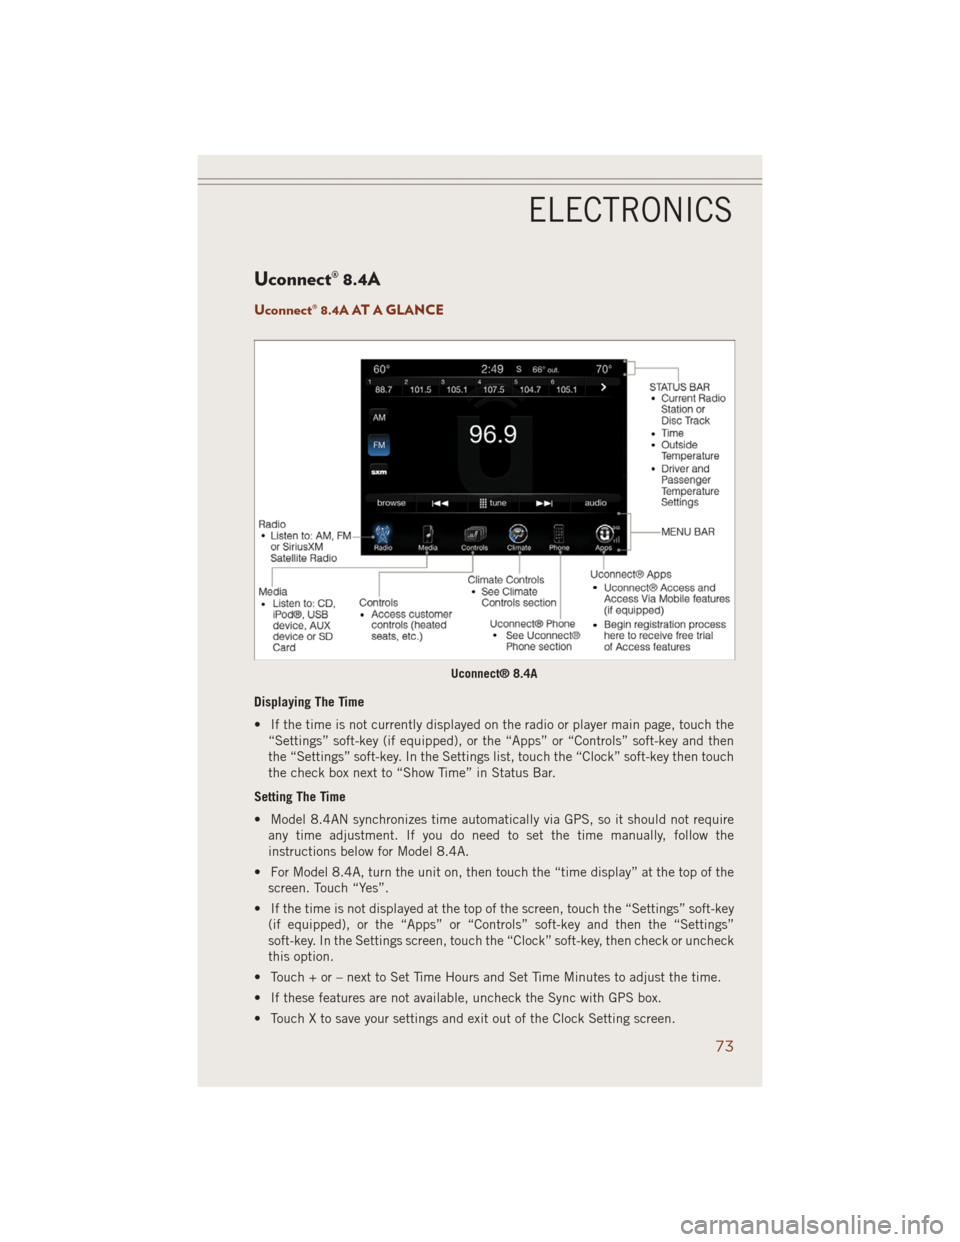
Uconnect® 8.4A
Uconnect® 8.4A AT A GLANCE
Displaying The Time
• If the time is not currently displayed on the radio or player main page, touch the
“Settings” soft-key (if equipped), or the “Apps” or “Controls” soft-key and then
the “Settings” soft-key. In the Settings list, touch the “Clock” soft-key then touch
the check box next to “Show Time” in Status Bar.
Setting The Time
• Model 8.4AN synchronizes time automatically via GPS, so it should not require
any time adjustment. If you do need to set the time manually, follow the
instructions below for Model 8.4A.
• For Model 8.4A, turn the unit on, then touch the “time display” at the top of the
screen. Touch “Yes”.
• If the time is not displayed at the top of the screen, touch the “Settings” soft-key
(if equipped), or the “Apps” or “Controls” soft-key and then the “Settings”
soft-key. In the Settings screen, touch the “Clock” soft-key, then check or uncheck
this option.
• Touch + or – next to Set Time Hours and Set Time Minutes to adjust the time.
• If these features are not available, uncheck the Sync with GPS box.
• Touch X to save your settings and exit out of the Clock Setting screen.
Uconnect® 8.4A
ELECTRONICS
73
Page 95 of 220
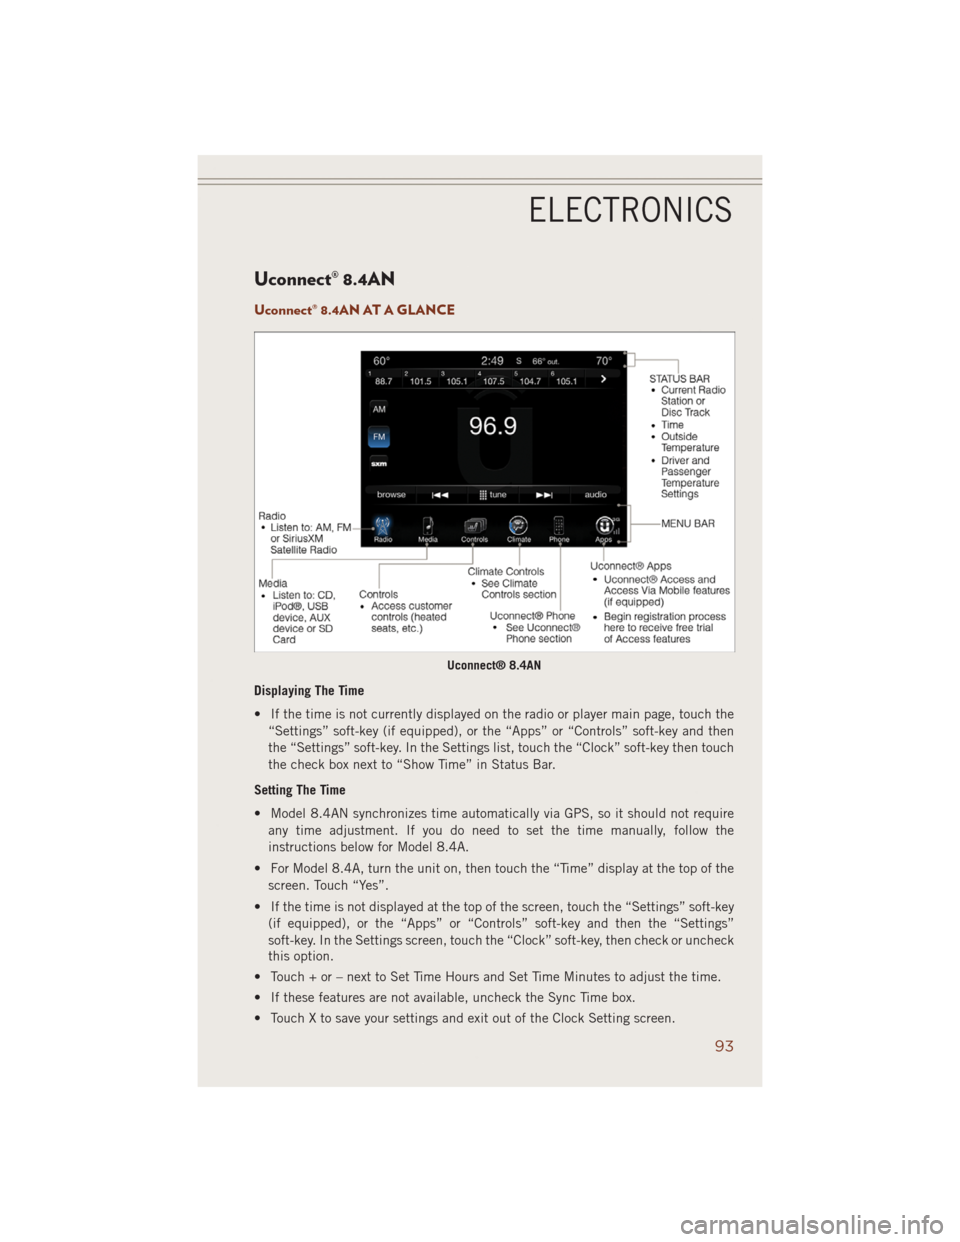
Uconnect® 8.4AN
Uconnect® 8.4AN AT A GLANCE
Displaying The Time
• If the time is not currently displayed on the radio or player main page, touch the
“Settings” soft-key (if equipped), or the “Apps” or “Controls” soft-key and then
the “Settings” soft-key. In the Settings list, touch the “Clock” soft-key then touch
the check box next to “Show Time” in Status Bar.
Setting The Time
• Model 8.4AN synchronizes time automatically via GPS, so it should not require
any time adjustment. If you do need to set the time manually, follow the
instructions below for Model 8.4A.
• For Model 8.4A, turn the unit on, then touch the “Time” display at the top of the
screen. Touch “Yes”.
• If the time is not displayed at the top of the screen, touch the “Settings” soft-key
(if equipped), or the “Apps” or “Controls” soft-key and then the “Settings”
soft-key. In the Settings screen, touch the “Clock” soft-key, then check or uncheck
this option.
• Touch + or – next to Set Time Hours and Set Time Minutes to adjust the time.
• If these features are not available, uncheck the Sync Time box.
• Touch X to save your settings and exit out of the Clock Setting screen.
Uconnect® 8.4AN
ELECTRONICS
93
Page 117 of 220
• Push the BACK/LEFTbutton to access the information screens or sub-menu
screens of a main menu item.
• Push theOKbutton to access/select the information screens or sub-menu screens
of a main menu item. Push and hold the OK button for two seconds to reset
displayed/selected features that can be reset.
Compass Calibration
This compass is self-calibrating, which eliminates the need to set the compass
manually. When the vehicle is new, the compass may appear erratic and the EVIC will
display “– –” until the compass is calibrated.
You may also calibrate the compass by completing one or more 360 degree turns (in
an area free from large metal or metallic objects) until the “– –” message displayed
in the EVIC turns off. The compass will now function normally.
PROGRAMMABLE FEATURES
EVIC Programmable Features
The EVIC can be used to view or change the following settings. Push the UPor
DOWN
button until System Setup displays, then push the RIGHTbutton.
Scroll through the settings using the UP or DOWN buttons. Push the OK button to
change the setting. Push the BACK/LEFT
button to scroll back to a previous
menu or sub menu.
• Radio Info • Trip Info
• Fuel Economy Info • Tire Pressure
• Cruise Control Info • Vehicle Info
• Digital Vehicle Speed • Stored Warning Messages
• Screen Setup
Uconnect® Customer Programmable Features
• The Uconnect®system allows you to access Customer Programmable feature
settings such as Display, Clock, Safety/Assistance, Lights, Doors & Locks, Auto-On
Comfort & Remote Start, Engine Off Operation, Compass Settings, Audio, Trailer
Brake, Phone/Bluetooth
®, Suspension and SiriusXM Setup and System Informa-
tion through soft-keys.
ELECTRONICS
115
Page 118 of 220
• Touch the “Controls” or “Apps” soft-key located near the bottom of the screen,
then touch the “settings” soft-key to access the Settings screen. When making a
selection, scroll up or down until the preferred setting is highlighted, then press
and release the preferred setting until a check-mark appears next to the setting,
showing that setting has been selected. The following feature settings are
available:
• Display • Clock
• Safety & Driving Assistance • Doors & Locks
• Auto-On Comfort • Engine Off Options
• Compass (Uconnect
®5.0) • Audio
• Phone/Bluetooth®• SiriusXM Setup
• Lights • Trailer Brake
• Suspension • System Information
• Units • Voice
NOTE:
Depending on the vehicles options, feature settings may vary.
EVIC Reconfigurable Screen Setup
The following settings allow you to change what information is displayed in the
instrument cluster as well as the location that information is displayed.
Trip A
• Press and release the UP or DOWN arrow button until the Trip A icon is highlighted
in the EVIC (Toggle left or right to select Trip A or Trip B). Press and release the OK
button to display the Trip A information.
Trip B
• Press and release the UP or DOWN arrow button until the Trip B icon is highlighted
in the EVIC (Toggle left or right to select Trip A or Trip B). Press and release the OK
button to display the Trip B information.
Fuel Economy
• Press and release the UP or DOWN arrow button until the Fuel Economy icon is
highlighted. Press the RIGHT arrow button and the next screen will display the
following:
• Average Fuel Economy/Miles Per Gallon (MPG Bargraph)
• Range To Empty (RTE)
• Current Miles Per Gallon (MPG)
ELECTRONICS
116
Page 131 of 220
Trailer Hitch Receiver Cover Removal (Summit Models) — If Equipped
Your vehicle may be equipped with a trailer hitch receiver cover, this must be
removed to access the trailer hitch receiver (if equipped). This hitch receiver cover is
located at the bottom center of the rear fascia.
1. Turn the two locking retainers located at the bottom of the hitch receiver cover a
1/4 turn counterclockwise.
NOTE:
Use a suitable tool such as a coin in the
slot of the locking retainer if needed for
added leverage.
2. Pull the bottom of the cover outward (towards you), pull downwards to disengage
the tabs located at the top of the hitch receiver cover.
Hitch Receiver Cover1—Hitch Receiver Cover Tab Locations
2 — Locking Retainers
Hitch Receiver Cover
UTILITY
129
Page 132 of 220
To reinstall the hitch receiver cover after towing repeat the procedure in reverse order.
NOTE:
Be sure to engage all tabs of the hitch
receiver cover in the bumper fascia prior
to installation.
Trailer Hitch Receiver Cover Removal (SRT Models) — If Equipped
Your vehicle may be equipped with a trailer hitch receiver cover, this must be
removed to access the trailer hitch receiver (if equipped). This hitch receiver cover is
located at the bottom center of the rear fascia.
1. Turn the two locking retainers located at the bottom of the hitch receiver cover a
1/4 turn counterclockwise.
NOTE:
Use a suitable tool such as a coin in the
slot of the locking retainer if needed for
added leverage.
Hitch Receiver Cover1—Hitch Receiver Cover Tab Locations
2 — Locking Retainers
Hitch Receiver Cover
1—Hitch Receiver Cover Retaining Tabs
2 — Hitch Receiver Cover
3 — Locking Retainers
UTILITY
130
Page 146 of 220
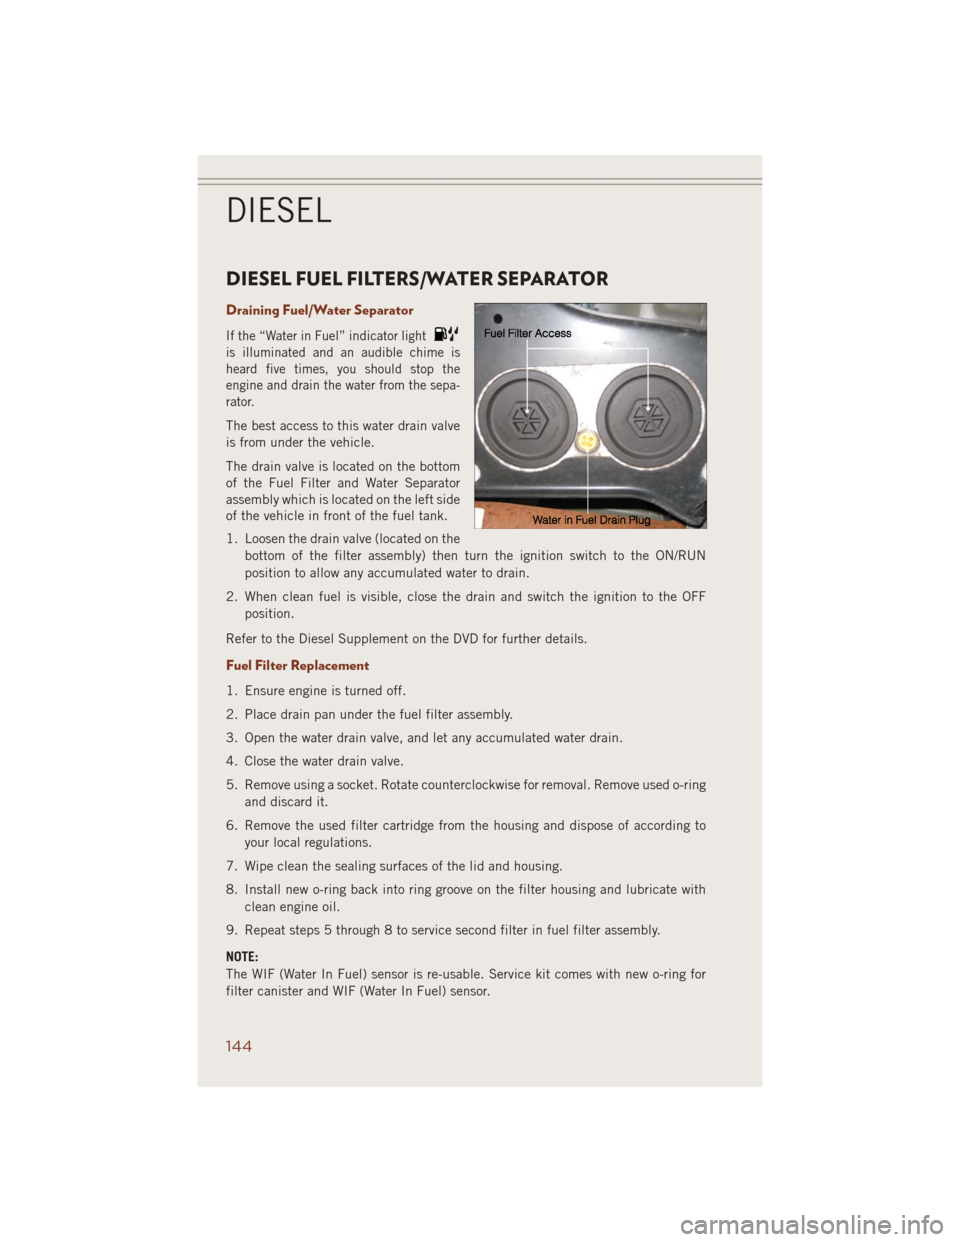
DIESEL FUEL FILTERS/WATER SEPARATOR
Draining Fuel/Water Separator
If the “Water in Fuel” indicator light
is illuminated and an audible chime is
heard five times, you should stop the
engine and drain the water from the sepa-
rator.
The best access to this water drain valve
is from under the vehicle.
The drain valve is located on the bottom
of the Fuel Filter and Water Separator
assembly which is located on the left side
of the vehicle in front of the fuel tank.
1. Loosen the drain valve (located on the
bottom of the filter assembly) then turn the ignition switch to the ON/RUN
position to allow any accumulated water to drain.
2. When clean fuel is visible, close the drain and switch the ignition to the OFF
position.
Refer to the Diesel Supplement on the DVD for further details.
Fuel Filter Replacement
1. Ensure engine is turned off.
2. Place drain pan under the fuel filter assembly.
3. Open the water drain valve, and let any accumulated water drain.
4. Close the water drain valve.
5. Remove using a socket. Rotate counterclockwise for removal. Remove used o-ring
and discard it.
6. Remove the used filter cartridge from the housing and dispose of according to
your local regulations.
7. Wipe clean the sealing surfaces of the lid and housing.
8. Install new o-ring back into ring groove on the filter housing and lubricate with
clean engine oil.
9. Repeat steps 5 through 8 to service second filter in fuel filter assembly.
NOTE:
The WIF (Water In Fuel) sensor is re-usable. Service kit comes with new o-ring for
filter canister and WIF (Water In Fuel) sensor.
DIESEL
144