2014 JEEP GRAND CHEROKEE rear view mirror
[x] Cancel search: rear view mirrorPage 3 of 220

INTRODUCTION/WELCOME
WELCOME FROM CHRYSLER
GROUP LLC.................. 3
CONTROLS AT A GLANCE
DRIVER COCKPIT............... 6
INSTRUMENT CLUSTER.......... 8
GETTING STARTED
KEYFOB ................... 10
REMOTE START............... 10
KEYLESS ENTER-N-GO™......... 11
VEHICLE SECURITY ALARM....... 15
SEATBELT .................. 15
SUPPLEMENTAL RESTRAINT SYSTEM
(SRS) — AIR BAGS............ 16
CHILD RESTRAINTS............ 17
FRONT SEATS................ 21
REAR SEATS................. 24
HEATED/VENTILATED SEATS....... 24
HEATED STEERING WHEEL....... 26
TILT/TELESCOPING STEERING
COLUMN................... 27
OPERATING YOUR VEHICLE
ENGINE BREAK-IN
RECOMMENDATIONS........... 28
HEADLIGHT SWITCH............ 29
TURN SIGNAL/WIPER/WASHER/HIGH
BEAM LEVER................ 30
AUTOMATIC DIMMING MIRRORS.... 32
SPEED CONTROL.............. 32
ADAPTIVE CRUISE CONTROL (ACC) . . . 34
FORWARD COLLISION WARNING (FCW)
WITHMITIGATION ............. 36
ELECTRONIC SHIFTER........... 38
PADDLE SHIFT MODE........... 39
FUEL ECONOMY (ECO) MODE...... 39
AUTOMATIC CLIMATE CONTROLS
WITH TOUCHSCREEN........... 40
PARKSENSE
®FRONT AND REAR
PARK ASSIST................ 42
PARKVIEW
®REAR BACK-UP CAMERA . 43
BLIND SPOT MONITORING........ 44
POWER SUNROOF............. 44
WIND BUFFETING............. 47
ELECTRONICS
YOUR VEHICLE'S SOUND SYSTEM . . . 48
IDENTIFYING YOUR RADIO........ 50
Uconnect
®ACCESS............. 51
Uconnect®5.0 ................ 65
Uconnect®8.4A ............... 73
Uconnect®8.4AN .............. 93
STEERING WHEEL AUDIO CONTROLS . . 114ELECTRONIC VEHICLE INFORMATION
CENTER (EVIC).............. 114
PROGRAMMABLE FEATURES...... 115
UNIVERSAL GARAGE DOOR OPENER
(HomeLink
®) ................ 117
POWER INVERTER............ 119
POWER OUTLETS............. 120
OFF-ROAD CAPABILITIES
(4WD OPERATION)
QUADRA-TRAC I®FOUR-WHEEL
DRIVE .................... 122
QUADRA-TRAC II
®/QUADRA-DRIVE II®FOUR-WHEEL DRIVE.......... 122
SELEC-TERRAIN™............ 124
QUADRA-LIFT™.............. 125
HILL START ASSIST/HILL DESCENT
CONTROL/SELEC SPEED CONTROL . . 127
UTILITY
TRAILER TOWING WEIGHTS (MAXIMUM
TRAILER WEIGHT RATINGS)...... 128
RECREATIONAL TOWING (BEHIND
MOTORHOME, ETC.)........... 132
SRT
PADDLE SHIFT MODE.......... 136
SELEC-TRACK™.............. 137
SRT PERFORMANCE FEATURES.... 138
SUMMER/THREE-SEASON TIRES . . . 141
DIESEL
DIESEL ENGINE BREAK-IN
RECOMMENDATIONS.......... 142
DIESEL ENGINE STARTING
PROCEDURES............... 142
DIESEL FUEL FILTERS/WATER
SEPARATOR ................ 144
EXHAUST REGENERATION....... 145
DIESEL EXHAUST FLUID........ 146
WHAT TO DO IN EMERGENCIES
ROADSIDE ASSISTANCE......... 150
INSTRUMENT CLUSTER WARNING
LIGHTS................... 150
IF YOUR ENGINE OVERHEATS..... 158
JACKING AND TIRE CHANGING.... 158
BATTERY LOCATION........... 165
JUMP-STARTING............. 165
EMERGENCY TOW HOOKS....... 167
MANUAL PARK RELEASE 8-SPEED . . 168
TOWING A DISABLED VEHICLE.... 169
EVENT DATA RECORDER (EDR).... 170
CAP-LESS FUEL FILL FUNNEL..... 170
TABLE OF CONTENTS
Page 32 of 220

Automatic High Beams
The Automatic High Beams system provides increased forward lighting at night by
automating high beam control through the use of a digital camera mounted on the
inside rearview mirror. This camera detects vehicle specific light and automatically
switches from high beams to low beams until the approaching vehicle is out of view.
This feature is programmable through the Uconnect
®system. Refer to “Uconnect®
Settings ” in “Understanding Your Instrument Panel” in the Owner's Manual on the
DVD for further details.
Instrument Panel Dimmer
• Rotate the dimmer control to the extreme bottom position to fully dim the
instrument panel lights and prevent the interior lights from illuminating when a
door is opened.
• Rotate the dimmer control up to increase the brightness of the instrument panel
when the parking lights or headlights are on.
• Rotate the dimmer control up to the next detent position to fully brighten the
odometer and radio when the parking lights or headlights are on.
• Rotate the dimmer control up to the last detent position to turn on the interior
lighting.
• If your vehicle is equipped with a touchscreen, the dimming is programmable
through the Uconnect
®system. Refer to “Uconnect®Settings ” in “Understanding
Your Instrument Panel” in the Owner's Manual on the DVD for further details.
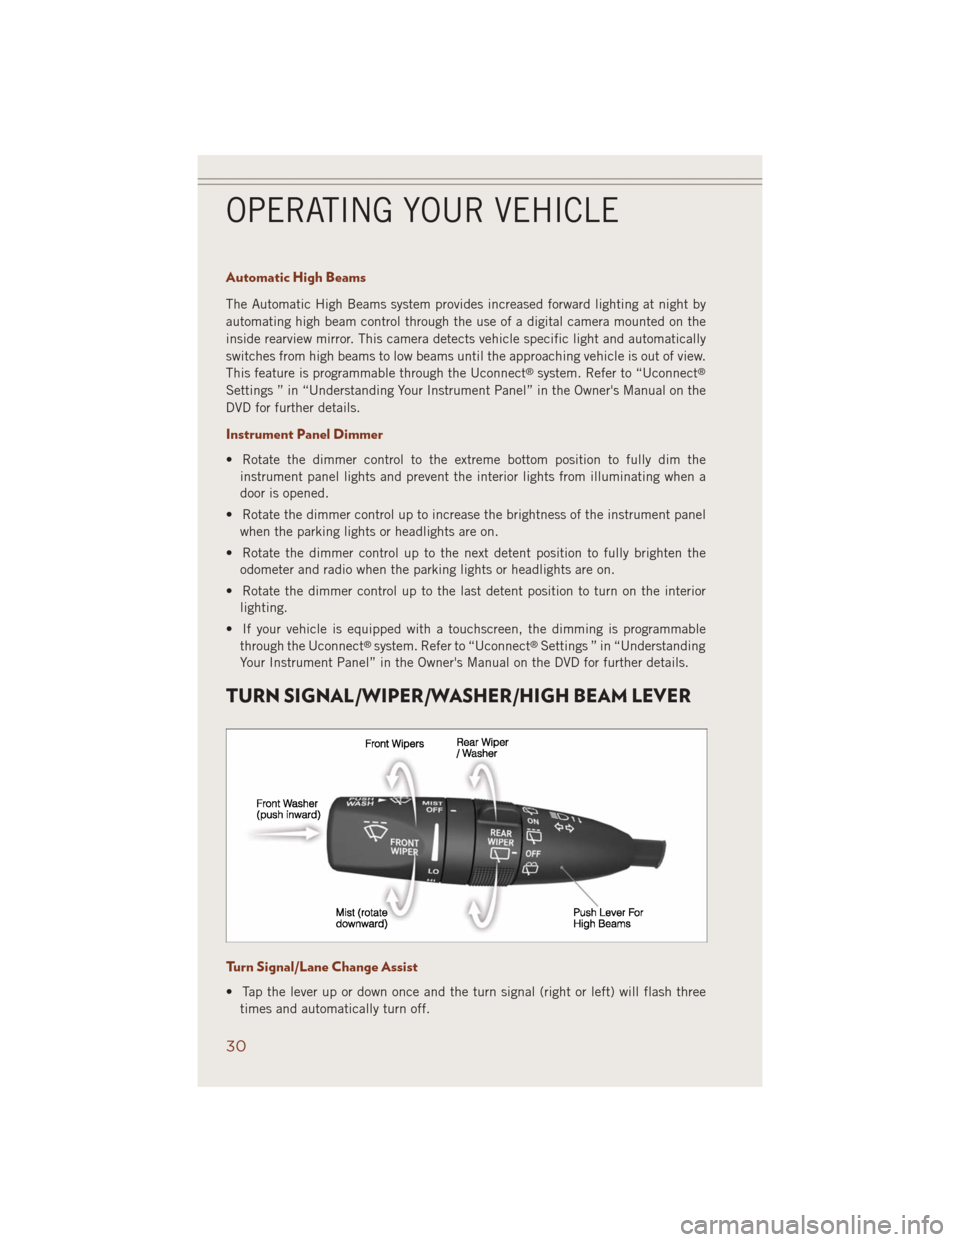
TURN SIGNAL/WIPER/WASHER/HIGH BEAM LEVER
Turn Signal/Lane Change Assist
• Tap the lever up or down once and the turn signal (right or left) will flash three
times and automatically turn off.
OPERATING YOUR VEHICLE
30
Page 34 of 220

AUTOMATIC DIMMING MIRRORS
The rearview and driver side exterior mirror automatically adjusts for headlight glare
from vehicles behind you.
SPEED CONTROL
The Speed Control switches are located on the right side of the steering wheel.
Cruise ON/OFF
• Push the ON/OFF buttonto acti-
vate the Speed Control.
CRUISE CONTROL READY will appear
on the instrument cluster to indicate the
Speed Control is on.
• Push the ON/OFF button
a sec-
ond time to turn the system off.
CRUISE CONTROL OFF will appear on
the instrument cluster to indicate the
Speed Control is off.
SET
• With the Speed Control on, push and
release the SET+ or SET- button to set
a desired speed.
Once a speed has been set a message
CRUISE CONTROL SET TO MPH/KM will appear indicating what speed was set. An
indicator CRUISE will also appear and stay on in the instrument cluster when the
speed is set.
Accel/Decel
To Increase Speed
• When the Electronic Speed Control is set, you can increase speed by pushing the
SET+button.
The speed increment shown is dependant on the speed of U.S. (mph) or Metric
(km/h) units:
U.S. Speed (mph)
• Pressing the SET+button once will result in a 1 mph increase in set speed. Each
subsequent tap of the button results in an increase of 1 mph.
• If the button is continually pressed, the set speed will continue to increase until
the button is released, then the new set speed will be established.
Speed Control Switches
1 — Push Cancel
2 — Push Set+/Accel
3 — Push Resume
4 — Push On/Off
5 — Push Set-/Decel
OPERATING YOUR VEHICLE
32
Page 44 of 220

SYNC Temperature Soft-Key
• Touch the “SYNC” soft-key on the Uconnect®radio to control the driver and
passenger temperatures simultaneously. Touch the “SYNC” soft-key a second time
to control the temperatures individually.
Air Recirculation
• Use Recirculation for maximum A/C operation.
• For window defogging, turn the recirculation button off.
• If the recirculation button is pushed while in the AUTO mode, the indicator light
may flash three times to indicate the cabin air is being controlled automatically.
Heated Mirrors
The mirrors are heated to melt frost or ice. This feature is activated whenever you turn
on the rear window defroster.
PARKSENSE® FRONT AND REAR PARK ASSIST
ParkSense®can be enabled and disabled by pressing the ParkSense®switch located
below the climate controls, on the switch panel.
The four ParkSense
®sensors, located in the rear fascia/bumper, monitor the area
behind the vehicle that is within the sensors’ field of view. The sensors can detect
obstacles from approximately 12 in (30 cm) up to 79 in (200 cm) from the rear
fascia/bumper in the horizontal direction, depending on the location, type and
orientation of the obstacle.
The six ParkSense
®sensors, located in the front fascia/bumper, monitor the area in
front of the vehicle that is within the sensors’ field of view. The sensors can detect
obstacles from approximately 12 in (30 cm) up to 47 in (120 cm) from the front
fascia/bumper in the horizontal direction, depending on the location, type and
orientation of the obstacle.
When an object is detected within 6.5 ft (2 m) behind the rear bumper while the
vehicle is in REVERSE, a warning will display in the Electronic Vehicle Information
Center (EVIC) and a chime will sound (when Sound and Display is selected from the
Customer Programmable Features section of the Uconnect
®System screen). As the
vehicle moves closer to the object, the chime rate will change from single 1/2 second
tone (for rear only), to slow (for rear only), to fast, to continuous.
Refer to your Owner's Manual on the DVD for further details.
OPERATING YOUR VEHICLE
42
Page 54 of 220

• Search for places to eat, shop, relax and play with Yelp®, using your voice or
on-screen menu. Then navigate to them (navigation standard on Uconnect®
8.4AN, optional on Uconnect®8.4A).
• Get operator assistance using the Assist button on your mirror.
Before you drive, familiarize yourself with the easy-to-use Uconnect® System.
1. The ASSIST and 9-1-1 buttons are located on your rearview mirror. The ASSIST
Button is used for contacting Roadside Assistance, Vehicle Care and Uconnect
®
Care. The 9-1-1 Button connects you to emergency services.
NOTE:
Vehicles sold in Canada and Mexico DO NOT have 9-1-1 Call system capabilities. 9-1-1
or other emergency line operators in Canada and Mexico may not answer or respond to
9-1-1 system calls.
2. The Uconnect
®“Apps” button on the menu bar at the bottom right corner of the
radio touchscreen. This is where you can begin your registration process, manage
your Apps and purchase WiFi on demand.
3. The Uconnect
®Voice Command and Uconnect®Phone buttons are located on the
left side of your steering wheel. These buttons let you use your voice to give
commands, make phone calls, send and receive text messages hands-free, enter
navigation destinations, and control your radio and media devices.
Included Trial Period For New Vehicles
Your new vehicle may come with an included trial period for use of the Uconnect
®
Access Services starting at the date of vehicle purchase (date based on vehicle sales
notification from your dealer).To activate the trial, you must first register with
Uconnect® Access. After the trial period, if you wish to continue your Uconnect
®
Access Services you can choose to purchase a subscription.
Features And Packages
• After the trial period, you can subscribe to continue your service by visiting
the Uconnect
®Store located within the Mopar Owner Connect website
(moparownerconnect.com). If you need assistance, U.S. residents can call
Uconnect
®Care at 855-792-4241.
• For the latest information on packages and pricing information: U.S. residents
visit DriveUconnect.com.
Uconnect® Access Registration (Uconnect® 8.4AN Only, U.S. 48 Contiguous
States And Alaska)
NOTE:
Should you require assistance anytime during the registration process, simply call
Uconnect
®Care at 855-792-4241.
1. From the parked vehicle with the radio touchscreen powered on, select the
“Apps” button on the touchscreen located near the bottom right-hand corner.
2. Press “Register” if you see a reminder screen or select “Uconnect Registration”
under the 'Favorites' tab.
ELECTRONICS
52
Page 56 of 220

Aha™ by HARMAN (www.aharadio.com)
• Enter your email address and password for Aha™, or create a new Aha™ account.
• You can link your Facebook, Twitter or Slacker accounts on the Aha™ website.
iHeartRadio (www.iheart.com)
• Click “Sign Up” if you’re new to iHeartRadio, or “Log In” to enter your iHeartRadio
account information.
• Select “Activate” to continue,
• Select “Close” to complete activation.
Pandora® (www.pandora.com)
• Enter your Pandora
®username/email address and password, then click “Save.”
Slacker Radio (www.slacker.com)
• Enter your Slacker username/email address and password, then click “Save.”
Invite family and friends to use the Via Mobile Apps in your vehicle by setting up their
own Via Mobile profile.
Renewing Subscriptions And Purchasing WiFi Hotspot (Uconnect® 8.4AN Only,
U.S. 48 Contiguous States And Alaska)
Subscriptions, and WiFi Hotspot, can be purchased from the Uconnect®Store within
your vehicle, and online at Mopar Owner Connect. If you need help press the ASSIST
button on the rearview mirror, then select Uconnect
®Care (or dial 855-792-4241).
Purchasing Online
You can renew your subscription to a package or purchase WiFi from the Mopar Owner
Connect website. You must first set up a Uconnect
®Access Payment Account online.
Log into moparownerconnect.com, select Edit Profile, then Uconnect®Payment
Account.
1. Log In to the Mopar Owner Connect website (moparownerconnect.com) with your
username/email and password.
2. Click on the “Shop” tab, then click on the Uconnect
®Store.
3. From the Uconnect
®Store, select the item you wish to purchase.
4. This will launch the selected item into purchase mode along with providing
additional information. The purchase process begins when you press the “Buy”
button on the touchscreen.
5. The Uconnect
®Store will display a “Purchase Overview” message confirming the
financial details of your purchase. Press the “Purchase” key to continue.
ELECTRONICS
54
Page 57 of 220

6.The Uconnect®Store will ask you to “Confirm Payment” using your default payment
method on file in your Payment Account. Press the “Complete” key to continue.
7. The Uconnect®Payment Account will then ask for your “Payment Account PIN,”
which you established when setting up your Uconnect®payment account. After
entering this four digit PIN, press the “Complete” key to make the purchase.
8. You will receive a confirmation message that your purchase has been submitted.
Press the OK button to end the process.
Purchasing WiFi Hotspot While In Your Vehicle
You must set up a Uconnect
®Access Payment Account online (log in to
moparownerconnect.com, go to Edit Profile, then Uconnect®Payment Account,to
set up and manage your Payment Account).
1. To purchase WiFi while in your vehicle, ensure the vehicle is running and in Park.
Press the Apps button on the touchscreen, then select WiFi within the Tools
menu. Follow the on-screen instructions. When asked for your payment PIN, use
the 4-digit PIN you established when setting up your payment account on Mopar
Owner Connect.
NOTE:
This may be different than the Uconnect
®Security PIN you established for using
features such as Remote Vehicle Start. After purchasing WiFi, it may take up to
30 minutes (with the vehicle running) before the WiFi will be active in your vehicle.
2. Select WiFi again, then note the hotspot name. Select this network when
connecting devices to the hotspot. Also click on View/Edit Passphrase, then note
the security passphrase you will need to connect to the network on each device.
If your devices cannot see the WiFi Hotspot network after 30 minutes, please contact
Uconnect
®Care by pressing the Assist button on the rear view mirror, or by calling
855-792-4241.
Using Uconnect® Access
Getting Started With Apps
Applications (Apps) and features in your Uconnect
®Access system deliver services
that are customized for the driver and are certified by Chrysler Group, LLC. Two
different types are:
1.Built-In Features— use the built-in 3G Cellular Network on your Uconnect
®8.4A
or 8.4AN radio.
2.Uconnect® Access via Mobile (if equipped)— uses the Uconnect Access app and
your smartphone's data plan to access your personal Pandora
®, iHeartRadio,
Aha™ and Slacker accounts from the vehicle and control them using the vehicle
touchscreen. Customer's data plan charges will apply.
ELECTRONICS
55
Page 59 of 220

Selling Your Vehicle
When you sell your vehicle, we recommend that you remove your Uconnect
®Access
Account information from the vehicle. You can do this using the radio touchscreen in
the vehicle(Uconnect® 8.4AN only)or on the Mopar Owner Connect website
(moparownerconnect.com). Removing your account information cancels your sub-
scription and makes your vehicle factory-ready for a new owner/subscriber.
1.
From your vehicle’s radio touchscreen, select “Uconnect®Store” from the Apps Menu.
2. Select “My Apps,” then “Settings.” Press “Remove Uconnect®Account.”
3. Enter your Uconnect
®Security PIN, select “Proceed to Remove Vehicle from
Uconnect Account.”
For additional information on Uconnect
®:
• U.S. residents - visit DriveUconnect.com or call 1-877-855-8400.
• Canadian Residents - visit DriveUconnect.ca or call, 1-800-465-2001 (English)
or 1-800-387-9983 (French).
Built-In Features (Uconnect® 8.4A And 8.4AN Only)
1.Assist Call– The rear view mirror contains an ASSIST push button which (once
registered) automatically connects the vehicle occupants to one of these pre-
defined destinations for immediate support:
•Roadside Assistance Call—Ifyou
get a flat tire, or need a tow, you’ll
be connected to someone who can
help anytime. Additional fees may
apply. Additional information in
this section.
•Uconnect® Access Care—Inve-
hicle support for Uconnect
®Access
System, Apps and Features.
•Vehicle Care— Total support for
your Chrysler Group LLC vehicle.
2.Emergency 9-1-1 Call (If Equipped)—
The rear view mirror contains a 9-1-1 button that, when pressed, will place a call to
a local 9-1-1 operator to request help from local police, fire or ambulance personnel
in the event of an emergency. If this button is accidentally pressed, you will have
10 seconds to cancel the call. To cancel, press the 9-1-1 Call button again or press
the “cancellation button” shown on the touchscreen. After 10 seconds has passed,
the 9-1-1 call will be placed and only the 9-1-1 operator can cancel it. The LED
light on the rearview mirror will turn green once a connection to a 9-1-1 operator
has been made. The green LED light will turn off once the 9-1-1 call is terminated.
Have an authorized dealer service the vehicle if the rearview mirror light is
continuously red.
If a connection is made between a 9-1-1 operator and your vehicle,
you understand and agree that 9-1-1 operators may, like any other 9-1-1 call, record
conversations and sounds in and near your vehicle upon connection.
Interior Rearview Mirror
ELECTRONICS
57