Page 1 of 16
CONTENTS
Driver controls 2
V ehicle access
3
C
omfort adjustments
4
S
tarting and driving
5
Driving aids
8
Hea
ting and ventilation
10
A
udio and touch screen
11
Na
vigation 14
Telephone
15
Filling station information
16
JJM189634141.indd 111/03/2013 12:53:58
Some features may not apply to your vehicle.
Refer to the Owner
Page 2 of 16
 down
3.
Instr
ument panel, warning lamps, Message center
and tur
n by turn")
2
DRIVER CONTROLSVEHICLE ACCESS
1. Headlamps, turn signals and Trip computer
2.
Man
ual gear change paddle (-) down
3.
Instr
ument panel, warning lamps, Message center
and tur
n by turn navigation
4.
Man
ual gear change paddle (+) up
5.
Wiper
and Washers
6.
ST
ART/STOP
7.
Sunroof control
8
.
P
arking aid
9.
Rear screen sun b
lind
10.
Sunroof b
linds
11.
Inter
ior lamps
12.
A
udio system
13.
Climate control
14.
Windshield heater
15.
Rear screen heater
16.
Gear selector
17.
Dynamic stability control (DSC) s
witch
18.
A
utomatic speed limiter (ASL) switch
19.
Electronic par
king brake (EPB)
20.
Dynamic mode s
witch
21.
Winter mode s
witch
22.
Instr
ument panel menu control
23.
Adaptiv
e cruise control gap setting and Cruise control
cancel 24. Cr
uise control
25.
Steer
ing column adjustment
26.
T
elephone controls
27.
Heated steer
ing wheel
28.
A
udio/video menu control
29.
Instr
uments dimmer control
30.
Rear f
og lamps
31.
T
runk release
32.
Centr
al locking switches
33.
Hazard w
arning
34.
T
ouch screen Home menu
35.
T
elephone menu
36.
Na
vigation menu
37.
Intelligent stop/star
t
38.
Heated front seats
Touch screen menu
39.
A
udio settings menu
40.
A
udio/video menu
41.
CD/D
VD eject
42.
A
udio/video sources
43.
Rear windo
w isolator
44.
Windo
w controls
45.
P
ower folding mirror selectors and adjuster
46.
Dr
iving position memory store controls.
Unlocking mode alternatives
Single-point entry allows only the driver’s door to
unlock with a single press. A second press unlocks all
other doors and the trunk.
Multi-point entry will unlock all doors and trunk with a
single press.
To change between modes, with the vehicle unlocked,
press the lock and unlock buttons simultaneously for 3
seconds. The hazard warning lamps will flash twice to
confirm the change. Mode change can also be made
via the Instrument panel menu control.
Smart key
Keyless entry/exit
To unlock the vehicle and disarm the alarm, first make
sure that the Smart key is outside the vehicle but within 3
ft (1 meter).
Operate a door handle or the trunk release button.
To lock the vehicle and arm the alarm, first make sure
that the Smart key is outside the vehicle but within 3 ft (1
meter).
Press a door handle button once to lock.
JJM189634141.indd 211/03/2013 12:53:59
Page 3 of 16

3
DRIVER CONTROLSVEHICLE ACCESS
Care point
The Smart key may not be detected if it is placed in
a metal container, or if it is shielded by a device with
a back lit LCD screen, (e.g., laptop, smart phone
etc.) Keep the Smart key clear of such devices
when attempting Keyless entry or Keyless starting.
24. Cruise control
25. Steering column adjustment
26. Telephone controls
27. Heated steering wheel
28. Audio/video menu control
29. Instruments dimmer control
30. Rear fog lamps
31. Trunk release
32. Central locking switches
33. Hazard warning
34. Touch screen Home menu
35. Telephone menu
36. Navigation menu
37. Intelligent stop/start
38. Heated front seats Touch screen menu
39. Audio settings menu
40. Audio/video menu
41. CD/DVD eject
42. Audio/video sources
43. Rear window isolator
44. Window controls
45. Power folding mirror selectors and adjuster
46. Driving position memory store controls.
Unlocking mode alternatives
Single-point entry allows only the driver’s door to
unlock with a single press. A second press unlocks all
other doors and the trunk.
Multi-point entry will unlock all doors and trunk with a
single press.
To change between modes, with the vehicle unlocked,
press the lock and unlock buttons simultaneously for 3
seconds. The hazard warning lamps will flash twice to
confirm the change. Mode change can also be made
via the Instrument panel menu control.
Smart key
Press once to lock the vehicle and arm the
exterior (perimetric) alarm.
Multi-point entry - Press once to disarm the alarm,
unlock all doors and unlock the trunk.
Press and hold to unlock all doors and open the
windows (Global opening).
Press once to switch the headlamps on for 30
seconds. Press again to switch off.
Press to open only the trunk. The rest of the
security system remains active.
Press and hold for 3 seconds to
activ
ate/cancel the panic alarm.
Keyless entry/exit
To unlock the vehicle and disarm the alarm, first make
sure that the Smart key is outside the vehicle but within 3
ft (1 meter).
Operate a door handle or the trunk release button.
To lock the vehicle and arm the alarm, first make sure
that the Smart key is outside the vehicle but within 3 ft (1
meter).
Press a door handle button once to lock.
Operating note
If the Smart key fails to
operate, hold it against
the facia, below the
auxiliary switch pack.
Start the engine as
normal (see page 5).
The Smart key can now
be removed.
Emergency key release
Slide the side section up to remove. Remove the
keyblade and unfold it.
Use the blade to lever off the appropriate door lock cover.
The cover has a key symbol embossed into it.
Insert the key into the exposed lock, then turn and
release it to unlock.
If the security system was previously armed with the
Smart key,
when the door
is unlocked
the alarm will
sound. To
disarm the
alarm, press the
unlock button
on the Smart
key or press the
START/STOP
button with the Smart key inside the vehicle.
JJM189634141.indd 311/03/2013 12:53:59
Page 4 of 16

COMFORT ADJUSTMENTS
4
STARTING AND DRIVING
Setting the driving position
See page 2, items 25 and 46
Driver’s seat
Set the seat position using the following controls.
1.
Seat f
orwards and back, cushion height and cushion angle.
2.
Cushion length.
3
.
Side bolster - inflate
.
4.
Side bolster - deflate
.
5.
Lumbar suppor
t.
6.
Seatbac
k angle and head restraint.
Steering column
7.
With the v
ehicle stationary, adjust the steering column to
the required driving position.
Door mirrors
1.
Press the left or r
ight mirror selector.
2.
Use the mirror adjuster to set the mirror position.
Storing the driving position to memor
y
When the driver’s seat, steering column and door mirrors are
adjusted to the required position, the settings can be stored.
1.
Press the
M button to activate the memory store function.
The button will illuminate to indicate the memory store function
is active.
2.
Press b
utton 1, 2 or 3 to store the current driving position
to the chosen number.
Use a stored memory position by pressing the appropriate
button; 1, 2 or 3. The seat, steering wheel and mirrors will
move to their preset positions.
Restraints
Operating note
Memory buttons 1, 2 or 3 must be pressed within 5
seconds after pressing the M button, otherwise the
memory store function will cancel.
A warning indicator in the Instrument panel
will illuminate if the seat belt of an occupied
front seat is not fastened. This may be
accompanied by an audible warning.
Using child seats
Refer to Child Seat Positioning in the Owner’s
Handbook to determine the correct seat for your child.
If it becomes necessary to fit a child restraint on the front
passenger seat, make the following seat adjustments:
• Move the seat fully rearward.
• Lumbar support to minimum setting.
• Seat cushion to highest position.
• Cushion front tilt to lowest position.
• Seatback to fully upright position.
• Adjust the upper seat belt anchorage to its lowest
position.
When a front passenger seat occupancy sensor is fitted
it determines the state of seat occupancy and sets the air
bag status to suit. The status indicator is in the overhead
console.
• Seat unoccupied - air bag deactivated and indicator
off.
• Seat occupied - air bag activated and indicator off.
• Low weight occupant or object - air bag deactivated
and indicator on.
Engine start/stop
See page 2, item 6
Ignition only on
• With the Smart key inside the vehicle, press the
START/STOP button once to switch on the ignition.
• A second press will switch off the ignition.
Engine start
• The rotary selector must be in either P or N position to
enable engine starting.
• With the foot brake depressed, press and release the
START/STOP button to start the engine.
• Press again to stop the engine and switch off the
ignition.
Instrument panel menu
Driver information is displayed on a TFT Virtual
Instrument Panel.
Many features of the display can be changed to suit
personal preferences. Other features, such as the
speedometer, can be altered to suit the driving situation.
The speedometer can be configured for KPH or MPH via
the Vehicle Settings menu.
To access the main menu in the Instrument panel, press
any button on the right side steering wheel control. Use
the direction controls to move through the menu and
subsequent options. Press OK to confirm your selections.
Intelligent Stop/Start
See page 2, item 37
The Stop/Start system is automatically activated when
the ignition is turned on. If the vehicle is stopped, the
engine will turn off (unless it is required to support other
vehicle systems). When the brake is released and a drive
gear is selected, the engine will restart automatically.
A warning lamp in the Instrument panel
will illuminate when the engine has been
switched off by the Stop/Start system.
JJM189634141.indd 411/03/2013 12:54:00
Page 5 of 16

COMFORT ADJUSTMENTSSTARTING AND DRIVING
5
Rolling start
If the engine is switched off while the vehicle is moving,
it can be restarted after 2 seconds have elapsed. Select
transmission N position and then press the START/STOP
button.
Smart key use
The engine will continue to run, even if the Smart key
is removed from the vehicle. However, if the engine is
stopped, it cannot be restarted until the Smart key is
returned to the vehicle.
Restraints
Operating note
Memory buttons 1, 2 or 3 must be pressed within 5
seconds after pressing the M button, otherwise the
memory store function will cancel.
• Seatback to fully upright position.
• Adjust the upper seat belt anchorage to its lowest
position.
When a front passenger seat occupancy sensor is fitted
it determines the state of seat occupancy and sets the air
bag status to suit. The status indicator is in the overhead
console.
• Seat unoccupied - air bag deactivated and indicator
off.
• Seat occupied - air bag activated and indicator off.
• Low weight occupant or object - air bag deactivated
and indicator on.
Engine start/stop
See page 2, item 6
Ignition only on
• With the Smart key inside the vehicle, press the
START/STOP button once to switch on the ignition.
• A second press will switch off the ignition.
Engine start
• The rotary selector must be in either P or N position to
enable engine starting.
• With the foot brake depressed, press and release the
START/STOP button to start the engine.
• Press again to stop the engine and switch off the
ignition.
Instrument panel menu
Driver information is displayed on a TFT Virtual
Instrument Panel.
Many features of the display can be changed to suit
personal preferences. Other features, such as the
speedometer, can be altered to suit the driving situation.
The speedometer can be configured for KPH or MPH via
the Vehicle Settings menu.
To access the main menu in the Instrument panel, press
any button on the right side steering wheel control. Use
the direction controls to move through the menu and
subsequent options. Press OK to confirm your selections.
Intelligent Stop/Start
See page 2, item 37
The Stop/Start system is automatically activated when
the ignition is turned on. If the vehicle is stopped, the
engine will turn off (unless it is required to support other
vehicle systems). When the brake is released and a drive
gear is selected, the engine will restart automatically.
A warning lamp in the Instrument panel
will illuminate when the engine has been
switched off by the Stop/Start system. To switch Stop/Start off, press the Eco switch.
Note: The engine will restart automatically if the switch is
pressed while an automatic engine stop is in progress.
JJM189634141.indd 511/03/2013 12:54:01
Page 6 of 16

STARTING AND DRIVING
6
STARTING AND DRIVING
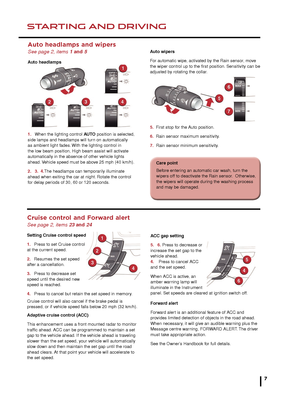
Auto headlamps and wipers
See page 2, items 1 and 5
Auto headlamps
1. When the lighting control AUTO position is selected,
side lamps and headlamps will turn on automatically
as ambient light fades. With the lighting control in
the low beam position, High beam assist will activate
automatically in the absence of other vehicle lights
ahead. Vehicle speed must be above 25 mph (40 km/h).
2. 3. 4.The headlamps can temporarily illuminate
ahead when exiting the car at night. Rotate the control
for delay periods of 30, 60 or 120 seconds.
Warning lamps Displayed in the Instrument panel
Select P before switching off the engine. However, if
the engine is switched off with R, D or S selected, the
selector will automatically return to P while retracting.
Air bag fault Seat belt reminder
Braking system fault or
brake fluid low Braking system fault or
brake fluid low. USA only Electric parking brake is
applied. Flashing - EPB fault.
USA only
Automatic speed limiter
activeForward alert active
Adaptive cruise control
active in Follow mode
Dynamic stability control
fault. Flashes when DSC is
operating
Anti-lock braking system
fault. USA only
Anti-lock braking system
fault. DSC switched off, Trac DSC on
Transmission
See page 2, item 2, 4 and 16
Gearshift interlock
Apply the foot brake then move the selector from the P
position. Maintain brake pressure until a gear is selected.
Automatic gear selection
Select D for fully automatic gear changes.
Sport mode
When selected, automatic gear change points are
modified to make full use of engine power.
Press the selector down and rotate from D to S.
Manual gear changes
Manual gear change mode is effective when rapid
acceleration and engine braking are required.
• To shift down, briefly pull the left (downshift) paddle.
• To shift up, briefly pull the right (upshift) paddle.
When the paddles are used in D, gear selection will revert
to automatic if use of the paddles is not maintained. With
S selected, continuous manual operation is initiated if the
paddles are used.
To return to automatic operation, pull and hold the
right (upshift) paddle for 2 seconds.
Operating note
If the engine is switched off with N selected, automatic
selection of P is delayed for 10 minutes. DO
NOT use
this feature to enable towing of the vehicle. Refer to
Vehicle recovery in the Owner’s Handbook.
Releasing
• With the ignition on, apply the foot brake and press
down on the EPB switch.
• If the vehicle is stationary with the EPB applied and
either D or R selected, pressing the accelerator will
automatically release the EPB.
Electronic parking brake (EPB)
See page 2, item 19
Applying
• With the vehicle stationary, lift up the EPB switch and
then release it. The red warning lamp in the Instrument
panel will illuminate.
Cruise control and Forward alert
See page 2, items 23 and 24
Setting Cruise control speed
1. Press to set Cruise control
at the current speed.
2. Resumes the set speed
after a cancellation.
3. Press to decrease set
speed until the desired new
speed is reached.
4. Press to cancel but retain the set speed in memory.
Cruise control will also cancel if the brake pedal is
pressed, or if vehicle speed falls below 20 mph (32 km/h).
Adaptive cruise control (ACC)
This enhancement uses a front mounted radar to monitor
traffic ahead. ACC can be programmed to maintain a set
gap to the vehicle ahead. If the vehicle ahead is traveling
slower than the set speed, your vehicle will automatically
slow down and then maintain the set gap until the road
ahead clears. At that point your vehicle will accelerate to
the set speed.
Engine/transmission
emissions fault Electric parking brake is
applied. Flashing - EPB fault.
Low tire pressure
JJM189634141.indd 611/03/2013 12:54:02
Page 7 of 16

STARTING AND DRIVINGSTARTING AND DRIVING
7
Auto headlamps and wipers
See page 2, items 1 and 5
Auto headlamps
1.
When the lighting control
AUTO position is selected,
side lamps and headlamps will turn on automatically
as ambient light fades. With the lighting control in
the low beam position, High beam assist will activate
automatically in the absence of other vehicle lights
ahead. Vehicle speed must be above 25 mph (40 km/h).
2.
3.
4.The headlamps can temporarily illuminate
ahead when exiting the car at night. Rotate the control
for delay periods of 30, 60 or 120 seconds.
Auto wipers
For automatic wipe, activated by the Rain sensor, move
the wiper control up to the first position. Sensitivity can be
adjusted by rotating the collar.
5. First stop for the Auto position.
6. Rain sensor maximum sensitivity.
7. Rain sensor minimum sensitivity.
Warning lamps Displayed in the Instrument panel
Select P before switching off the engine. However, if
the engine is switched off with R, D or S selected, the
selector will automatically return to P while retracting. Seat belt reminder
Automatic speed limiter
active
Forward alert active
Adaptive cruise control
active in Follow mode
Operating note
If the engine is switched off with N selected, automatic
selection of P is delayed for 10 minutes. DO NOT use
this feature to enable towing of the vehicle. Refer to
Vehicle recovery in the Owner’s Handbook.
Releasing
• With the ignition on, apply the foot brake and press
down on the EPB switch.
• If the vehicle is stationary with the EPB applied and
either D or R selected, pressing the accelerator will
automatically release the EPB.
Cruise control and Forward alert
See page 2, items 23 and 24
Setting Cruise control speed
1.
Press to set Cr
uise control
at the current speed.
2.
Resumes the set speed
after a cancellation.
3
.
Press to decrease set
speed until the desired ne
w
speed is reached.
4
.
Press to cancel b
ut retain the set speed in memory.
Cruise control will also cancel if the brake pedal is
pressed, or if vehicle speed falls below 20 mph (32 km/h).
Adaptive cruise control (ACC)
This enhancement uses a front mounted radar to monitor
traffic ahead. ACC can be programmed to maintain a set
gap to the vehicle ahead. If the vehicle ahead is traveling
slower than the set speed, your vehicle will automatically
slow down and then maintain the set gap until the road
ahead clears. At that point your vehicle will accelerate to
the set speed.
7
ACC gap setting
5.
6.
Press to decrease or
increase the set gap to the
vehicle ahead.
4. Press to cancel ACC
and the set speed.
When ACC is active, an
amber warning lamp will
illuminate in the Instrument
panel. Set speeds are cleared at ignition switch off.
Forward alert
Forward alert is an additional feature of ACC and
provides limited detection of objects in the road ahead.
When necessary, it will give an audible warning plus the
Message centre warning, FORWARD ALERT. The driver
must take appropriate action.
See the Owner’s Handbook for full details.
Care point
Before entering an automatic car wash, turn the
wipers off to deactivate the Rain sensor. Otherwise,
the wipers will operate during the washing process
and may be damaged.
Low tire pressure
JJM189634141.indd 711/03/2013 12:54:02
Page 8 of 16

See page 2, items 18 and 24
ASL allows any speed above 20 mph (32 km/h) to be set
as a maximum speed. This is useful to make sure that
an")
DRIVING AIDS
8
DRIVING AIDS
Automatic speed limiter (ASL)
See page 2, items 18 and 24
ASL allows any speed above 20 mph (32 km/h) to be set
as a maximum speed. This is useful to make sure that
any given speed limit is not exceeded.
Setting a speed
The setting procedure can be made
while the vehicle is stationary.
1.
Press the ASL b
utton. An ASL
warning lamp illuminates in the
speedometer.
2.
Use the Cr
uise control increase
and decrease controls to set a speed.
The Message center will display the
set speed. Adjustment can be made
at any time to suit variable speed
limits.
Parking aids See page 2, item 8
When transmissiion R is selected, Parking aids at the
rear and front will activate.
The Touch screen will display a vehicle graphic and
indicate the approximate distance to any object detected.
Note: Sensors may activate when water, snow or ice are
detected on their surfaces. Make sure that the sensors
are cleaned regularly.
An audible alert will increase in frequency as the object is
approached.
To activate the front sensors manually, press
the Parking aid switch in the overhead panel.
The front sensors are deactivated when vehicle speed
exceeds 10 mph (16 km/h).
Audible alert volume can be adjusted via the Touch
screen. Select the Home menu then Setup followed by
System. Now select Volume presets. Use the + or - soft
keys alongside Parking aid to adjust the volume.
3 trip memories are available via the TRIP button. You
can specify which one is viewable in the Instrument panel
menu.
Trip A and B can be reset to zero with a long press of the
TRIP button. Auto will reset to zero after each ignition
cycle.
Message centre
Messages are displayed
in the Instrument panel
right side dial and may
be accompanied by an
icon. If more than one
message is active then
each will be displayed
in turn.
Turn by turn Navigation
When a destination is set
on the Navigation Touch
screen and guidance is
commenced, a simplified
graphic guide is displayed
in the Instrument panel.
It gives turn by turn
information about the
next part of the journey.Trip computer and Message center
See page 2, items 1 and 3
Trip computer
Trip computer information can be accessed via the TRIP
button on the end of the lighting control. Information is
displayed in the Instrument panel left side dial.
Press the TRIP button repeatedly to display data in the
following order:
• Odometer.
• Trip distance since trip reset.
• Average speed since the start of the trip.
• Average fuel consumption since the trip reset.
• Instantaneous fuel consumption.
• Remaining range estimate based on current fuel
consumption.
If ASL is suspended due to kick-down acceleration or by
pressing the Cruise control CAN button, the Message
center will display a LIMITER
CANCELLED message.
Press the RES control to reinstate the ASL set speed.
ASL will resume if vehicle speed is below the previously
set speed limit.
JaguarDrive control
See page 2, items 17, 20 and 21
Winter mode, Dynamic mode and Dynamic Stability
Control (DSC) allow the driver to more finely tune
the vehicle’s driving characteristics to suit prevailing
conditions.
Blind spot monitoring
Each mirror displays amber icons to warn of overtaking
vehicles in adjacent lanes. The monitored area extends
approximately 20 ft (6 meters) behind the rear wheels
and 8.2 ft (2.5 meters) to the sides.
It switches on automatically at speeds of above 10mph
(16 km/h) while in a forward gear.
Care point
When negotiating a steep downhill gradient, vehicle
speed may exceed the set speed. The Message
center will display a warning. Driver intervention
may be required to reduce the speed.
JJM189634141.indd 811/03/2013 12:54:03