2014 INFINITI QX50 mirror
[x] Cancel search: mirrorPage 188 of 498

SAA1896
HOW TO READ DISPLAYED LINES
Guiding lines which indicate the vehicle
width and distances to objects with re-
ference to the bumper line
*Aare dis-
played on the monitor.
Distance guide lines:
Indicate distances from the bumper.
. Red line
*1: approx. 1.5 ft (0.5 m)
. Yellow line
*2: approx. 3 ft (1 m)
. Green line
*3: approx. 7 ft (2 m)
. Green line
*4: approx. 10 ft (3 m)
Vehicle width guide lines
*5:
Indicate the vehicle width when backing up.
Predictive course lines
*6:
Indicate the predictive course when back-
ing up. The predictive course lines will be
displayed on the monitor when the shift
lever is in the R (Reverse) position and the
steering wheel is turned. The predictive
course lines will move depending on how
much the steering wheel is turned and will
not be displayed while the steering wheel
is in the neutral position.
The vehicle width guide lines and the width
of the predictive course lines are wider
than the actual width and course.
WARNING
. Always turn and check that it is safe to
park your car before backing up. Always
back up slowly.
. If the tires are replaced with different
sized tires, the predictive course line
may not be displayed correctly.
. On a snow-covered or slippery road,
there may be a difference between the
predictive course line and the actual
course line. .
The displayed lines will appear slightly
off to the right because the RearView
camera is not installed in the rear center
of the vehicle.
. The distance guide line and the vehicle
width guide line should be used as a
reference only when the vehicle is on a
level paved surface. The distance viewed
on the monitor is for reference only and
may be different than the actual distance
between the vehicle and displayed ob-
jects.
. When backing up the vehicle up a hill,
objects viewed in the monitor are further
than they appear. When backing up the
vehicle down a hill, objects viewed in the
monitor are closer than they appear. Use
the inside mirror or glance over your
shoulder to properly judge distances to
other objects.
Monitor, climate, audio, phone and voice recognition systems4-25
Page 194 of 498

When you push theCAMERAbutton or shift
the shift lever into the R (Reverse) position
while the ignition switch is in the ON
position, the Around View Monitor oper-
ates. The monitor displays various views of
the position of the vehicle.
Available views:
. Bird-Eye View
The surrounding view of the vehicle.
. Front-Side View
The view around and ahead of the front
passenger’s side wheel.
. Front View
The view to the front of the vehicle.
. RearView
The view to the rear of the vehicle.
. Rear-Wide View
An approximately 180-degree view of
the rear of the vehicle.
The system is designed as an aid to the
driver in situations such as slot parking or
parallel parking.
SAA2148
There are some areas where the system
will not show objects. When in the front or
the rearview display, an object below the
bumper or on the ground may not be
viewed
*1. When in the bird-eye view, a
tall object near the seam of the camera
viewing areas will not appear in the monitor
*2.
WARNING
.
The Around View Monitor is a conveni-
ence but it is not a substitute for proper
vehicle operation because it has areas
where objects cannot be viewed. Always
look out the windows and check to be
sure that it is safe to move before
operating the vehicle. Always operate
the vehicle slowly.
. Do not use the Around View Monitor with
the outside mirror in the stored position,
and make sure that the lift gate is
securely closed when operating the
vehicle using the Around View Monitor.
. The distance between objects viewed on
the Around View Monitor differs from the
actual distance.
. The cameras are installed above the
front grille, the outside mirrors and
above the rear license plate. Do not put
anything on the cameras.
. When washing the vehicle with high-
pressure water, be sure not to spray it
around the cameras. Otherwise, water
may enter the camera unit causing water
Monitor, climate, audio, phone and voice recognition systems4-31
AROUND VIEW MONITOR (if so equipped)
Page 197 of 498

4-34Monitor, climate, audio, phone and voice recognition systems
.The view on the screen on the passen-
ger’s side switches to the front-side
view
*Cwhen the CAMERAbutton is
pushed
*3. When the CAMERAbutton
is pushed again
*5, the rear-wide view
*Dis displayed. When the CAMERA
button is pushed again
*7, the view on
the screen on the passenger’s side
switches to the bird-eye view
*B.
The passenger’s side screen returns to
another by operating the same proce-
dures again.
When selecting the “Wide”,“Side”or
“Top ”key on the screen using the
INFINITI controller and pushing the
ENTER button, the view on the screen
will change to the one previously
selected
*4,*6,*8.
. Once you have changed the view on the
screen on the passenger’s side, the
view on the driver’s side will change to
the front view by shifting the shift lever
out of the R (Reverse) position
*12,*14.
When the shift lever is moved to any
other position than the R (Reverse)
position while the rear-wide view
*D
is displayed, another view that is set to
a higher priority will be displayed
*16.
Starting with the CAMERA button
operation
. When the CAMERAbutton is pushed*9
while another screen*Ais displayed,
Around View Monitor operates and the
front view and bird-eye view
*Eare
displayed.
. The view on the screen on the passen-
ger’s side switches to the front-side
view
*Fwhen the CAMERAbutton is
pushed
*10. When the CAMERAbutton
is pushed again
*17, the screen*Ais
displayed.
. When selecting the “Side”or“Top ”key
on the screen using the INFINITI con-
troller and pushing the ENTER button,
the view on the screen will change to
the one previously selected
*11.
. The left screen switches to the rearview
*B,*Cwhen the shift lever is shifted
into the R (Reverse) position
*13,*15
and returns to the front view*E,*F
when the shift lever is shifted out of the
R (Reverse) position
*12,*14.
. Push another button on the control
panel to quit the Around View Monitor.
HOW TO SEE EACH VIEW
WARNING
. The distance guide line and the vehicle
width line should be used as a reference
only when the vehicle is on a paved,
level surface. The distance viewed on the
monitor is for reference only and may be
different than the actual distance be-
tween the vehicle and displayed objects.
. Use the displayed lines and the bird-eye
view as a reference. The lines and the
bird-eye view are greatly affected by the
number of occupants, fuel level, vehicle
position, road condition and road grade.
. If the tires are replaced with different
sized tires, the predictive course line
and the bird-eye view may be displayed
incorrectly.
. When driving the vehicle up a hill,
objects viewed in the monitor are further
than they appear. When driving the
vehicle down a hill, objects viewed in
the monitor are closer than they appear.
Use the mirrors or actually look to
properly judge distances to other ob-
jects.
Page 199 of 498

4-36Monitor, climate, audio, phone and voice recognition systems
WARNING
.The distance between objects viewed in
the rearview differs from actual distance
because a wide-angle lens is used.
Objects in the rearview will appear
visually opposite than when viewed in
the rearview and outside mirrors.
. On a snow-covered or slippery road,
there may be a difference between the
predictive course line and the actual
course line.
. If predictive course lines are displayed
incorrectly, drive the vehicle on a
straight road for 110 yd (100 m) at a
speed of above 20 MPH (30 km/h).
. The displayed lines on the rearview will
appear slightly off to the right because
the rearview camera is not installed in
the rear center of the vehicle.
NOTE:
When the monitor displays the front view
and the steering wheel turns about 90
degrees or less from the neutral position,
both the right and left predictive course
lines
*6are displayed. When the steering wheel turns about 90 degrees or more, a
line is displayed only on the opposite side
of the turn.
SAA1841
Bird-eye view
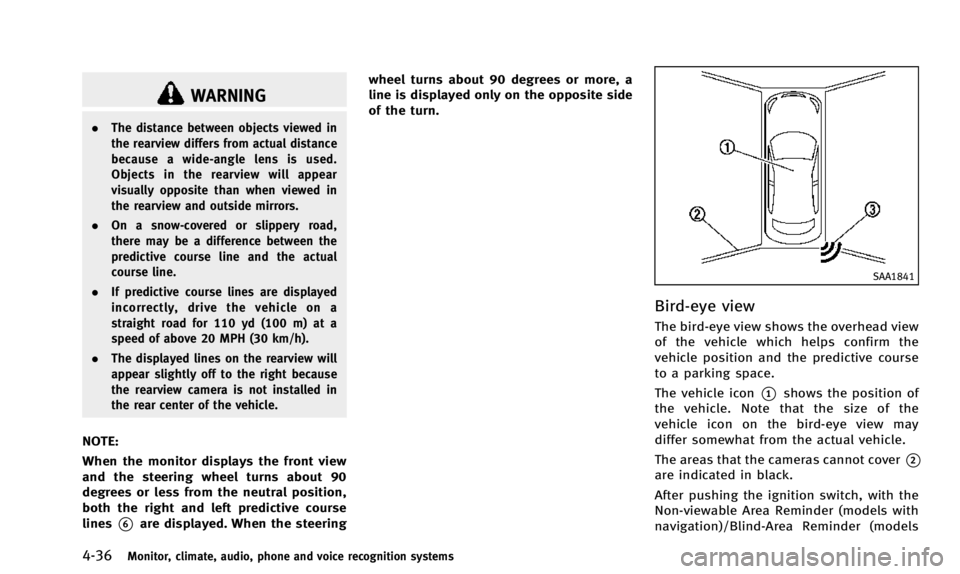
The bird-eye view shows the overhead view
of the vehicle which helps confirm the
vehicle position and the predictive course
to a parking space.
The vehicle icon
*1shows the position of
the vehicle. Note that the size of the
vehicle icon on the bird-eye view may
differ somewhat from the actual vehicle.
The areas that the cameras cannot cover
*2
are indicated in black.
After pushing the ignition switch, with the
Non-viewable Area Reminder (models with
navigation)/Blind-Area Reminder (models
Page 200 of 498

without navigation) turned on, the non-
viewable area
*2is highlighted in yellow
for 7 seconds after the bird-eye view is
displayed.
When the corner of the vehicle moves
closer to an object, the corner sonar
indicator
*3appears.
WARNING
. Objects in the bird-eye view will appear
further than the actual distance because
the bird-eye view is a pseudo view that
is processed by combining the views
from the cameras on the outside mirrors,
the front and the rear of the vehicle.
. Tall objects, such as a curb or vehicle,
may be misaligned or not displayed at
the seam of the views.
. Objects that are above the camera
cannot be displayed.
. The view for the bird-eye view may be
misaligned when the camera position
alters.
. A line on the ground may be misaligned
and is not seen as being straight at the
seam of the views. The misalignment will
increase as the line proceeds away from the vehicle.
SAA1842
Front-side view
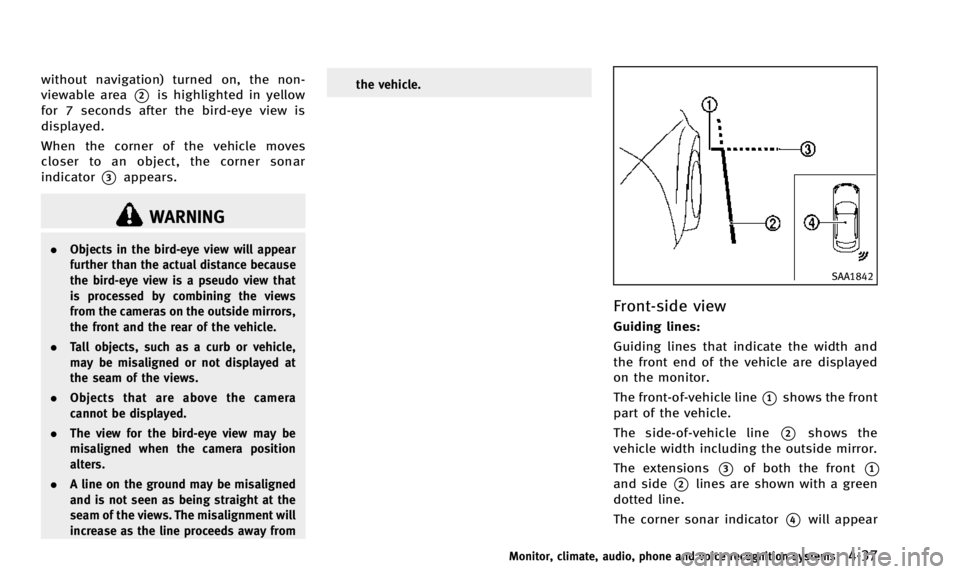
Guiding lines:
Guiding lines that indicate the width and
the front end of the vehicle are displayed
on the monitor.
The front-of-vehicle line
*1shows the front
part of the vehicle.
The side-of-vehicle line
*2shows the
vehicle width including the outside mirror.
The extensions
*3of both the front*1
and side*2lines are shown with a green
dotted line.
The corner sonar indicator
*4will appear
Monitor, climate, audio, phone and voice recognition systems4-37
Page 209 of 498

4-46Monitor, climate, audio, phone and voice recognition systems
SAA1527
Type A
AUTOMATIC CLIMATE CONTROL
(Type A)
Automatic operation
1.“AUTO” automatic climate control ON
button/Temperature control dial (dri-
ver side)
2. “A/C” air conditioner ON/OFF button
3. “
”fan speed increase button
4. “
”front defroster button
5. “MODE” manual air flow control but-
ton
6. “DUAL” zone control ON/OFF button/
Temperature control dial (passenger side)
7. “OFF” button for climate control sys-
tem
8. “
”fan speed decrease button
9. “
”rear window defroster button
(See “Rear window and outside mirror
defroster switch” (P.2-33).)
10. “
”intake air control button
Cooling and/or dehumidified heating
(AUTO):
This mode may be used all year round. The
system works automatically to control the
inside temperature, air flow distribution and fan speed after the preferred tempera-
ture is set manually.
1. Push the
“AUTO” button on. (The
indicator on the button will illuminate
and AUTO will be displayed.)
2. Turn the temperature control dial (dri- ver side) to set the desired tempera-
ture.
.The temperature can be set withinthe following range.
— For U.S.: 60 to 908F
— For Canada: 18 to 328C
.The temperature of the passenger
compartment will be maintained
automatically. Air flow distribution
and fan speed will also be controlled
automatically.
3. You can individually set driver and front passenger side temperature using each
temperature control button. When the
“DUAL” button is pushed or the pas-
senger side temperature control button
is turned, the DUAL indicator will come
on. To turn off the passenger side
temperature control, push the “DUAL”
button.
4. To turn off the climate control system, push the “OFF”button.
Page 211 of 498

4-48Monitor, climate, audio, phone and voice recognition systems
ger compartment. The indicator light on the
“”side will come on.
Automatic intake air control:
In the AUTO mode, the intake air will be
controlled automatically. To manually con-
trol the intake air, push the intake air
control button “
”. To return to the
automatic control mode, push the intake
air control button “
”for about 2
seconds. The indicator lights (both air
recirculation and outside air circulation
sides) will flash twice, and then the intake
air will be controlled automatically.
To turn system off
Push the OFF button.
SAA3568
Type B
AUTOMATIC CLIMATE CONTROL (Type B)
Automatic operation (AUTO)
1. “AUTO” automatic climate control ON
button/Temperature control dial (dri-
ver side)
2. “A/C” air conditioner ON/OFF button
3. “
”fan speed increase button
4. “
”front defroster button
5. “MODE” manual air flow control but-
ton
6. “DUAL” zone control ON/OFF button/
Temperature control dial (passenger
side) 7.
“OFF” button for climate control sys-
tem*
8. “
”fan speed decrease button
9. “
”rear window defroster button
(See “Rear window and outside mirror
defroster switch” (P.2-33).)
10. “
”auto-recirculation button/
intake air control button
The AUTO mode may be used year-round
as the system automatically controls con-
stant temperature, air flow distribution and
fan speed after the desired temperature is
set manually.
Page 265 of 498

4-102Monitor, climate, audio, phone and voice recognition systems
WARNING
.Use a phone after stopping your vehicle
in a safe location. If you have to use a
phone while driving, exercise extreme
caution at all times so full attention may
be given to vehicle operation.
. If you find yourself unable to devote full
attention to vehicle operation while
talking on the phone, pull off the road
to a safe location and stop your vehicle
before doing so.
CAUTION
To avoid draining the vehicle battery, use a
phone after starting the engine.
Your vehicle is equipped with Bluetooth®
Hands-Free Phone System. If you are an
owner of a Bluetooth®enabled cellular
phone, you can set up the wireless
connection between your cellular phone
and the in-vehicle phone module. With
Bluetooth
®wireless technology, you can
make or receive a telephone call with your
cellular phone in your pocket. Once your cellular phone is paired to the
in-vehicle phone module, no phone con-
necting procedure is required. Your phone
is automatically connected with the in-
vehicle phone module when the ignition
switch is pushed to the
“ON”position with
the registered cellular phone turned on
and carried in the vehicle.
You can register up to 5 different Blue-
tooth
®cellular phones in the in-vehicle
phone module. However, you can talk on
only one cellular phone at a time.
When a call is active, the audio system and
microphone (located in the ceiling in front
of the rearview mirror) are used for the
handsfree communications.
If the audio system is being used at the
time, the audio mode will mute and will
stay muted until the active call is ended.
The INFINITI Voice Recognition system
supports the phone commands, so dialing
a phone number using your voice is
possible.
Before using the Bluetooth
®Hands-Free
Phone System, refer to the following notes.
. Wireless LAN (Wi-Fi) and the Bluetooth
®
functions share the same frequency
band (2.4 GHz). Using the Bluetooth®
and the wireless LAN functions at the
same time may slow down or discon-
nect the communication and cause
undesired noise. It is recommended
that you turn off the wireless LAN (Wi-
Fi) when using the Bluetooth
®func-
tions.
. Set up the wireless connection between
a cellular phone and the in-vehicle
phone module before using the Blue-
tooth
®Hands-Free Phone System.
. Some Bluetooth®enabled cellular
phones may not be recognized by the
in-vehicle phone module.
. You will not be able to use a hands-free
phone under the following conditions:
— Your vehicle is outside of the tele-
phone service area.
— Your vehicle is in an area where it is
difficult to receive radio waves; such
as in a tunnel, in an underground
parking garage, behind a tall build-
ing or in a mountainous area.
— Your cellular phone is locked in
order not to be dialed.
. When the radio wave condition is not
ideal or ambient sound is too loud, it
may be difficult to hear the other
person’s voice during a call.
Bluetooth®HANDS-FREE PHONE SYSTEM
(models without navigation system) (if so
equipped)