2014 Hyundai Sonata turn signal bulb
[x] Cancel search: turn signal bulbPage 20 of 665

F20F20
Washer fluid .........................................................7-35
Checking the washer fluid level ...............................7-35
Parking brake .......................................................7-36
Checking the parking brake .........................................7-36
Air cleaner ............................................................7-37
Filter replacement ...........................................................7-37
Climate control air filter .....................................7-39
Filter inspection ...............................................................7-39
Filter replacement ...........................................................7-39
Wiper blades .........................................................7-40
Blade inspection ..............................................................7-40
Blade replacement ..........................................................7-40
Battery...................................................................7-42
For best battery service................................................7-42
Battery capacity label ...................................................7-44
Battery recharging .......................................................7-44
Reset items .......................................................................7-45
Tires and wheels ..................................................7-46
Tire care ............................................................................7-46
Recommended cold tire inflation pressures.............7-46
Checking tire inflation pressure ..................................7-48
Tire rotation ....................................................................7-49
Wheel alignment and tire balance ..............................7-50
Tire replacement .............................................................7-50
Wheel replacement ........................................................7-52
Tire traction ......................................................................7-52
Tire maintenance ...........................................................7-52
Tire sidewall labeling ......................................................7-52
Low aspect ratio tire ......................................................7-57
Fuses ......................................................................7-58
Fuse/Relay panel description ......................................7-64
Light bulbs.............................................................7-72
Headlamp, position lamp, turn signal lamp and
side marker light bulb replacement ............................7-73
Side repeater lamp replacement .................................7-75
Headlamp and front fog lamp aiming (for Europe) ...7-76
Rear combination light bulb replacement .................7-81
High mounted stop lamp replacement .......................7-85
License plate light bulb replacement ........................7-85
Interior light bulb replacement ....................................7-85
Appearance care ..................................................7-87
Exterior care ....................................................................7-87
Interior care......................................................................7-93
Emission control system .....................................7-95
Crankcase emission control system ...........................7-95
Evaporative emission control system.........................7-95
Exhaust emission control system ...............................7-96
Page 196 of 665

3-100
Convenient features of your vehicle
To flash the high beam headlamp,
pull the lever towards you, then
release the lever. The high beams
will remain ON as long as you hold
the lever towards you.
Turn signals and lane change
signals
To signal a turn, push down on the
lever for a left turn or up for a right
turn in position (A). To signal a lane
change, move the turn signal lever
slightly and hold it in position (B).The
lever will return to the OFF position
when released or when the turn is
completed.
If an indicator stays on and does not
flash or if it flashes abnormally, one of
the turn signal bulbs may be burned
out and will require replacement.
One-touch turn signal function
(if equipped)
To activate an one-touch turn signal
function, move the turn signal lever
slightly and then release it. The lane
change signals will blink 3, 5 or 7
times.
Yo u c a n a c t i v a t e / d e a c t i v a t e t h e O n e
Touch Turn Signal function or choose
the number of blinking (3, 5, or 7)
from the User Settings Mode on the
LCD display.For more details, refer
to "LCD Display" in this chapter.
OLF044088L
OLF044091L
Page 530 of 665

5-81
Driving your vehicle
5
Backing up
Hold the bottom of the steering
wheel with one hand. Then, to move
the trailer to the left, move your hand
to the left. To move the trailer to the
right, move your hand to the right.
Always back up slowly and, if possi-
ble, have someone guide you.
Making turns
When you’re turning with a trailer,
make wider turns than normal. Do
this so your trailer won’t strike soft
shoulders, curbs, road signs, trees,
or other objects. Avoid jerky or sud-
den maneuvers. Signal well in
advance.
Turn signals
When you tow a trailer, your vehicle
has to have a different turn signal
flasher and extra wiring. The green
arrows on your instrument panel will
flash whenever you signal a turn or
lane change. Properly connected,
the trailer lights will also flash to alert
other drivers you’re about to turn,
change lanes, or stop.
When towing a trailer, the green
arrows on your instrument panel will
flash for turns even if the bulbs on
the trailer are burned out. Thus, you
may think drivers behind you are
seeing your signals when, in fact,
they are not. It’s important to check
occasionally to be sure the trailer
bulbs are still working. You must also
check the lights every time you dis-
connect and then reconnect the
wires.
Do not connect a trailer lighting
system directly to your vehi-
cle’s lighting system. Use an
approved trailer wiring harness.
Failure to do so could result in
damage to the vehicle electrical
system and/or personal injury.
Consult an authorized
HYUNDAI dealer for assistance.
WARNING
Page 559 of 665

7
Tire sidewall labeling ......................................................7-52
Low aspect ratio tire ......................................................7-57
Fuses ......................................................................7-58
Fuse/Relay panel description ......................................7-64
Light bulbs.............................................................7-72
Headlamp, position lamp, turn signal lamp and
side marker light bulb replacement ............................7-73
Side repeater lamp replacement .................................7-75
Headlamp and front fog lamp aiming (for Europe) ...7-76
Rear combination light bulb replacement .................7-81
High mounted stop lamp replacement .......................7-85
License plate light bulb replacement ........................7-85
Interior light bulb replacement ....................................7-85
Appearance care ..................................................7-87
Exterior care ....................................................................7-87
Interior care......................................................................7-93
Emission control system .....................................7-95
Crankcase emission control system ...........................7-95
Evaporative emission control system.........................7-95
Exhaust emission control system ...............................7-96
Page 630 of 665

7-73
7
Maintenance
Headlamp, position lamp,
turn signal lamp and fog lamp
light bulb replacement
Type A
(1) Headlamp (Low)
(2) Headlamp (High)
(3) Turn signal lamp
(4) Daytime running lamp/
Position lamp
Type B
(1) Headlamp (Low)
(2) Headlamp (High)
(3) Turn signal lamp
(4) Position lamp
(5) Fog lamp
Headlamp (Halogen bulb)
OLF074051N
OLMB073042L
•Handle halogen bulbs with
care. Halogen bulbs contain
pressurized gas that will pro-
duce flying pieces of glass
that could cause injuries if
broken.
•Wear eye protection when
changing a bulb. Allow the
bulb to cool down before han-
dling it.
WARNING
OLF074050
Page 632 of 665

7-75
7
Maintenance
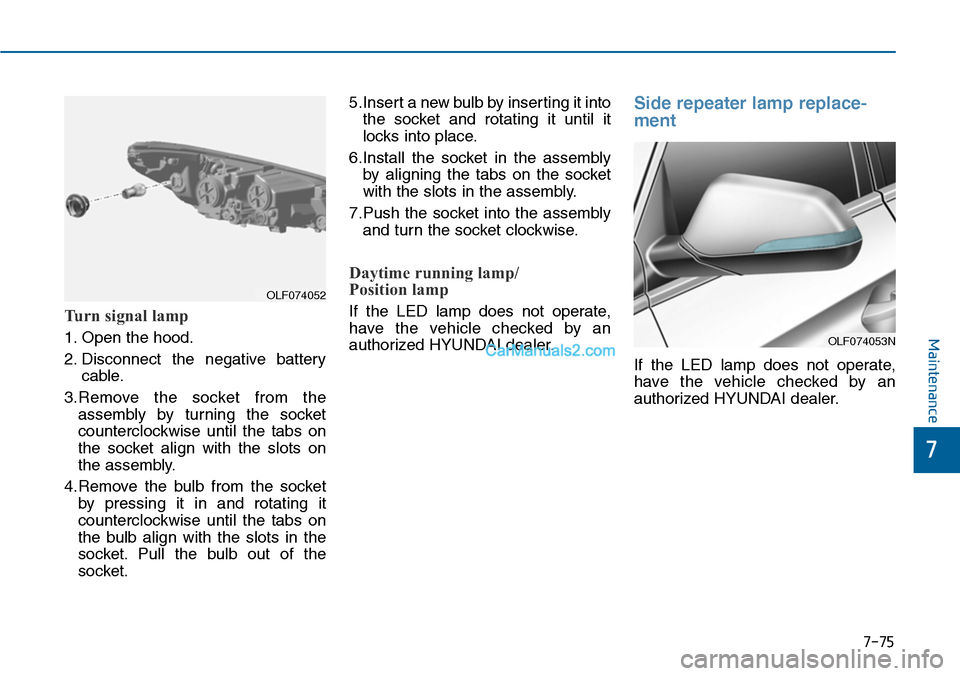
Turn signal lamp
1. Open the hood.
2. Disconnect the negative battery
cable.
3.Remove the socket from the
assembly by turning the socket
counterclockwise until the tabs on
the socket align with the slots on
the assembly.
4.Remove the bulb from the socket
by pressing it in and rotating it
counterclockwise until the tabs on
the bulb align with the slots in the
socket. Pull the bulb out of the
socket.
5.Insert a new bulb by inserting it into
the socket and rotating it until it
locks into place.
6.Install the socket in the assembly
by aligning the tabs on the socket
with the slots in the assembly.
7.Push the socket into the assembly
and turn the socket clockwise.
Daytime running lamp/
Position lamp
If the LED lamp does not operate,
have the vehicle checked by an
authorized HYUNDAI dealer.
Side repeater lamp replace-
ment
If the LED lamp does not operate,
have the vehicle checked by an
authorized HYUNDAI dealer.
OLF074052
OLF074053N
Page 638 of 665

7-81
7
Maintenance
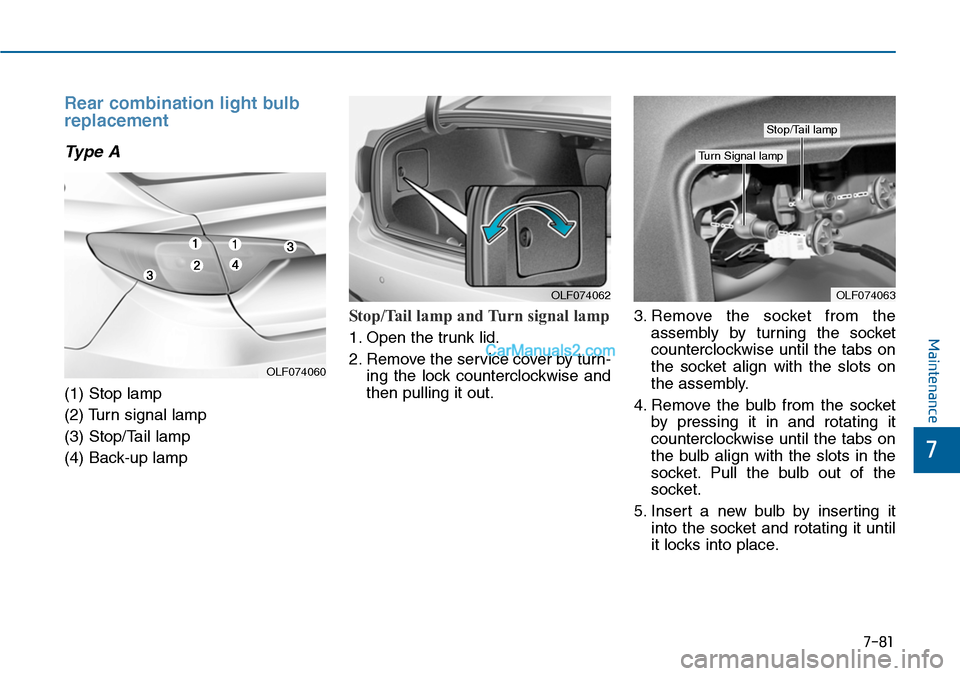
Rear combination light bulb
replacement
Type A
(1) Stop lamp
(2) Turn signal lamp
(3) Stop/Tail lamp
(4) Back-up lamp
Stop/Tail lamp and Turn signal lamp
1. Open the trunk lid.
2. Remove the service cover by turn-
ing the lock counterclockwise and
then pulling it out.
3. Remove the socket from the
assembly by turning the socket
counterclockwise until the tabs on
the socket align with the slots on
the assembly.
4. Remove the bulb from the socket
by pressing it in and rotating it
counterclockwise until the tabs on
the bulb align with the slots in the
socket. Pull the bulb out of the
socket.
5. Insert a new bulb by inserting it
into the socket and rotating it until
it locks into place.
OLF074063OLF074062
Stop/Tail lamp
Turn Signal lamp
OLF074060
Page 641 of 665

7-84
Maintenance
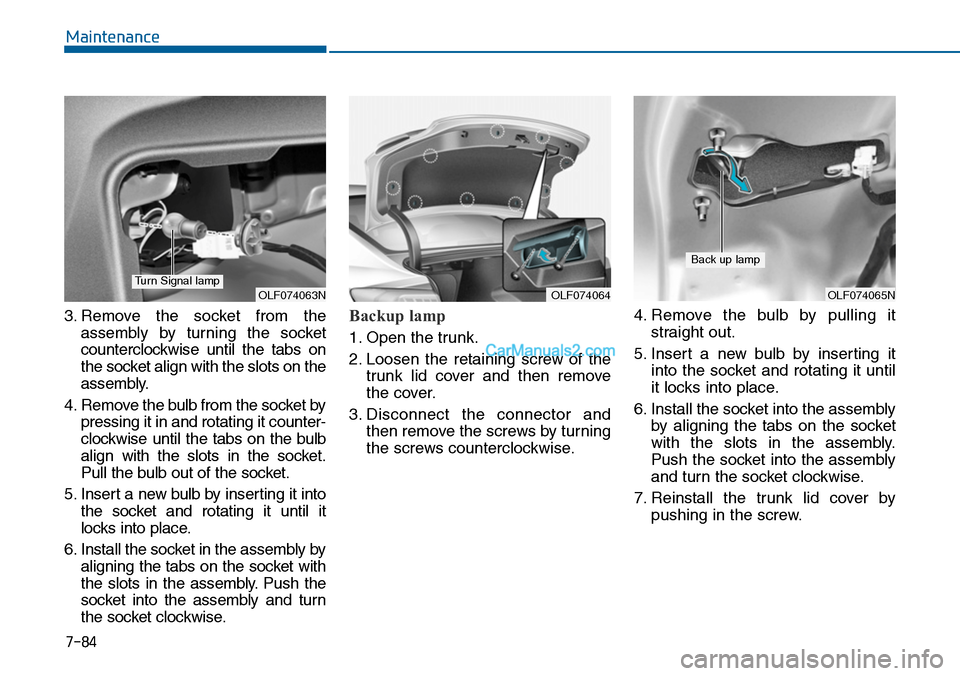
3. Remove the socket from the
assembly by turning the socket
counterclockwise until the tabs on
the socket align with the slots on the
assembly.
4. Remove the bulb from the socket by
pressing it in and rotating it counter-
clockwise until the tabs on the bulb
align with the slots in the socket.
Pull the bulb out of the socket.
5. Insert a new bulb by inserting it into
the socket and rotating it until it
locks into place.
6. Install the socket in the assembly by
aligning the tabs on the socket with
the slots in the assembly. Push the
socket into the assembly and turn
the socket clockwise.
Backup lamp
1. Open the trunk.
2. Loosen the retaining screw of the
trunk lid cover and then remove
the cover.
3. Disconnect the connector and
then remove the screws by turning
the screws counterclockwise.
4. Remove the bulb by pulling it
straight out.
5. Insert a new bulb by inserting it
into the socket and rotating it until
it locks into place.
6. Install the socket into the assembly
by aligning the tabs on the socket
with the slots in the assembly.
Push the socket into the assembly
and turn the socket clockwise.
7. Reinstall the trunk lid cover by
pushing in the screw.
OLF074064OLF074063NOLF074065N
Back up lamp
Turn Signal lamp