2014 Hyundai Sonata Start car
[x] Cancel search: Start carPage 54 of 665
2-25
Safety system of your vehicle
2
This section describes how to use the
seat belts properly. It also describes
some of the things not to do when
using seat belts.
Seat belt safety precautions
Always fasten your seat belt and
make sure all passengers have fas-
tened their seat belts before starting
any trip. Air bags (if equipped) are
designed to supplement the seat belt
as an additional safety device, but
they are not a substitute. Most coun-
tries require all occupants of a vehicle
to wear seat belts.
SEAT BELTS
Seat belts must be used by ALL
passengers whenever the vehi-
cle is moving. Take the following
precautions when adjusting and
wearing seat belts:
•ALWAYS properly restrain
children under age 13 in the
rear seats.
•NEVER allow children to ride
in the front passenger seat. If
a child age 13 or older must be
seated in the front seat, move
the seat as far back as possi-
ble and properly restrain them
in the seat.
•NEVER allow an infant or child
to be carried on an occupant’s
lap.
•NEVER ride with the seatback
reclined when the vehicle is
moving.
•Do not allow children to share
a seat or seat belt.
(Continued)
WARNING (Continued)
•Do not wear the shoulder belt
under your arm or behind your
back.
•Never wear a seat belt over
fragile objects. If there is a
sudden stop or impact, the
seat belt can damage it.
•Do not use the seat belt if it is
twisted. A twisted seat belt
will not protect you properly
in an accident.
•Do not use a seat belt if the
webbing or hardware is dam-
aged.
•Do not latch the seat belt into
the buckles of other seats.
•NEVER unfasten the seat belt
while driving. This may cause
loss of vehicle control result-
ing in an accident.
•Make sure there is nothing in
the buckle interfering with the
seat belt latch mechanism.
This may prevent the seat belt
from fastening securely.
(Continued)
Page 105 of 665
3-9
Convenient features of your vehicle
Even though you press the outside
door handle button, the doors will not
lock and the chime will sound for
three seconds if any of the following
occur:
•The Smart Key is in the vehicle.
•The Engine Start/Stop button is in
ACC or ON position.
•Any door except the trunk is open.
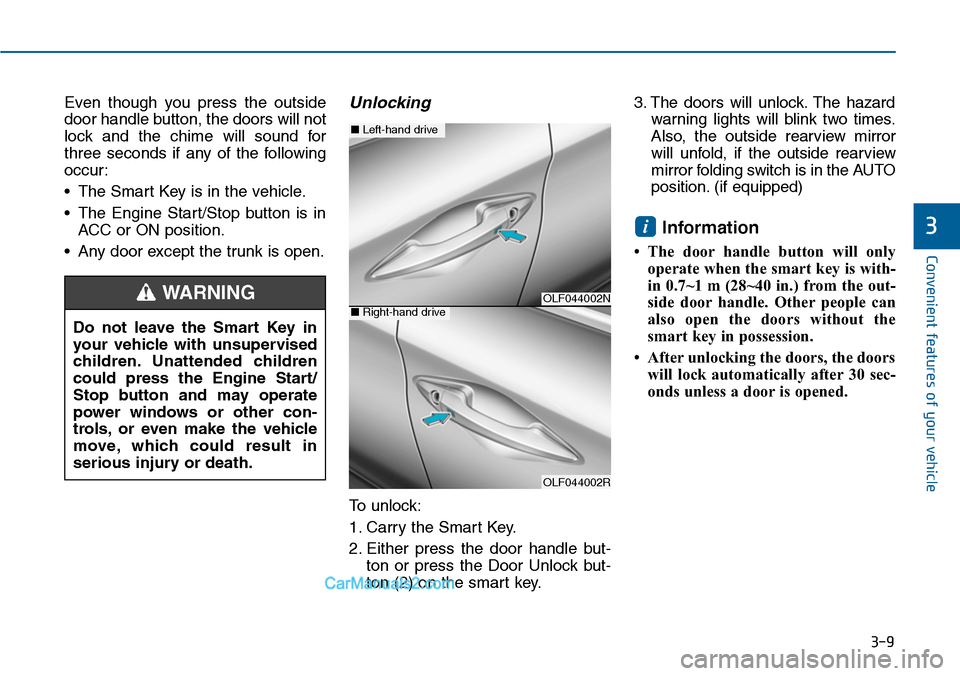
Unlocking
To unlock:
1. Carry the Smart Key.
2. Either press the door handle but-
ton or press the Door Unlock but-
ton (2) on the smart key.
3. The doors will unlock. The hazard
warning lights will blink two times.
Also, the outside rearview mirror
will unfold, if the outside rearview
mirror folding switch is in the AUTO
position. (if equipped)
Information
• The door handle button will only
operate when the smart key is with-
in 0.7~1 m (28~40 in.) from the out-
side door handle. Other people can
also open the doors without the
smart key in possession.
•Afterunlocking the doors, the doors
will lock automatically after 30 sec-
onds unless a door is opened.
i3
Do not leave the Smart Key in
your vehicle with unsupervised
children. Unattended children
could press the Engine Start/
Stop button and may operate
power windows or other con-
trols, or even make the vehicle
move, which could result in
serious injury or death.
WARNINGOLF044002N
OLF044002R
■Left-hand drive
■Right-hand drive
Page 106 of 665
3-10
Convenient features of your vehicle
Trunk unlocking
To unlock:
1. Carry the smart key.
2. Either press the trunk handle but-
ton or press the Trunk Unlock but-
ton (3) on the smart key for more
than one second.
3. The hazard warning lights will
blink two times.
Once the trunk is opened and then
closed, the trunk will lock automati-
cally.
Information
After unlocking the trunk, the trunk
will lock automatically after 30 sec-
onds unless the trunk is opened.
Start-up
Yo u c a n s t a r t t h e e n g i n e w i t h o u t
inserting the key.For detailed infor-
mation refer to the Engine
Start/Stop button in chapter 5.
To prevent damaging the smart
key:
•Keep the smart key away from
water or any liquid. If the smart
key is inoperative due to expo-
sure to water or other liquids, it
will not be covered by your man-
ufacturer’s vehicle warranty.
•Avoid dropping or throwing the
smart key.
•Protect the smart key from
extreme temperatures.
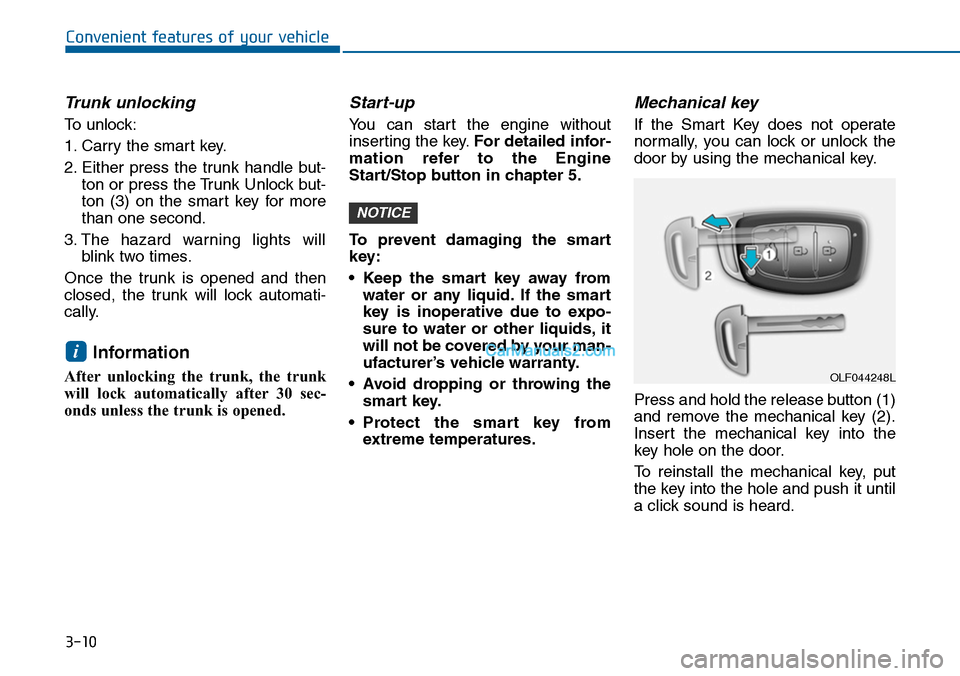
Mechanical key
If the Smart Key does not operate
normally, you can lock or unlock the
door by using the mechanical key.
Press and hold the release button (1)
and remove the mechanical key (2).
Insert the mechanical key into the
key hole on the door.
To reinstall the mechanical key, put
the key into the hole and push it until
a click sound is heard.
NOTICE
i
OLF044248L
Page 125 of 665
3-29
Convenient features of your vehicle
3
MIRRORS
Inside rearview mirror
Before you start driving, adjust the
rearview mirror to the center on the
view through the rear window.
When cleaning the mirror, use a
paper towel or similar material
dampened with glass cleaner. Do
not spray glass cleaner directly on
the mirror as that may cause the
liquid cleaner to enter the mirror
housing.
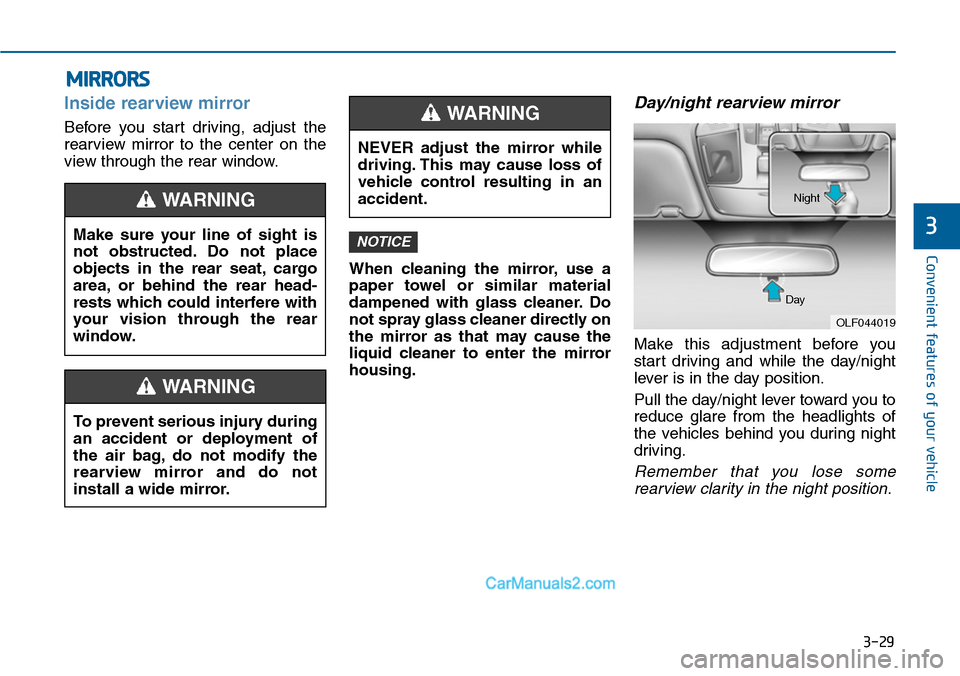
Day/night rearview mirror
Make this adjustment before you
start driving and while the day/night
lever is in the day position.
Pull the day/night lever toward you to
reduce glare from the headlights of
the vehicles behind you during night
driving.
Remember that you lose some
rearview clarity in the night position.
NOTICEMake sure your line of sight is
not obstructed. Do not place
objects in the rear seat, cargo
area, or behind the rear head-
rests which could interfere with
your vision through the rear
window.
WARNING
To prevent serious injury during
an accident or deployment of
the air bag, do not modify the
rearview mirror and do not
install a wide mirror.
WARNING
NEVER adjust the mirror while
driving. This may cause loss of
vehicle control resulting in an
accident.
WARNING
OLF044019
Day
Night
Page 126 of 665
3-30
Convenient features of your vehicle
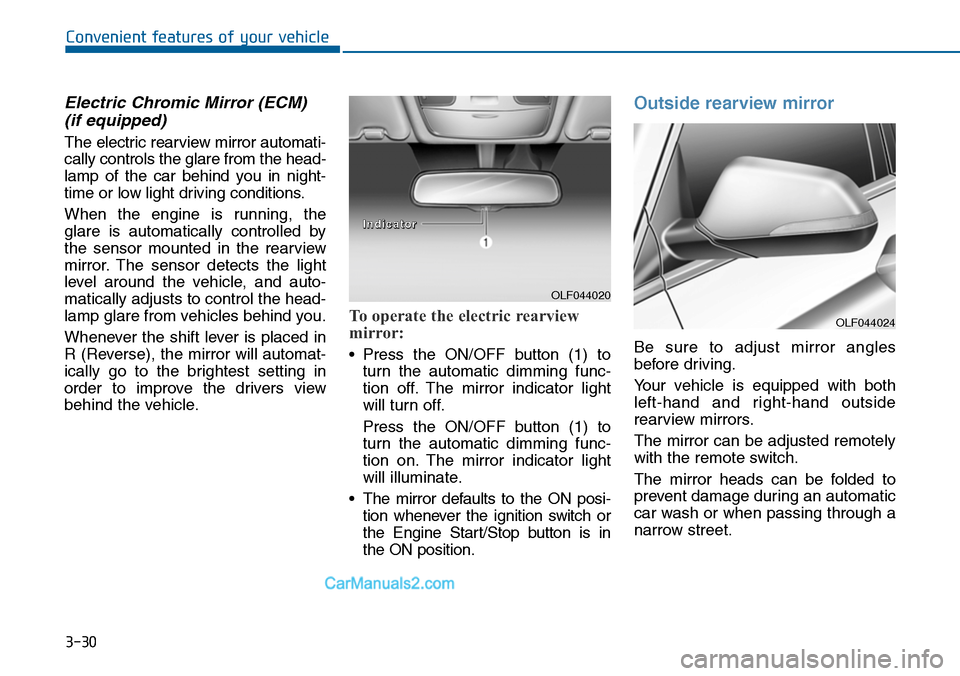
Electric Chromic Mirror (ECM)
(if equipped)
The electric rearview mirror automati-
cally controls the glare from the head-
lamp of the car behind you in night-
time or low light driving conditions.
When the engine is running, the
glare is automatically controlled by
the sensor mounted in the rearview
mirror. The sensor detects the light
level around the vehicle, and auto-
matically adjusts to control the head-
lamp glare from vehicles behind you.
Whenever the shift lever is placed in
R (Reverse), the mirror will automat-
ically go to the brightest setting in
order to improve the drivers view
behind the vehicle.
To operate the electric rearview
mirror:
•Press the ON/OFF button (1) to
turn the automatic dimming func-
tion off. The mirror indicator light
will turn off.
Press the ON/OFF button (1) to
turn the automatic dimming func-
tion on. The mirror indicator light
will illuminate.
•The mirror defaults to the ON posi-
tion whenever the ignition switch or
the Engine Start/Stop button is in
the ON position.
Outside rearview mirror
Be sure to adjust mirror angles
before driving.
Yo u r v e h i c l e i s e q u i p p e d w i t h b o t h
left-hand and right-hand outside
rearview mirrors.
The mirror can be adjusted remotely
with the remote switch.
The mirror heads can be folded to
prevent damage during an automatic
car wash or when passing through a
narrow street.
OLF044020
IInnddiiccaattoorr
OLF044024
Page 147 of 665
3-51
Convenient features of your vehicle
3
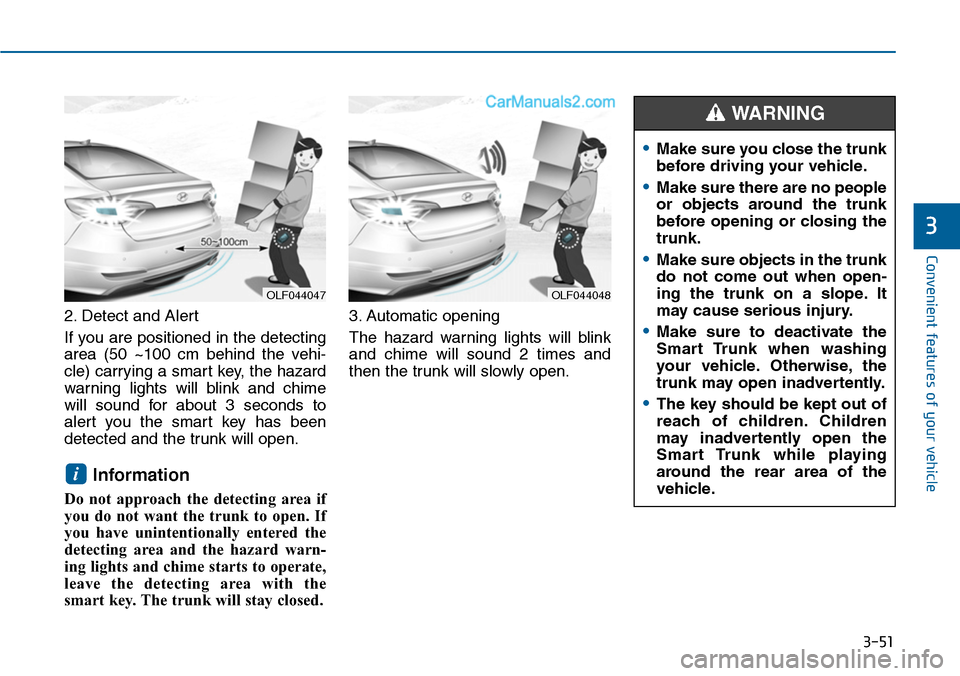
2. Detect and Alert
If you are positioned in the detecting
area (50 ~100 cm behind the vehi-
cle) carrying a smart key, the hazard
warning lights will blink and chime
will sound for about 3 seconds to
alert you the smart key has been
detected and the trunk will open.
Information
Do not approach the detecting area if
you do not want the trunk to open. If
you have unintentionally entered the
detecting area and the hazard warn-
ing lights and chime starts to operate,
leave the detecting area with the
smart key. The trunk will stay closed.
3. Automatic opening
The hazard warning lights will blink
and chime will sound 2 times and
then the trunk will slowly open.
i
OLF044048OLF044047
•Make sure you close the trunk
before driving your vehicle.
•Make sure there are no people
or objects around the trunk
before opening or closing the
trunk.
•Make sure objects in the trunk
do not come out when open-
ing the trunk on a slope. It
may cause serious injury.
•Make sure to deactivate the
Smart Trunk when washing
your vehicle. Otherwise, the
trunk may open inadvertently.
•The key should be kept out of
reach of children. Children
may inadvertently open the
Smart Trunk while playing
around the rear area of the
vehicle.
WARNING
Page 188 of 665

3-92
Convenient features of your vehicle
Charging System
Warning Light
This warning light illuminates:
•Once you set the ignition switch or
the Engine Start/Stop button to the
ON position.
- It remains on until the engine is
started.
•When there is a malfunction with
either the alternator or electrical
charging system.
If there is a malfunction with either
the alternator or electrical charging
system:
1. Drive carefully to the nearest safe
location and stop your vehicle.
2. Turn the engine off and check the
alternator drive belt for looseness
or breakage.
If the belt is adjusted properly,
there may be a problem in the
electrical charging system.
In this case, we recommend that
you have the vehicle inspected by
an authorized HYUNDAI dealer as
soon as possible.
Engine Oil Pressure
Warning Light
This warning light illuminates:
•Once you set the ignition switch or
the Engine Start/Stop button to the
ON position.
- It remains on until the engine is
started.
•When the engine oil pressure is low.
If the engine oil pressure is low:
1. Drive carefully to the nearest safe
location and stop your vehicle.
2. Turn the engine off and check the
engine oil level (For more details,
refer to “Engine Oil” in chapter 7).
If the level is low, add oil as required.
If the warning light remains on
after adding oil or if oil is not avail-
able, we recommend that you
have the vehicle inspected by an
authorized HYUNDAI dealer as
soon as possible.
Page 239 of 665
3-143
Convenient features of your vehicle
3
Operation Tips
•To keep dust or unpleasant fumes
from entering the vehicle through
the ventilation system, temporarily
set the air intake control to the
recirculated air position. Be sure to
return the control to the fresh air
position when the irritation has
passed to keep fresh air in the
vehicle. This will help keep the driv-
er alert and comfortable.
•Air for the heating/cooling system
is drawn in through the grilles just
ahead of the windshield. Care
should be taken that these are not
blocked by leaves, snow, ice or
other obstructions.
•To prevent interior fog on the wind-
shield, set the air intake control to
the fresh air position and fan speed
to the desired position, turn on the
air conditioning system, and adjust
the temperature control to desired
temperature.
Air conditioning
HYUNDAI Air Conditioning Systems
are filled with R-134a refrigerant.
1. Start the engine. Push the air con-
ditioning button.
2. Set the mode to the position.
3. Set the air intake control to the out-
side air or recirculated air position.
4. Adjust the fan speed control and
temperature control to maintain
maximum comfort.
•The refrigerant system should
only be serviced by trained and
certified technicians to insure
proper and safe operation.
•The refrigerant system should
be serviced in a well-ventilated
place.
•The air conditioning evaporator
(cooling coil) shall never be
repaired or replaced with one
removed from a used or sal-
vaged vehicle and new replace-
ment MAC evaporators shall be
certified (and labeled) as meet-
ing SAE Standard J2842.
NOTICE