2014 Hyundai Santa Fe display
[x] Cancel search: displayPage 472 of 711
523
Driving your vehicle
Transaxle ranges
The indicator lights in the instrument
cluster displays the shift lever posi-
tion when the ignition switch is in the
ON position.
P (Park)
Always come to a complete stop
before shifting into P (Park). This
position locks the transaxle and pre-
vents the front wheels from rotating.R (Reverse)
Use this position to drive the vehicle
backward.N (Neutral)
The wheels and transaxle are not
engaged. The vehicle will roll freely
even on the slightest incline unless
the parking brake or service brakes
are applied.
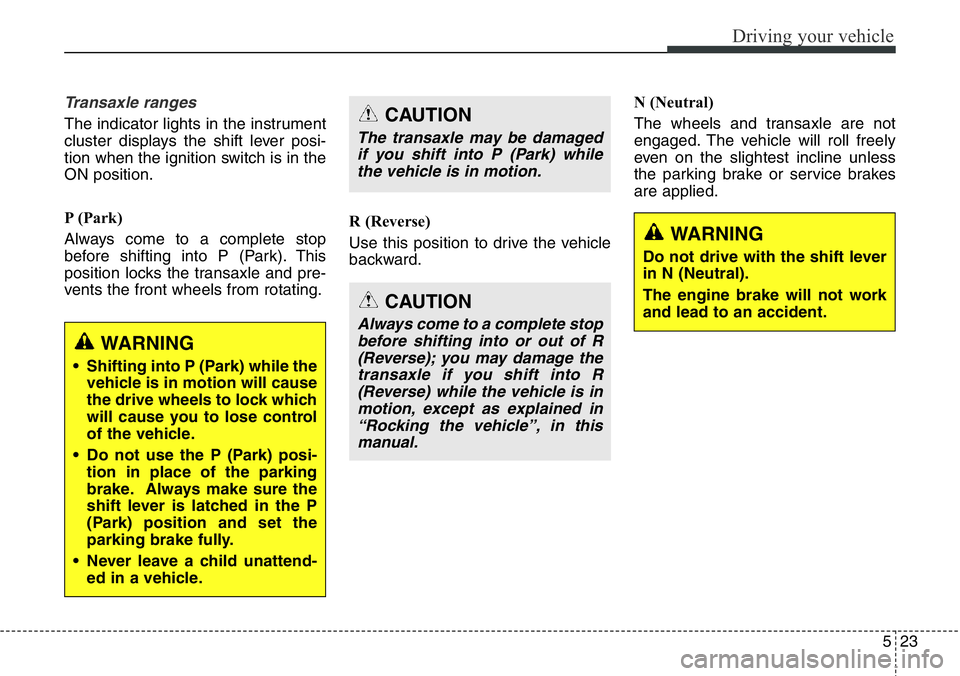
WARNING
• Shifting into P (Park) while the
vehicle is in motion will cause
the drive wheels to lock which
will cause you to lose control
of the vehicle.
• Do not use the P (Park) posi-
tion in place of the parking
brake. Always make sure the
shift lever is latched in the P
(Park) position and set the
parking brake fully.
• Never leave a child unattend-
ed in a vehicle.
CAUTION
Always come to a complete stop
before shifting into or out of R
(Reverse); you may damage the
transaxle if you shift into R
(Reverse) while the vehicle is in
motion, except as explained in
“Rocking the vehicle”, in this
manual.
CAUTION
The transaxle may be damaged
if you shift into P (Park) while
the vehicle is in motion.
WARNING
Do not drive with the shift lever
in N (Neutral).
The engine brake will not work
and lead to an accident.
Page 519 of 711
Driving your vehicle
70 5
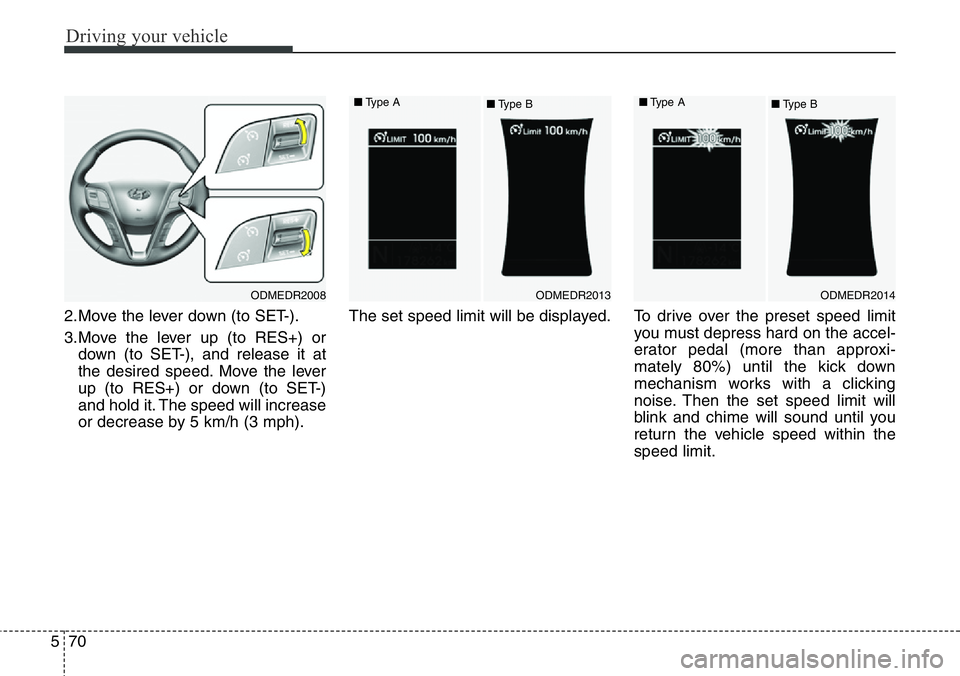
2.Move the lever down (to SET-).
3.Move the lever up (to RES+) or
down (to SET-), and release it at
the desired speed. Move the lever
up (to RES+) or down (to SET-)
and hold it. The speed will increase
or decrease by 5 km/h (3 mph).The set speed limit will be displayed. To drive over the preset speed limit
you must depress hard on the accel-
erator pedal (more than approxi-
mately 80%) until the kick down
mechanism works with a clicking
noise. Then the set speed limit will
blink and chime will sound until you
return the vehicle speed within the
speed limit.
ODMEDR2008ODMEDR2013ODMEDR2014 ■Type A
■Type B■Type A
■Type B
Page 523 of 711
Driving your vehicle
74 5
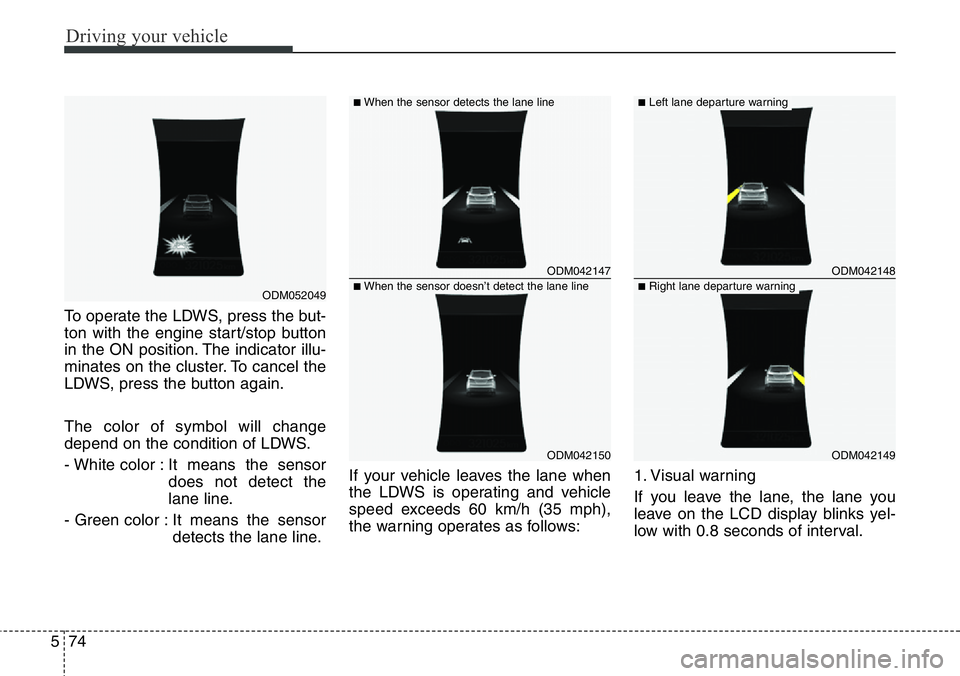
To operate the LDWS, press the but-
ton with the engine start/stop button
in the ON position. The indicator illu-
minates on the cluster. To cancel the
LDWS, press the button again.
The color of symbol will change
depend on the condition of LDWS.
- White color : It means the sensor
does not detect the
lane line.
- Green color : It means the sensor
detects the lane line.If your vehicle leaves the lane when
the LDWS is operating and vehicle
speed exceeds 60 km/h (35 mph),
the warning operates as follows:1. Visual warning
If you leave the lane, the lane you
leave on the LCD display blinks yel-
low with 0.8 seconds of interval.
ODM042147
ODM042150
ODM042148
ODM042149
■When the sensor detects the lane line■Left lane departure warning
■When the sensor doesn’t detect the lane line■Right lane departure warningODM052049
Page 558 of 711
What to do in an emergency
8 6
TIRE PRESSURE MONITORING SYSTEM (TPMS) (IF EQUIPPED)
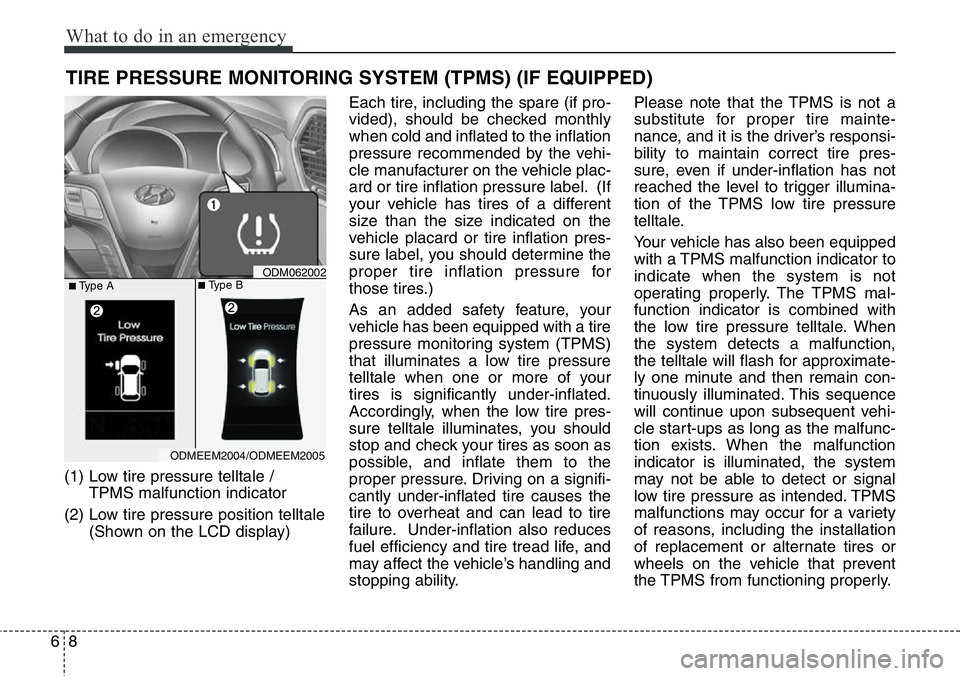
(1) Low tire pressure telltale /
TPMS malfunction indicator
(2) Low tire pressure position telltale
(Shown on the LCD display)Each tire, including the spare (if pro-
vided), should be checked monthly
when cold and inflated to the inflation
pressure recommended by the vehi-
cle manufacturer on the vehicle plac-
ard or tire inflation pressure label. (If
your vehicle has tires of a different
size than the size indicated on the
vehicle placard or tire inflation pres-
sure label, you should determine the
proper tire inflation pressure for
those tires.)
As an added safety feature, your
vehicle has been equipped with a tire
pressure monitoring system (TPMS)
that illuminates a low tire pressure
telltale when one or more of your
tires is significantly under-inflated.
Accordingly, when the low tire pres-
sure telltale illuminates, you should
stop and check your tires as soon as
possible, and inflate them to the
proper pressure. Driving on a signifi-
cantly under-inflated tire causes the
tire to overheat and can lead to tire
failure. Under-inflation also reduces
fuel efficiency and tire tread life, and
may affect the vehicle’s handling and
stopping ability.Please note that the TPMS is not a
substitute for proper tire mainte-
nance, and it is the driver’s responsi-
bility to maintain correct tire pres-
sure, even if under-inflation has not
reached the level to trigger illumina-
tion of the TPMS low tire pressure
telltale.
Your vehicle has also been equipped
with a TPMS malfunction indicator to
indicate when the system is not
operating properly. The TPMS mal-
function indicator is combined with
the low tire pressure telltale. When
the system detects a malfunction,
the telltale will flash for approximate-
ly one minute and then remain con-
tinuously illuminated. This sequence
will continue upon subsequent vehi-
cle start-ups as long as the malfunc-
tion exists. When the malfunction
indicator is illuminated, the system
may not be able to detect or signal
low tire pressure as intended. TPMS
malfunctions may occur for a variety
of reasons, including the installation
of replacement or alternate tires or
wheels on the vehicle that prevent
the TPMS from functioning properly.
ODMEEM2004/ODMEEM2005
ODM062002■Type A■Type B
Page 559 of 711
69
What to do in an emergency
Always check the TPMS malfunction
telltale after replacing one or more
tires or wheels on your vehicle to
ensure that the replacement or alter-
nate tires and wheels allow the
TPMS to continue to function proper-
ly.
✽NOTICE
If any of the below happens, we rec-
ommend that the system be checked
by an authorized HYUNDAI dealer.
1.The low tire pressure telltale/
TPMS malfunction indicator do
not illuminate for 3 seconds when
the ignition switch is turned to the
ON position or engine is running.
2. The TPMS malfunction indicator
remains illuminated after blinking
for approximately 1 minute.
3. The Low tire pressure position
telltale remains illuminated.
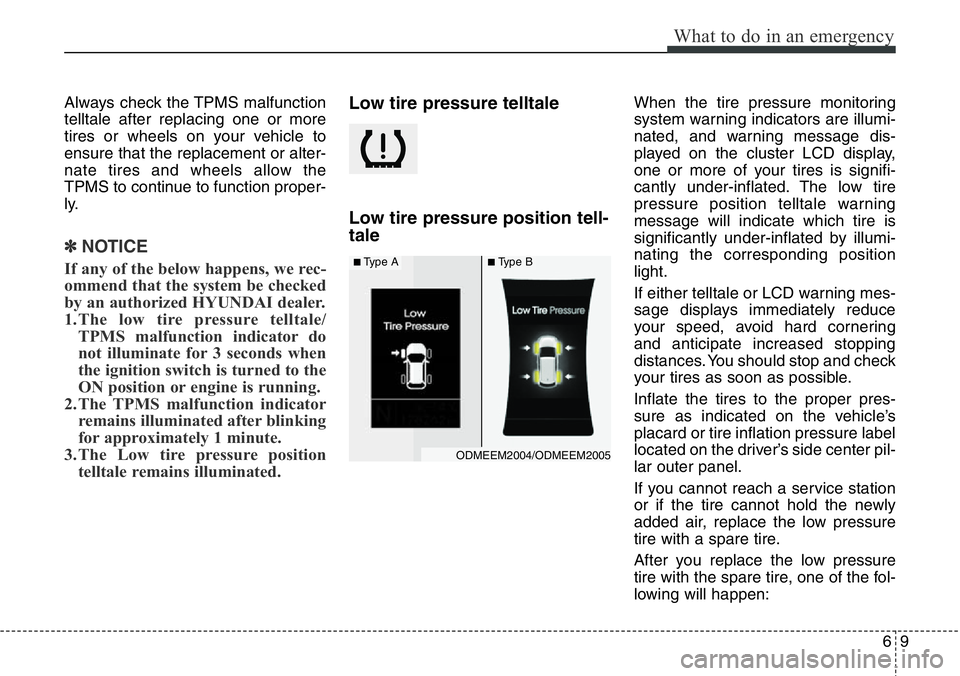
Low tire pressure telltale
Low tire pressure position tell-
taleWhen the tire pressure monitoring
system warning indicators are illumi-
nated, and warning message dis-
played on the cluster LCD display,
one or more of your tires is signifi-
cantly under-inflated. The low tire
pressure position telltale warning
message will indicate which tire is
significantly under-inflated by illumi-
nating the corresponding position
light.
If either telltale or LCD warning mes-
sage displays immediately reduce
your speed, avoid hard cornering
and anticipate increased stopping
distances. You should stop and check
your tires as soon as possible.
Inflate the tires to the proper pres-
sure as indicated on the vehicle’s
placard or tire inflation pressure label
located on the driver’s side center pil-
lar outer panel.
If you cannot reach a service station
or if the tire cannot hold the newly
added air, replace the low pressure
tire with a spare tire.
After you replace the low pressure
tire with the spare tire, one of the fol-
lowing will happen:
ODMEEM2004/ODMEEM2005
■Type A■Type B
Page 561 of 711
611
What to do in an emergency
TPMS (Tire Pressure
Monitoring System)
malfunction indicator
The TPMS malfunction indicator will
illuminate after it blinks for approxi-
mately one minute when there is a
problem with the Tire Pressure
Monitoring System.
We recommend that the system be
checked by an authorized HYUNDAI
dealer to determine the cause of the
problem.
✽NOTICE
If there is a malfunction with the
TPMS, the low tire pressure position
telltale will not be displayed even
though the vehicle has an under-
inflated tire.
Changing a tire with TPMS
If you have a flat tire, the low Tire
Pressure and Position telltales will
come on. We recommend that the
system be checked by an authorized
HYUNDAI dealer.
Each wheel is equipped with a tire
pressure sensor mounted inside the
tire behind the valve stem. You must
use TPMS specific wheels. It is rec-
ommended that you have your tires
serviced by an authorized HYUNDAI
dealer.If you drive the vehicle for about 10
minutes at speeds above 25 km/h
after replaceing the low pressure tire
with the spare tire, one of the follow-
ing will happen:
• The TPMS malfunction indicator
may blink for approximately 1
minute and then remain continu-
ously illuminated because the
TPMS sensor is not mounted on
the spare wheel. (changed tire
equipped with a sensor not in the
vehicle)
• The TPMS malfunction indicator
will remain continuously illuminat-
ed while driving because the
TPMS sensor is not mounted on
the spare wheel. (changed tire
equipped with a sensor in the vehi-
cle)
CAUTION
We recommend that you use the
sealant approved by HYUNDAI.
The sealant on the tire pressure
sensor and wheel shall be elem-
inated when you replace the tire
with a new one.
Page 575 of 711
625
What to do in an emergency
It is possible that some tires, espe-
cially with larger punctures or dam-
age to the sidewall, cannot be sealed
completely.
Air pressure loss in the tire may
adversely affect tire performance.
For this reason, you should avoid
abrupt steering or other driving
maneuvers, especially if the vehicle is
heavily loaded or if a trailer is in use.
The TMK is not designed or intended
as a permanent tire repair method
and is to be used for one tire only.
This instruction shows you step by
step how to temporarily seal the
puncture simply and reliably.
Read the section "Notes on the safe
use of the Tire Mobility Kit".
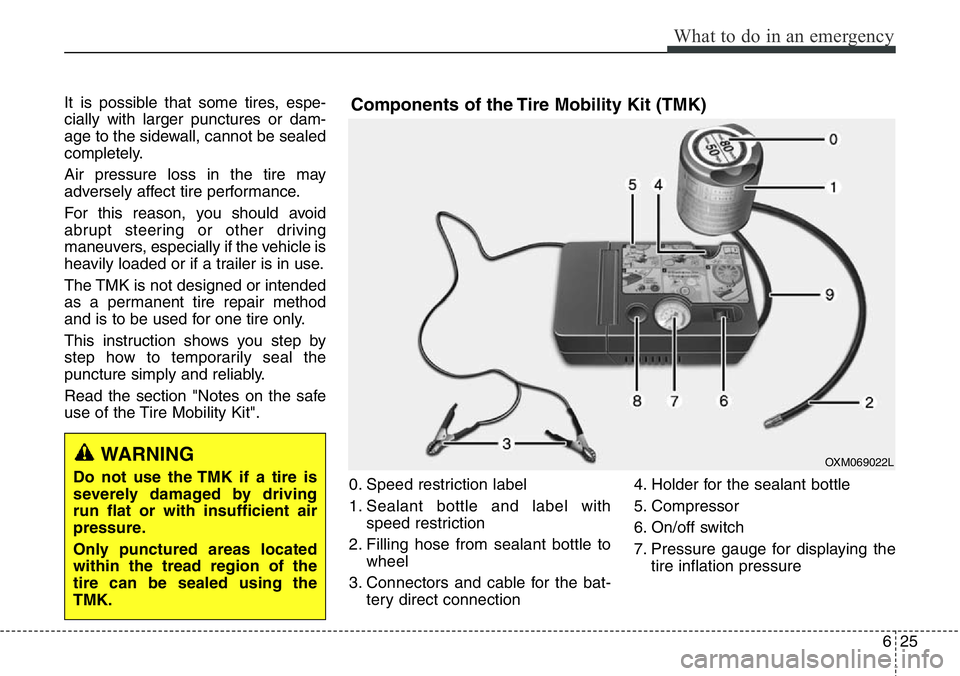
0. Speed restriction label
1. Sealant bottle and label with
speed restriction
2. Filling hose from sealant bottle to
wheel
3. Connectors and cable for the bat-
tery direct connection4. Holder for the sealant bottle
5. Compressor
6. On/off switch
7. Pressure gauge for displaying the
tire inflation pressureComponents of the Tire Mobility Kit (TMK)
OXM069022LWARNING
Do not use the TMK if a tire is
severely damaged by driving
run flat or with insufficient air
pressure.
Only punctured areas located
within the tread region of the
tire can be sealed using the
TMK.
Page 651 of 711
Maintenance
66 7
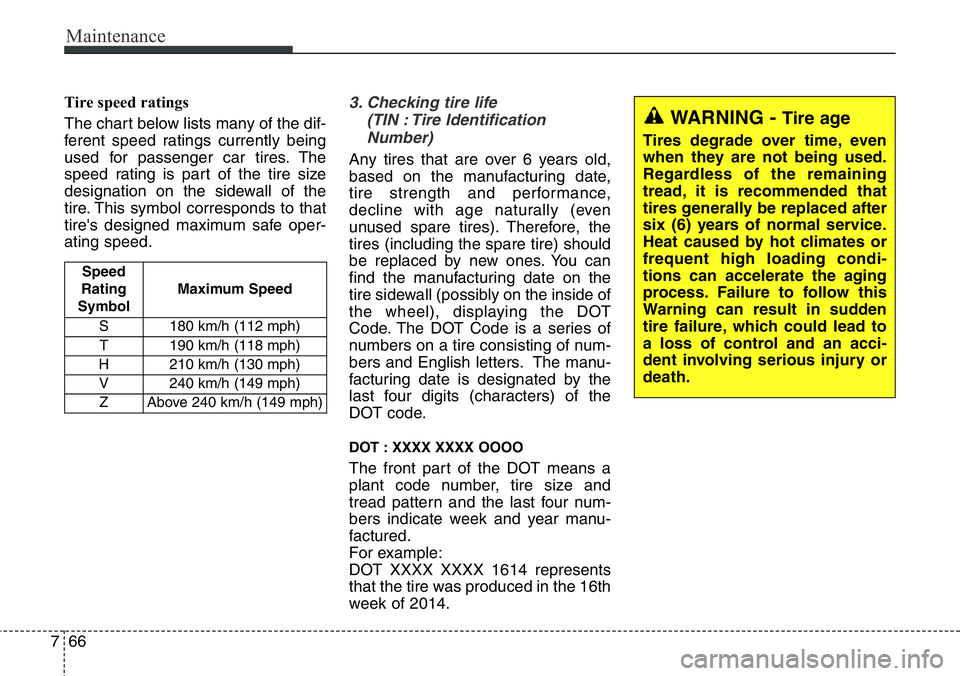
Tire speed ratings
The chart below lists many of the dif-
ferent speed ratings currently being
used for passenger car tires. The
speed rating is part of the tire size
designation on the sidewall of the
tire. This symbol corresponds to that
tire's designed maximum safe oper-
ating speed.3. Checking tire life
(TIN : Tire Identification
Number)
Any tires that are over 6 years old,
based on the manufacturing date,
tire strength and performance,
decline with age naturally (even
unused spare tires). Therefore, the
tires (including the spare tire) should
be replaced by new ones. You can
find the manufacturing date on the
tire sidewall (possibly on the inside of
the wheel), displaying the DOT
Code. The DOT Code is a series of
numbers on a tire consisting of num-
bers and English letters. The manu-
facturing date is designated by the
last four digits (characters) of the
DOT code.
DOT : XXXX XXXX OOOO
The front part of the DOT means a
plant code number, tire size and
tread pattern and the last four num-
bers indicate week and year manu-
factured.
For example:
DOT XXXX XXXX 1614 represents
that the tire was produced in the 16th
week of 2014.
WARNING - Tire age
Tires degrade over time, even
when they are not being used.
Regardless of the remaining
tread, it is recommended that
tires generally be replaced after
six (6) years of normal service.
Heat caused by hot climates or
frequent high loading condi-
tions can accelerate the aging
process. Failure to follow this
Warning can result in sudden
tire failure, which could lead to
a loss of control and an acci-
dent involving serious injury or
death.
Speed
Rating
SymbolMaximum Speed
S 180 km/h (112 mph)
T 190 km/h (118 mph)
H 210 km/h (130 mph)
V 240 km/h (149 mph)
Z Above 240 km/h (149 mph)