2014 Hyundai Equus tow
[x] Cancel search: towPage 87 of 479

Safety features of your vehicle
68 3
SRS Care
The SRS is virtually maintenance-
free and so there are no parts you
can safely service by yourself. If the
SRS air bag warning light does not
illuminate when you turn the ignition
ON, or if it continuously remains on,
we recommend that the system be
inspected by an authorized HYUNDAI
dealer.
Improper handling of the SRS sys-
tem may result in serious personal
injury.WARNING
• Modification to SRS compo-
nents or wiring, including the
addition of any kind of badges
to the pad covers or modifica-
tions to the body structure,
can adversely affect SRS per-
formance and lead to possible
injury.
• For cleaning the air bag pad
covers, use only a soft, dry
cloth or one which has been
moistened with plain water.
Solvents or cleaners could
adversely affect the air bag
covers and proper deploy-
ment of the system.
• No objects should be placed
over or near the air bag mod-
ules on the steering wheel,
instrument panel, and the
front passenger's panel above
the glove box, because any
such object could cause harm
if the vehicle is in a crash
severe enough to cause the
air bags to inflate.
(Continued)
(Continued)
• If the air bags inflate, they
must be replaced by an
authorized HYUNDAI dealer.
• Do not tamper with or discon-
nect SRS wiring, or other
components of the SRS sys-
tem. Doing so could result in
injury, due to accidental infla-
tion of the air bags or by ren-
dering the SRS inoperative.
• If components of the air bag
system must be discarded, or
if the vehicle must be
scrapped, certain safety pre-
cautions must be observed.
An authorized HYUNDAI deal-
er knows these precautions
and can give you the neces-
sary information. Failure to
follow these precautions and
procedures could increase
the risk of personal injury.
• If your car was flooded and
has soaked carpeting or water
on the flooring, you shouldn't
try to start the engine; have
the car towed to an authorized
HYUNDAI dealer.
Page 98 of 479

49
Features of your vehicle
Lock release
To release the trunk lock feature,
open the glove box with the mechan-
ical key and set the trunk lid control
button to ON position (pressed). In
this position the trunk will open with
the trunk lid button or smart key.Smart key precautions
✽NOTICE
• If, for some reason, you happen to
lose your smart key, you will not
be able to start the engine. Tow the
vehicle, if necessary, we recom-
mend that you contact an author-
ized HYUNDAI dealer.
• A maximum of 3 smart keys
including card type (if equipped)
can be registered to a single vehi-
cle. If you lose a smart key, we rec-
ommend that you contact an
authorized HYUNDAI dealer.
• The smart key will not work if any
of the following occurs:
- The smart key is close to a radio
transmitter such as a radio sta-
tion or an airport which can
interfere with normal operation
of the smart key.
- The smart key is near a mobile
two-way radio system or a cellu-
lar phone.
- Another vehicle’s smart key is
being operated close to your
vehicle.
(Continued)(Continued)
When the smart key does not work
properly, open and close the door
with the mechanical key. If you
have a problem with the smart
key, we recommend that you con-
tact an authorized HYUNDAI
dealer.
• If the smart key is in close proxim-
ity to your cell phone or smart
phone, the signal from the smart
key could be blocked by normal
operation of your cell phone or
smart phone. This is especially
important when the phone is
active such as making call, receiv-
ing calls, text messaging, and/or
sending/receiving emails. Avoid
placing the smart key and your
cell phone or smart phone in the
same pants or jacket pocket and
maintain adequate distance
between the two devices.
Page 105 of 479

Features of your vehicle
16 4
Operating door locks from
outside the vehicle
• To lock the doors, press the button
of the outside door handle while car-
rying the smart key with you or press
the lock button on the smart key.• To unlock the doors, put your hand
into the outside door handle while
carrying the smart key or press the
unlock button on the smart key.
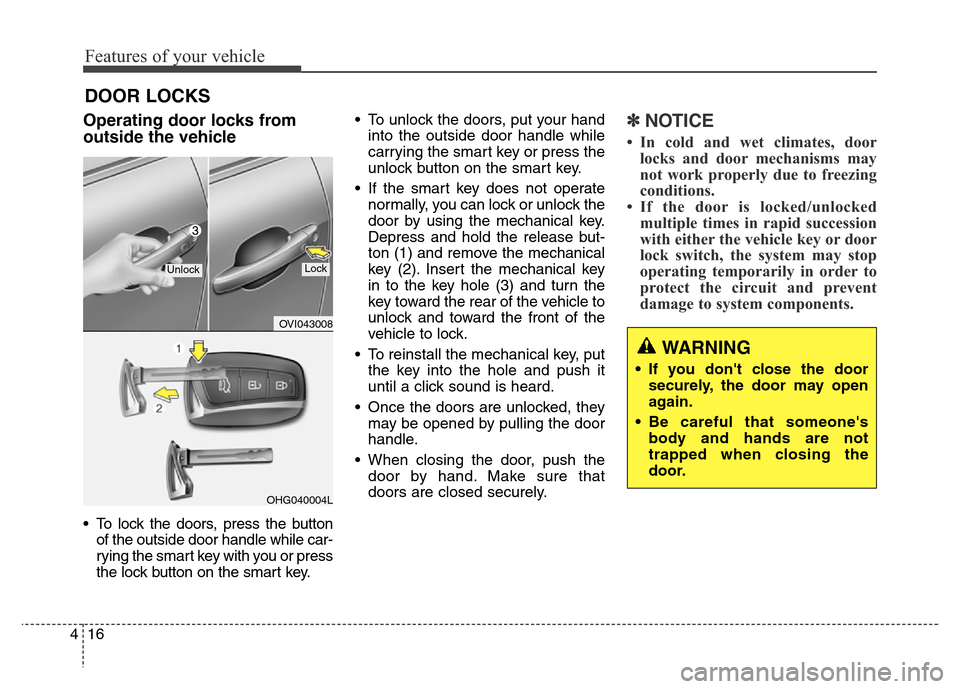
• If the smart key does not operate
normally, you can lock or unlock the
door by using the mechanical key.
Depress and hold the release but-
ton (1) and remove the mechanical
key (2). Insert the mechanical key
in to the key hole (3) and turn the
key toward the rear of the vehicle to
unlock and toward the front of the
vehicle to lock.
• To reinstall the mechanical key, put
the key into the hole and push it
until a click sound is heard.
• Once the doors are unlocked, they
may be opened by pulling the door
handle.
• When closing the door, push the
door by hand. Make sure that
doors are closed securely.
✽NOTICE
• In cold and wet climates, door
locks and door mechanisms may
not work properly due to freezing
conditions.
• If the door is locked/unlocked
multiple times in rapid succession
with either the vehicle key or door
lock switch, the system may stop
operating temporarily in order to
protect the circuit and prevent
damage to system components.
DOOR LOCKS
OVI043008
OHG040004L
UnlockLock
WARNING
• If you don't close the door
securely, the door may open
again.
• Be careful that someone's
body and hands are not
trapped when closing the
door.
Page 132 of 479

443
Features of your vehicle
Recalling positions from memory
1. Shift the shift lever into P while the
engine start/stop button is ON.
2. To recall the position in memory,
press the desired memory button
(1 or 2). The system will beep
once, and then the driver seat,
outside rearview mirrors, steering
wheel and HUD (Head-Up
Display) height will automatically
adjust to the stored positions.
Adjusting one of the control knobs for
the driver seat, outside rearview mir-
ror and steering wheel while the sys-
tem is recalling the stored positions
will cause the movement for that
component to stop and move in the
direction that the control knob is
moved. Other components will con-
tinue to the recalled position.
Easy access function
(if equipped)
The steering wheel will move away
from the driver and the seat will
move rearward, when the engine
start/stop button is turned to the OFF
position.
The steering wheel will move toward
the driver and the seat will move for-
ward, when the engine start/stop but-
ton is turned to the ACC or ON posi-
tion.
WARNING
Use caution when recalling
adjustment memory while sitting
in the vehicle. Push the seat posi-
tion control knob to the desired
position immediately if the seat
moves too far in any direction.
Page 137 of 479

Features of your vehicle
48 4
The electric rearview mirror automati-
cally controls the glare from the head-
lights of the car behind you in night-
time or low light driving conditions. The
sensor mounted in the mirror senses
the light level around the vehicle, and
automatically controls the headlight
glare from vehicles behind you.
When the engine is running, the glare
is automatically controlled by the sen-
sor mounted in the rearview mirror.
Whenever the shift lever is shifted
into R (Reverse), the mirror will auto-
matically go to the brightest setting in
order to improve the drivers view
behind the vehicle.To operate the electric rearview mirror:
• Press the on/off button (1) to turn the
automatic dimming function on. The
mirror indicator light will illuminate.
Press the on/off button to turn the
automatic dimming function off. The
mirror indicator light will turn off.
• The mirror defaults to the ON posi-
tion whenever the ignition switch is
turned on.1. To operate Compass feature
Press and release the button, then the
vehicle's directional heading will be
displayed. Pressing and releasing the
button again will turn off the display.
Heading display
- E : East
- W : West
- S : South
- N : North
ex) NE : North East
CAUTION
When cleaning the mirror, use a
paper towel or similar material
dampened with glass cleaner.
Do not spray glass cleaner
directly on the mirror as that
may cause the liquid cleaner to
enter the mirror housing.
Page 139 of 479

Features of your vehicle
50 4
3. Press the button until the new zone
number appears in the display.
After you stop pressing the button
in, the display will show a compass
direction within a few seconds.
4. Changing Mirror Angle setting
(if equipped):
Due to mirror positions being angled
towards the driver, the compass mir-
ror can also compensate for drivers
seated on the Left Hand side of the
vehicle (steering wheel on the LH
side of the vehicle) or Right Hand
side of the vehicle (steering wheel on
the RH side of the vehicle).To adjust the Left Hand, “L” or Right
Hand, “R”, setting:
1. Press and hold the button for more
than 12 seconds.
2. Release then press the button to
toggle between “L” and “R”.
✽NOTICE
This procedure also causes the com-
pass to be de-calibrated.
3. To re-calibrate the compass, drive
the vehicle in 2 complete circles at
less than 8km/h (5mph).
CAUTION
1.Do not install the ski rack,
antenna, etc. which are
attached to the vehicle by
means of a magnet. They affect
the operation of the compass.
2.If the compass deviates from
the correct indication soon
after repeated adjustment, we
recommend that the system
be checked by an authorized
HYUNDAI dealer.
3.The compass may not indicate
the correct compass point in
tunnels or while driving up or
down a steep hill.
(The compass returns to the
correct compass point when
the vehicle moves to an area
where the geomagnetism is
stabilized.)
4.When cleaning the mirror, use
a paper towel or similar materi-
al dampened with glass clean-
er. Do not spray glass cleaner
directly on the mirror as that
may cause the liquid cleaner to
enter the mirror housing.
Page 143 of 479

Features of your vehicle
54 4
Folding the outside rearview mirror
To fold the outside rearview mirror,
press the button.
To unfold it, press the button again.The engine start/stop button must be
in the ON position to fold or unfold
the outside rearview mirrors.
The electric folding outside rearview
mirror can be operated for approxi-
mately 30 seconds after the engine
start/stop button is turned to the ACC
or OFF position.
Also, the outside rearview mirror will
fold or unfold as follows:
- The mirror will fold or unfold when
the door is locked or unlocked with
the smart key.
- The mirror will unfold when you
approach the locked vehicle with
the smart key in your possession.
OVI043041
CAUTION
In case of the electric type of
outside rearview mirror, don’t
fold it by hand. It could cause
the failure of the motor.
CAUTION
When cleaning the mirror, use a
paper towel or similar material
dampened with glass cleaner.
Do not spray glass cleaner
directly on the mirror as that
may cause the liquid cleaner to
enter the mirror housing.
Page 149 of 479

Features of your vehicle
60 4
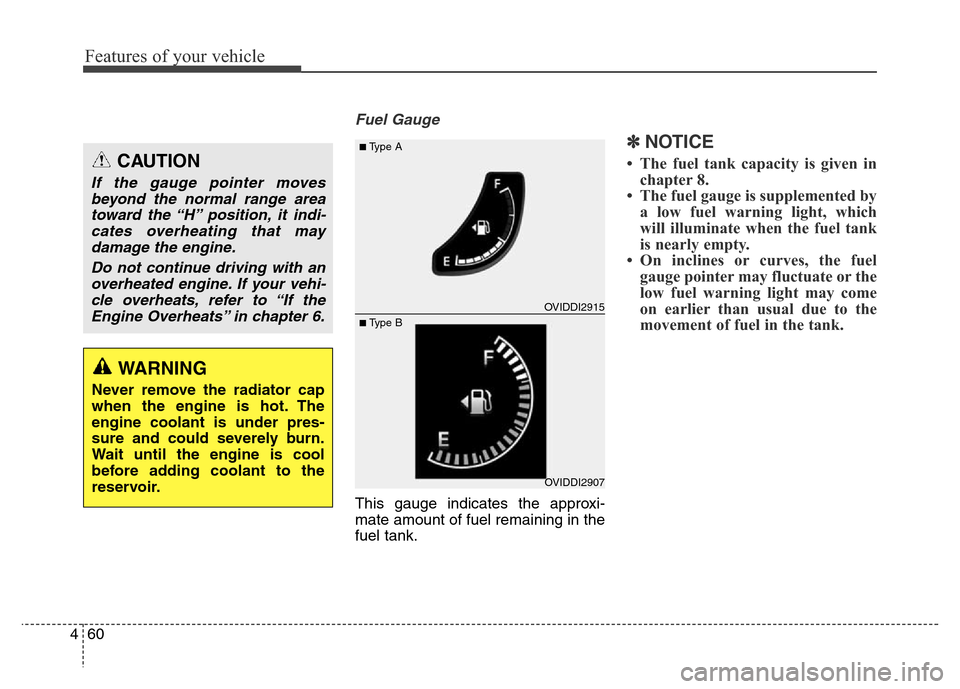
Fuel Gauge
This gauge indicates the approxi-
mate amount of fuel remaining in the
fuel tank.
✽NOTICE
• The fuel tank capacity is given in
chapter 8.
• The fuel gauge is supplemented by
a low fuel warning light, which
will illuminate when the fuel tank
is nearly empty.
• On inclines or curves, the fuel
gauge pointer may fluctuate or the
low fuel warning light may come
on earlier than usual due to the
movement of fuel in the tank.
WARNING
Never remove the radiator cap
when the engine is hot. The
engine coolant is under pres-
sure and could severely burn.
Wait until the engine is cool
before adding coolant to the
reservoir.
CAUTION
If the gauge pointer moves
beyond the normal range area
toward the “H” position, it indi-
cates overheating that may
damage the engine.
Do not continue driving with an
overheated engine. If your vehi-
cle overheats, refer to “If the
Engine Overheats” in chapter 6.
OVIDDI2907
■Type A
■ Type BOVIDDI2915