Page 18 of 476
25
Your vehicle at a glance
INSTRUMENT PANEL OVERVIEW
OGD012004N❈ The actual shape may differ from the illustration.1. Instrument cluster...............................4-56
2. Horn ...................................................4-45
3. Driver’s air bag ...................................3-52
4. Light control/Turn signals ...................4-83
5. Wiper/washer .....................................4-89
6. Ignition switch* or ENGINE START/
STOP button* ................................5-6, 5-9
7. Audio* ...............................................4-130
8. Hazard..................................................6-2
9. Climate control system ...........4-97, 4-106
10. Power outlet* ..................................4-123
11. Aux, USB and iPod port*................4-125
12. Transaxle shift lever ................5-14, 5-17
13. Glove box .......................................4-118
14. Front passenger’s air bag ................3-52
* : if equipped
Page 88 of 476

Windshield defrosting and defogging ..................4-113
................................4-113
............................4-114
Storage compartment............................................4-117
..............................................4-117
..........................................................4-117
....................................................................4-118
......................................................................4-118
..........................................................4-119
..................................................4-119
Interior features ....................................................4-121
..................................................................4-121
......................................................................4-122
................................................................4-123
............................................................4-124
USB and iPod
®..................................................4-125
........................................................4-126
Exterior features....................................................4-128
Audio system ..........................................................4-130
......................................................................4-130
4
Page 133 of 476
Features of your vehicle
48 4
Inside rearview mirror
Adjust the rearview mirror so that the
center view through the rear window
is seen. Make this adjustment before
you start driving.
Day/night rearview mirror
Make this adjustment before you
start driving and while the day/night
lever is in the day position.
Pull the day/night lever toward you to
reduce glare from the headlights of
the vehicles behind you during night
driving.
Remember that you may lose some
rearview clarity in the night position.Blue Link
®center
For the details, refer to the Blue Link®
Owner’s Guide, navigation manual or
audio manual. The audio manual is in
this section.
MIRRORS
WARNING - Rear visibility
Do not place objects in the rear
seat or cargo area which inter-
fere with your vision through
the rear window.
OMD040031 DayNight
WARNING
Do not modify the inside mirror
or install an aftermarket mirror.
Doing so may result in injury
during an accident.
OFS042222N
Page 208 of 476

4123
Features of your vehicle
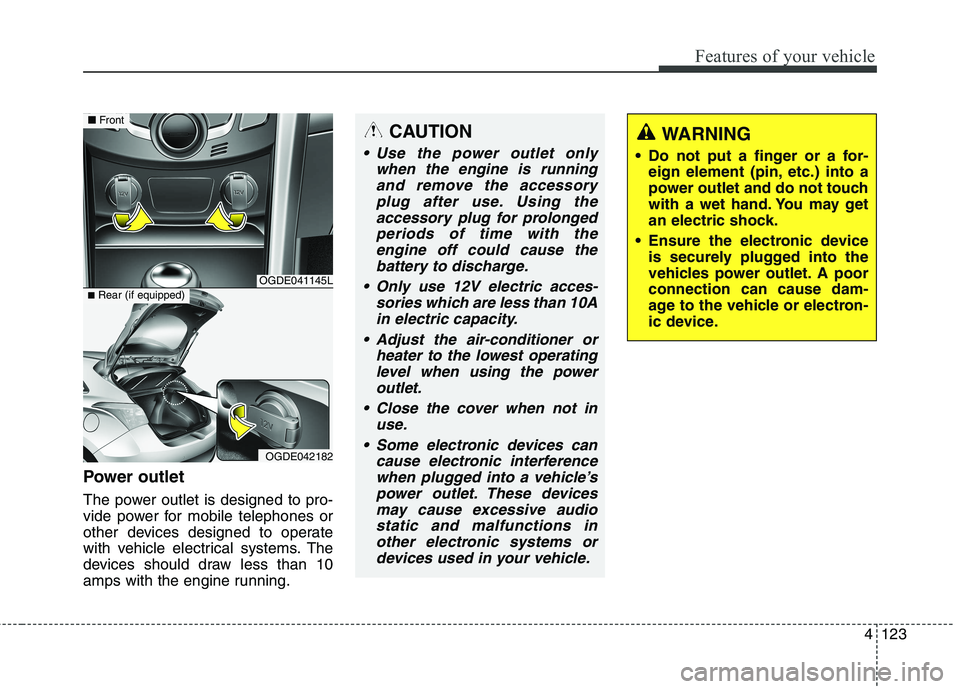
Power outlet
The power outlet is designed to pro-
vide power for mobile telephones or
other devices designed to operate
with vehicle electrical systems. The
devices should draw less than 10
amps with the engine running.
CAUTION
Use the power outlet only
when the engine is running
and remove the accessory
plug after use. Using the
accessory plug for prolonged
periods of time with the
engine off could cause the
battery to discharge.
Only use 12V electric acces-
sories which are less than 10A
in electric capacity.
Adjust the air-conditioner or
heater to the lowest operating
level when using the power
outlet.
Close the cover when not in
use.
Some electronic devices can
cause electronic interference
when plugged into a vehicle’s
power outlet. These devices
may cause excessive audio
static and malfunctions in
other electronic systems or
devices used in your vehicle.
WARNING
Do not put a finger or a for-
eign element (pin, etc.) into a
power outlet and do not touch
with a wet hand. You may get
an electric shock.
Ensure the electronic device
is securely plugged into the
vehicles power outlet. A poor
connection can cause dam-
age to the vehicle or electron-
ic device.
OGDE041145L
OGDE042182
■Front
■Rear (if equipped)
Page 210 of 476

4125
Features of your vehicle
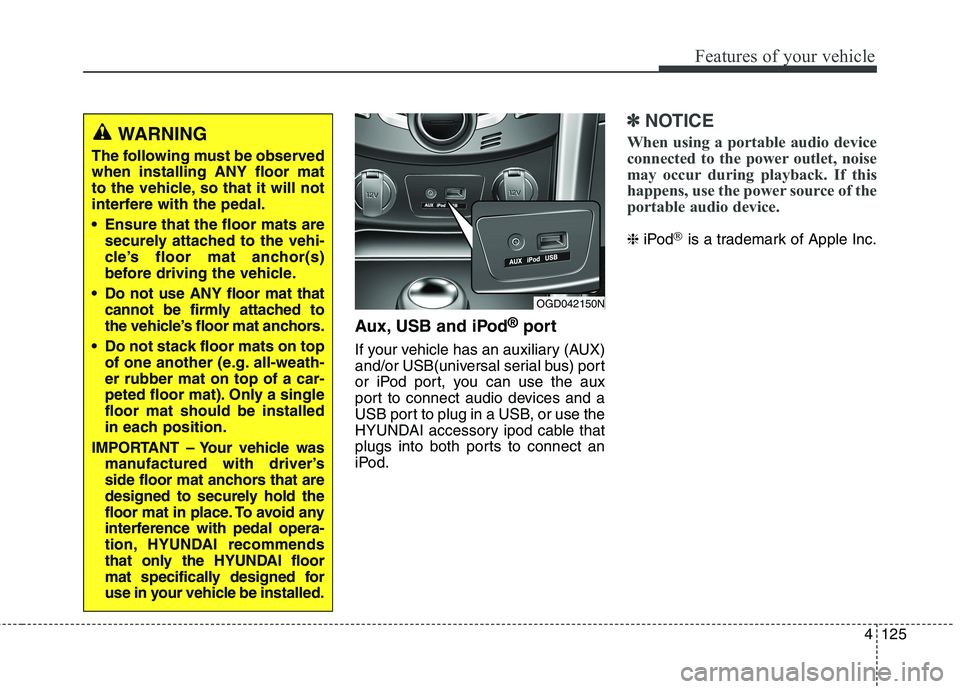
Aux, USB and iPod®port
If your vehicle has an auxiliary (AUX)
and/or USB(universal serial bus) port
or iPod port, you can use the aux
port to connect audio devices and a
USB port to plug in a USB, or use the
HYUNDAI accessory ipod cable that
plugs into both ports to connect an
iPod.
✽ ✽
NOTICE
When using a portable audio device
connected to the power outlet, noise
may occur during playback. If this
happens, use the power source of the
portable audio device.
❈iPod®is a trademark of Apple Inc.
OGD042150N
WARNING
The following must be observed
when installing ANY floor mat
to the vehicle, so that it will not
interfere with the pedal.
Ensure that the floor mats are
securely attached to the vehi-
cle’s floor mat anchor(s)
before driving the vehicle.
Do not use ANY floor mat that
cannot be firmly attached to
the vehicle’s floor mat anchors.
Do not stack floor mats on top
of one another (e.g. all-weath-
er rubber mat on top of a car-
peted floor mat). Only a single
floor mat should be installed
in each position.
IMPORTANT – Your vehicle was
manufactured with driver’s
side floor mat anchors that are
designed to securely hold the
floor mat in place. To avoid any
interference with pedal opera-
tion, HYUNDAI recommends
that only the HYUNDAI floor
mat specifically designed for
use in your vehicle be installed.
Page 211 of 476

Features of your vehicle
126 4
Navigation system (if equipped)
The navigation system ascertains
the present position of your vehicle
by using information from satellites
and guides you to the place you
assign as the destination.
Detailed information for the naviga-
tion system is described in a seper-
ate manual.
Bluetooth®Wireless
Technology hands-free
(if equipped)
You can use the phone wirelessly by
using the
Bluetooth®Wireless
Technology.
Detailed information for the
Bluetooth®Wireless Technology
hands-free is described in the “Audio
section” in this chapter or in the man-
ual supplied separately.
Cargo area cover (if equipped)
Use the cover to hide items stored in
the cargo area.
The cargo area cover will be lifted
when the tailgate is opened.
Disconnect the strap (1) from holder if
you want to return the cover to original
position. To remove the cargo area
cover completely, lift the cover to a 50-
degree angle and pull it out to the full
(2). For installation of the cover,
reverse the removal procedure.
OGD041149
Page 215 of 476
Features of your vehicle
130 4
✽
✽
NOTICE
If you install an aftermarket HID
headlamp, your vehicle's audio and
electronic device may malfunction.
Antenna
Roof antenna
Your vehicle uses a roof antenna to
receive both AM and FM broadcast
signals. This antenna is removable.
To remove the antenna, turn it coun-
terclockwise. To install the antenna,
turn it clockwise.
AUDIO SYSTEM
OHM048154
■Type A■Type BCAUTION
Before entering a place with a
low height clearance or a car
wash, remove the antenna by
rotating it counterclockwise. If
not, the antenna may be dam-
aged.
Page 216 of 476

4131
Features of your vehicle
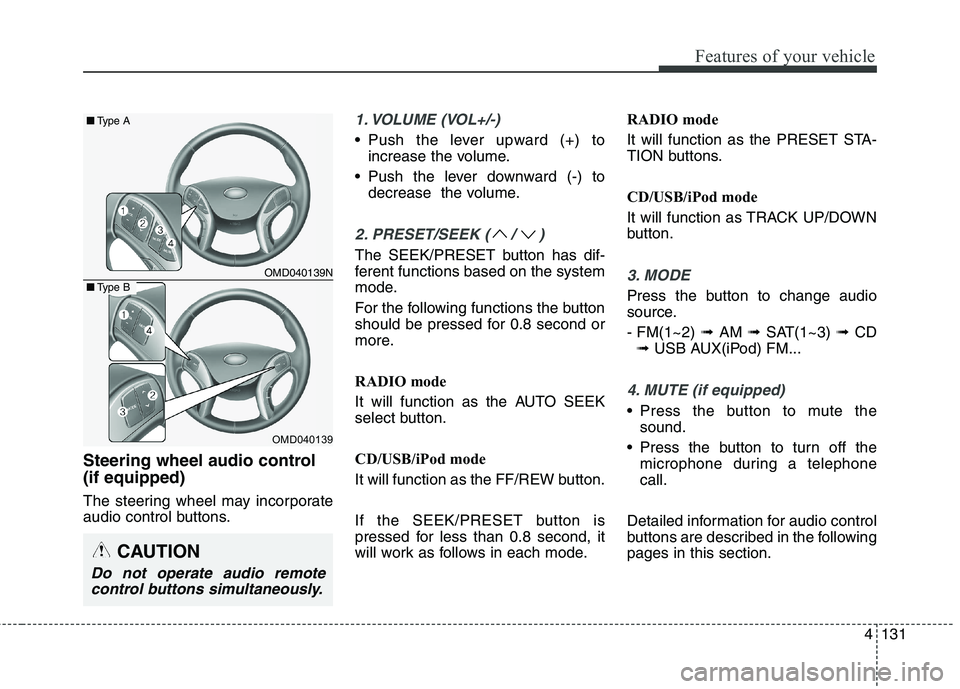
Steering wheel audio control
(if equipped)
The steering wheel may incorporate
audio control buttons.
1. VOLUME (VOL+/-)
• Push the lever upward (+) to
increase the volume.
Push the lever downward (-) to
decrease the volume.
2. PRESET/SEEK ( / )
The SEEK/PRESET button has dif-
ferent functions based on the system
mode.
For the following functions the button
should be pressed for 0.8 second or
more.
RADIO mode
It will function as the AUTO SEEK
select button.
CD/USB/iPod mode
It will function as the FF/REW button.
If the SEEK/PRESET button is
pressed for less than 0.8 second, it
will work as follows in each mode.RADIO mode
It will function as the PRESET STA-
TION buttons.
CD/USB/iPod mode
It will function as TRACK UP/DOWN
button.
3. MODE
Press the button to change audio
source.
- FM(1~2) ➟ AM ➟ SAT(1~3) ➟ CD
➟ USB AUX(iPod) FM...
4. MUTE (if equipped)
Press the button to mute the
sound.
Press the button to turn off the
microphone during a telephone
call.
Detailed information for audio control
buttons are described in the following
pages in this section.
OMD040139N
OMD040139
■Type A
■Type B
CAUTION
Do not operate audio remote
control buttons simultaneously.