Page 212 of 476
4127
Features of your vehicle
CAUTION
When you return the cargo area
cover to its original position,
hold the cover and lower it.
Do not operate the vehicle
with the cover removed. It may
damage to the cover.
The cargo area cover may be
lifted when the tailgate is
opened. Ensure that the lug-
gage on the cover is moved to
a safe place.
Since the cargo area cover
may be damaged or mal-
formed, do not apply exces-
sive force to the cover or do
not put the heavy loads on it.
WARNING
Do not place objects on the
cargo area cover while driv-
ing. Such objects may be
thrown about inside the vehi-
cle and possibly injure vehicle
occupants during an accident
or when braking.
Never allow anyone to ride in
the luggage compartment. It
is designed for luggage only.
Maintain the balance of the
vehicle and locate the weight
as far forward as possible.
Page 275 of 476

53
Driving your vehicle
WARNING- ENGINE EXHAUST CAN BE DANGEROUS!
Engine exhaust fumes can be extremely dangerous. If, at any time, you smell exhaust fumes inside the vehicle,
open the windows immediately.
• Do not inhale exhaust fumes.
Exhaust fumes contain carbon monoxide, a colorless, odorless gas that can cause unconsciousness and death
by asphyxiation.
The exhaust system should be checked whenever the vehicle is raised to change the oil or for any other purpose.
If you hear a change in the sound of the exhaust or if you drive over something that strikes the under side of the
car, have the exhaust system checked as soon as possible by an authorized HYUNDAI dealer.
Letting the engine idle in your garage, even with the garage door open, is a hazardous practice. Never run the
engine in your garage any longer than it takes to start the engine and back the car out.
If it is necessary to idle the engine for a prolonged period with people inside the car, be sure to do so only in an
open area with the air intake set at "Fresh" and fan operating at one of the higher speeds so fresh air is drawn
into the interior.
If you must drive with the tailgate open because you are carrying objects that make this necessary:
1. Close all windows.
2. Open side vents.
3. Set the air intake control at "Fresh", the air flow control at "Floor" or "Face" and the fan at one of the higher
speeds.
To assure proper operation of the ventilation system, be sure the ventilation air intakes located just in front of the
windshield are kept clear of snow, ice, leaves or other obstructions.
Page 301 of 476

529
Driving your vehicle
To release EPB (electric parking
brake) automatically:
Manual transaxle vehicle
1. Start the engine.
2. Fasten the driver's seat belt.
3. Close the driver's door, engine
hood and tailgate.
4. Depress the clutch pedal with
the gear engaged.
5. Depress the accelerator pedal
while releasing the clutch pedal.
Automatic transaxle vehicle
1. Start the engine.
2. Fasten the driver's seat belt.
3. Close the driver's door, engine
hood and tailgate.
4. Depress the accelerator pedal
while the shift lever is in R
(Rear), D (Drive). Shift lever in P (Park)
With the engine running depress
the brake pedal and shift out of P
(Park) to R (Rear) or D (Drive).
Shift lever in N (Neutral)
With the engine running depress
the brake pedal and shift out of N
(Neutral) to R (Rear) or D (Drive).
Make sure the brake warning light
goes off.
✽ ✽
NOTICE
• For your safety, you can engage
the EPB even though the ignition
switch or engine stop/start button
is in the OFF position, but you
cannot release it.
• For your safety, depress the brake
pedal and release the parking
brake manually with the EPB
switch when you drive downhill or
when backing up the vehicle.
✽ ✽
NOTICE - Manual transaxle
A vehicle towing a trailer on a hill or
on an incline may slightly roll back-
wards when starting the vehicle. To
prevent the situation follow the
below instructions.
1. Depress the clutch pedal and
select a gear.
2. Keep pulling up the EPB switch.
3. Depress the accelerator pedal and
slowly release the clutch pedal.
4. If the vehicle starts off with
enough driving power release the
EPB switch.
Do not follow the above procedure
when driving on a flat level ground.
The vehicle may suddenly move for-
ward.
Page 302 of 476
Driving your vehicle
30 5
EPB (electric parking brake) may be
automatically applied when:
The EPB is overheated
Requested by other systems
If you try to drive off depressing the
accelerator pedal with the EPB
applied, but doesn't release auto-
matically, a warning will sound and
a message will appear.
If the driver's seat belt is not fas-
tened and any door, the engine
hood or tailgate is opened, a warn-
ing will sound and a message will
appear.
If there is a problem with the vehi-
cle, a warning may sound and a
message may appear.
If the above situation occurs,
depress the brake pedal and release
EPB by pressing the EPB switch.CAUTION
If the parking brake warning
light is still on even though
the EPB has been released,
we recommend that the sys-
tem be checked by an author-
ized HYUNDAI dealer.
Do not drive your vehicle with
the EPB applied. It may cause
excessive brake pad and
brake rotor wear.
OGDE051048
Page 359 of 476
623
What to do in an emergency
When towing your vehicle in an
emergency without wheel dollies :
1. Set the ignition switch in the ACC
position.
2. Place the shift lever in N (Neutral).
3. Release the parking brake.
Removable towing hook
(if equipped)
1. Open the tailgate, and remove the
towing hook from the tool case
which is stored under the cargo
area floorboard.
2. Remove the hole cover pressing
the lower part of the cover on the
bumper.
3. Install the towing hook by turning it
clockwise into the hole until it is
fully secured.
4. Remove the towing hook and
install the cover after use.
Emergency towing (if equipped)
If towing is necessary, we recom-
mend you to have it done by an
authorized Hyundai dealer or a
commercial tow truck service.
CAUTION
Failure to place the transaxle
shift lever in N (Neutral) may
cause internal damage to the
transaxle.
OGD061010
OGD061011
OGD061012
■Rear
■Front
Page 438 of 476

777
Maintenance
Outside light
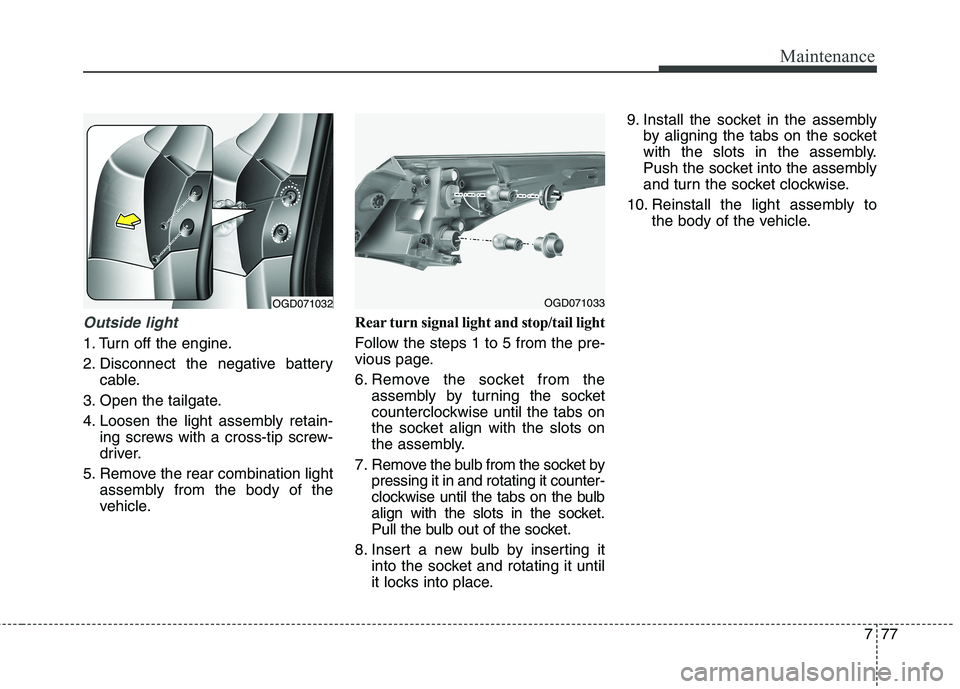
1. Turn off the engine.
2. Disconnect the negative battery
cable.
3. Open the tailgate.
4. Loosen the light assembly retain-
ing screws with a cross-tip screw-
driver.
5. Remove the rear combination light
assembly from the body of the
vehicle.Rear turn signal light and stop/tail light
Follow the steps 1 to 5 from the pre-
vious page.
6. Remove the socket from the
assembly by turning the socket
counterclockwise until the tabs on
the socket align with the slots on
the assembly.
7. Remove the bulb from the socket by
pressing it in and rotating it counter-
clockwise until the tabs on the bulb
align with the slots in the socket.
Pull the bulb out of the socket.
8. Insert a new bulb by inserting it
into the socket and rotating it until
it locks into place.9. Install the socket in the assembly
by aligning the tabs on the socket
with the slots in the assembly.
Push the socket into the assembly
and turn the socket clockwise.
10. Reinstall the light assembly to
the body of the vehicle.
OGD071032OGD071033
Page 439 of 476
Maintenance
78 7
Rear side marker
Follow the steps 1 to 5 from the pre-
vious page.
6. Remove the socket from the
assembly by turning the socket
counterclockwise until the tabs on
the socket align with the slots on
the assembly.
7. Remove the bulb from the socket
by pulling out the bulb.
8. Insert a new bulb.9. Install the socket in the assembly
by aligning the tabs on the socket
with the slots in the assembly.
Push the socket into the assembly
and turn the socket clockwise.
10. Reinstall the light assembly to
the body of the vehicle.Inside light
1. Turn off the engine.
2. Disconnect the negative battery
cable.
3. Open the tailgate.
4. Remove the service cover using a
flat-blade screwdriver.
OGD072063NOGD071034
Page 440 of 476

779
Maintenance
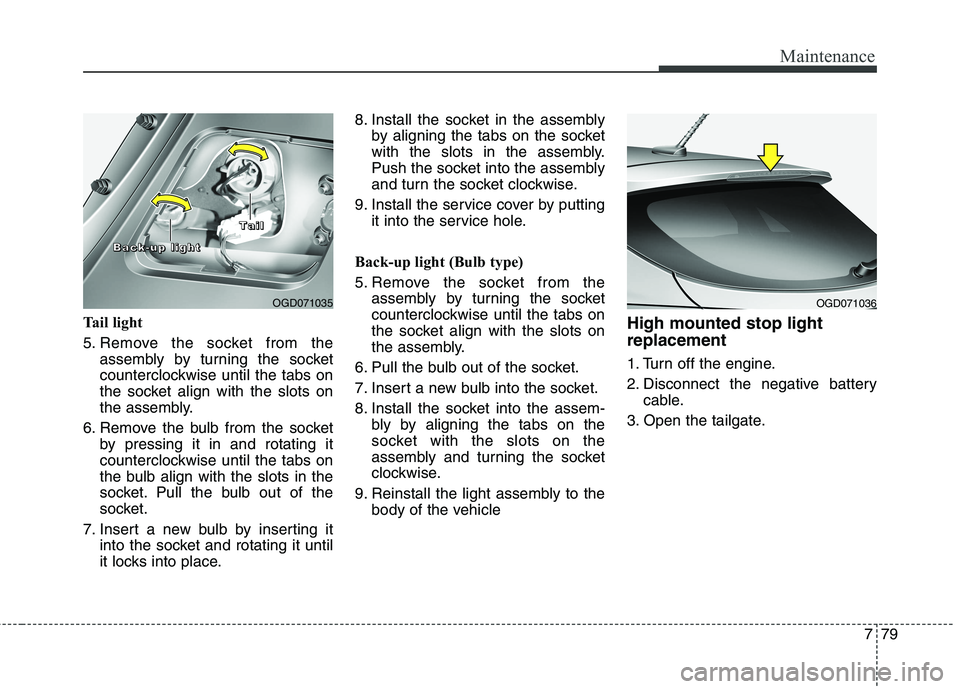
Tail light
5. Remove the socket from the
assembly by turning the socket
counterclockwise until the tabs on
the socket align with the slots on
the assembly.
6. Remove the bulb from the socket
by pressing it in and rotating it
counterclockwise until the tabs on
the bulb align with the slots in the
socket. Pull the bulb out of the
socket.
7. Insert a new bulb by inserting it
into the socket and rotating it until
it locks into place.8. Install the socket in the assembly
by aligning the tabs on the socket
with the slots in the assembly.
Push the socket into the assembly
and turn the socket clockwise.
9. Install the service cover by putting
it into the service hole.
Back-up light (Bulb type)
5. Remove the socket from the
assembly by turning the socket
counterclockwise until the tabs on
the socket align with the slots on
the assembly.
6. Pull the bulb out of the socket.
7. Insert a new bulb into the socket.
8. Install the socket into the assem-
bly by aligning the tabs on the
socket with the slots on the
assembly and turning the socket
clockwise.
9. Reinstall the light assembly to the
body of the vehicleHigh mounted stop light
replacement
1. Turn off the engine.
2. Disconnect the negative battery
cable.
3. Open the tailgate.
OGD071035
B B B B
a a a a
c c c c
k k k k
- - - -
u u u u
p p p p
l l l l
i i i i
g g g g
h h h h
t t t t
T
T T T
a a a a
i i i i
l l l l
OGD071036