Page 421 of 476

Maintenance
60 7
If the headlights or other electrical
components do not work and the
fuses are OK, check the fuse panel
in the engine compartment. If a fuse
is open, it must be replaced.
If the headlights, fog lights, turn sig-
nal lights, position lights or interior
lights do not work and there is noth-
ing wrong with the bulbs, consult with
an authorized HYUNDAI dealer.
Fuse switch
Always put the transportation fuse
switch at the ON position.
If you move the switch to the OFF
position, some items such as the
audio and digital clock must be reset
and the transmitter (or smart key)
may not work properly.
✽ ✽
NOTICE
If you need to park your vehicle for
prolonged periods more than 1
month, move the transportation fuse
switch to the OFF position to pre-
vent the battery being discharged.
CAUTION
Always place the transporta-
tion fuse switch in the ON posi-
tion while driving the vehicle.
Do not move the transportation
fuse switch repeatedly. The
fuse switch may be worn out.
OGDE071018
Page 425 of 476
Maintenance
64 7
DescriptionFuse ratingProtected component
WIPER RR15ARear Wiper Relay, Rear Wiper Motor, Multifunction Switch
STOP LAMP15AStop Lamp Switch, ICM Relay Box (HAC Relay)
P/WDW RH25A
PDM 27.5ASmart Key Control Module, Start/Stop Button Switch
MODULE 57.5AEMS BOX (Head Lamp Washer Relay), Ionizer Unit, Panorama Sunroof,
DC-DC Converter, DSL BOX (PTC Relay), E/R Fuse & Relay BOX(RLY. ),
Driver/Passenger Seat Warmer Module
IG120AE/R Fuse & Relay Box (Fuse – F)
MODULE 610AOutside Mirror Switch, Audio, Navigation Head Unit, Digital Clock, DC-DC Converter
MDPS7.5AEPS Control Module
DR LOCK20ADoor Lock/Unlock Relay, ICM Relay BOX (Dead Lock Relay),
Driver/Passenger Door Lock Actuator, Fuel filler actuator, Door Lock Actuator LH/RH
INTERIOR LAMP10AGlove Box Lamp, Vanity Lamp LH/RH, Overhead Console Lamp, Room Lamp,
Luggage Lamp, DR Warning Switch
MULTI MEDIA15AAudio, Navigation Head Unit, DC-DC Converter (Audio)
A/BAG15ASRS Control Module
Page 426 of 476
765
Maintenance
DescriptionFuse ratingProtected component
MEMORY 17.5AUltrasonic instruction Protection Sensor
A/BAG IND7.5AInstrument Cluster
PDM 37.5ASmart Key Control Module, Ultrasonic instrusion Protection Sensor
MEMORY 210AOutside Mirror Switch, Tire Pressure Monitoring Module, BCM,
Auto Light & Photo Sensor, Instrument Cluster, OBD, Digital Clock, A/C Control Module
PDM 125ASmart Key Control Module
START7.5AW/O Button Start : E/R Fuse & Relay Box (RLY. ) Ignition Lock Switch,
Transaxle Range Switch
With Button Start : ECM/PCM, Transaxle Range Switch
SUNROOF20APanorama Sunroof
BCM7.5ABCM, Smart Key Control Module
A/CON SWITCH7.5AA/C Control Module
MODULE 77.5ABCM, Smart Key Control Module
FOG LAMP RR10ARear Fog Lamp
PUDDLE LAMP10ADriver/Passenger Power Outside Mirror
Page 432 of 476

771
Maintenance
LIGHT BULBS
Use only the bulbs of the specified
wattage.
✽ ✽
NOTICE
After heavy, driving rain or wash-
ing, headlight and taillight lenses
could appear frosty. This condition
is caused by the temperature differ-
ence between the lamp inside and
outside. This is similar to the con-
densation on your windows inside
your vehicle during the rain and
doesn’t indicate a problem with
your vehicle. If the water leaks into
the lamp bulb circuitry, we recom-
mend that the vehicle be checked by
an authorized HYUNDAI dealer.WARNING - Working on
the lights
Prior to working on the light,
firmly apply the parking brake,
ensure that the ignition switch
is turned to the LOCK position
and turn off the lights to avoid
sudden movement of the vehi-
cle and burning your fingers or
receiving an electric shock.
CAUTION
Be sure to replace the burned-
out bulb with one of the same
wattage rating. Otherwise, it
may cause damage to the fuse
or electric wiring system.
CAUTION
The headlight aiming adjust-
ment may be necessary after
the headlight assembly is rein-
stalled. If you are unsure how to
replace or aim the headlight, we
recommend that you consult
with an authorized HYUNDAI
dealer.
CAUTION
If you don’t have necessary
tools, the correct bulbs and the
expertise, we recommend that
you consult with an authorized
HYUNDAI dealer. In many cases,
it is difficult to replace vehicle
light bulbs because other parts
of the vehicle must be removed
before you can get to the bulb.
This is especially true if you
have to remove the headlight
assembly to get to the bulb(s).
Removing/installing the head-
light assembly can result in
damage to the vehicle.
Page 434 of 476

773
Maintenance
Replace front lamps
1. Open the hood.
2. Disconnect the negative battery
cable.
3. Loosen the assembly retaining
screws and nuts. If you can reach
the bulb without removing the
headlight assembly, you do not
need to do step 3, 4 and 5.4. Pull out the both side of the front
bumper and then pull out the front
bumper.
5. Remove the headlight assembly
from the body of the vehicle.
6. Disconnect the power connec-
tor(s) from the back of the head-
light assembly.Headlight bulb (high)
Follow the steps 1 to 6 from the pre-
vious page.
7. Remove the headlight bulb cover
by turning it counterclockwise.
8. Disconnect the headlight bulb
socket-connector.
9. Unsnap the headlight bulb retain-
ing wire by depressing the end
and pushing it upward.
10. Remove the bulb from the head-
light assembly.
11. Install a new headlight bulb and
snap the headlight bulb retaining
wire into position by aligning the
wire with the groove on the bulb.
OGDE071052OGD071044
H H H H
i i i i
g g g g
h h h h
L
L L L
o o o o
w w w w
OGDE071050
OGDE071051
Page 435 of 476
Maintenance
74 7
12. Connect the headlight bulb sock-
et-connector.
13. Install the headlight bulb cover by
turning it clockwise.Headlight (Low)
Follow the steps 1 to 6 from the pre-
vious page.
7. Remove the cover by turning it
counterclockwise.
8. Remove the socket from the
assembly by turning the socket
counterclockwise until the tabs on
the socket align with the slots on
the assembly.
9. Pull the bulb out of the socket.
10. Insert a new bulb into the socket.
11. Install the socket in the assembly
by aligning the tabs on the sock-
et with the slots in the assembly.
Push the socket into the assem-
bly and turn the socket clockwise.
12. Install the headlight bulb cover by
turning it clockwise.
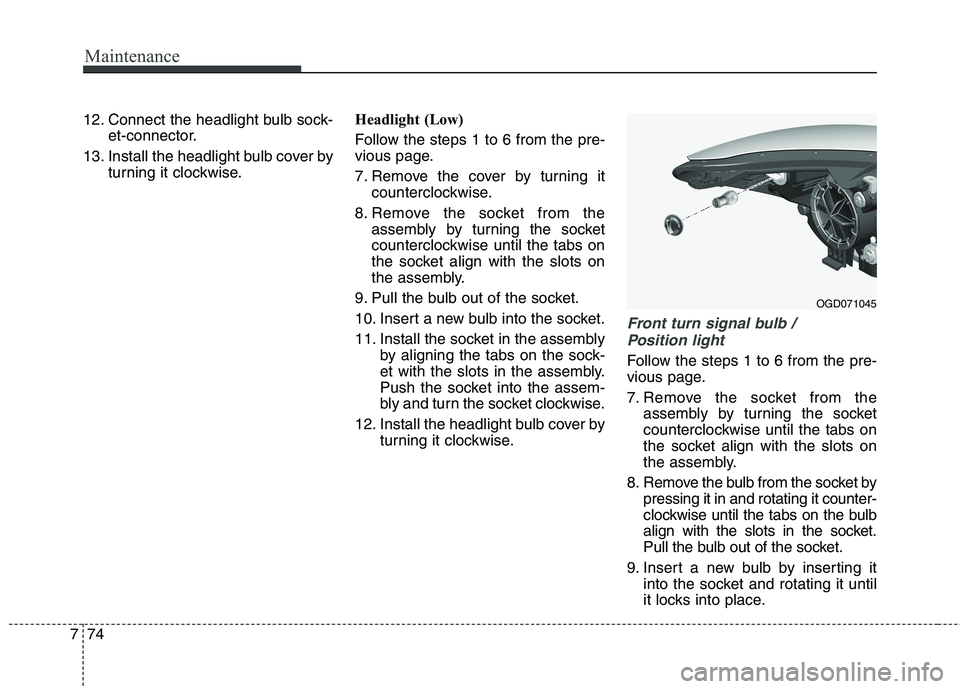
Front turn signal bulb /
Position light
Follow the steps 1 to 6 from the pre-
vious page.
7. Remove the socket from the
assembly by turning the socket
counterclockwise until the tabs on
the socket align with the slots on
the assembly.
8. Remove the bulb from the socket by
pressing it in and rotating it counter-
clockwise until the tabs on the bulb
align with the slots in the socket.
Pull the bulb out of the socket.
9. Insert a new bulb by inserting it
into the socket and rotating it until
it locks into place.
OGD071045
Page 436 of 476
775
Maintenance
10. Install the socket in the assembly
by aligning the tabs on the sock-
et with the slots in the assembly.
Push the socket into the assem-
bly and turn the socket clockwise.
11. Reinstall the light assembly to
the body of the vehicle.
Front side marker
Follow the steps 1 to 6 from the pre-
vious page.
7. Remove the socket from the
assembly by turning the socket
counterclockwise until the tabs on
the socket align with the slots on
the assembly.
8. Remove the bulb from the socket
by pulling out the bulb.
9. Insert a new bulb.10. Install the socket in the assembly
by aligning the tabs on the sock-
et with the slots in the assembly.
Push the socket into the assem-
bly and turn the socket clockwise.
11. Reinstall the light assembly to
the body of the vehicle.
OGD072062N
Page 437 of 476
Maintenance
76 7
Front fog light (if equipped)
Follow the steps 1 to 6 from the pre-
vious page.
7. Disconnect the power connector
from the socket.
8. Remove the bulb-socket from the
housing by turning the socket
counter clockwise until the tabs on
the socket align with the slots on
the housing.
9. Install the new bulb-socket into the
housing by aligning the tabs on the
socket with the slots in the hous-
ing. Push the socket into the hous-
ing and turn the socket clockwise.
10. Connect the power connector to
the socket.
Side repeater light bulb
replacement (if equipped)
If the light bulb is not operating, we
recommend that the vehicle be
checked by an authorized HYUNDAI
dealer.
Rear combination light bulb
replacement
(1) Back-up light
(2) Tail light
(3) Rear turn signal light
(4) Stop/tail light
(5) Side marker
OGDE071055LOGD071031OGD071030


