Page 201 of 488

200
uu Audio System Basic Operation u Playing CD Library
Features
■Deactivating the prompt display
If you do not want the prompt to appear on the display for the first time you play a
CD: 1.Press the SET
UP button.
2. Ro
tate to select CD L ibrary Setup,
then press .
3. Ro
tate to select Prompt to Record CD ,
then press .
u T
o activate the prompt display again,
follow the same procedure.
■Recording a CD Manually 1.Insert a CD
you want to record to the flash
memory, and press the SETUP button.
2. Ro
tate to select CD L ibrary Setup,
then press .
3. Ro
tate to select Re cord CD Now , then
press .
u T
he display changes to the album list.
4. Rotate
to select one of the album numbers you want the currently playing CD
to be stored, then press .
u If y
ou select an album number that ha s already had another CD, the system
asks if you want to replace this albu m with the album currently in the slot.
Select Yes to replace, and No to return.
Select this option.
Select this option.
Page 278 of 488

277
uu HomeLink ® Universal Transceiver * u Training HomeLink
Features
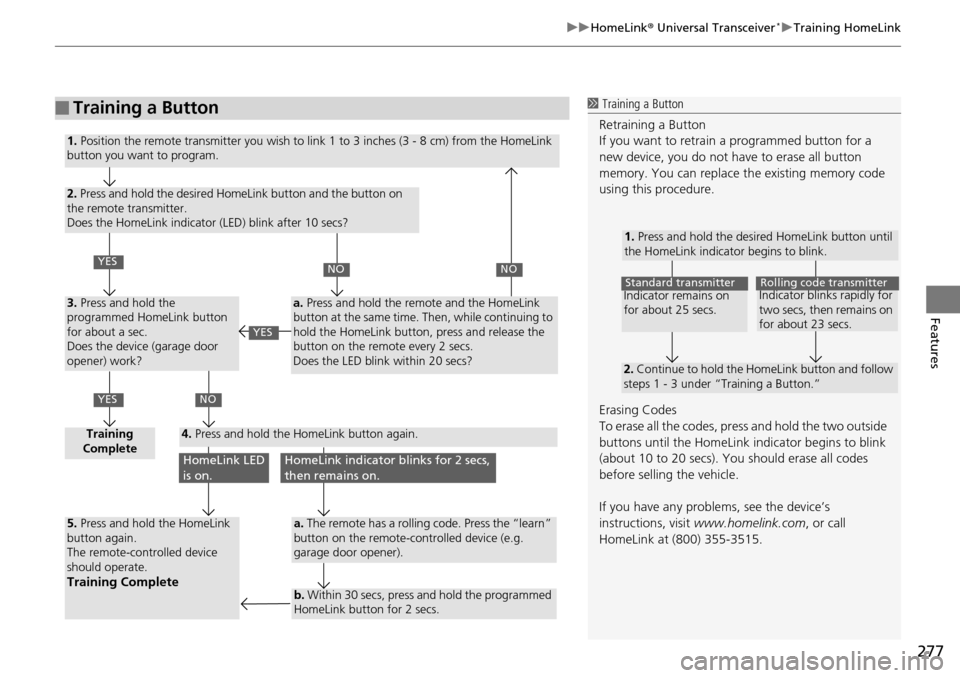
■Training a Button1 Training a Button
Retraining a Button
If you want to retrain a programmed button for a
new device, you do not ha ve to erase all button
memory. You can replace the existing memory code
using this procedure.
Erasing Codes
To erase all the codes, press and hold the two outside
buttons until the HomeLink i ndicator begins to blink
(about 10 to 20 secs). You should erase all codes
before selling the vehicle.
If you have any problems, see the device’s
instructions, visit www.homelink.com , or call
HomeLink at (800) 355-3515.
1. Press and hold the desired HomeLink button until
the HomeLink indicator begins to blink.
2. Continue to hold the HomeLink button and follow
steps 1 - 3 under “Training a Button.”
Indicator remains on
for about 25 secs.Standard transmitterIndicator blinks rapidly for
two secs, then remains on
for about 23 secs.Rolling code transmitter
1. Position the remote transmitter you wish to link 1 to 3 inches (3 - 8 cm) from the HomeLink
button you want to program.
2. Press and hold the desired HomeLink button and the button on
the remote transmitter.
Does the HomeLink indicator (LED) blink after 10 secs?
3. Press and hold the
programmed HomeLink button
for about a sec.
Does the device (garage door
opener) work?
Training
Complete4. Press and hold the HomeLink button again.
5. Press and hold the HomeLink
button again.
The remote-controlled device
should operate.
Training Complete
a. Press and hold the remote and the HomeLink
button at the same time. Then, while continuing to
hold the HomeLink button, press and release the
button on the remote every 2 secs.
Does the LED blink within 20 secs?
a. The remote has a rolling code. Press the “learn”
button on the remote-controlled device (e.g.
garage door opener).
b. Within 30 secs, press and hold the programmed
HomeLink button for 2 secs.
YES
YES
NONO
NO
HomeLink LED
is on.HomeLink indicator blinks for 2 secs,
then remains on.
YES
Page 344 of 488

343
uu When Driving u Starting the Engine
Driving
1. Keeping your right foot on the brake pedal, release the parking brake. Check that
the parking brake indicator has gone off.
2 Parking Brake P. 360
2. Put the shift lever in (D
. Select (R
when reversing.
3. Gradua
lly release the brake pedal and gently depress the accelerator pedal to pull
away.
■Hill start assist system
Hill start assist keeps the brake engaged br iefly to
help prevent the vehicle from
rolling on inclines as you move your foot from the brake pedal to the accelerator.
Move the shift lever to
(D
or (d
when facing uphill, or (R
when facing downhill,
then release the brake pedal.
■Starting to Drive1 Starting the Engine
The immobilizer system pr otects your vehicle from
theft. If an improperly code d key (or other device) is
used, the engine's fuel system is disabled.
2 Immobilizer System P. 118
1Hill start assist system
Hill start assist may not prevent the vehicle from
rolling downhill on a very st eep or slippery slope, and
does not operate on small inclines.
Hill start assist is not a replacement for the parking
brake.
Hill start assist will operate even when VSA ® is
switched off.
Page 345 of 488

344
uu When Driving u Precautions While Driving
Driving
Precautions While Driving
Utility vehicles have a significantly higher rollover rate than other types of vehicles.
To prevent rollovers or loss of control:
• Take corne
rs at slower speeds than yo u would with a passenger vehicle.
• Av
oid sharp turns and abrupt maneuvers whenever possible.
•Do
not modify your vehicle in any way that you would raise the center of gravity.
•Never
carry more than 165 lbs (75 kg ) of cargo on the roof rack (Honda
accessory).
Avoid driving in deep water and on flooded roads. This can damage the engine,
driv
eline, or cause electrical component failure.
If there is a strong impact with something u
nder the vehicle, stop in a safe location.
Check the underside of the vehicle for damage or any fluid leaks.
■Driving Guidelines for Your Utility Vehicle
■In Rain
■Other Precautions
1 Driving Guidelines for Your Utility Vehicle
Failure to operate your vehi cle correctly might result
in a crash or a rollover. 2 Important Handling Information P. 26
2 Precautions While Driving P. 344
1Precautions While Driving
NOTICE
Do not operate the shift lever while pressing the
accelerator pedal. You could damage the
transmission.
If the ignition switch is turned to ACCESSORY
(
q
or
LOCK (
0
while driving, the e ngine will shut down
and all steering and brake pow er assist functions will
stop, making it difficult to control the vehicle.
Do not put the shift lever in
(
N
, as you will lose
engine braking (and acce leration) performance.
During the first 600 miles (1,000 km) of operation,
avoid sudden acceleration or full throttle operation so
as not to damage the engine or powertrain.
Avoid hard braking for the first 200 miles (300 km).
You should also follow this when the brake pads are
replaced.
Page 359 of 488

358
uu When Driving u Tire Pressure Monitoring System (TPMS) - Required Federal Explanation
Driving
Please note that the TPMS is not a substitute for proper tire
maintenance, and it is the driver 's responsibility to maintain
correct tire pressure, even if un der-inflation has not reached the
level to trigger illumina tion of the TPMS low ti re pressure telltale.
Your vehicle has also been eq uipped with a TPMS malfunction
indicator to indicate when the sy stem is not operating properly.
The TPMS malfunction indicator is provided by a separate telltale,
which displays the symbol “TPMS” when illuminated.
When the malfunction indicator is illuminated,
the system may not be able to detect or signal low tire pressure as
in
tended.
TPMS malfunctions may occur for a variety of reasons, including
the in
stallation of replacement or alternate tires or wheels on the
vehicle that prevent the TPMS from functioning properly.
Always check the TPMS malfunction t
elltale after replacing one or
more tires or wheels on your vehicle to ensure that the
replacement or alternate tires and wheels allow the TPMS to
continue to function properly.
Models with info rmation display
Page 360 of 488

359
uu When Driving u Tire Pressure Monitoring System (TPMS) - Required Federal Explanation
Driving
Your vehicle has also been equi pped with a TPMS malfunction
indicator to indicate when the system is not operating properly.
The TPMS malfunction indicator is combined with the low tire
pressure telltale. When the syst em detects a malfunction, the
telltale will flash fo r approximately one minute and then remain
continuously illumina ted. This sequence will continue upon
subsequent vehicle start-ups as long as the malfunction exists.
When the malfunction indicator is illuminated, the system may
not be able to detect or signal low tire pressure as intended.
TPMS malfunctions may occur
for a variety of reasons, including
the installation of replacement or alternate tires or wheels on the
vehicle that prevent the TPMS from functioning properly.
Always check the TPMS m
alfunction telltale after replacing one or
more tires or wheels on your vehicle to ensure that the
replacement or alternate tires and wheels allow the TPMS to
continue to function properly.
Models with multi- information display
Page 362 of 488

361
uu Braking u Brake System
Driving
Your vehicle is equipped with disc brakes at all four wheels. A vacuum power assist
helps reduce the effort needed on the brake pedal. The brake assist system increases
the stopping force when you depress the brake pedal hard in an emergency
situation. The anti-lock brake system (ABS) helps you retain steering control when
braking very hard.
2 Brake Assist System P. 363
2 ABS (Anti-lock Brake System) P. 362
■Foot Brake1Foot Brake
Check the brakes after driving through deep water,
or if there is a buildup of road surface water. If
necessary, dry the brakes by lightly depressing the
pedal several times.
If you hear a continuous me tallic friction sound when
applying the brakes, the brake pads need to be
replaced. Have the vehicle checked by a dealer.
Constantly using the brak e pedal while going down a
long hill builds up heat, which reduces the brake
effectiveness. Apply engine braking by taking your
foot off the accelerator pe dal and downshifting to a
lower gear.
Do not rest your foot on the brake pedal while
driving, as it will lightly apply the brakes and cause
them to lose effectiveness over time and reduce pad
life. It will also conf use drivers behind you.
Page 374 of 488

373
uu Refueling u How to Refuel
Driving
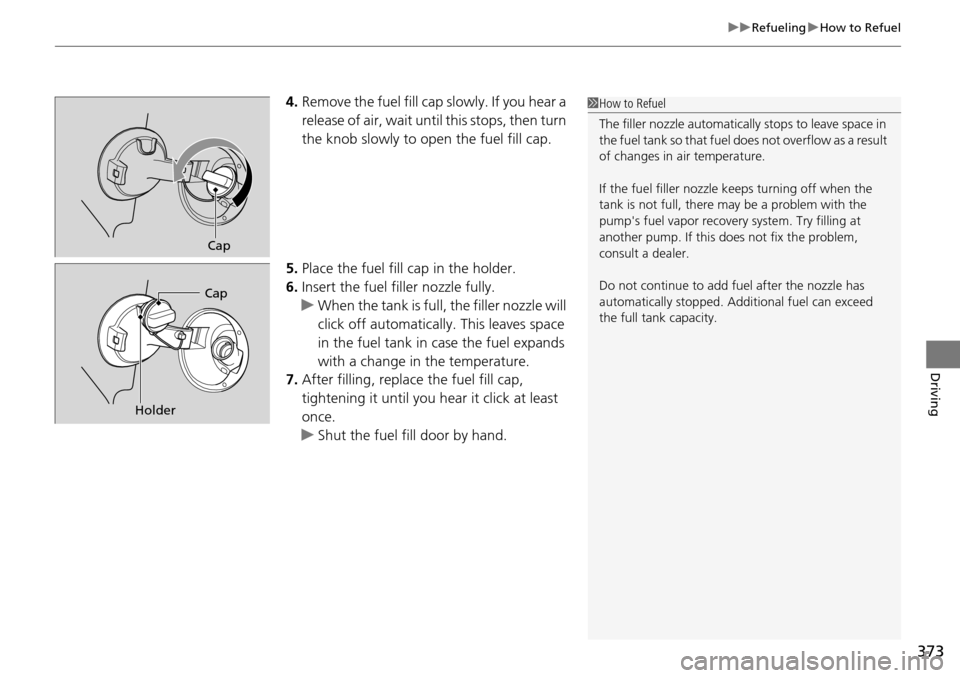
4. Remove the fuel fill cap slowly. If you hear a
release of air, wait until this stops, then turn
the knob slowly to open the fuel fill cap.
5. Place the fuel fill cap in the holder.
6. In
sert the fuel filler nozzle fully.
u When the ta
nk is full, the filler nozzle will
click off automatically. This leaves space
in the fuel tank in case the fuel expands
with a change in the temperature.
7. After fill
ing, replace the fuel fill cap,
tightening it until you hear it click at least
once.
u Sh
ut the fuel fill door by hand.
1How to Refuel
The filler nozzle automatically stops to leave space in
the fuel tank so that fuel does not overflow as a result
of changes in air temperature.
If the fuel filler nozzle keeps turning off when the
tank is not full, there ma y be a problem with the
pump's fuel vapor recovery system. Try filling at
another pump. If this does not fix the problem,
consult a dealer.
Do not continue to add fuel after the nozzle has
automatically stopped. Addi tional fuel can exceed
the full tank capacity.
Cap
Cap
Holder