Page 296 of 488
Continued295
uu Bluetooth ® HandsFreeLink ® u HFL Menus
Features
You can make calls by inputting any phone number, or by using the imported
phonebook, call history, speed dial entries, or redial.
■Making a Call1Making a Call
Any voice-tagged speed dial entry can be dialed by
voice from any screen.
Press the button and follow the prompts.
The maximum range be tween your phone and
vehicles is 30 fe et (10 meters).
Once a call is connected, you can hear the voice of
the person you are call ing through the audio
speakers.
Page 299 of 488

uu Bluetooth ® HandsFreeLink ® u HFL Menus
298
Features
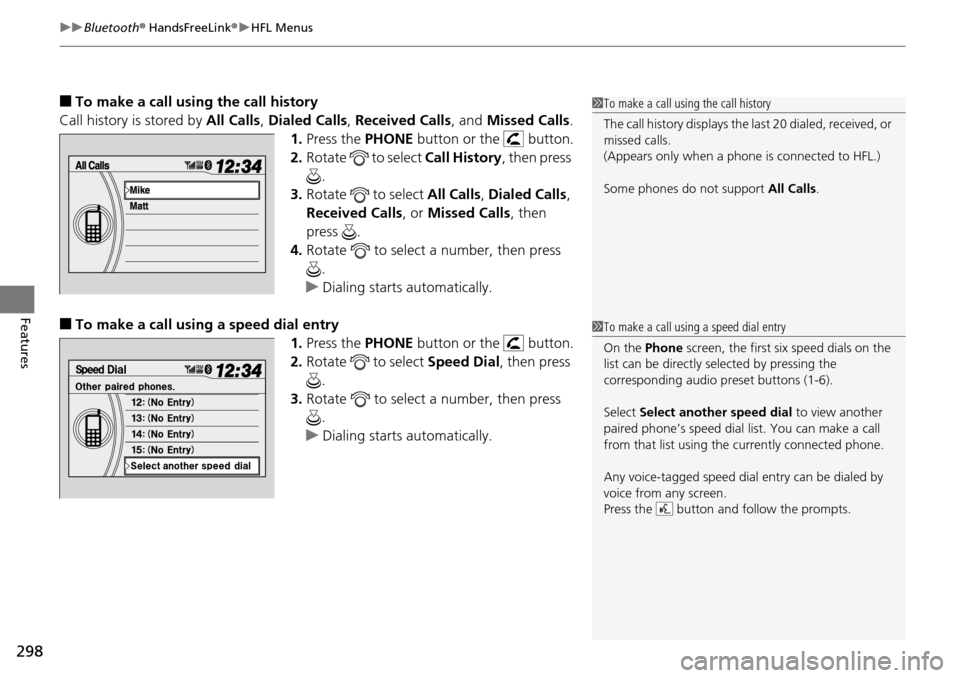
■To make a call usin g the call history
Call history is stored by All Ca
lls, Dialed Calls , Received Calls , and Missed Calls .
1. Press the PH
ONE button or the button.
2. Ro
tate to select Call History, then press
.
3. Ro
tate to select All Call s, Dialed Calls ,
Received Calls , or Mi
ssed Calls, then
press .
4. Ro
tate to select a number, then press
.
u Dialing sta
rts automatically.
■To make a call using a speed dial entry
1.Press the PH
ONE button or the button.
2. Ro
tate to select Speed Dial, then press
.
3. Ro
tate to select a number, then press
.
u Dialing sta
rts automatically.
1To make a call using the call history
The call history disp lays the last 20 dialed, received, or
missed calls.
(Appears only when a phone is connected to HFL.)
Some phones do not support All Calls.
1To make a call using a speed dial entry
On the Phone screen, the first six speed dials on the
list can be directly selected by pressing the
corresponding audio preset buttons (1-6).
Select Select another speed dial to view another
paired phone’s speed dial list. You can make a call
from that list using th e currently connected phone.
Any voice-tagged speed dial entry can be dialed by
voice from any screen.
Press the button and follow the prompts.
Page 302 of 488

301Continued
Features
Bluetooth® HandsFreeLink ®
Bluetooth® HandsFreeLink ® (HFL) allows you to place and receive phone calls using
your vehicle's audio system, without handling your cell phone.
Using HFL
(Pick-up) button: Press to go directly to the Ph one screen or to answer an
incoming call.
(Hang-up) button: Press to end a call.
(Talk) button: Press to call a number with
a stored voice tag.
PHONE button: Press to go directly to the Ph
one screen.
(Back) button: Press to cancel a command.
Interface dial: Rotate or move to select an item on the screen, then press .
■HFL Buttons
1Bluetooth ® HandsFreeLink ®
To use HFL, you need a Bluetooth-compatible cell
phone. For a list of compatible phones, pairing
procedures, and special feature capabilities:
•U.S.: Visit www.handsfreelink.honda.com , or call
1-888-528-7876.
•Canada: Visit www.handsfreelink.ca , or call 1-888-
528 -7876.
Voice control tips
•Aim the vents away from the ceiling and close the
windows, as noise coming fr om them may interfere
with the microphone.
•Press and release the button when you want to
call a number using a st ored voice tag. Speak
clearly and naturally after a beep.
•If the microphone picks up vo ices other than yours,
the command may be misinterpreted.
•To change the volume level, use the audio system's
volume knob or the remote audio controls on the
steering wheel.
State or local laws may pr ohibit the operation of
handheld electronic devices while operating a
vehicle.
Models with navigation system
Talk
Button
Volume up Microphone
Hang-up Button
Pick-up Button
Volume down
Interface
Dial
PHONE
Button
(Back) Button
Page 303 of 488
uu Bluetooth ® HandsFreeLink ® u Using HFL
302
Features
The display shows call status and phone
information.
■HFL Status Display1Bluetooth ® HandsFreeLink ®
Bluetooth ® Wireless Technology
The Bluetooth ® word mark and logos are registered
trademarks owned by Bluetooth SIG, Inc., and any
use of such marks by Honda Motors Co., Ltd., is
under license. Other tradem arks and trade names are
those of their respective owners.
HFL Limitations
An incoming call on HFL will interrupt the audio
system when it is playing. It will resume when the call
is ended.
Signal Strength
HFL Mode Battery Level Status
Roam Status
Call Name
Bluetooth IndicatorComes on when your
phone is connected to HFL.
1 HFL Status Display
The information that appe ars on the display varies
between phone models.
You can change the system language to English,
French, or Spanish.
2 Customized Features P. 90
Page 320 of 488

319
uu Bluetooth ® HandsFreeLink ® u HFL Menus
Features
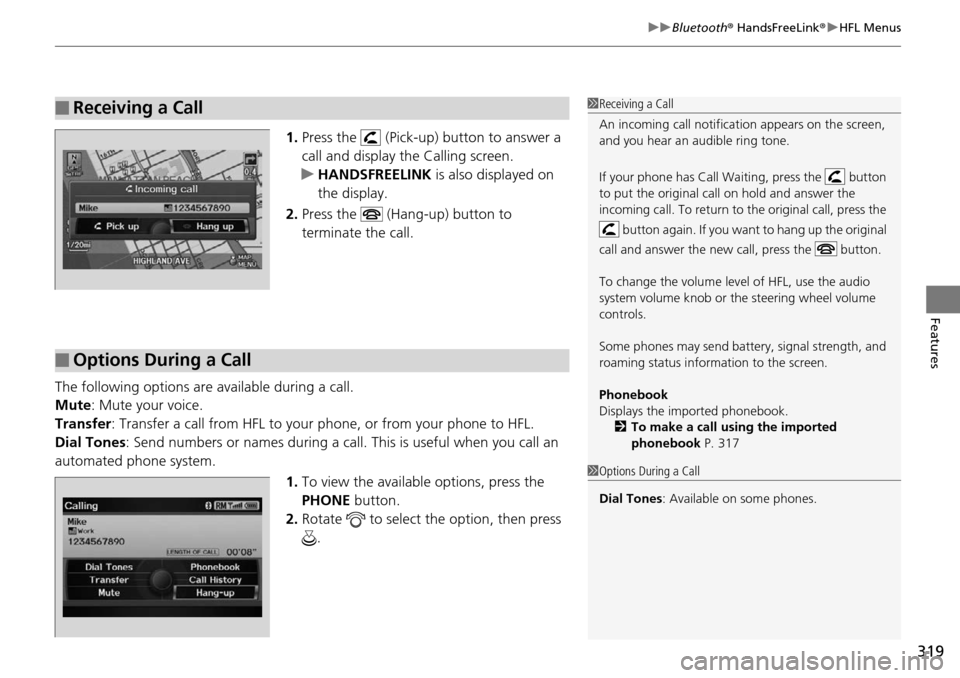
1. Press the (Pick-up) button to answer a
call and display the Calling screen.
u HA
NDSFREELINK is also displayed on
the display.
2. Press the (Hang-up) button to
terminate the call.
The following options ar e available during a
call.
Mute : M
ute your voice.
Transfer: Tran
sfer a call from HFL to your phone, or from your phone to HFL.
Dial Tones :
Send numbers or names during a call. This is useful when you call an
automated phone system.
1.To vie
w the availabl e options, press the
PHONE button.
2. Ro
tate to select the option, then press
.
■Receiving a Call1 Receiving a Call
An incoming call notificat ion appears on the screen,
and you hear an audible ring tone.
If your phone has Call Wa iting, press the button
to put the original call on hold and answer the
incoming call. To return to the original call, press the
button again. If you want to hang up the original
call and answer the new call, press the button.
To change the volume level of HFL, use the audio
system volume knob or the steering wheel volume
controls.
Some phones may send batter y, signal strength, and
roaming status information to the screen.
Phonebook
Displays the imported phonebook. 2 To make a call using the imported
phonebook P. 317
■Options During a Call
1Options During a Call
Dial Tones : Available on some phones.
Page 322 of 488
321
uu Compass * u Compass Zone Selection
Features
Compass Zone Selection
1. Turn the ignition switch to ON (w
.
2. Press and hold the S
ETUP button until the
display shows the compass setting menu
list.
3. Ro
tate to select Zone Adjust, then
press . The display shows the current
zone number.
4. Ro
tate to select the zone number of
your area (See Zone Map), then press .
1Compass Zone Selection
The zone selection is done to compensate the variation
between magnetic north and true north.
If the calibration starts while the audio system is in
use, the display returns to normal after the calibration
is completed.
Zone Number
2
3
4 5678910
111213
14
15Zone Map
Guam Island: Zone 8
Puerto Rico: Zone11
Page 370 of 488

369
Driving
Rearview Camera *
About Your Rearview Camera
The audio/information screen can display your vehicle’s rear view.
The display automatically changes to a rear
view when the shift lever is moved to
(R
.
■Rearview Camera Display Area
1About Your Rearview Camera
The rear camera view is restricted. You cannot see
the corner ends of the bum per or what is underneath
the bumper. Its unique le ns also makes objects
appear closer or farther than they actually are.
Visually confirm that it is safe to drive before backing
up. Certain conditions (such as weather, lighting, and
high temperatures) may also restrict the rear view. Do
not rely on the rearview display which does not give
you all information about conditions at the back of
your vehicle.
To turn the guide lines on or off, press and hold the
RETURN button for about three seconds.
If you turn the guide lines off, they remain off until
you turn them back on.
Rotate to adjust the br ightness of the rearview
camera.
If the camera lens is cove red with dirt or moisture,
use a soft, moist cloth to keep the lens clean and free
of debris.Models without navigation system
Screen display
Bumper
Guidelines
Approx. 118 in (3 m)
Approx. 79 in (2 m) Approx. 39 in (1 m)
Approx. 20 in (0.5 m)
Tailgate Open Range
Approx. 118 in (3 m) Approx. 79 in (2 m) Approx. 39 in (1 m) Camera
* Not available on all models
Page 424 of 488

423
Maintenance
Battery
Checking the Battery
Check the battery condition monthly. Look at
the test indicator window and check the
terminals for corrosion.
If your vehicle's battery is disconnected or goes dead:
• The audio
system is disabled.
2Reactivate the audio system P. 174
• The clock resets.
2 Setting the Clock P. 98
• The navigation system * is disabled.
2Refer to the navigation system manual
Charging the Battery
Disconnect both battery cables to prevent damaging your vehicle's electrical system.
Always disconnect the negative (–) cable first, and reconnect it last.
1Battery
WARNING: Battery post, terminals,
and related accessories contain lead
and lead compounds.
Wash your hands after handling.
The test indicator's color information is on the
battery.
When you find corrosion, cl ean the battery terminals
by applying a baking powder and water solution.
Clean terminals with a damp towel. Cloth/towel dry
the battery. Coat the terminals with grease to help
prevent future corrosion.
3 WARNING
The battery gives off explosive hydrogen
gas during normal operation.
A spark or flame can cause the battery to
explode with enough force to kill or
seriously hurt you.
When conducting any battery
maintenance, wear prot ective clothing and
a face shield, or have a skilled technician do
it.
Test Indicator Window
* Not available on all models