Page 400 of 488

399
uu Maintenance Under the Hood u Transmission Fluid
Maintenance
Transmission Fluid
Check the fluid level when the engine is at normal operating temperature.
1. Park
on level ground, and start the engine.
2.Wait
until the radiator fan starts and then
turn off the engine.
u Perform
step 3 after waiting for about 60
seconds (less than 90 seconds).
3. Remove the dipst
ick (yellow loop) from the
transmission and wipe it with a clean cloth.
4. Insert
the dipstick all the way back into the
transmission securely , as shown in the
image.
5. Remove the
dipstick and check the fluid
level.
u I
t should be between the upper and
lower marks in the HOT range.
6. If the
level is below the lower mark, add
fluid into the dipstick hole to bring it to the
level between the upper and lower marks,
and have your vehicle checked by a dealer
immediately.
■Automatic Transmission Fluid
Specified fluid: Honda ATF DW-1 (automatic transmission fluid)
1Automatic Transmission Fluid
NOTICE
Do not mix Honda ATF DW-1 with other
transmission fluids.
Using a transmission flui d other than Honda ATF
DW-1 may adversely af fect the operation and
durability of your vehicle' s transmission, and damage
the transmission.
Any damage caused by usi ng a transmission fluid that
is not equivalent to Honda ATF DW-1 is not covered
by Honda's new vehicle warranty.
NOTICE
Pour the fluid slowly and ca refully so you do not spill
any. Clean up any spills immediately; they can
damage components in the engine compartment.
Upper Mark
Lower Mark
HOT
Range
Page 402 of 488
401
uu Maintenance Under the Hood u Refilling Window Washer Fluid
Maintenance
Refilling Window Washer Fluid
Check the amount of window washer fluid.
If the level is low, fill the washer reservoir.
If the washer fluid is low, the washer level indicator
* appears on the instrument
panel or a message appears on the multi-information display *.
Pour the washer fluid carefully. Do not
overflow the reservoir.
Models without washer level sensor1Refilling Window Washer Fluid
NOTICE
Do not use engine antifreeze or a vinegar/water
solution in the windshield washer reservoir.
Antifreeze can damage y our vehicle's paint. A
vinegar/water solution ca n damage the windshield
washer pump.
Models with washer level sensor
* Not available on all models
Page 403 of 488

402
Maintenance
Replacing Light Bulbs
Headlight Bulbs
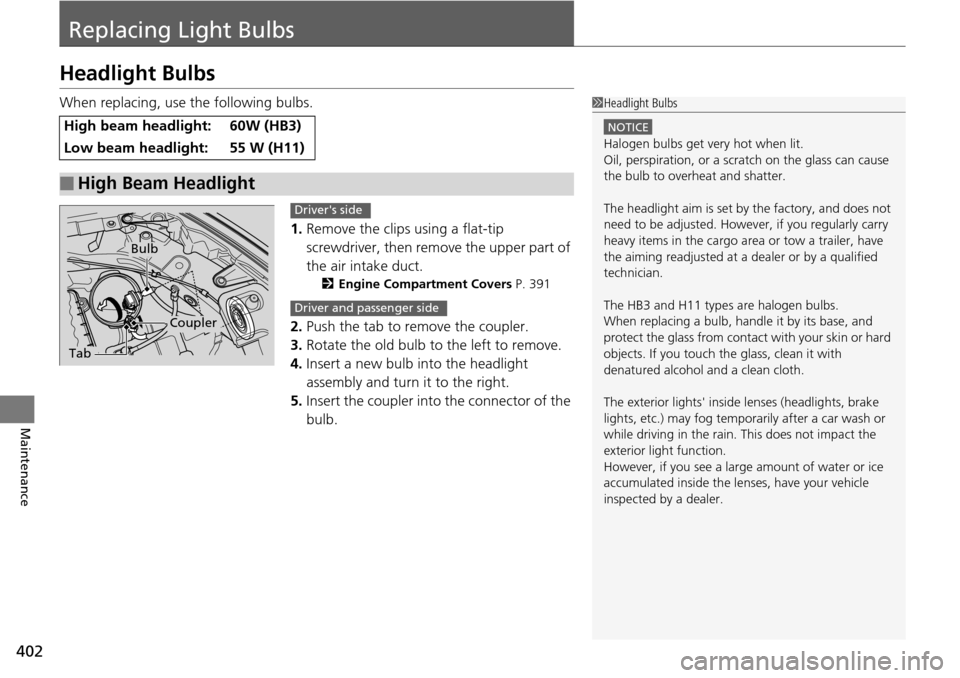
When replacing, use the following bulbs.1.Re
move the clips using a flat-tip
screwdriver, then remove the upper part of
the air intake duct.
2 Engine Compartment Covers P. 391
2.Push the tab to remove the coupler.
3. Rotat
e the old bulb to the left to remove.
4.In
sert a new bulb into the headlight
assembly and turn it to the right.
5. Insert
the coupler into the connector of the
bulb.
High beam headlight:60W (HB3)
Low beam headlight:55 W (H11)
■High Beam Headlight
1Headlight Bulbs
NOTICE
Halogen bulbs get very hot when lit.
Oil, perspiration, or a scratch on the glass can cause
the bulb to overhe at and shatter.
The headlight aim is set by the factory, and does not
need to be adjusted. Howeve r, if you regularly carry
heavy items in the cargo area or tow a trailer, have
the aiming readjusted at a dealer or by a qualified
technician.
The HB3 and H11 types are halogen bulbs.
When replacing a bulb, ha ndle it by its base, and
protect the glass from contact with your skin or hard
objects. If you touch the glass, clean it with
denatured alcohol and a clean cloth.
The exterior lights' inside lenses (headlights, brake
lights, etc.) may fog temporarily after a car wash or
while driving in the rain. This does not impact the
exterior light function.
However, if you see a larg e amount of water or ice
accumulated inside the le nses, have your vehicle
inspected by a dealer.
Tab
Coupler
Bulb
Driver's side
Driver and passenger side
Page 404 of 488

Continued403
uu Replacing Light Bulbs u Fog Light Bulbs *
Maintenance
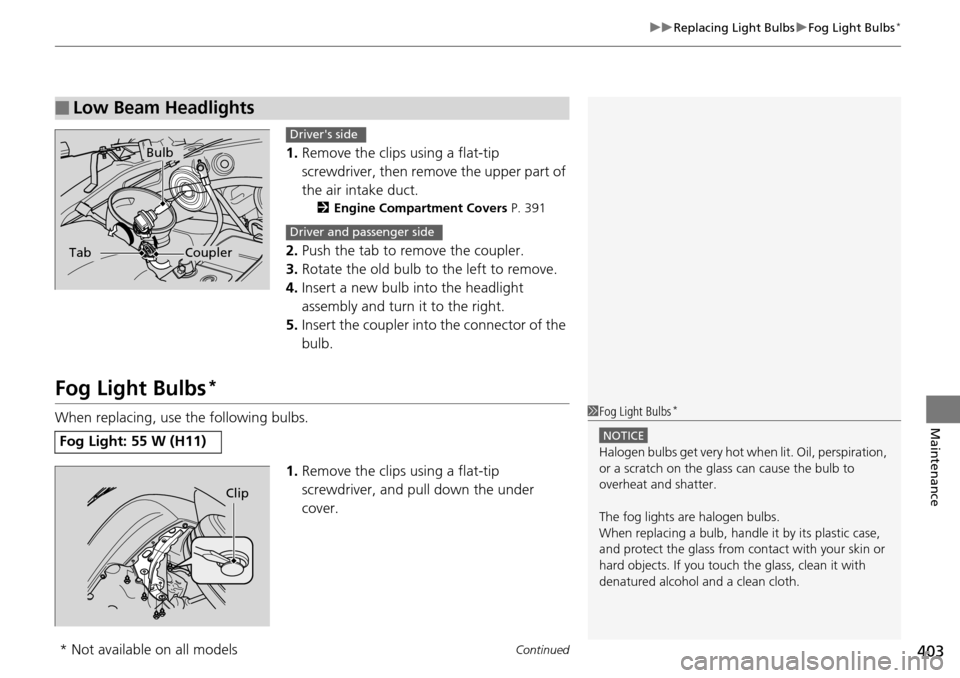
1. Remove the clips using a flat-tip
screwdriver, then remo ve the upper part of
the air intake duct.
2 Engine Compartment Covers P. 391
2. Push the tab to remove the coupler.
3. Rot
ate the old bulb to the left to remove.
4.In
sert a new bulb into the headlight
assembly and turn it to the right.
5. Insert
the coupler into the connector of the
bulb.
Fog Light Bulbs *
When replacing, use the following bulbs.
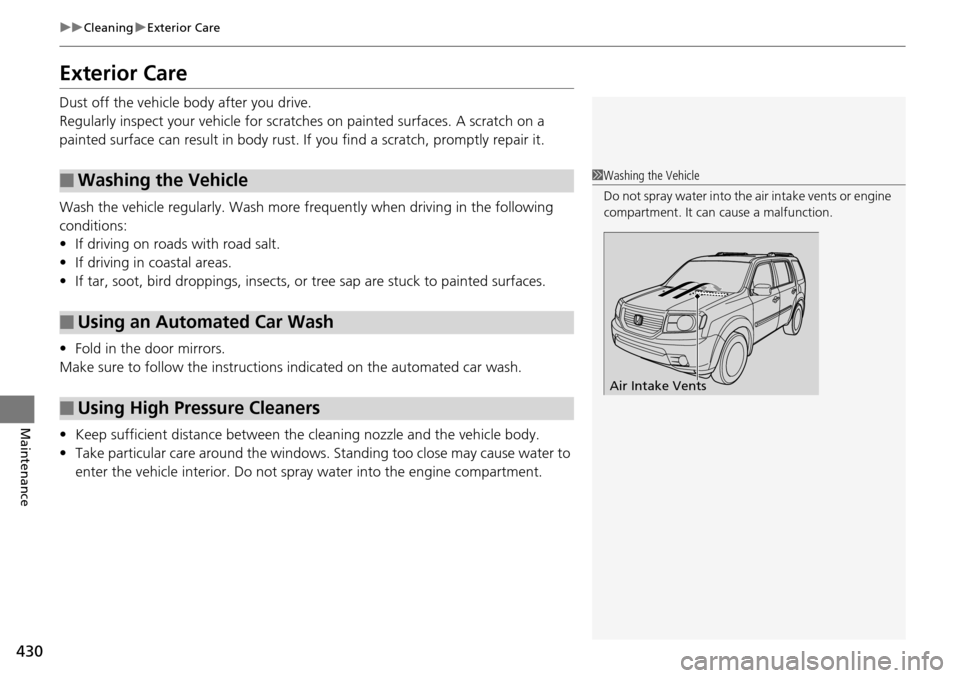
1.Remove the
clips using a flat-tip
screwdriver, and pu ll down the under
cover.
■Low Beam Headlights
Bulb
TabCoupler
Driver's side
Driver and passenger side
Fog Light: 55 W (H11)
1 Fog Light Bulbs *
NOTICE
Halogen bulbs get very hot wh en lit. Oil, perspiration,
or a scratch on the glass can cause the bulb to
overheat and shatter.
The fog lights ar e halogen bulbs.
When replacing a bulb, handl e it by its plastic case,
and protect the glass from c ontact with your skin or
hard objects. If you touch the glass, clean it with
denatured alcohol and a clean cloth.
Clip
* Not available on all models
Page 431 of 488

430
uu Cleaning u Exterior Care
Maintenance
Exterior Care
Dust off the vehicle body after you drive.
Regularly inspect your vehi cl
e for scratches on painted surfaces. A scratch on a
painted surface can result in body rust. If you find a scratch, promptly repair it.
Wash the vehicle regularly. Wash more frequently when
driving in the following
conditions:
• If
driving on roads with road salt.
•If
driving in coastal areas.
•I
f tar, soot, bird droppings, insects, or tree sap are stuck to painted surfaces.
• F
old in the door mirrors.
Make sure to follow the instructions indicat
ed on the automated car wash.
• Keep sufficient distance between the cleaning nozzl e and the
vehicle body.
• Take particular care around the windows. St anding too close may ca
use water to
enter the vehicle interior. Do not spra y water into the engine compartment.
■Washing the Vehicle
■Using an Automated Car Wash
■Using High Pressure Cleaners
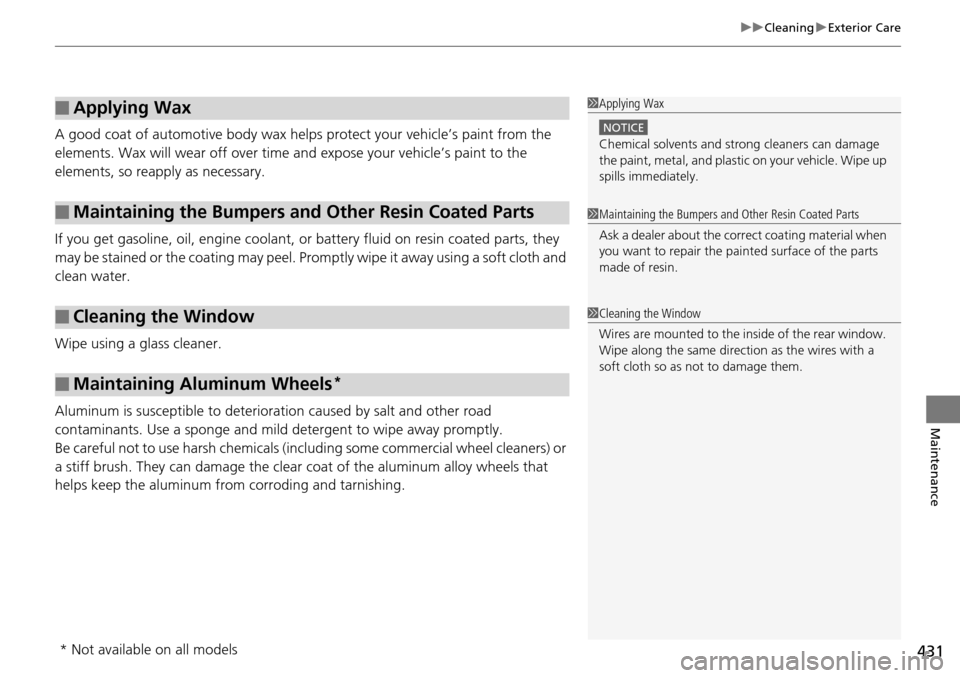
1Washing the Vehicle
Do not spray water into the air intake vents or engine
compartment. It can cause a malfunction.
Air Intake Vents
Page 432 of 488

431
uu Cleaning u Exterior Care
Maintenance
A good coat of automotive body wax helps protect your vehicle’s paint from the
elements. Wax will wear off over time and expose your vehicle’s paint to the
elements, so reapply as necessary.
If you get gasoline, oil, engine coolant, or battery fluid on resi n coated parts, they
may be stained or the coating may peel. Prom ptly wipe it away using a soft cloth and
clean water.
Wipe using a glass cleaner.
Aluminum is susceptible to deterioration caused by salt and other road
con
taminants. Use a sponge and mild detergent to wipe away promptly.
Be careful not to use harsh chemicals (including some commercial wheel cleaners) or
a
stiff brush. They can damage the clear coat of the aluminum alloy wheels that
helps keep the aluminum from corroding and tarnishing.
■Applying Wax
■Maintaining the Bumpers and Other Resin Coated Parts
■Cleaning the Window
■Maintaining Aluminum Wheels *
1Applying Wax
NOTICE
Chemical solvents and st rong cleaners can damage
the paint, metal, and plasti c on your vehicle. Wipe up
spills immediately.
1 Maintaining the Bumpers an d Other Resin Coated Parts
Ask a dealer about the corr ect coating material when
you want to repair the painted surface of the parts
made of resin.
1 Cleaning the Window
Wires are mounted to the in side of the rear window.
Wipe along the same direct ion as the wires with a
soft cloth so as not to damage them.
* Not available on all models
Page 434 of 488

433
Handling the Unexpected
This chapter explains how to handle unexpected troubles.
ToolsTypes of Tools .................................. 434
If a Tire Goes Flat Changing a Flat Tire ......................... 435
Engine Does Not Start Checking the Engine ........................ 444
Jump Starting ..........
.......................... 445
Shift Lever Does Not Move .........
..... 447
Overheating How to Handle Overheating ............. 448 Indicator, Coming On/Blinking
If the Low Oil Pressure Indicator Comes
On ............................................. 450
If the Charging System Indicator Comes
On ................................................. 450
If the Malfunction Indicator Lamp Comes On or Blinks ................................... 451
If the Brake System Indicator (Red) Comes On ................................................. 452
If the Low Tire Pressure Indicator Comes On ................................................. 452
If the TPMS Indicator Comes On ...... 453 If the Low Tire Pressure/TPMS Indicator
Comes On or Blinks ....................... 453
Fuses Fuse Locations ................................. 454
Inspecting and Changing Fuses ........ 458
Emergency Towing ..............
............. 459
When You Cannot Open the Tailgate..... 461
Page 440 of 488

Continued439
uu If a Tire Goes Flat u Changing a Flat Tire
Handling the Unexpected
1. Place the jack under the jacking point
closest to the tire to be changed.
2.Turn the dial at the bottom of the jack to
the right until the top of the jack contacts
the jacking point.
u Ma
ke sure that the jacking point tab is
resting in the jack notch.
■How to Set Up the Jack1How to Set Up the Jack
Do not use the jack with people or luggage in the
vehicle.
Use the jack provided in your vehicle.
Other jacks may not support the weight (“load”) or
their shape may not match.
The following instructions must be followed to use
the jack safely.
•Do not use while the engine is running.
•Use only where the ground is firm and level.
•Use only at the jacking points.•Do not get in the vehicl e while using the jack.
•Do not put anything on top of or underneath the
jack.
3 WARNING
The vehicle can easily roll off the jack,
seriously injuring anyone underneath.
Follow the directions for changing a tire
exactly, and never get under the vehicle
when it is supported only by the jack.