Page 283 of 573
uuCustomized Features
*u
282Features
With the ignition switch in ON
(w*1, press the SETTINGS button. Rotate to
select Audio Settings, Phone Settings, Camera Settings, Vehicle Settings,
System Settings, Info Settings, or Navi Settings and press .
*1: Models with the smart entry system have an ENGINE START/STOP button instead of an
ignition switch.Models with navigation system
SETTINGS Button
Audio/Information Screen
Interface Dial
1Customized Features
*
When you customize setting, make sure that the
vehicle is at a complete stop and shift to
(P.
To customize other features, rotate , move , ,
or , and press .
2List of customizable options P. 304
Models with navigation system
* Not available on all models
Page 335 of 573

334
uuBluetooth® HandsFreeLink®uHFL Menus
Features
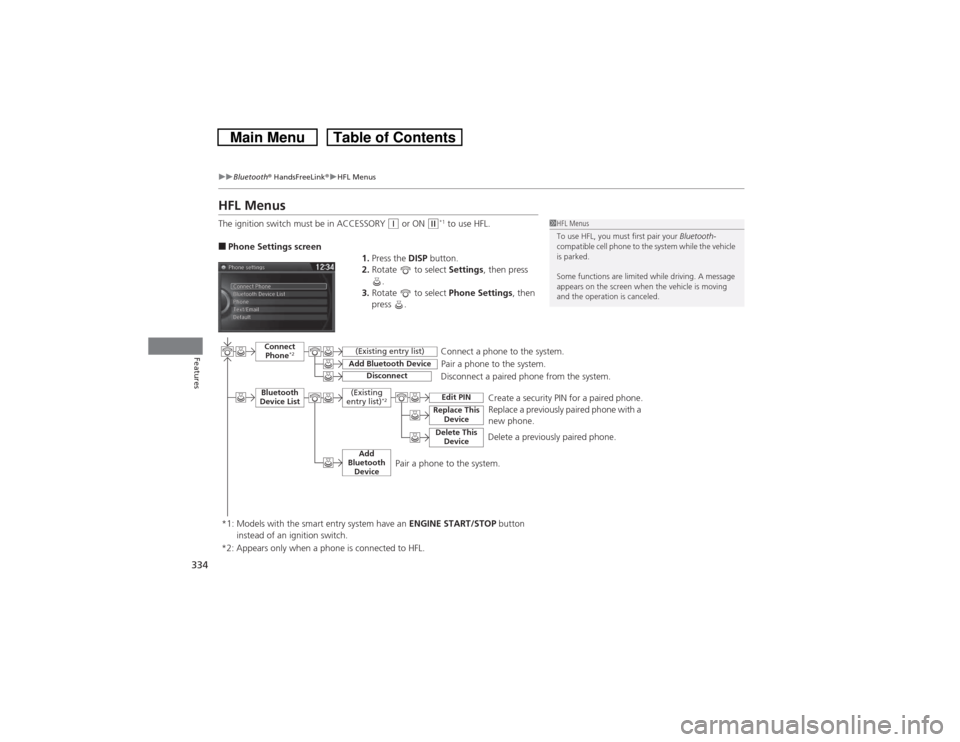
HFL MenusThe ignition switch must be in ACCESSORY
(q or ON
(w*1 to use HFL.
■Phone Settings screen
1.Press the DISP button.
2.Rotate to select Settings, then press
.
3.Rotate to select Phone Settings, then
press .
1HFL Menus
To use HFL, you must first pair your Bluetooth-
compatible cell phone to the system while the vehicle
is parked.
Some functions are limited while driving. A message
appears on the screen when the vehicle is moving
and the operation is canceled.
Pair a phone to the system.
Replace a previously paired phone with a
new phone.
Connect
Phone
*2
Bluetooth
Device List
Add Bluetooth Device
Edit PIN
(Existing entry list)Disconnect
Connect a phone to the system.
Disconnect a paired phone from the system.
*1: Models with the smart entry system have an ENGINE START/STOP button
instead of an ignition switch.
(Existing
entry list)
*2
Replace This
DeviceDelete This
Device
Delete a previously paired phone.Create a security PIN for a paired phone.
Add
Bluetooth
Device
*2: Appears only when a phone is connected to HFL.
Pair a phone to the system.
Page 365 of 573
uuBluetooth® HandsFreeLink®uHFL Menus
364Features
■Using the Stop or Read option
1.Go to the text message or E-mail screen.
uThe system automatically starts reading
the message aloud.
2Displaying Messages P. 362
2.Press to have the pop-up menu appear
on the screen.
3.Rotate to select Stop or Read, then
press .
1Using the Stop or Read option
This option changes to:•Stop while the text message/E-mail is read out.
Select this option to discontinue the message read
out.•Read when the system has finished reading out the
text message/E-mail, or after you selected Stop.
Select this option to hear the system read out the
selected message.
Page 370 of 573

369
uuBluetooth® HandsFreeLink®uHFL Menus
Continued
Features
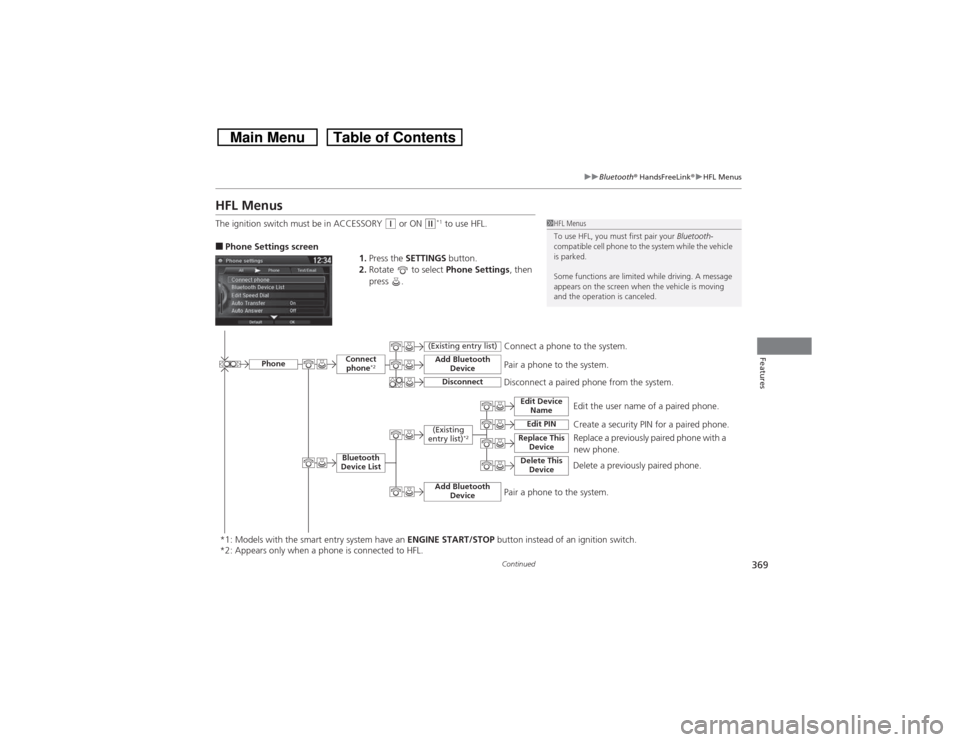
HFL MenusThe ignition switch must be in ACCESSORY
(q or ON
(w*1 to use HFL.
■Phone Settings screen
1.Press the SETTINGS button.
2.Rotate to select Phone Settings, then
press .
1HFL Menus
To use HFL, you must first pair your Bluetooth-
compatible cell phone to the system while the vehicle
is parked.
Some functions are limited while driving. A message
appears on the screen when the vehicle is moving
and the operation is canceled.
Edit the user name of a paired phone.
Phone
Edit Device
Name
Connect
phone
*2
Bluetooth
Device List
(Existing
entry list)
*2
Replace This
Device
Add Bluetooth
Device
Disconnect a paired phone from the system.Connect a phone to the system.
Disconnect
(Existing entry list)
Pair a phone to the system.
Edit PIN
Create a security PIN for a paired phone.
Replace a previously paired phone with a
new phone.
Delete This
Device
Delete a previously paired phone.
Add Bluetooth
Device
Pair a phone to the system.
*1: Models with the smart entry system have an ENGINE START/STOP button instead of an ignition switch.
*2: Appears only when a phone is connected to HFL.
Page 404 of 573
Continued
403
uuBluetooth® HandsFreeLink®uHFL Menus
Features
■Read or stop reading a message
1.Go to the text message or E-mail screen.
uThe system automatically starts reading
the message aloud.
2Displaying Messages P. 401
2.Press to stop reading.
Press again to start reading the message
from the beginning.■Reply to a message
1.Go to the text message or E-mail screen.
uThe system automatically starts reading
the message aloud.
2Displaying Messages P. 401
2.Move and rotate to select Reply,
then press .
3.Rotate to select the reply message, then
press .
uThe pop-up menu appears on the screen.
4.Select Send to send the message.
uComplete appears on the screen when
the reply message was successfully sent.
1Reply to a message
The available fixed reply messages are as follows:•Talk to you later, I’m driving.•I’m on my way.•I’m running late.•OK•Yes•No
You cannot add, edit, or delete reply messages.
Page 408 of 573

407Features
Compass
*
When you turn the ignition switch to ON
(w*1, the compass self-calibrates, and the
compass display appears.
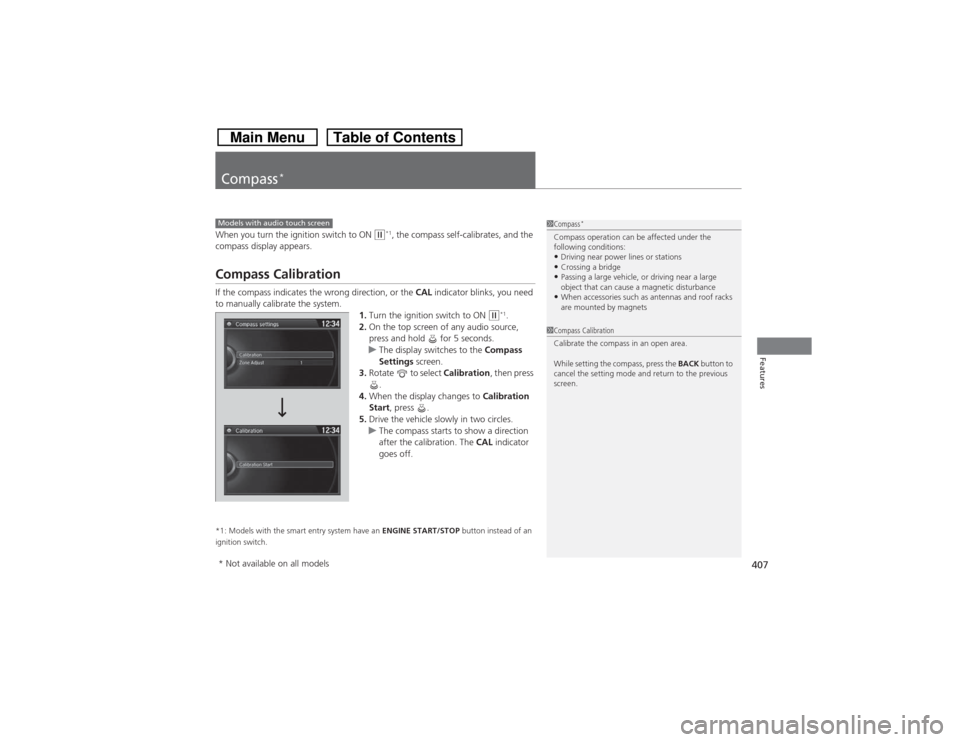
Compass CalibrationIf the compass indicates the wrong direction, or the CAL indicator blinks, you need
to manually calibrate the system.
1.Turn the ignition switch to ON
(w*1.
2.On the top screen of any audio source,
press and hold for 5 seconds.
uThe display switches to the Compass
Settings screen.
3.Rotate to select Calibration, then press
.
4.When the display changes to Calibration
Start, press .
5.Drive the vehicle slowly in two circles.
uThe compass starts to show a direction
after the calibration. The CAL indicator
goes off.
*1: Models with the smart entry system have an ENGINE START/STOP button instead of an
ignition switch.Models with audio touch screen
1Compass
*
Compass operation can be affected under the
following conditions:•Driving near power lines or stations•Crossing a bridge•Passing a large vehicle, or driving near a large
object that can cause a magnetic disturbance•When accessories such as antennas and roof racks
are mounted by magnets
1Compass Calibration
Calibrate the compass in an open area.
While setting the compass, press the BACK button to
cancel the setting mode and return to the previous
screen.
* Not available on all models
Page 409 of 573
408
uuCompass
*uCompass Zone Selection
Features
Compass Zone Selection
1.Turn the ignition switch to ON
(w*1.
2.On the top screen of any audio source,
press and hold for 5 seconds.
uThe display switches to the Compass
Settings screen.
3.Rotate to select Zone Adjust, then
press .
uThe display shows the current zone
number.
4.Rotate to select the zone number of
your area (See Zone Map), then press .
*1: Models with the smart entry system have an ENGINE START/STOP button instead of an
ignition switch.
2
3
4
5
6
78910111213 14 15
Zone Map
Guam Island: Zone 8
Puerto Rico: Zone 11
1Compass Zone Selection
The zone selection is done to compensate the
variation between magnetic north and true north.
If the calibration starts while the audio system is in
use, the display returns to normal after the calibration
is completed.
Page 410 of 573

409
Driving
This chapter discusses driving, refueling, and information on items such as accessories.
Before Driving
Driving Preparation .......................... 410
Maximum Load Limit........................ 413
Towing a Trailer
Towing Preparation .......................... 415
Driving Safely with a Trailer .............. 418
Towing Your Vehicle ........................ 419
When Driving
Starting the Engine .......................... 420
Precautions While Driving................. 424
Automatic Transmission ................... 425
Shifting ............................................ 426Cruise Control ................................. 432
Forward Collision Warning (FCW)
*.. 435
Lane Departure Warning (LDW)
*..... 439
VSA® (Vehicle Stability Assist), aka ESC
(Electronic Stability Control), System .. 442
LaneWatch
TM*.................................. 444
TPMS (Tire Pressure Monitoring System) .. 446Tire Pressure Monitoring System (TPMS) -
Required Federal Explanation ......... 447
Braking
Brake System ................................... 449
ABS (Anti-lock Brake System) ........... 451Brake Assist System ......................... 452
Parking Your Vehicle
When Stopped ................................ 453
Rearview Camera............................. 454
Multi-View Rear Camera.................. 455
Refueling
Fuel Information .............................. 456
How to Refuel ................................. 457
Fuel Economy.................................... 459
Improving Fuel Economy .................. 459
Accessories and Modifications........ 460
* Not available on all models