2014 HONDA CROSSTOUR fuel
[x] Cancel search: fuelPage 423 of 573

422
uuWhen DrivinguStarting the Engine
Driving
Starting the Engine
1.Make sure the parking brake is applied.
2.Check that the shift lever is in
(P, then
depress the brake pedal.
uAlthough it is possible to start the vehicle
in
(N, it is safer to start it in
(P.
Models with smart entry system
1Starting the Engine
Keep your foot firmly on the brake pedal when
starting the engine.
The engine is harder to start in cold weather and in
thinner air found at altitudes above 8,000 feet (2,400
meters).
When starting the engine in cold weather, turn off all
electrical accessories such as the lights, climate
control system, and rear defogger in order to reduce
battery drain.
If you live in a region where winter is extremely cold,
an engine block heater will improve starting and
warming of the engine. If temperatures consistently
below -22°F (-30°C) are expected, the coolant
mixture should be changed to a higher concentration
to prevent freezing. Consult a dealer for details.
If the exhaust system sounds abnormal or you can
smell exhaust gas inside the vehicle, have your vehicle
checked by a dealer. There may be a problem with
the engine or exhaust system.
The immobilizer system protects your vehicle from
theft.
If an improperly coded device is used, the engine’s
fuel system is disabled.
2Immobilizer System P. 107
Brake Pedal
Page 428 of 573
427
uuWhen DrivinguShifting
Driving
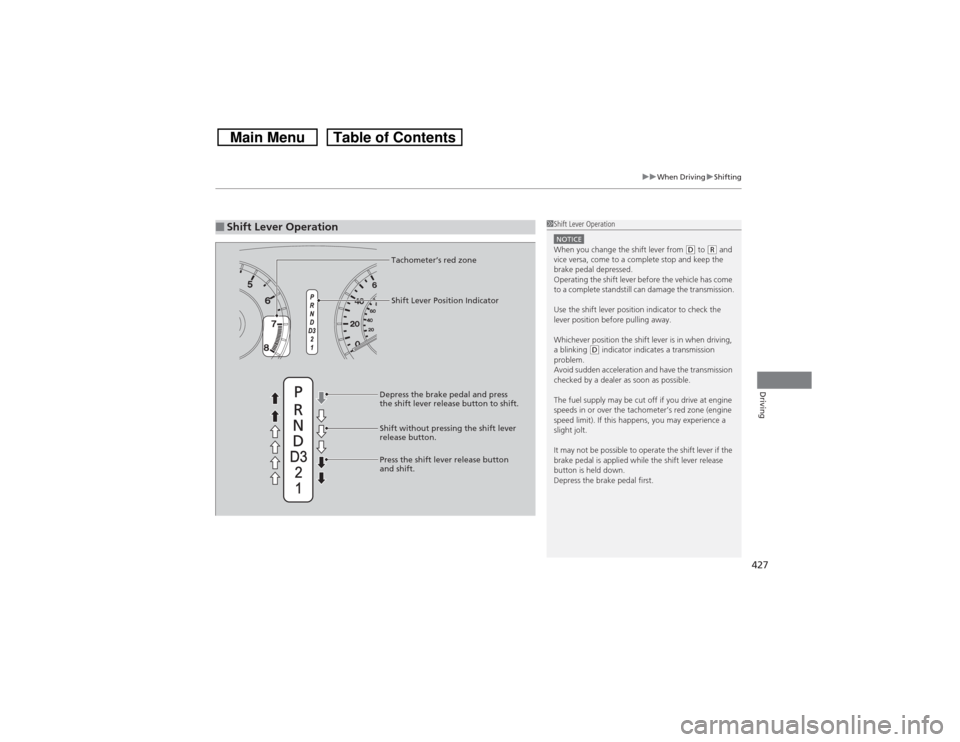
■Shift Lever Operation
1Shift Lever OperationNOTICEWhen you change the shift lever from
(D to
(R and
vice versa, come to a complete stop and keep the
brake pedal depressed.
Operating the shift lever before the vehicle has come
to a complete standstill can damage the transmission.
Use the shift lever position indicator to check the
lever position before pulling away.
Whichever position the shift lever is in when driving,
a blinking
(D indicator indicates a transmission
problem.
Avoid sudden acceleration and have the transmission
checked by a dealer as soon as possible.
The fuel supply may be cut off if you drive at engine
speeds in or over the tachometer’s red zone (engine
speed limit). If this happens, you may experience a
slight jolt.
It may not be possible to operate the shift lever if the
brake pedal is applied while the shift lever release
button is held down.
Depress the brake pedal first.
Tachometer’s red zone
Shift Lever Position Indicator
Depress the brake pedal and press
the shift lever release button to shift.
Shift without pressing the shift lever
release button.
Press the shift lever release button
and shift.
Page 430 of 573
Continued
429
uuWhen DrivinguShifting
Driving
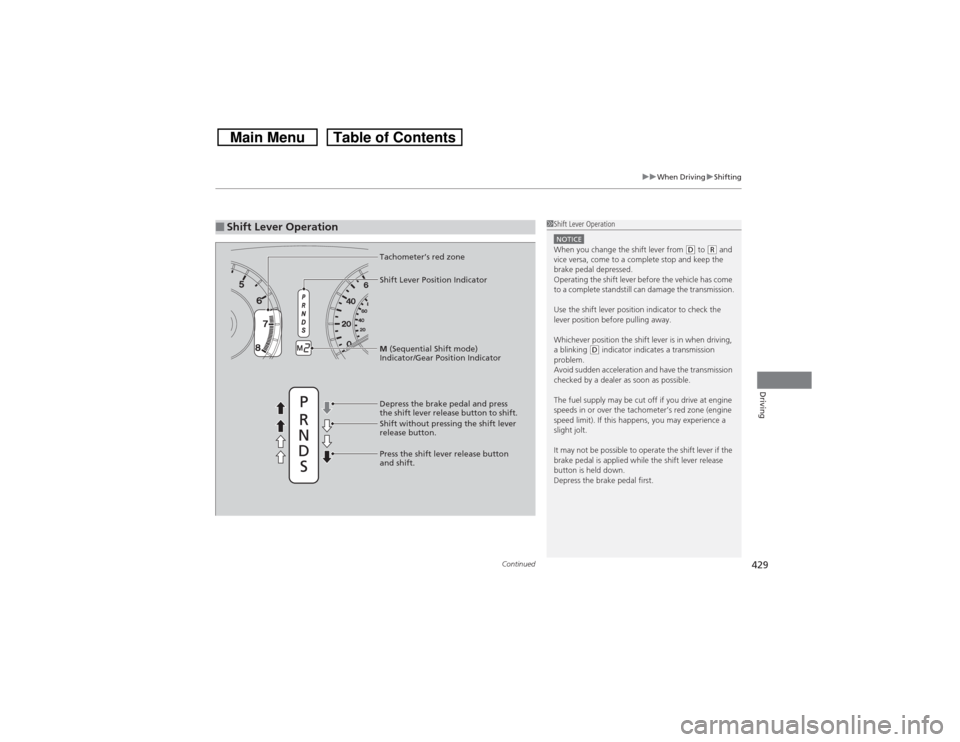
■Shift Lever Operation
1Shift Lever OperationNOTICEWhen you change the shift lever from
(D to
(R and
vice versa, come to a complete stop and keep the
brake pedal depressed.
Operating the shift lever before the vehicle has come
to a complete standstill can damage the transmission.
Use the shift lever position indicator to check the
lever position before pulling away.
Whichever position the shift lever is in when driving,
a blinking
(D indicator indicates a transmission
problem.
Avoid sudden acceleration and have the transmission
checked by a dealer as soon as possible.
The fuel supply may be cut off if you drive at engine
speeds in or over the tachometer’s red zone (engine
speed limit). If this happens, you may experience a
slight jolt.
It may not be possible to operate the shift lever if the
brake pedal is applied while the shift lever release
button is held down.
Depress the brake pedal first.
Tachometer’s red zone
M (Sequential Shift mode)
Indicator/Gear Position Indicator
Depress the brake pedal and press
the shift lever release button to shift.
Shift without pressing the shift lever
release button.
Press the shift lever release button
and shift. Shift Lever Position Indicator
Page 432 of 573
431
uuWhen DrivinguShifting
Driving
■Second gear lock mode
If you pull the
(+ paddle shifter while stopped or driving at 6 mph (10 km/h) or less,
the gear position will be locked in 2nd gear. This makes it easier to pull away on
slippery surfaces such as snow covered roads.
To cancel the 2nd gear lock mode, pull the
(- paddle shifter, or move the shift lever
from
(S to
(D.
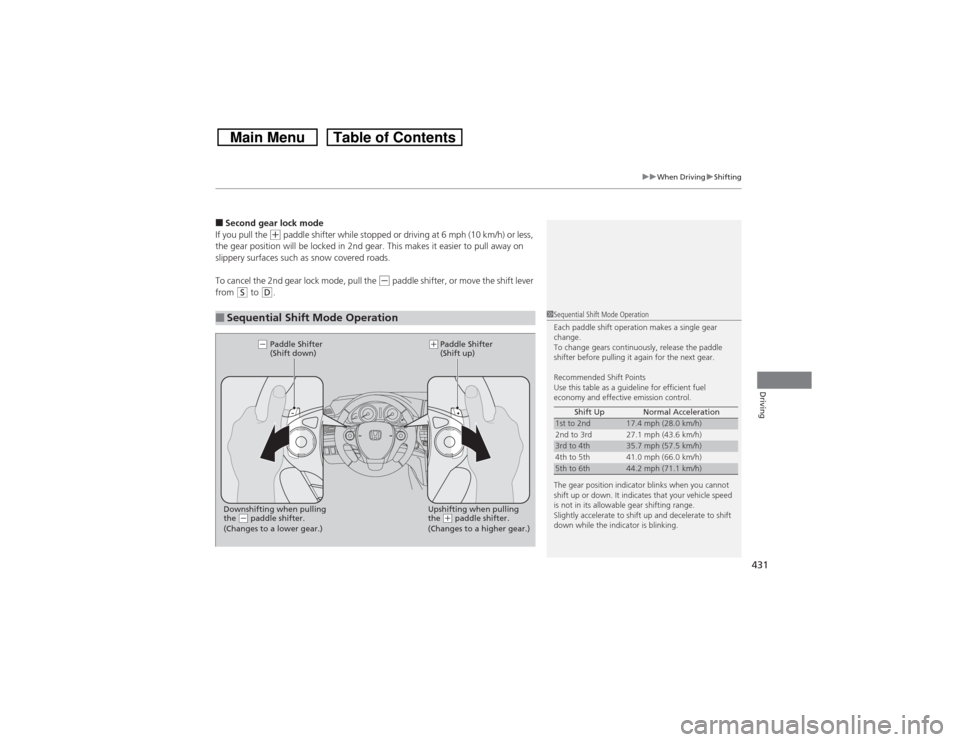
■Sequential Shift Mode Operation
1Sequential Shift Mode Operation
Each paddle shift operation makes a single gear
change.
To change gears continuously, release the paddle
shifter before pulling it again for the next gear.
Recommended Shift Points
Use this table as a guideline for efficient fuel
economy and effective emission control.
The gear position indicator blinks when you cannot
shift up or down. It indicates that your vehicle speed
is not in its allowable gear shifting range.
Slightly accelerate to shift up and decelerate to shift
down while the indicator is blinking.Shift Up Normal Acceleration1st to 2nd
17.4 mph (28.0 km/h)
2nd to 3rd 27.1 mph (43.6 km/h)
3rd to 4th
35.7 mph (57.5 km/h)
4th to 5th 41.0 mph (66.0 km/h)
5th to 6th
44.2 mph (71.1 km/h)
Paddle Shifter
(Shift down)Paddle Shifter
(Shift up)
Downshifting when pulling
the
(- paddle shifter.Upshifting when pulling
the
(+ paddle shifter.
(-(+
(Changes to a lower gear.) (Changes to a higher gear.)
Page 448 of 573
447
uuWhen DrivinguTire Pressure Monitoring System (TPMS) - Required Federal Explanation
Continued
Driving
Tire Pressure Monitoring System (TPMS) - Required Federal ExplanationEach tire, including the spare (if provided), should be checked
monthly when cold and inflated to the inflation pressure
recommended by the vehicle manufacturer on the vehicle placard
or tire inflation pressure label.
(If your vehicle has tires of a different size than the size indicated
on the vehicle placard or tire inflation pressure label, you should
determine the proper tire inflation pressure for those tires.)
As an added safety feature, your vehicle has been equipped with
a tire pressure monitoring system (TPMS) that illuminates a low
tire pressure telltale
when one or more of your tires is significantly under-inflated.
Accordingly, when the low tire pressure telltale illuminates, you
should stop and check your tires as soon as possible, and inflate
them to the proper pressure.
Driving on a significantly under-inflated tire causes the tire to
overheat and can lead to tire failure. Under-inflation also reduces
fuel efficiency and tire tread life, and may affect the vehicle’s
handling and stopping ability.U.S. models
Page 457 of 573
456Driving
RefuelingFuel Information■Fuel recommendation
Use of lower octane gasoline can cause a persistent, heavy metallic knocking noise
that can lead to engine damage.■Top tier detergent gasoline
Because the level of detergency and additives in gasoline vary in the market, Honda
endorses the use of “TOP TIER Detergent Gasoline” where available to help
maintain the performance and reliability of your vehicle. TOP TIER Detergent
Gasoline meets a new gasoline standard jointly established by leading automotive
manufacturers to meet the needs of today’s advanced engines.
Qualifying gasoline retailers will, in most cases, identify their gasoline as having met
“TOP TIER Detergent Gasoline” standards at the retail location. This fuel is
guaranteed to contain the proper level of detergent additives and be free of metallic
additives. The proper level of detergent additives, and absence of harmful metallic
additives in gasoline, help avoid build-up of deposits in your engine and emission
control system.
For further important fuel-related information for your vehicle, or on information on
gasoline that does not contain MMT, visit www.hondacars.com. In Canada, visit
www.honda.ca for additional information on gasoline. For more information on top
tier gasoline, visit www.toptiergas.com.■Fuel tank capacity: 18.5 US gal (70 liters)Unleaded gasoline, pump octane number 87 or higher
1Fuel InformationNOTICEWe recommend quality gasoline containing
detergent additives that help prevent fuel system and
engine deposits. In addition, in order to maintain
good performance, fuel economy, and emissions
control, we strongly recommend the use of gasoline
that does NOT contain harmful manganese-based
fuel additives such as MMT, if such gasoline is
available.
Use of gasoline with these additives may adversely
affect performance, and cause the malfunction
indicator lamp on your instrument panel to come on.
If this happens, contact a dealer for service.
Some gasoline today is blended with oxygenates such
as ethanol. Your vehicle is designed to operate on
oxygenated gasoline containing up to 15% ethanol
by volume. Do not use gasoline containing methanol.
If you notice any undesirable operating symptoms, try
another service station or switch to another brand of
gasoline.
Page 458 of 573
457
uuRefuelinguHow to Refuel
Continued
Driving
How to Refuel
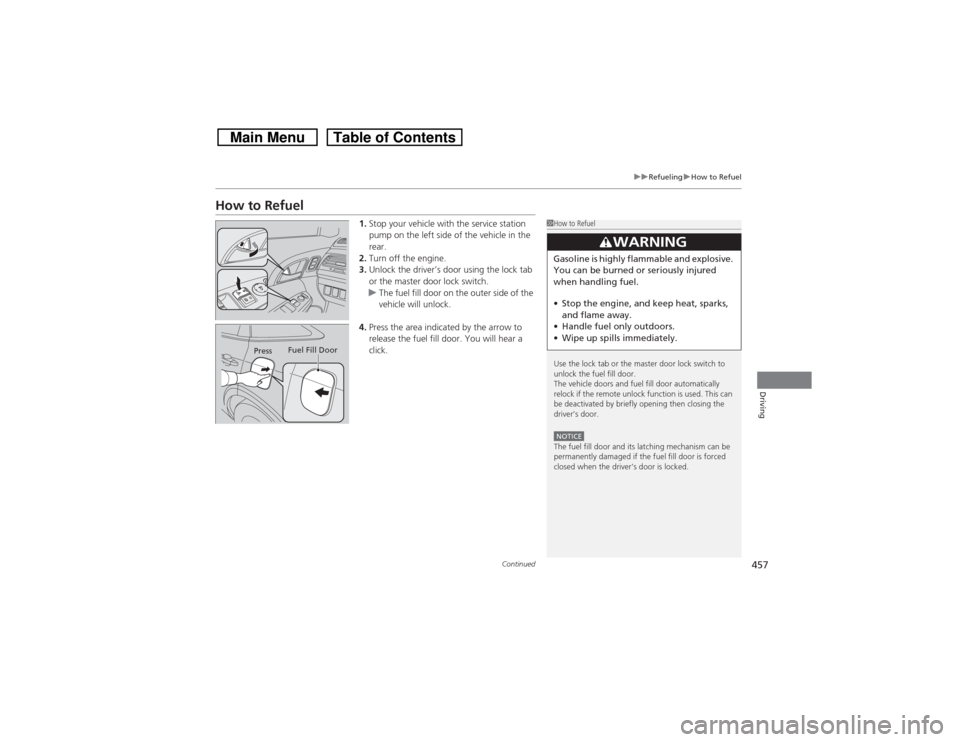
1.Stop your vehicle with the service station
pump on the left side of the vehicle in the
rear.
2.Turn off the engine.
3.Unlock the driver’s door using the lock tab
or the master door lock switch.
uThe fuel fill door on the outer side of the
vehicle will unlock.
4.Press the area indicated by the arrow to
release the fuel fill door. You will hear a
click.
1How to Refuel
Use the lock tab or the master door lock switch to
unlock the fuel fill door.
The vehicle doors and fuel fill door automatically
relock if the remote unlock function is used. This can
be deactivated by briefly opening then closing the
driver’s door.NOTICEThe fuel fill door and its latching mechanism can be
permanently damaged if the fuel fill door is forced
closed when the driver’s door is locked.
3
WARNING
Gasoline is highly flammable and explosive.
You can be burned or seriously injured
when handling fuel.
•Stop the engine, and keep heat, sparks,
and flame away.
•Handle fuel only outdoors.
•Wipe up spills immediately.
PressFuel Fill Door
Page 459 of 573
uuRefuelinguHow to Refuel
458Driving
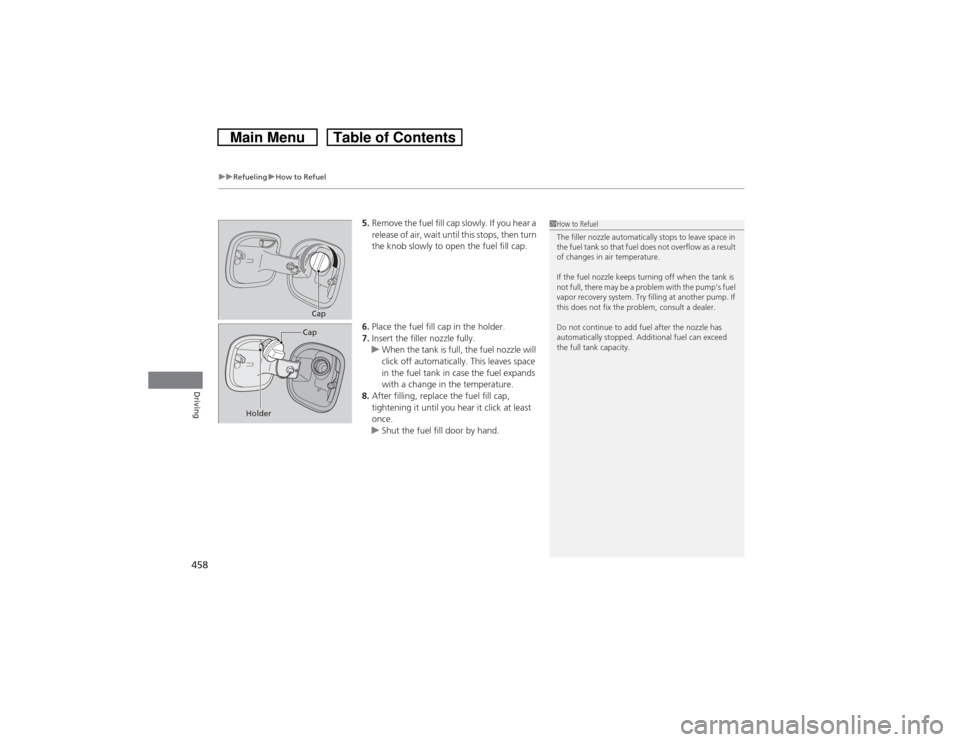
5.Remove the fuel fill cap slowly. If you hear a
release of air, wait until this stops, then turn
the knob slowly to open the fuel fill cap.
6.Place the fuel fill cap in the holder.
7.Insert the filler nozzle fully.
uWhen the tank is full, the fuel nozzle will
click off automatically. This leaves space
in the fuel tank in case the fuel expands
with a change in the temperature.
8.After filling, replace the fuel fill cap,
tightening it until you hear it click at least
once.
uShut the fuel fill door by hand.
1How to Refuel
The filler nozzle automatically stops to leave space in
the fuel tank so that fuel does not overflow as a result
of changes in air temperature.
If the fuel nozzle keeps turning off when the tank is
not full, there may be a problem with the pump’s fuel
vapor recovery system. Try filling at another pump. If
this does not fix the problem, consult a dealer.
Do not continue to add fuel after the nozzle has
automatically stopped. Additional fuel can exceed
the full tank capacity.
CapCap
Holder