Page 100 of 573

99
uuLocking and Unlocking the DoorsuLocking/Unlocking the Doors from the Inside
Continued
Controls
Locking/Unlocking the Doors from the Inside
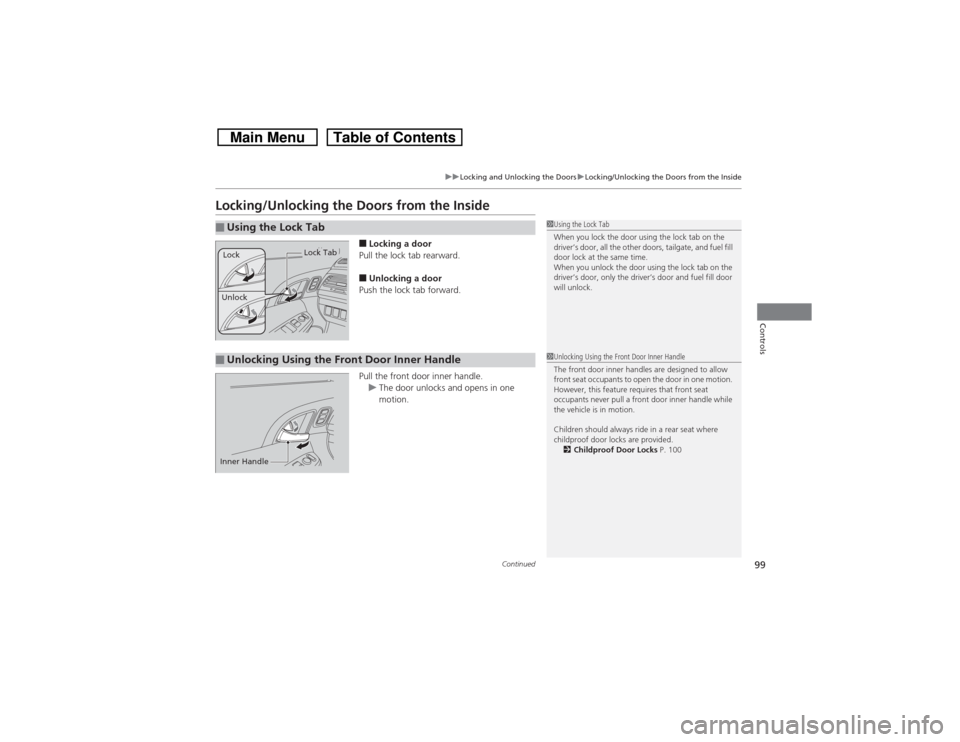
■Locking a door
Pull the lock tab rearward.■Unlocking a door
Push the lock tab forward.
Pull the front door inner handle.
uThe door unlocks and opens in one
motion.
■Using the Lock Tab
1Using the Lock Tab
When you lock the door using the lock tab on the
driver’s door, all the other doors, tailgate, and fuel fill
door lock at the same time.
When you unlock the door using the lock tab on the
driver’s door, only the driver’s door and fuel fill door
will unlock.
Unlock
Lock Tab
Lock
■Unlocking Using the Front Door Inner Handle
1Unlocking Using the Front Door Inner Handle
The front door inner handles are designed to allow
front seat occupants to open the door in one motion.
However, this feature requires that front seat
occupants never pull a front door inner handle while
the vehicle is in motion.
Children should always ride in a rear seat where
childproof door locks are provided.
2Childproof Door Locks P. 100
Inner Handle
Page 101 of 573

uuLocking and Unlocking the DoorsuChildproof Door Locks
100Controls
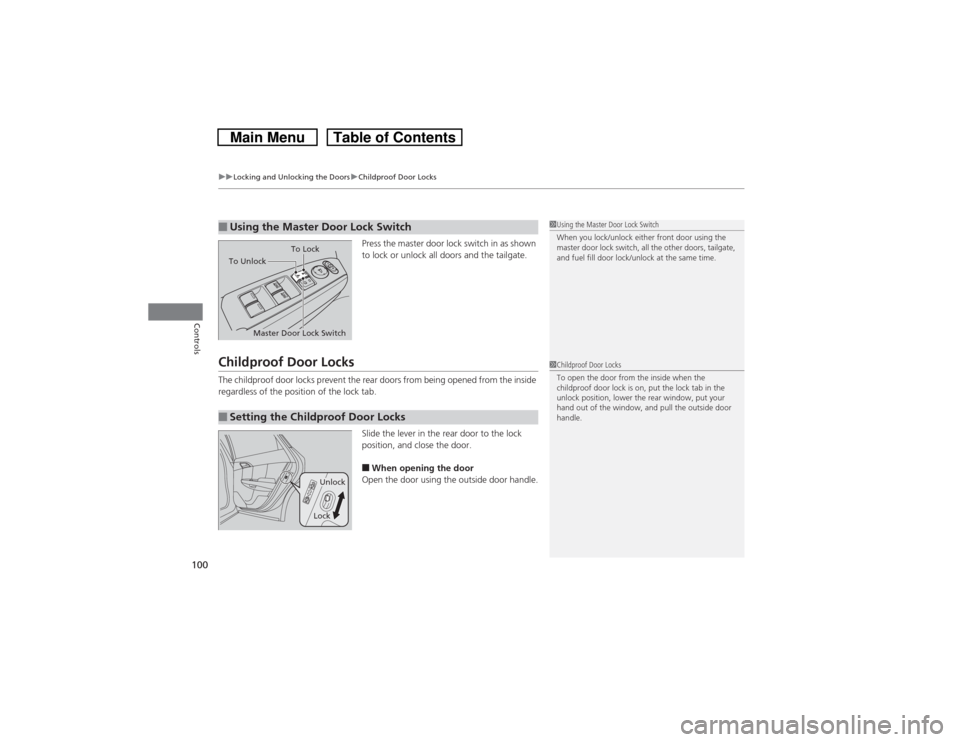
Press the master door lock switch in as shown
to lock or unlock all doors and the tailgate.
Childproof Door LocksThe childproof door locks prevent the rear doors from being opened from the inside
regardless of the position of the lock tab.
Slide the lever in the rear door to the lock
position, and close the door.
■When opening the door
Open the door using the outside door handle.
■Using the Master Door Lock Switch
1Using the Master Door Lock Switch
When you lock/unlock either front door using the
master door lock switch, all the other doors, tailgate,
and fuel fill door lock/unlock at the same time.
To Unlock
Master Door Lock SwitchTo Lock
■Setting the Childproof Door Locks
1Childproof Door Locks
To open the door from the inside when the
childproof door lock is on, put the lock tab in the
unlock position, lower the rear window, put your
hand out of the window, and pull the outside door
handle.
Unlock
Lock
Page 189 of 573

188
uuAudio System Basic OperationuAudio/Information Screen
Features
■Info
Shows the Trip Computer or Clock/Wallpaper information.
Press , rotate to select an item, then press .
Info menu items
Current Drive (Trip computer)
Shows the range, and instant and average fuel economy of the current trip, as well
as the average fuel economy from your last trip.
History of Trip A (Trip computer)
Shows the range, average fuel economy and distance traveled for the current trip,
as well as the average fuel economy and distances traveled during the last three
driving cycles.
Each time you reset the trip meter A, the information on the display updates. The
history of the previous three driving cycles is kept.
Delete History
1.Rotate to select Delete History, then press .
2.You will receive a confirmation message on the screen. Rotate to select Yes,
then press .
Clock/Wallpaper
Shows the current clock type and wallpaper
Clock/Wallpaper Change
Enters the clock and wallpaper setting menu screen.
Page 220 of 573

219
uuAudio System Basic OperationuAudio/Information Screen
Continued
Features
■Audio
Shows the current audio information.■Navigation
Shows the navigation screen.
2 Refer to the Navigation System Manual
■Phone
Shows the HFL information.
2 Bluetooth® HandsFreeLink® P. 367
■Info
Shows the Trip Computer or Clock/Wallpaper and other information. Rotate
to select an item, then press .■Trip computer (Current Drive)
Shows the range, and instant and average fuel economy of the current trip, as well
as the average fuel economy from your last trip.■Trip computer (History of Trip A)
Shows the range, average fuel economy and distances traveled for the current trip, as well
as the average fuel economy and distances traveled during the last three driving cycles.
Each time you reset the trip meter A, the information on the display updates. The
history of the previous three driving cycles is kept.■Deleting the history manually
1.Move on the History of Trip A screen to select Delete History, then press .
2.You will receive a confirmation message on the screen. Rotate to select Yes,
then press .■Clock/Wallpaper
Shows a clock screen or an image you import.
Page 297 of 573
296
uuCustomized Features
*u
Features
*1:Default SettingSetup
GroupCustomizable Features Description Selectable SettingsVehicle
SettingsDriver
Assist
System
Setup
*
Forward Collision Warning
Distance
*
Changes at which distance FCW alerts, or turns
FCW on and off.Long
*1/Normal/
Short/Off
Meter
SetupAdjust Outside Temp.
DisplayAdjusts the temperature reading by a few
degrees.-5°F ~ ±0°F
*1 ~ +5°F
(U.S.)
-3°C ~ ±0°C*1 ~ +3°C
(Canada)
“Trip A” Reset TimingChanges the setting of how to reset trip meter A
and average fuel economy A.With Refuel/IGN Off/
Manually Reset*1
“Trip B” Reset TimingChanges the setting of how to reset trip meter B
and average fuel economy B.With Refuel/IGN Off/
Manually Reset
*1
Driving
Position
Setup
*
Memory Position LinkChanges the driver’s seat and door mirror
positions to a stored setting.On
*1/Off
* Not available on all models
Page 308 of 573

307
uuCustomized Features
*u
Continued
Features
*1:Default SettingSetup
GroupCustomizable Features Description Selectable SettingsVehicle
SettingsDriver
Assist
System
SetupForward Collision Warning
DistanceChanges at which distance FCW alerts, or turns
FCW on and off.Long
*1/Normal/
Short/Off
Meter
SetupAdjust Outside Temp.
DisplayAdjusts the temperature reading by a few
degrees.-5°F ~ ±0°F
*1 ~ +5°F
(U.S.)
-3°C ~ ±0°C*1 ~ +3°C
(Canada)
“Trip A” Reset TimingChanges the setting of how to reset trip meter A,
average fuel economy A, average speed A
*, and
elapsed time A
*.With Refuel/IGN Off/
Manually Reset
*1
“Trip B” Reset TimingChanges the setting of how to reset trip meter B,
average fuel economy B, average speed B
*, and
elapsed time B
*.With Refuel/IGN Off/
Manually Reset
*1
Fuel Efficiency BacklightTurns the ambient meter feature on and off.On
*1/Off
Keyless Start Guidance
ScreensDisplays the push button start guidance when
conditions are met to change power mode.On*1/Off
* Not available on all models
Page 410 of 573

409
Driving
This chapter discusses driving, refueling, and information on items such as accessories.
Before Driving
Driving Preparation .......................... 410
Maximum Load Limit........................ 413
Towing a Trailer
Towing Preparation .......................... 415
Driving Safely with a Trailer .............. 418
Towing Your Vehicle ........................ 419
When Driving
Starting the Engine .......................... 420
Precautions While Driving................. 424
Automatic Transmission ................... 425
Shifting ............................................ 426Cruise Control ................................. 432
Forward Collision Warning (FCW)
*.. 435
Lane Departure Warning (LDW)
*..... 439
VSA® (Vehicle Stability Assist), aka ESC
(Electronic Stability Control), System .. 442
LaneWatch
TM*.................................. 444
TPMS (Tire Pressure Monitoring System) .. 446Tire Pressure Monitoring System (TPMS) -
Required Federal Explanation ......... 447
Braking
Brake System ................................... 449
ABS (Anti-lock Brake System) ........... 451Brake Assist System ......................... 452
Parking Your Vehicle
When Stopped ................................ 453
Rearview Camera............................. 454
Multi-View Rear Camera.................. 455
Refueling
Fuel Information .............................. 456
How to Refuel ................................. 457
Fuel Economy.................................... 459
Improving Fuel Economy .................. 459
Accessories and Modifications........ 460
* Not available on all models
Page 422 of 573

421
uuWhen DrivinguStarting the Engine
Driving
3.Turn the ignition switch to START
(e
without depressing the accelerator pedal.
1.Keeping your right foot on the brake pedal, release the parking brake. Check that
the parking brake indicator has gone off.
2Parking Brake P. 449
2.Put the shift lever in
(D. Select
(R when reversing.
3.Gradually release the brake pedal and gently depress the accelerator pedal to pull
away.
■Starting to Drive
1Starting the Engine
Do not hold the key in START
(e for more than 15
seconds.
•If the engine does not start right away, wait for at
least 10 seconds before trying again.•If the engine starts, but then immediately stops,
wait at least 10 seconds before repeating step 3
while gently depressing the accelerator pedal.
Release the accelerator pedal once the engine
starts.
The immobilizer system protects your vehicle from
theft. If an improperly coded key (or other device) is
used, the engine’s fuel system is disabled.
2Immobilizer System P. 107