Page 139 of 573

uuAdjusting the SeatsuAdjusting the Seat Positions
138Controls
After all occupants have adjusted their seats and head restraints, and put on their
seat belts, it is very important that they continue to sit upright, well back in their
seats, with their feet on the floor, until the vehicle is safely parked and the engine is
off.
Sitting improperly can increase the chance of injury during a crash. For example, if
an occupant slouches, lies down, turns sideways, sits forward, leans forward or
sideways, or puts one or both feet up, the chance of injury during a crash is greatly
increased.
In addition, an occupant who is out of position in the front seat can be seriously or
fatally injured in a crash by striking interior parts of the vehicle or being struck by an
inflating front airbag.
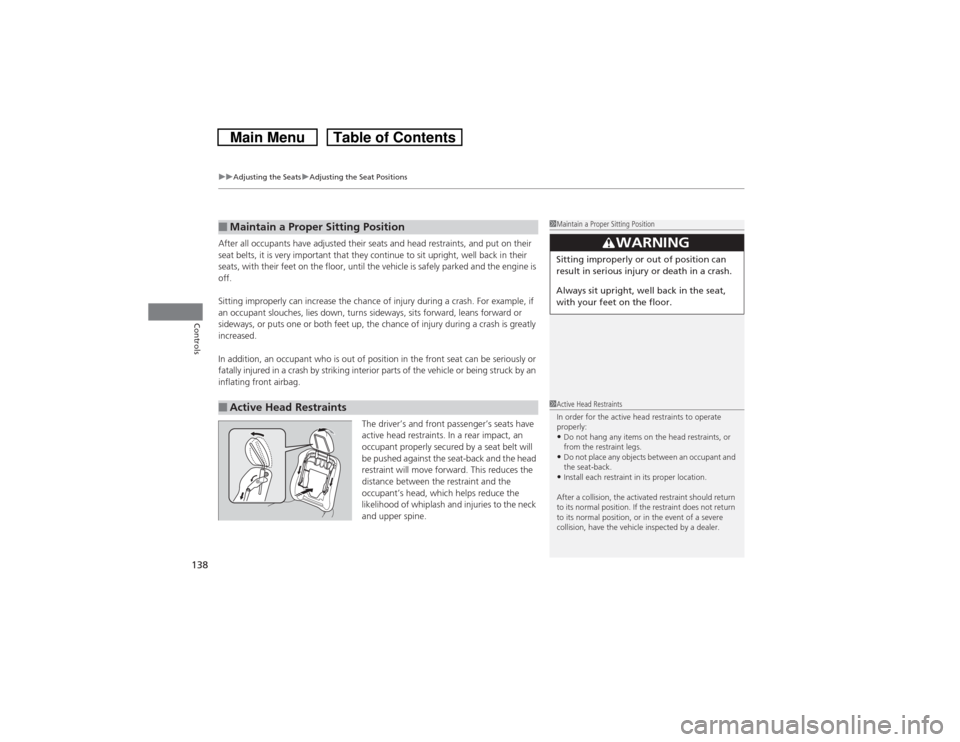
The driver’s and front passenger’s seats have
active head restraints. In a rear impact, an
occupant properly secured by a seat belt will
be pushed against the seat-back and the head
restraint will move forward. This reduces the
distance between the restraint and the
occupant’s head, which helps reduce the
likelihood of whiplash and injuries to the neck
and upper spine.■Maintain a Proper Sitting Position■Active Head Restraints
1Maintain a Proper Sitting Position
3
WARNING
Sitting improperly or out of position can
result in serious injury or death in a crash.
Always sit upright, well back in the seat,
with your feet on the floor.1Active Head Restraints
In order for the active head restraints to operate
properly:•Do not hang any items on the head restraints, or
from the restraint legs.•Do not place any objects between an occupant and
the seat-back.•Install each restraint in its proper location.
After a collision, the activated restraint should return
to its normal position. If the restraint does not return
to its normal position, or in the event of a severe
collision, have the vehicle inspected by a dealer.
Page 140 of 573

139
uuAdjusting the SeatsuRear Seats
Continued
Controls
Rear SeatsSeparately fold down the left and right halves of the rear seat to make room for
cargo.■To fold down the seat
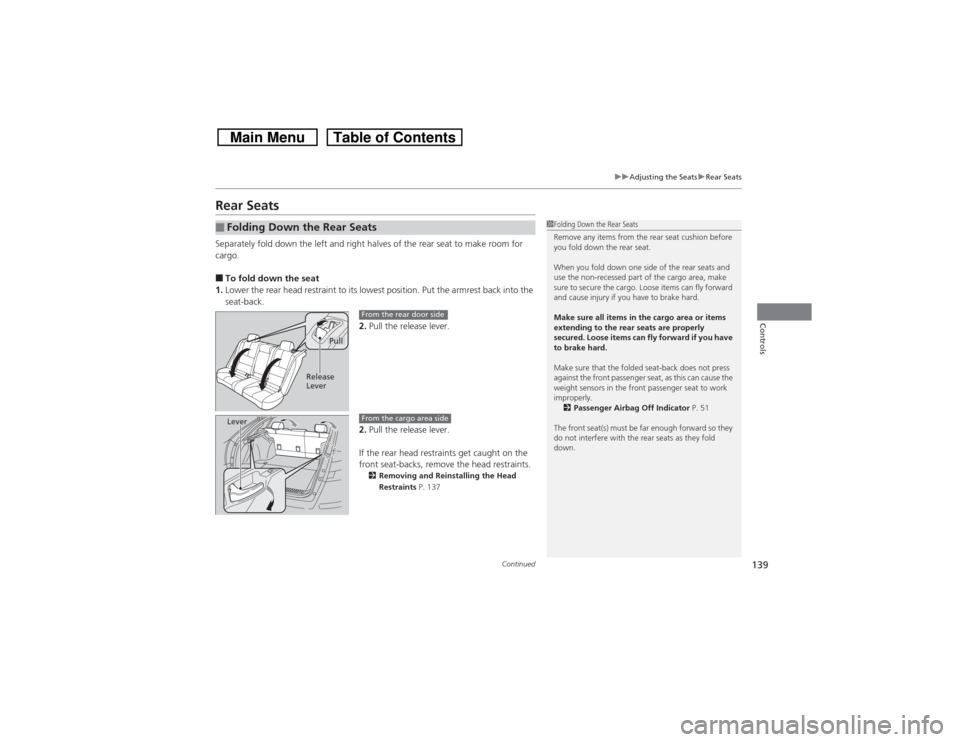
1.Lower the rear head restraint to its lowest position. Put the armrest back into the
seat-back.
2.Pull the release lever.
2.Pull the release lever.
If the rear head restraints get caught on the
front seat-backs, remove the head restraints.
2Removing and Reinstalling the Head
Restraints P. 137
■Folding Down the Rear Seats
1Folding Down the Rear Seats
Remove any items from the rear seat cushion before
you fold down the rear seat.
When you fold down one side of the rear seats and
use the non-recessed part of the cargo area, make
sure to secure the cargo. Loose items can fly forward
and cause injury if you have to brake hard.
Make sure all items in the cargo area or items
extending to the rear seats are properly
secured. Loose items can fly forward if you have
to brake hard.
Make sure that the folded seat-back does not press
against the front passenger seat, as this can cause the
weight sensors in the front passenger seat to work
improperly.
2Passenger Airbag Off Indicator P. 51
The front seat(s) must be far enough forward so they
do not interfere with the rear seats as they fold
down.
Pull
Release
Lever
From the rear door side
Lever
From the cargo area side
Page 150 of 573
Continued
149
uuInterior Lights/Interior Convenience ItemsuInterior Convenience Items
Controls
Use floor cargo hooks to secure luggage in the
cargo area.
There are also hooks on both sides of the
cargo area.
■Cargo Hooks
1Cargo Hooks
Each hook is designed to hold up to 56.2 lbs (25.5 kg)
of weight.
Hooks Hooks
Page 167 of 573

166
uuAudio SystemuAudio System Theft Protection
Features
Audio System Theft ProtectionThe audio system is disabled when it is disconnected from the power source, such as
when the battery is disconnected or goes dead.■Reactivating the audio system
1.Turn the ignition switch to ON
(w, and turn on the audio system.
uIf you turn the ignition switch to ACCESSORY
(q, you will be requested to
enter the audio security code.
2.Enter the audio security code using the preset buttons.
1.Turn the ignition switch to ON
(w*1, and turn on the audio system.
uIf you turn the ignition switch to ACCESSORY
(q*1, you will be requested to
enter the audio security code. See step 3.
2.Press and hold the VOL/ (power/volume) button again for more than two
seconds.
uThe audio system is reactivated when the system’s control unit recognizes that
the system is in your vehicle.
If the control unit fails to recognize, Enter code/Enter PIN appears on the
audio/information screen.
3.If the two steps do not work, you can enter the audio security code using the
touch screen.
If you enter an incorrect digit, continue to the last digit, then try again. If you do not
enter the code correctly after 10 tries, leave the system for one hour before trying
again, or visit a dealer to have the system reset.
*1: Models with the smart entry system have an ENGINE START/STOP button instead of an
ignition switch.
1Audio System Theft Protection
Find the audio system’s security code and serial
number label in your owner’s manual kit.
We recommend that you write down the serial
number in this owner’s manual.
Do not store the label in your vehicle. If you lose the
label, you must first retrieve the serial number, and
then obtain the code.
You can find out about your serial number and
security code from a dealer.
You can register the security code at Honda Owners
(owners.honda.com.), and find information on how
to retrieve the serial number and obtain the code at
radio-navicode.honda.com.U.S. models
Audio system without touch screenAudio system with touch screenAll models
Page 281 of 573
uuGeneral Information on the Audio SystemuCompatible iPod and USB Flash Drives
280Features
•Use a recommended USB flash drive of 256 MB or higher.
•Some digital audio players may not be compatible.
•Some USB flash drives (e.g., a device with security lockout) may not work.
•Some software files may not allow for audio play or text data display.
•Some versions of MP3, WMA, or AAC formats may be unsupported.■USB Flash Drives
1USB Flash Drives
Files on the USB flash drive are played in their stored
order. This order may be different from the order
displayed on your PC or device.
Page 285 of 573
284
uuCustomized Features
*u
Features
“Trip B” Reset Timing
Adjust Outside Temp. Display
“Trip A” Reset TimingKeyless Access Light FlashAuto Light Sensitivity
Auto Door LockAuto Door Unlock
Forward Collision Warning
Distance
*
Door Unlock Mode
Interior Light Dimming TimeHeadlight Auto Off Timer
Memory Position Link
Key And Remote Unlock ModeKeyless Lock Answer BackSecurity Relock Timer
Maintenance Reset
Default All
Vehicle
Settings
Driver Assist System Setup
*
Meter
SetupDriving Position Setup
*
Keyless
Access
SetupLighting
SetupDoor
Setup
Maintenance Info.
Keyless Access Beep
* Not available on all models
Page 291 of 573
290
uuCustomized Features
*u
Features
“Trip A” Reset Timing“Trip B” Reset Timing
Adjust Outside Temp. Display
Forward Collision Warning Distance
Default
Memory Position Link
Door Unlock Mode
Keyless Access Light Flash
Interior Light Dimming TimeHeadlight Auto Off TimerAuto light Sensitivity
Key And Remote Unlock ModeKeyless Lock Answer BackSecurity Relock TimerAuto Door LockAuto Door Unlock
Maintenance Reset
Vehicle
Settings
Meter
SetupDriver
Assist
System
SetupDriving Position Setup
Keyless
Access
SetupLighting
SetupDoor
Setup
Maintenance Info.
Keyless Access Beep
Page 295 of 573
294
uuCustomized Features
*u
Features
■List of customizable options
*1:Default SettingSetup
GroupCustomizable Features Description Selectable SettingsSystem
Settings
Display
Brightness
Changes the brightness of the audio/information
screen.
—
Contrast
Changes the contrast of the audio/information
screen.
—
Black level
Changes the black level of the audio/information
screen.
—
Beep
Selects whether a beeper sounds or not when
you operate the selector knob.
On
*1/Off
Blue-
tooth
Bluetooth
Turns the Bluetooth® on and off.
On
*1/Off
Bluetooth Device List
Pairs a new phone to HFL, edits and deletes a
paired phone, and create a security PIN.2Phone Setup P. 339
—
Edit Pairing Code
Changes a pairing code.2To change the pairing code setting P. 341
Random/Fixed
*1
Voice Recognition
Turns the voice recognition on and off.
On
*1/Off
Models without navigation system