2014 HONDA CROSSTOUR towing
[x] Cancel search: towingPage 1 of 573

ContentsThis owner’s manual should be considered a permanent part of the
vehicle and should remain with the vehicle when it is sold.
This owner’s manual covers all models of your vehicle. You may find
descriptions of equipment and features that are not on your
particular model.
Images throughout this owner’s manual (including the front cover)
represent features and equipment that are available on some, but
not all, models. Your particular model may not have some of these
features.
This owner’s manual is for vehicles sold in the United States and
Canada.
The information and specifications included in this publication were
in effect at the time of approval for printing. Honda Motor Co., Ltd.
reserves the right, however, to discontinue or change specifications
or design at any time without notice and without incurring any
obligation.
2Safe Driving P. 27For Safe Driving P. 28 Seat Belts P. 32 Airbags P. 392Instrument Panel P. 69Indicators P. 70 Gauges and Displays P. 832Controls P. 87Setting the Clock P. 88 Locking and Unlocking the Doors P. 91
Opening and Closing the Moonroof P. 113
Adjusting the Seats P. 133
Climate Control System
* P. 157
2Features P. 163Audio System P. 164 Audio System Basic Operation P. 169, 182, 215
Customized Features
* P. 281 HomeLink® Universal Transceiver
* P. 318
2Driving P. 409Before Driving P. 410 Towing a Trailer P. 415Parking Your Vehicle P. 453
Rearview Camera P. 454
Multi-View Rear Camera P. 455
2Maintenance P. 461Before Performing Maintenance P. 462 Maintenance Minder
TM P. 465
Checking and Maintaining Wiper Blades P. 493
Heating and Cooling System
*/Climate Control System
* Maintenance P. 509
2Handling the Unexpected P. 515Tools P. 516 If a Tire Goes Flat P. 517
Overheating P. 532 Indicator, Coming On/Blinking P. 534
When You Cannot Unlock the Fuel Fill Door P. 5432Information P. 545Specifications P. 546 Identification Numbers P. 550
Emissions Testing P. 553 Warranty Coverages P. 555
Page 2 of 573

Contents
Child Safety P. 54 Exhaust Gas Hazard P. 66 Safety Labels P. 67Opening and Closing the Tailgate P. 105 Security System P. 107 Opening and Closing the Windows P. 110
Operating the Switches Around the Steering Wheel P. 114 Adjusting the Mirrors P. 130
Interior Lights/Interior Convenience Items P. 142 Heating and Cooling System
* P. 154
Audio Error Messages P. 268 General Information on the Audio System P. 276
Bluetooth® HandsFreeLink® P. 320, 332, 367 Compass
* P. 405, 407
When Driving P. 420 Braking P. 449
Refueling P. 456 Fuel Economy P. 459 Accessories and Modifications P. 460Maintenance Under the Hood P. 469 Replacing Light Bulbs P. 484
Checking and Maintaining Tires P. 497 Battery P. 506 Remote Transmitter Care P. 507
Cleaning P. 510Engine Does Not Start P. 525 Jump Starting P. 528 Shift Lever Does Not Move P. 531
Fuses P. 538 Emergency Towing P. 542
When You Cannot Open the Tailgate P. 544Devices that Emit Radio Waves P. 551 Reporting Safety Defects P. 552
Authorized Manuals P. 557 Customer Service Information P. 558
Quick Reference Guide
P. 2
Safe Driving
P. 27
Instrument Panel
P. 69
Controls
P. 87
Features
P. 163
Driving
P. 409
Maintenance
P. 461
Handling the Unexpected
P. 515
Information
P. 545
Index
P. 562
Page 19 of 573

18Quick Reference Guide
Driving
(P409)
Release ButtonShift LeverAutomatic Transmission
(P426, 428)
●Shift to
(P and depress the brake pedal when starting the engine.
Shifting
Park
Turn off or start the engine.
Transmission is locked.
Reverse
Used when reversing.
Neutral
Transmission is not locked.
Drive
Normal driving.
On models with paddle shifter,
D-paddle shift mode can be used.Drive (D3)
Used when:
•Going up or down hills
•Towing a trailer in hilly terrain
Second
Used to increase engine braking (the
transmission is locked in 2nd gear)
First
Used to further increase engine braking
(the transmission is locked in 1st gear)
Models with
paddle shifter
Models without
paddle shifter
S Position
Sequential shift mode can be used.
Models with paddle shifter
Models without paddle shifter
Paddle Shifters
(P431)
●Paddle shifters allow you to shift gears much like a
manual transmission (1st through 6th). This is useful for
engine braking.
●D-paddle shift mode: The transmission will shift back to
automatic mode once the system detects that the vehicle
is cruising.
●Sequential shift mode: Holds the selected gear, and the M
indicator comes on.
●The selected gear position is shown in the instrument
panel.
Shift Down
(-
Paddle ShifterShift Up
(+
Paddle Shifter
Selected Gear
Number M Indicator Shift Lever
Position Indicator Depress the brake pedal and
press the release button to
move out of
(P.
Move the shift lever without
pressing the release button.
Press the release button to move
the shift lever.
Page 22 of 573

Quick Reference Guide21
Handling the Unexpected
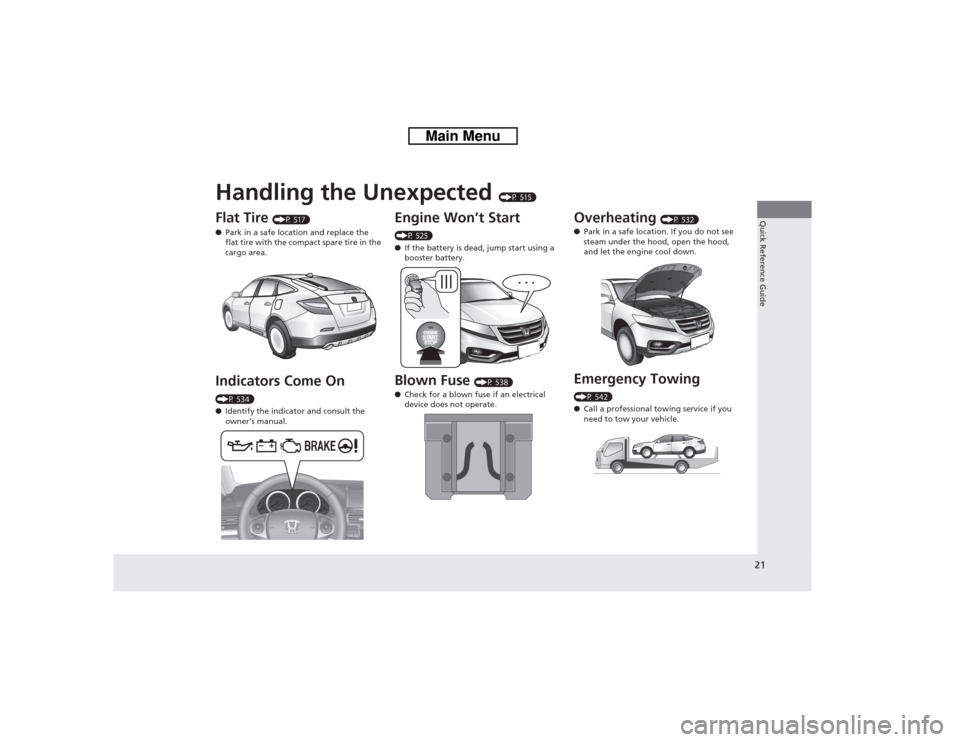
(P 515)
Flat Tire
(P 517)
●Park in a safe location and replace the
flat tire with the compact spare tire in the
cargo area.
Indicators Come On (P 534)
●Identify the indicator and consult the
owner’s manual.
Engine Won’t Start (P 525)
●If the battery is dead, jump start using a
booster battery.Blown Fuse
(P 538)
●Check for a blown fuse if an electrical
device does not operate.
Overheating
(P 532)
●Park in a safe location. If you do not see
steam under the hood, open the hood,
and let the engine cool down.
Emergency Towing (P 542)
●Call a professional towing service if you
need to tow your vehicle.
Page 410 of 573

409
Driving
This chapter discusses driving, refueling, and information on items such as accessories.
Before Driving
Driving Preparation .......................... 410
Maximum Load Limit........................ 413
Towing a Trailer
Towing Preparation .......................... 415
Driving Safely with a Trailer .............. 418
Towing Your Vehicle ........................ 419
When Driving
Starting the Engine .......................... 420
Precautions While Driving................. 424
Automatic Transmission ................... 425
Shifting ............................................ 426Cruise Control ................................. 432
Forward Collision Warning (FCW)
*.. 435
Lane Departure Warning (LDW)
*..... 439
VSA® (Vehicle Stability Assist), aka ESC
(Electronic Stability Control), System .. 442
LaneWatch
TM*.................................. 444
TPMS (Tire Pressure Monitoring System) .. 446Tire Pressure Monitoring System (TPMS) -
Required Federal Explanation ......... 447
Braking
Brake System ................................... 449
ABS (Anti-lock Brake System) ........... 451Brake Assist System ......................... 452
Parking Your Vehicle
When Stopped ................................ 453
Rearview Camera............................. 454
Multi-View Rear Camera.................. 455
Refueling
Fuel Information .............................. 456
How to Refuel ................................. 457
Fuel Economy.................................... 459
Improving Fuel Economy .................. 459
Accessories and Modifications........ 460
* Not available on all models
Page 414 of 573

413
uuBefore DrivinguMaximum Load Limit
Continued
Driving
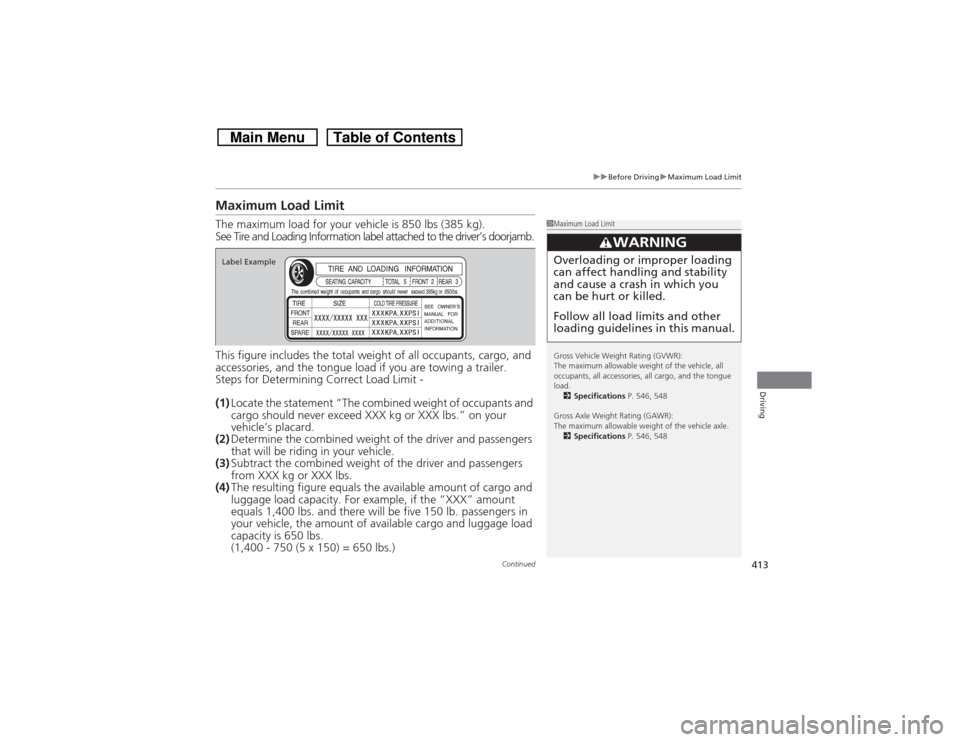
Maximum Load LimitThe maximum load for your vehicle is 850 lbs (385 kg).
See Tire and Loading Information label attached to the driver’s doorjamb.
This figure includes the total weight of all occupants, cargo, and
accessories, and the tongue load if you are towing a trailer.
Steps for Determining Correct Load Limit -
(1)Locate the statement “The combined weight of occupants and
cargo should never exceed XXX kg or XXX lbs.” on your
vehicle’s placard.
(2)Determine the combined weight of the driver and passengers
that will be riding in your vehicle.
(3)Subtract the combined weight of the driver and passengers
from XXX kg or XXX lbs.
(4)The resulting figure equals the available amount of cargo and
luggage load capacity. For example, if the “XXX” amount
equals 1,400 lbs. and there will be five 150 lb. passengers in
your vehicle, the amount of available cargo and luggage load
capacity is 650 lbs.
(1,400 - 750 (5 x 150) = 650 lbs.)
1Maximum Load Limit
Gross Vehicle Weight Rating (GVWR):
The maximum allowable weight of the vehicle, all
occupants, all accessories, all cargo, and the tongue
load.
2Specifications P. 546, 548
Gross Axle Weight Rating (GAWR):
The maximum allowable weight of the vehicle axle.
2Specifications P. 546, 548
3
WARNING
Overloading or improper loading
can affect handling and stability
and cause a crash in which you
can be hurt or killed.
Follow all load limits and other
loading guidelines in this manual.
Label Example
Page 415 of 573

414
uuBefore DrivinguMaximum Load Limit
Driving
(5)Determine the combined weight of luggage and cargo being
loaded on the vehicle. That weight may not safely exceed the
available cargo and luggage load capacity calculated in step 4.
(6)If your vehicle will be towing a trailer, load from your trailer will
be transferred to your vehicle. Consult this manual to
determine how this reduces the available cargo and luggage
load capacity of your vehicle.
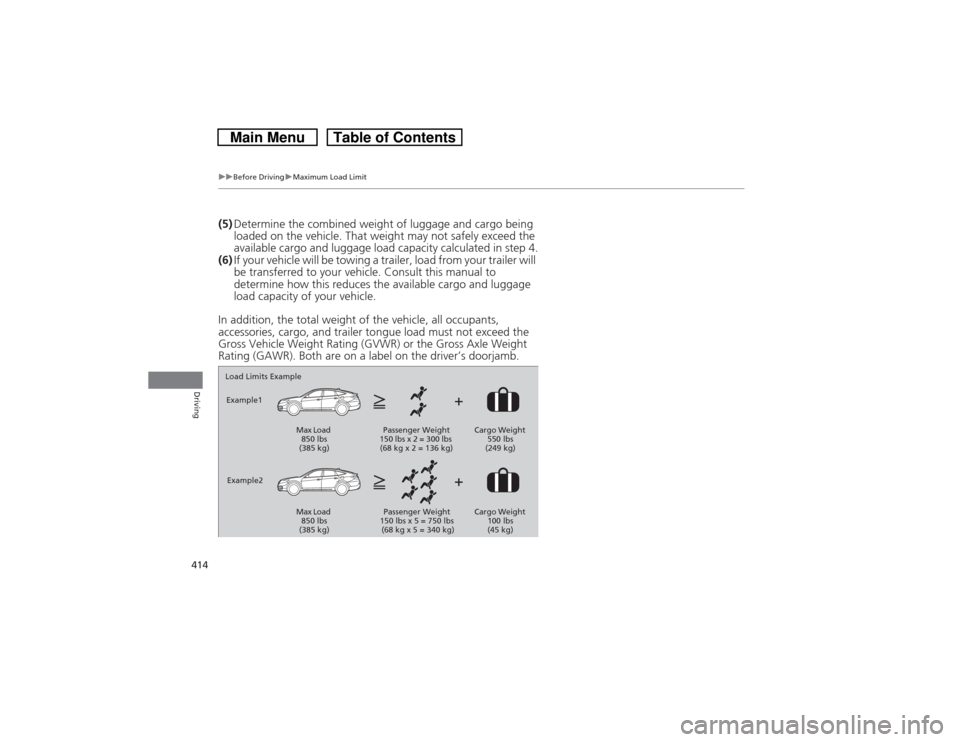
In addition, the total weight of the vehicle, all occupants,
accessories, cargo, and trailer tongue load must not exceed the
Gross Vehicle Weight Rating (GVWR) or the Gross Axle Weight
Rating (GAWR). Both are on a label on the driver’s doorjamb.Load Limits Example
Example1
Max Load
850 lbs
(385 kg)Passenger Weight
150 lbs x 2 = 300 lbs
(68 kg x 2 = 136 kg)Cargo Weight
550 lbs
(249 kg)
Example2
Max Load
850 lbs
(385 kg)Passenger Weight
150 lbs x 5 = 750 lbs
(68 kg x 5 = 340 kg)Cargo Weight
100 lbs
(45 kg)
Page 416 of 573

415
Continued
Driving
Towing a TrailerTowing PreparationYour vehicle can tow a trailer if you carefully observe the load limits, use the proper
equipment, and follow the towing guidelines. Check the load limits before driving.
■Total trailer weight
Maximum allowable weight of the trailer,
cargo, and everything in or on it must not
exceed 1,500 lbs (680 kg) for 6-cylinder
models and 1,000 lbs (453 kg) for 4-cylinder
models. Towing loads in excess of this can
seriously affect vehicle handling and
performance and can damage the engine and
drivetrain.■Tongue load
The weight of the tongue with a fully loaded
trailer on the hitch should be approximately
10% of the total trailer weight.
•Excessive tongue load reduces front tire
traction and steering control. Too little
tongue load can make the trailer unstable
and cause it to sway.
•To achieve a proper tongue load, start by
loading 60% of the load toward the front
of the trailer and 40% toward the rear.
Readjust the load as needed.
■Towing Load Limits
1Towing Load Limits
Check if all loads are within limits at a public scale.
If a public scale is not available, add the estimated
weight of your cargo load to the weight of your
trailer (as quoted by the manufacturer), and the
tongue load.
Break-in Period
Avoid towing a trailer during your vehicle’s first 600
miles (1,000 km).
Never exceed the gross weight ratings.
Gross weight information
2Vehicle Specifications P. 546, 548
3
WARNING
Exceeding any load limit or improperly
loading your vehicle and trailer can cause a
crash in which you can be seriously hurt or
killed.
Check the loading of your vehicle and
trailer carefully before starting to drive.
Total LoadTongue LoadTongue Load