2014 HONDA CIVIC ignition
[x] Cancel search: ignitionPage 180 of 469
179Features
Audio System Basic OperationTo use the audio system function, the ignition switch must be in ACCESSORY
(q
or
ON
(w
*1.
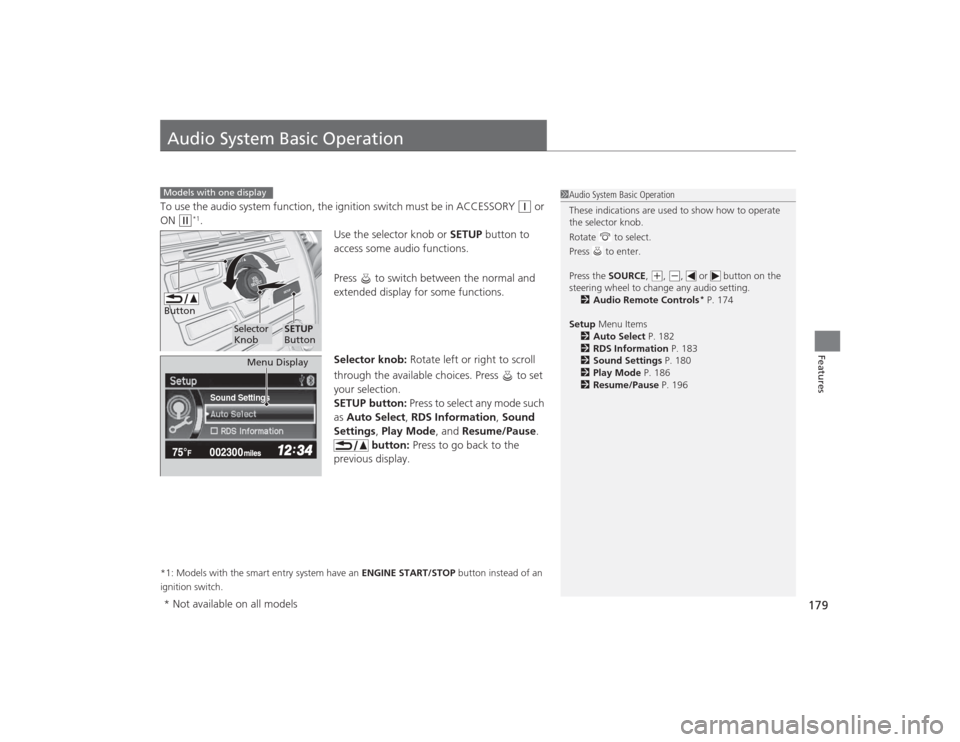
Use the selector knob or SETUP button to
access some audio functions.
Press to switch between the normal and
extended display for some functions.
Selector knob: Rotate left or right to scroll
through the available choices. Press to set
your selection.
SETUP button: Press to select any mode such
as Auto Select , RDS Information , Sound
Settings , Play Mode , and Resume/Pause.
button: Press to go back to the
previous display.
*1: Models with the smart entry system have an ENGINE START/STOP button instead of an
ignition switch.Models with one display
1 Audio System Basic Operation
These indications are used to show how to operate
the selector knob.
Rotate to select.
Press to enter.
Press the SOURCE ,
(+, (-, or button on the
steering wheel to change any audio setting. 2 Audio Remote Controls
* P. 174
Setup Menu Items
2 Auto Select P. 182
2 RDS Information P. 183
2 Sound Settings P. 180
2 Play Mode P. 186
2 Resume/Pause P. 196
Button
Selector
Knob
SETUP
Button
Sound Settings
Menu Display
* Not available on all models
Page 249 of 469
248
uuBluetooth ® HandsFreeLink ®
*uHFL Menus
Features
HFL MenusThe ignition switch must be in ACCESSORY
(q
or ON
(w
*1 to use HFL.
1HFL Menus
To use HFL, you must first pair your Bluetooth-
compatible cell phone to the system while the vehicle
is parked.
Some functions are limit ed while driving. A message
appears on the screen when the vehicle is moving
and the operation is canceled.
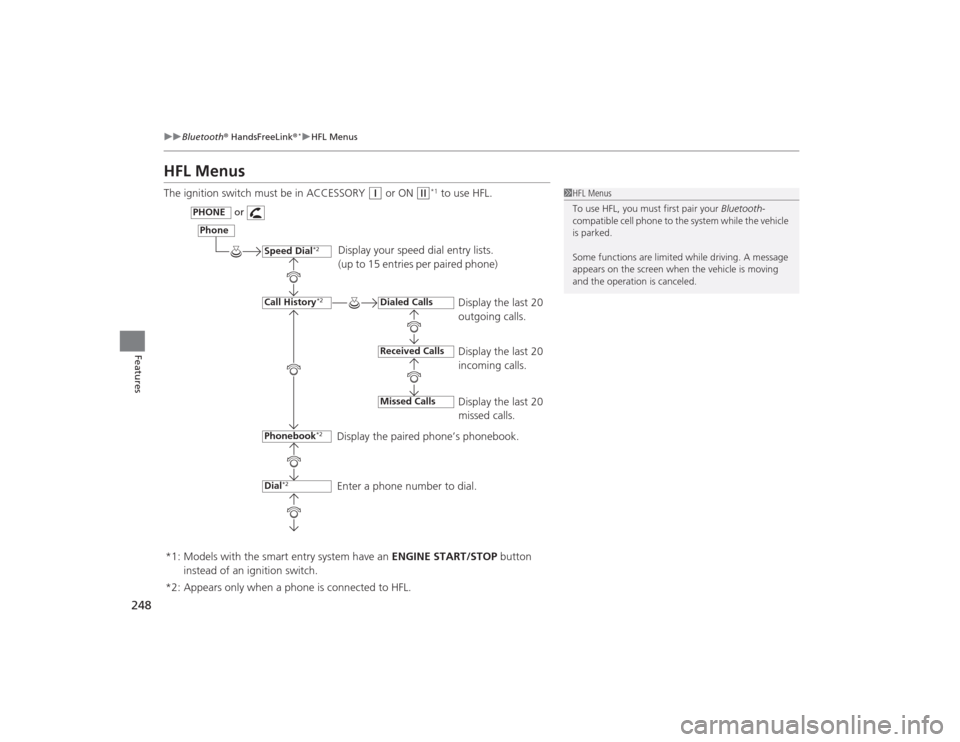
Display your speed dial entry lists.
(up to 15 entries per paired phone)
Display the last 20
outgoing calls.
Display the last 20
incoming calls.
Display the last 20
missed calls.
Display the paired phone’s phonebook.
Enter a phone number to dial.
Phone
Speed Dial
*2
Call History
*2
PHONE
or
Phonebook
*2
Dial
*2
Dialed CallsReceived CallsMissed Calls
*2: Appears only when a phone is connected to HFL. *1: Models with the smart entry system have an ENGINE START/STOP button
instead of an ignition switch.
Page 315 of 469
uuWhen Driving uStarting the Engine
314Driving
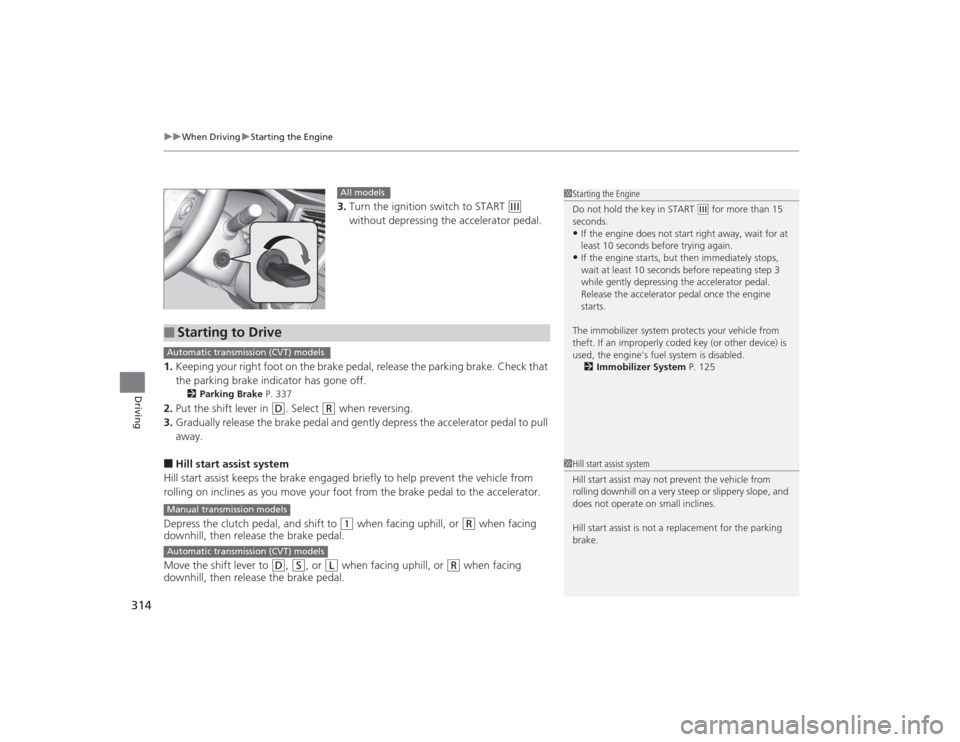
3. Turn the ignition switch to START
(e
without depressing the accelerator pedal.
1. Keeping your right foot on the brake pedal, release the parking brake. Check that
the parking brake indicator has gone off.
2 Parking Brake P. 337
2.Put the shift lever in
(D
. Select
(R
when reversing.
3. Gradually release the brake pedal and gently depress the accelerator pedal to pull
away.
■Hill start assist system
Hill start assist keeps the brake engaged briefly to help prevent the vehicle from
rolling on inclines as you move your foot from the brake pedal to the accelerator.
Depress the clutch pedal, and shift to
(1
when facing uphill, or
(R
when facing
downhill, then release the brake pedal.
Move the shift lever to
(D
, (S
, or
(L
when facing uphill, or
(R
when facing
downhill, then release the brake pedal.
1 Starting the Engine
Do not hold the key in START
(e for more than 15
seconds.
•If the engine does not start right away, wait for at
least 10 seconds before trying again.•If the engine starts, but then immediately stops,
wait at least 10 seconds before repeating step 3
while gently depressing the acce lerator pedal.
Release the accelerator pedal once the engine
starts.
The immobilizer system protects your vehicle from
theft. If an improperly coded key (or other device) is
used, the engine's fuel system is disabled. 2 Immobilizer System P. 125
All models
■
Starting to DriveAutomatic transmission (CVT) modelsManual transmission modelsAutomatic transmission (CVT) models
1Hill start assist system
Hill start assist may not prevent the vehicle from
rolling downhill on a very steep or slippery slope, and
does not operate on small inclines.
Hill start assist is not a replacement for the parking
brake.
Page 319 of 469
318
uuWhen Driving uPrecautions While Driving
Driving
Precautions While DrivingAvoid driving in deep water and on flooded roads. This can damage the engine or
driveline, or cause electrical component failure.
If there is a strong impact with something under the vehicle, stop in a safe location.
Check the underside of the vehicle for damage or any fluid leaks.*1: Models with the smart entry system have an ENGINE START/STOP button instead of an
ignition switch.■
In Rain
■
Other Precautions
1 Precautions While DrivingNOTICEDo not operate the shift lever while pressing the
accelerator pedal. You could damage the
transmission.
If the ignition switch is turned to ACCESSORY
(q*1
while driving, the engine will shut down and all
steering and brake power assist functions will stop,
making it difficult to control the vehicle.
Do not put the shift lever in
( N, as you will lose
engine braking (and acceleration) performance.
During the first 600 miles (1,000 km) of operation,
avoid sudden acceleration or full throttle operation so
as not to damage the engine or powertrain.
Avoid hard braking for the first 200 miles (300 km).
You should also follow this when the brake pads are
replaced.
NOTICEIf you repeatedly turn the steering wheel at an
extremely low speed, or hold the steering wheel on
the full left or right position for a while, the electric
power steering (EPS) system heats up. The system
goes into a protective mode, and limits its
performance. The steering wheel becomes harder
and harder to operate. Once the system cools down,
the EPS system is restored.
Repeated operation under these conditions can
eventually damage the system.
Page 321 of 469
320
uuWhen Driving uShifting
Driving
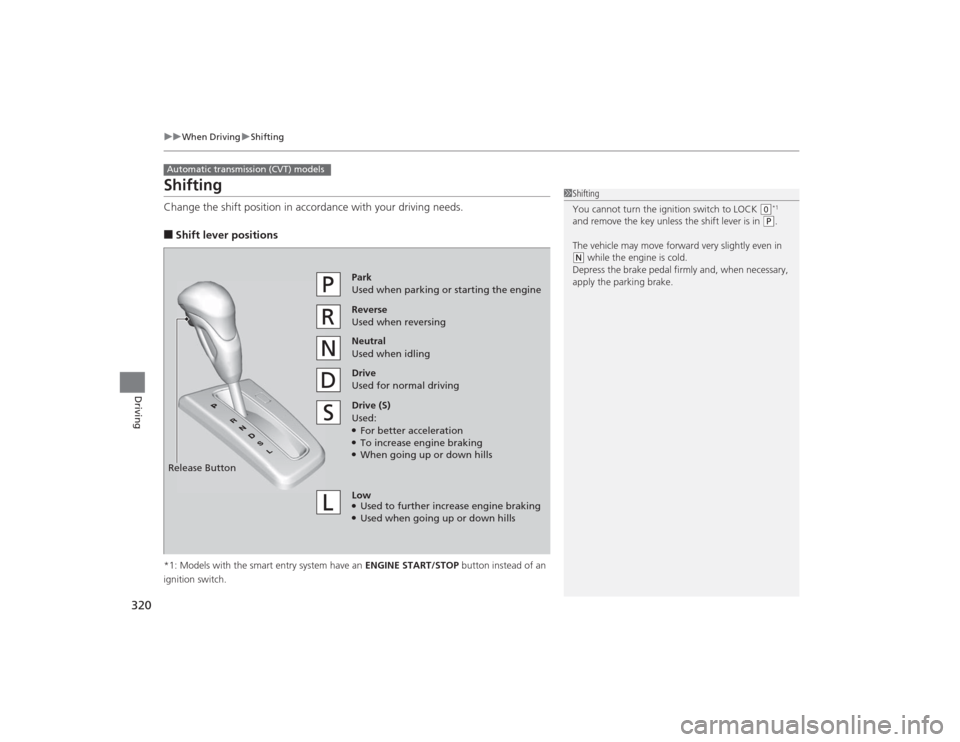
ShiftingChange the shift position in accordance with your driving needs.■Shift lever positions*1: Models with the smart entry system have an ENGINE START/STOP button instead of an
ignition switch.Automatic transmission (CVT) models
1 Shifting
You cannot turn the ignition switch to LOCK
(0*1
and remove the key unless the shift lever is in
( P.
The vehicle may move forward very slightly even in
( N while the engine is cold.
Depress the brake pedal firmly and, when necessary,
apply the parking brake.
Reverse
Used when reversingDrive
Used for normal drivingPark
Used when parking or starting the engine
Neutral
Used when idling
Release ButtonDrive (S)
Used:●For better acceleration●To increase engine braking●When going up or down hills
Low●Used to further increase engine braking●Used when going up or down hills
Page 325 of 469
324
uuWhen Driving uShifting
Driving
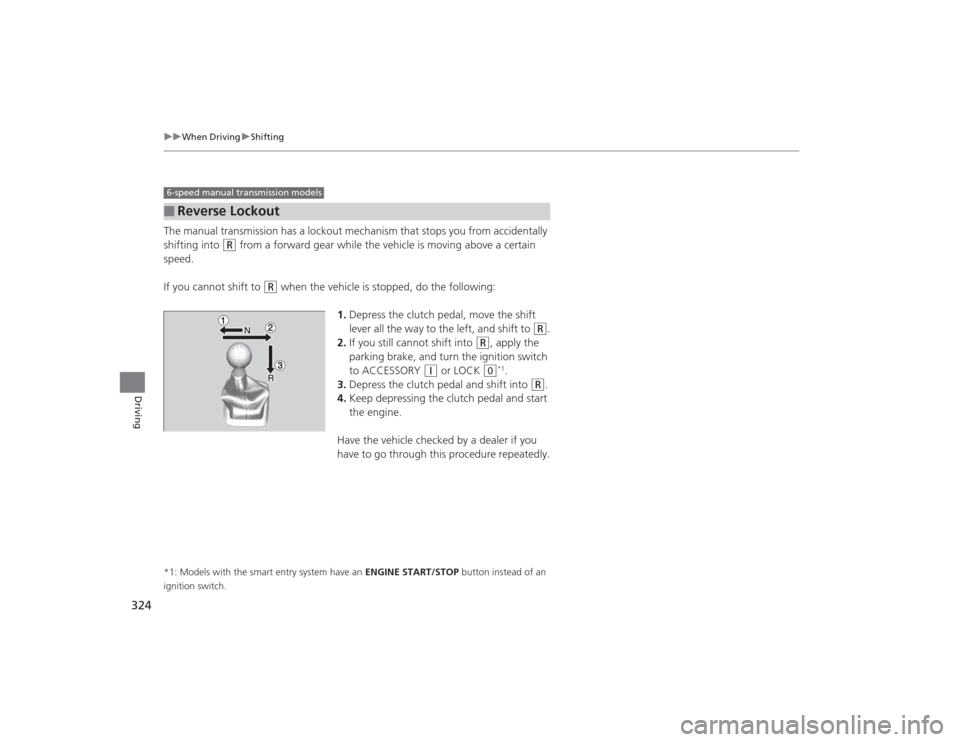
The manual transmission has a lockout mechanism that stops you from accidentally
shifting into
(R
from a forward gear while the vehicle is moving above a certain
speed.
If you cannot shift to
(R
when the vehicle is stopped, do the following:
1.Depress the clutch pedal, move the shift
lever all the way to the left, and shift to
(R
.
2. If you still cannot shift into
(R
, apply the
parking brake, and turn the ignition switch
to ACCESSORY
(q
or LOCK
(0
*1.
3. Depress the clutch pedal and shift into
(R
.
4. Keep depressing the clutch pedal and start
the engine.
Have the vehicle checked by a dealer if you
have to go through this procedure repeatedly.
*1: Models with the smart entry system have an ENGINE START/STOP button instead of an
ignition switch.■
Reverse Lockout6-speed manual transmission models
Page 334 of 469
333
uuWhen Driving uTire Pressure Monitoring System (TPMS)
Continued
Driving
Tire Pressure Monitoring System (TPMS)Instead of directly measuring the pressure in each tire, the TPMS on this vehicle
monitors and compares the rolling radius and rotational characteristics of each
wheel and tire while you are driving to determine if one or more tires are
significantly under-inflated. This will cause th e low tire pressure/TPMS indicator to
come on and a message to appear on the i-MID.
You must start TPMS calibration every time you:
• Adjust the pressure in one or more tires.
• Rotate the tires.
• Replace one or more tires.
Before calibrating the TPMS:
• Set the cold tire pressure in all four tires.
2 Checking Tires P. 391
Make sure:
•The vehicle is at a complete stop.
• The shift lever is in
(N
.
• The shift lever is in
(P
.
• The ignition switch is in ON
(w
*1.
*1: Models with the smart entry system have an ENGINE START/STOP button instead of an
ignition switch.■
TPMS CalibrationU.S. models
1 Tire Pressure Monitoring System (TPMS)
The system does not monitor the tires when driving
at low speed.
Conditions such as low ambient temperature and
altitude change directly affect tire pressure and can
trigger the low tire pressure/TPMS indicator to come on.
Tire pressure checked and inflated in:•Warm weather can become under-inflated in
colder weather.•Cold weather can become over-inflated in warmer
weather.
The low tire pressure i ndicator will not come on as a
result of over inflation.
The TPMS may not function properly if tire type and
size are mixed. Make sure to use the same size and
type of tire. 2 Checking and Maintaining Tires P. 391
The low tire pressure/TPMS indicator may come on
with a delay or may not come on at all when:•You rapidly accele rate, decelerate, or turn the
steering wheel.•You drive on snowy or slippery roads.•Snow chains are used.
The low tire pressure/TPMS indicator may come on
under the following conditions:•A compact spare tire
* is used.
•There is a heavier and uneven load on the tires,
such as when towing a trailer, than the condition at
calibration.•Snow chains are used.
Manual transmission modelsAutomatic transmission (CVT) modelsAll models* Not available on all models
Page 335 of 469
uuWhen Driving uTire Pressure Monitoring System (TPMS)
334Driving
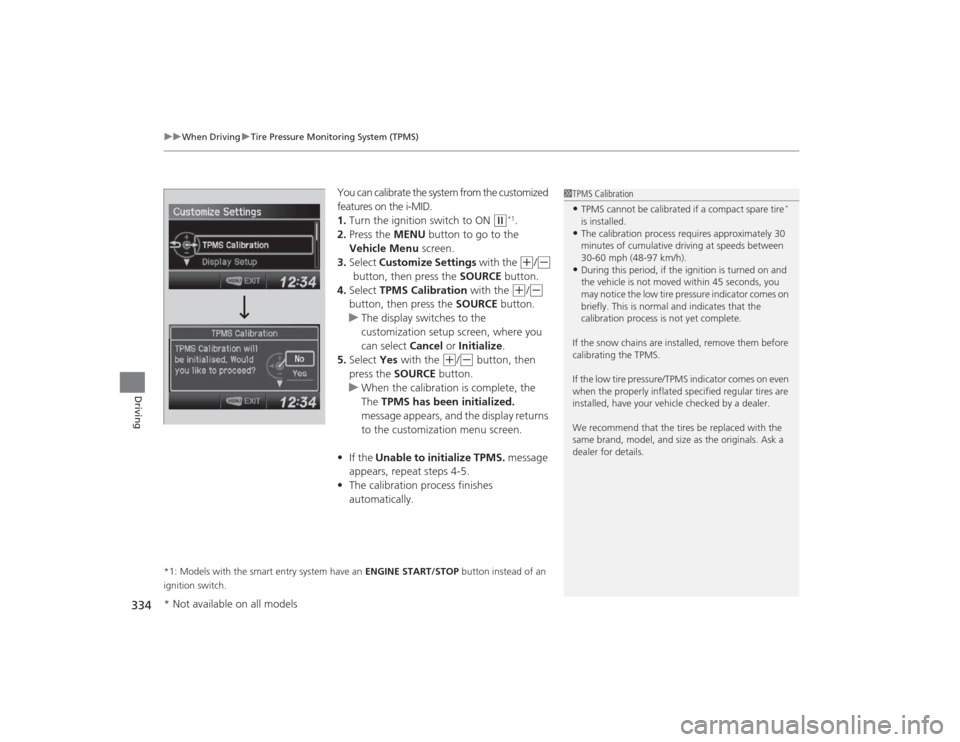
You can calibrate the system from the customized
features on the i-MID.
1. Turn the ignition switch to ON
(w
*1.
2. Press the MENU button to go to the
Vehicle Menu screen.
3. Select Customize Settings with the (+
/(-
button, then press the SOURCE button.
4. Select TPMS Calibration with the
(+
/(-
button, then press the SOURCE button.
u The display switches to the
customization setup screen, where you
can select Cancel or Initialize .
5. Select Yes with the
(+
/(-
button, then
press the SOURCE button.
u When the calibration is complete, the
The TPMS has been initialized.
message appears, and the display returns
to the customization menu screen.
• If the Unable to initialize TPMS. message
appears, repeat steps 4-5.
• The calibration process finishes
automatically.
*1: Models with the smart entry system have an ENGINE START/STOP button instead of an
ignition switch.
1 TPMS Calibration•TPMS cannot be calibrated if a compact spare tire
*
is installed.
•The calibration process requires approximately 30
minutes of cumulative driving at speeds between
30-60 mph (48-97 km/h).•During this period, if the ignition is turned on and
the vehicle is not moved within 45 seconds, you
may notice the low tire pressure indicator comes on
briefly. This is normal and indicates that the
calibration process is not yet complete.
If the snow chains are installed, remove them before
calibrating the TPMS.
If the low tire pressure/TPMS indicator comes on even
when the properly inflated specified regular tires are
installed, have your vehicle checked by a dealer.
We recommend that the tires be replaced with the
same brand, model, and size as the originals. Ask a
dealer for details.
* Not available on all models