Page 513 of 561
uuIf a Tire Goes FlatuTemporarily Repairing a Flat Tire
512
Handling the Unexpected
1. Remove the valve cap from the tire valve stem.
2. Remove the sealant/air hose from the
packaging.
3. Attach the sealant/air hose onto the tire
valve stem. Screw it until it is tight.
■Injecting Sealant and Air1Injecting Sealant and Air
In cold temperatures, the sealant may not flow easily.
In this situation, warm it up for five minutes before using.
The sealant can permanently stain clothing and other
materials. Be careful during handling and wipe away
any spills immediately.
3WARNING
Tire sealant contains substances that are
harmful and can be fatal if swallowed.
If accidentally swallowed, do not induce
vomiting. Drink plenty of water and get
medical attention immediately.
For skin or eye contac t, flush with cool
water and get medical attention if necessary.
Valve Stem
Valve Cap
Sealant/Air Hose
Valve Stem
Sealant/Air Hose
Main MenuTable of Contents
Page 514 of 561

Continued513
uuIf a Tire Goes FlatuTemporarily Repairing a Flat Tire
Handling the Unexpected
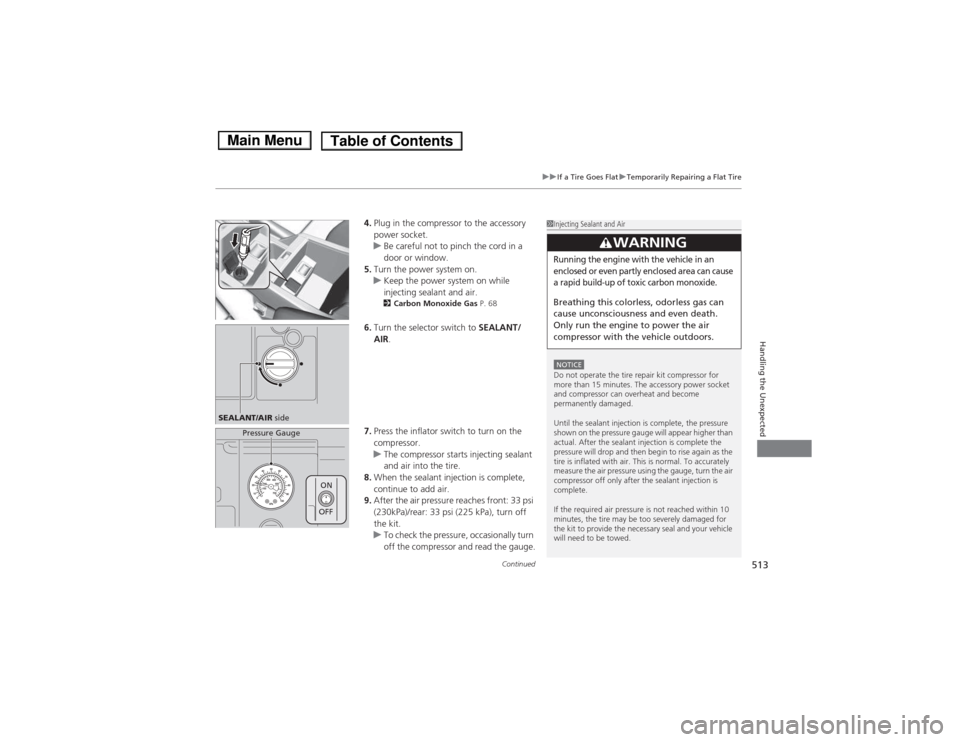
4.Plug in the compressor to the accessory power socket.
uBe careful not to pinch the cord in a
door or window.
5. Turn the power system on.
uKeep the power system on while
injecting sealant and air.
2 Carbon Monoxide Gas P. 68
6. Turn the selector switch to SEALANT/
AIR .
7. Press the inflator switch to turn on the
compressor.
uThe compressor starts injecting sealant
and air into the tire.
8. When the sealant injection is complete,
continue to add air.
9. After the air pressure reaches front: 33 psi
(230kPa)/rear: 33 psi (225 kPa), turn off
the kit.
uTo check the pressure, occasionally turn
off the compressor and read the gauge.
1Injecting Sealant and Air
NOTICEDo not operate the tire repair kit compressor for
more than 15 minutes. The accessory power socket
and compressor can overheat and become permanently damaged.
Until the sealant injection is complete, the pressure
shown on the pressure gauge will appear higher than
actual. After the sealant injection is complete the
pressure will drop and then begin to rise again as the
tire is inflated with air. This is normal. To accurately
measure the air pressure using the gauge, turn the air
compressor off only after the sealant injection is complete.
If the required air pressure is not reached within 10
minutes, the tire may be too severely damaged for
the kit to provide the necessary seal and your vehicle
will need to be towed.
3WARNING
Running the engine with the vehicle in an
enclosed or even partly enclosed area can cause
a rapid build-up of toxic carbon monoxide.
Breathing this colorless, odorless gas can
cause unconsciousness and even death.
Only run the engine to power the air
compressor with the vehicle outdoors.
SEALANT/AIR side
Pressure Gauge
ON
OFF
Main MenuTable of Contents
Page 516 of 561

Continued515
uuIf a Tire Goes FlatuTemporarily Repairing a Flat Tire
Handling the Unexpected
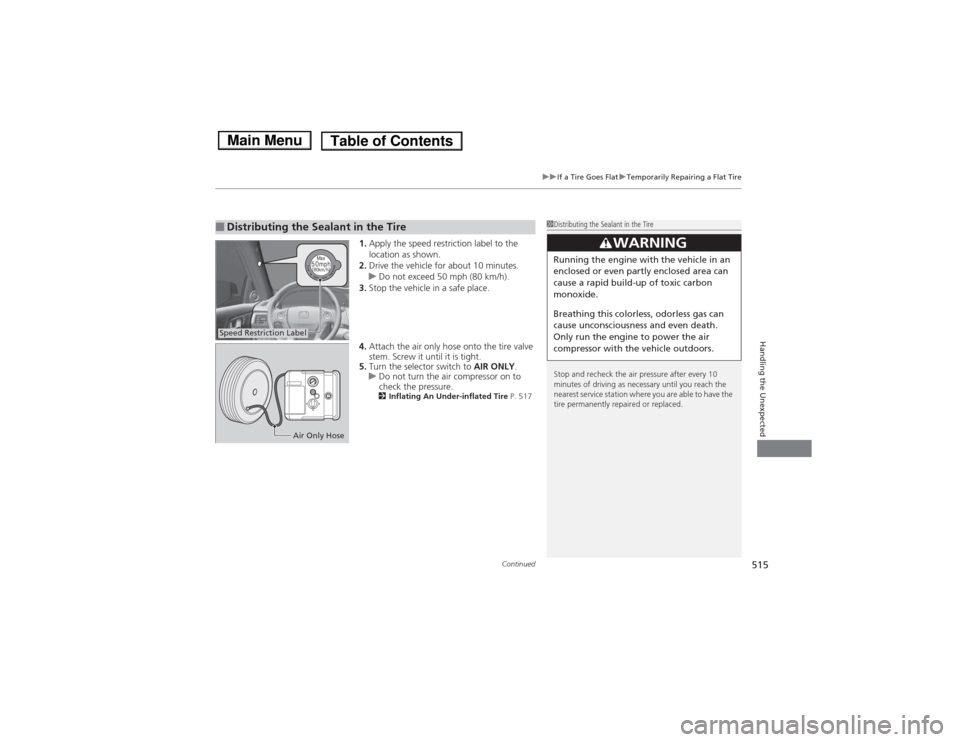
1.Apply the speed restriction label to the
location as shown.
2. Drive the vehicle for about 10 minutes.
uDo not exceed 50 mph (80 km/h).
3. Stop the vehicle in a safe place.
4. Attach the air only hose onto the tire valve
stem. Screw it until it is tight.
5. Turn the selector switch to AIR ONLY.
uDo not turn the air compressor on to
check the pressure.
2 Inflating An Under-inflated Tire P. 517
■Distributing the Sealant in the Tire1Distributing the Sealant in the Tire
Stop and recheck the air pressure after every 10
minutes of driving as necessary until you reach the
nearest service station where you are able to have the
tire permanently repaired or replaced.
3WARNING
Running the engine with the vehicle in an
enclosed or even partly enclosed area can
cause a rapid build-up of toxic carbon monoxide.
Breathing this colorless, odorless gas can
cause unconsciousness and even death.
Only run the engine to power the air
compressor with the vehicle outdoors.
Speed Restriction Label
Air Only Hose
Main MenuTable of Contents
Page 519 of 561

uuIf a Tire Goes FlatuTemporarily Repairing a Flat Tire
518
Handling the Unexpected
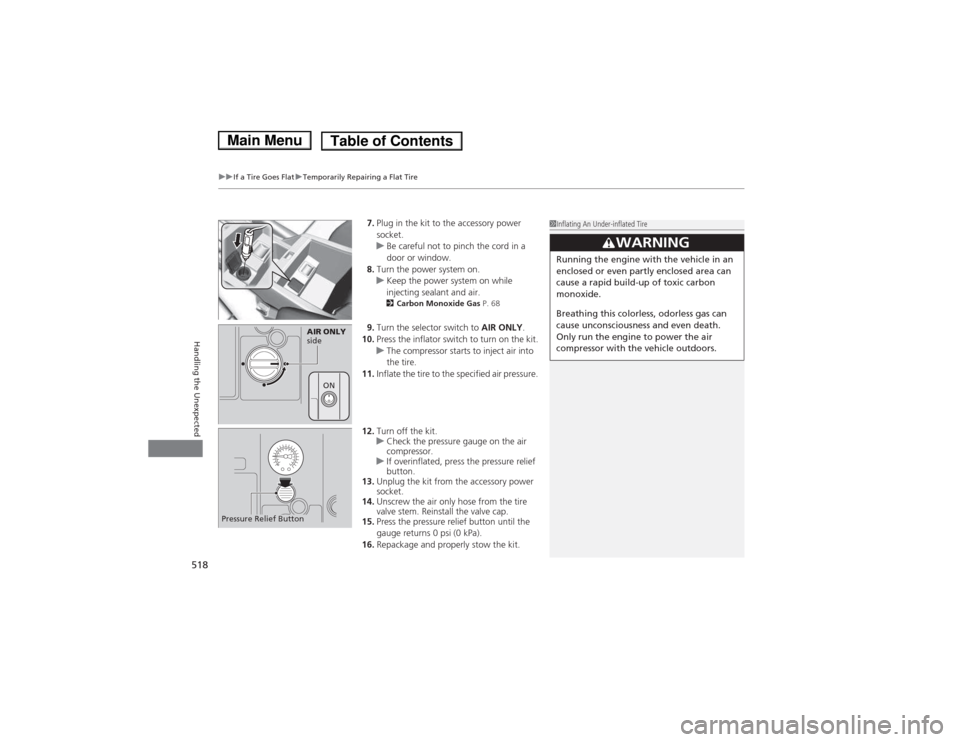
7. Plug in the kit to the accessory power socket.
uBe careful not to pinch the cord in a
door or window.
8. Turn the power system on.
uKeep the power system on while
injecting sealant and air.
2 Carbon Monoxide Gas P. 68
9. Turn the selector switch to AIR ONLY.
10. Press the inflator switch to turn on the kit.
uThe compressor starts to inject air into
the tire.
11. Inflate the tire to the specified air pressure.
12. Turn off the kit.
uCheck the pressure gauge on the air
compressor.
uIf overinflated, press the pressure relief button.
13. Unplug the kit from the accessory power socket.
14. Unscrew the air only hose from the tire
valve stem. Reinstall the valve cap.
15. Press the pressure relief button until the
gauge returns 0 psi (0 kPa).
16. Repackage and properly stow the kit.
1Inflating An Under-inflated Tire
3WARNING
Running the engine with the vehicle in an
enclosed or even partly enclosed area can
cause a rapid build-up of toxic carbon monoxide.
Breathing this colorless, odorless gas can
cause unconsciousness and even death.
Only run the engine to power the air
compressor with the vehicle outdoors.
AIR ONLY
side
ON
Pressure Relief Button
Main MenuTable of Contents
Page 520 of 561

519
Handling the Unexpected
Power System Won’t Start
Checking the Procedure When the READY indicator does not come on and the Ready to Drive message
does not appear on the multi-information display, check the following items and
take appropriate action.
ChecklistConditionWhat to DoCheck if the related
indicator or multi- information display
messages come on.The Temperature is Too Cold For Vehicle To Operate
message appears2 Multi-Information Display Warning and
Information Messages P. 84
The To Start, Hold Remote Near Start Button message
appears
uMake sure the smart entry remote is in its operating range. 2POWER Button Operating Range P. 1332If the Smart Entry Remote Battery is Weak
P. 520
The POWER SYSTEM indicator comes onHave your vehicle checked by a dealer.
Check the brightness
of the interior lights. The interior lights are dim or do not come on at all Have the 12-volt battery checked by a dealer.
The interior lights come on normally Check all fuses, or have your vehicle checked by
a dealer.2Inspecting and Changing Fuses P. 534
Check the shift lever
position.The shift lever is not in (P or (NMove the shift lever to the (P position.
Check the
immobilizer system indicator. When the immobilizer system indicator is blinking, the power
system cannot be turned on.
2
Immobilizer System Indicator P. 80
1Checking the Procedure
If you must start the vehicle immediately, use an
assisting vehicle to jump start it.
2 Jump Starting P. 522
Main MenuTable of Contents
Page 523 of 561

522
Handling the Unexpected
Jump Starting
Turn off the power to electric devices, such as audio and lights. Turn off the power
system, then open the hood.1.Connect the first jumper cable to your vehicle's 12-volt battery + terminal.
2. Connect the other end of the first jumper
cable to the booster battery + terminal.
uUse a 12-volt booster battery only.
3. Connect the second jumper cable to the
booster battery - terminal.
4. Connect the other end of the second
jumper cable to the engine mounting bolt
as shown. Do not connect this jumper cable
to any other part.
5. If your vehicle is connected to another
vehicle, start the assisting vehicle's engine
and increase its rpm slightly.
6. Attempt to start your vehicle's engine. If it
turns over slowly, check that the jumper
cables have good metal-to-metal contact.
■Jump Starting Procedure1Jump Starting
Securely attach the jumper cables clips so that they
do not come off when the engine vibrates. Also be
careful not to tangle the jumper cables or allow the
cable ends to touch each other while attaching or
detaching the jumper cables.
12-volt battery performance degrades in cold
conditions and may prevent the engine from starting.
3WARNING
A 12-volt battery can explode if you do not
follow the correct procedure, seriously
injuring anyone nearby.
Keep all sparks, open flames, and smoking
materials away from the 12-volt battery.
Booster Battery
Main MenuTable of Contents
Page 526 of 561
525
Continued
Handling the Unexpected
Overheating
How to Handle Overheating
Overheating symptoms are as follows: •
The High Temperature. Power Reduced. message appears on the multi-
information display.
• The Engine Temperature Too Hot message appears on the multi-information
display.
• Steam or spray comes out of the engine compartment.
The High Temperature. Power Reduced. message appears on the multi-
information display when the power system temperature is high. 2 Multi-Information Display Warning and Information Messages P. 90
1. Immediately park the vehicle in a safe place.
uMove the shift lever to (P , and set the parking brake. Turn off all accessories
and turn on the hazard warning lights.
2. Keep the power mode on, and wait until the message disappears.
uIf the message does not disappear, have your vehicle inspected at a dealer.
■The High Temperature. Power Reduced. Message Appears
on the Multi-Information Display
Main MenuTable of Contents
Page 527 of 561
uuOverheatinguHow to Handle Overheating
526
Handling the Unexpected
■ First thing to do
1. Immediately park the vehicle in a safe place.
2. Turn off all accessories and turn on the hazard warning lights.
uNo steam or spray present: Keep the power system on and open the hood.uSteam or spray is present: Turn off the power system and wait until it
subsides. Then open the hood.
■The Engine Temperature Too Hot Message Appears on the
Multi-Information Display1The Engine Temperature Too Hot Message Appears on the Multi-Information Display
NOTICEContinuing to drive with the Engine Temperature
Too Hot message on the multi-information display
may damage the engine.
3WARNING
Steam and spray from an overheated
engine can seriously scald you.
Do not open the hood if steam is coming
out.
Main MenuTable of Contents