2014 HONDA ACCORD COUPE ECO mode
[x] Cancel search: ECO modePage 142 of 593

141
uuOperating the Switches Around the Steering Wheel uBrightness Control
Controls
Brightness Control
When the parking lights are turned on and the
ignition switch is in ON
(w*1, you can use the
brightness control knob to adjust instrument
panel brightness.
Brighten: Turn the knob to the right.
Dim: Turn the knob to the left.
You will hear a beep when the brightness
reaches minimum or maximum. The
information display
*/multi-information
display* will return to its original state several
seconds after you adjust the brightness.
■Brightness level indicator
The brightness level is shown on the
information display
*/multi-information
display* while you are adjusting it.
*1: Models with the smart entry system have an ENGINE START/STOP button instead of an
ignition switch.
1 Brightness Control
Instrument panel brightne ss varies, depending on
whether the exterior lights are on or off. The
instrument panel dims to reduce glare when they are
on.
Pressing the (Select/Reset) knob switches the
display.
If you turn the knob to the right until the brightness
display is up to max, the beeper sounds. This cancels
the reduced instrument panel brightness when the
parking lights are on.
The brightness can be set differently for when the
exterior lights are on, and when they are off.
Control Knob
On multi-information display
On information display
* Not available on all models
Page 145 of 593
uuOperating the Switches Around the Steering Wheel uDriving Position Memory System*
144
Controls
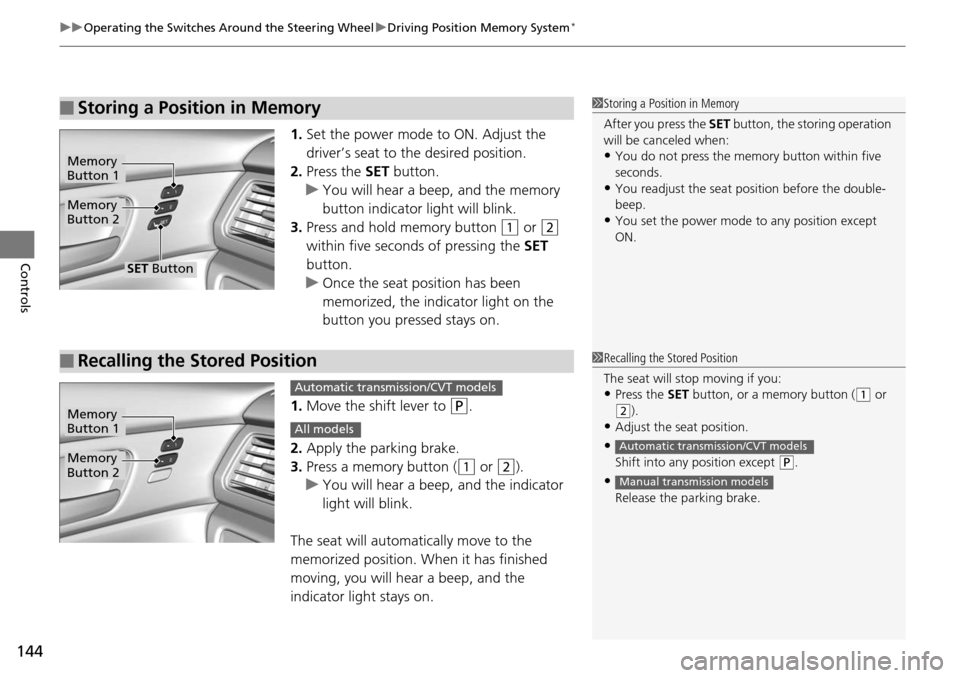
1. Set the power mode to ON. Adjust the
driver’s seat to the desired position.
2. Press the SET button.
u You will hear a beep, and the memory
button indicator light will blink.
3. Press and hold memory button
(1 or (2
within five seconds of pressing the SET
button.
u Once the seat position has been
memorized, the indicator light on the
button you pressed stays on.
1. Move the shift lever to
(P.
2. Apply the parking brake.
3. Press a memory button (
(1 or (2).
u You will hear a beep, and the indicator
light will blink.
The seat will automatically move to the
memorized position. When it has finished
moving, you will hear a beep, and the
indicator light stays on.
■Storing a Position in Memory1 Storing a Position in Memory
After you press the SET button, the storing operation
will be canceled when:
•You do not press the memory button within five
seconds.
•You readjust the seat position before the double-
beep.
•You set the power mode to any position except
ON.
Memory
Button 1
Memory
Button 2
SET Button
■Recalling the Stored Position1 Recalling the Stored Position
The seat will st op moving if you:
•Press the SET button, or a memory button ((1 or
(2).
•Adjust the seat position.
•Shift into any position except ( P.
•
Release the parking brake.
Automatic transmission/CVT models
Manual transmission models
Memory
Button 1
Memory
Button 2
Automatic transmission/CVT models
All models
Page 149 of 593
148
Controls
Adjusting the Seats
Adjusting the Seat Positions
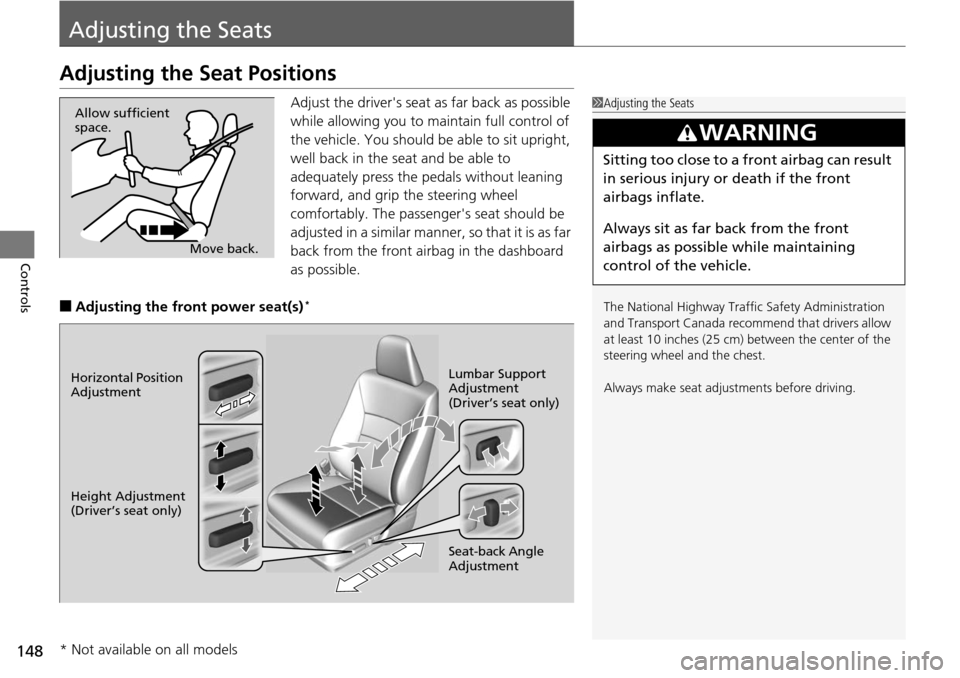
Adjust the driver's seat as far back as possible
while allowing you to maintain full control of
the vehicle. You should be able to sit upright,
well back in the seat and be able to
adequately press the pedals without leaning
forward, and grip the steering wheel
comfortably. The passenger's seat should be
adjusted in a similar manner, so that it is as far
back from the front airbag in the dashboard
as possible.
■Adjusting the front power seat(s)*
1Adjusting the Seats
The National Highway Traffic Safety Administration
and Transport Cana da recommend that drivers allow
at least 10 inches (25 cm) between the center of the
steering wheel and the chest.
Always make seat adjustments before driving.
3WARNING
Sitting too close to a front airbag can result
in serious injury or death if the front
airbags inflate.
Always sit as far back from the front
airbags as possible while maintaining
control of the vehicle.
Move back.
Allow sufficient
space.
Horizontal Position
Adjustment
Height Adjustment
(Driver’s seat only)
Seat-back Angle
Adjustment Lumbar Support
Adjustment
(Driver’s seat only)
* Not available on all models
Page 157 of 593

156
Controls
Interior Lights/Interior Convenience Items
Interior Lights
■ON
The interior lights come on regardless of
whether the doors are open or closed.
■Door activated
The interior lights come on in the following
situations:
• When any of the doors are opened.
• You unlock the driver's door.
• You remove the key from the ignition
switch.
• When the power mode is set to VEHICLE
OFF (LOCK).
■OFF
The interior lights remain off regardless of
whether the doors are open or closed.
■Interior Light Switches1 Interior Light Switches
In the door activated position, the interior lights fade out
and go off about 30 seconds after the doors are closed.
The lights go off after 30 seconds in the following
situations:
•When you unlock the driver's door but do not open it.
•When you remove the key from the ignition switch
but do not open a door.
•When you set the power mode to VEHICLE OFF
(LOCK) but do not open a door.
You can change the interi or lights dimming time.
2 Customized Features P. 97, 298
The interior lights go off i mmediately in the following
situations:
•When you lock the driver's door.•When you turn the ignition switch to ON ( w*1.
•When you close the driver's door with the key in
the ignition switch.
•When you close the driver's door in ACCESSORY
mode.
If you leave any of the doors open without the key in
the ignition switch
*1, the interior lights go off after
about 15 minutes.
*1: Models with the smar t entry system have an ENGINE
START/STOP button instead of an ignition switch.
Models without smart entry system
Models with smart entry system
Models without smart entry system
Models with smart entry system
Door Activated Position
Off
Door Activated
Position
On
OffModels without smart entry system
Models with smart entry system
Page 169 of 593
uuHeating and Cooling*uUsing Vents, Heating and A/C
168
Controls
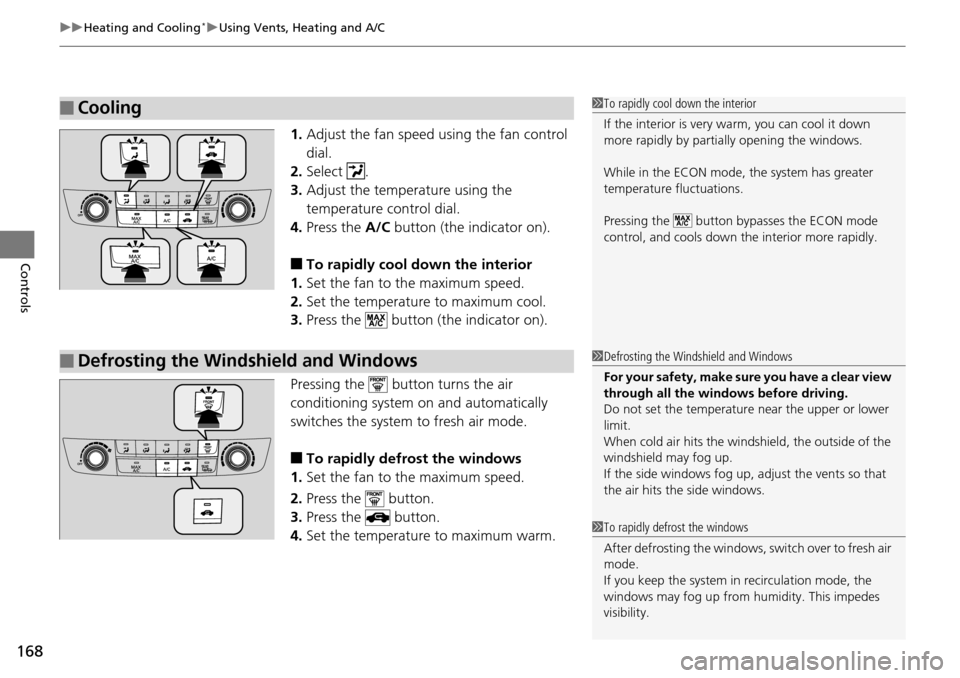
1. Adjust the fan speed using the fan control
dial.
2. Select .
3. Adjust the temperature using the
temperature control dial.
4. Press the A/C button (the indicator on).
■To rapidly cool down the interior
1. Set the fan to the maximum speed.
2. Set the temperature to maximum cool.
3. Press the button (the indicator on).
Pressing the button turns the air
conditioning system on and automatically
switches the system to fresh air mode.
■To rapidly defrost the windows
1. Set the fan to the maximum speed.
2. Press the button.
3. Press the button.
4. Set the temperature to maximum warm.
■Cooling1To rapidly cool down the interior
If the interior is very warm, you can cool it down
more rapidly by parti ally opening the windows.
While in the ECON mode, the system has greater
temperature fluctuations.
Pressing the button bypasses the ECON mode
control, and cools down the interior more rapidly.
■Defrosting the Windshield and Windows1 Defrosting the Windshield and Windows
For your safety, make sure you have a clear view
through all the windows before driving.
Do not set the temperatur e near the upper or lower
limit.
When cold air hits the windshield, the outside of the
windshield may fog up.
If the side windows fog up, adjust the vents so that
the air hits th e side windows.
1To rapidly defrost the windows
After defrosting the windows, switch over to fresh air
mode.
If you keep the system in recirculation mode, the
windows may fog up from humidity. This impedes
visibility.
Page 176 of 593
175
uuAudio System uUSB Port
Features
USB Port
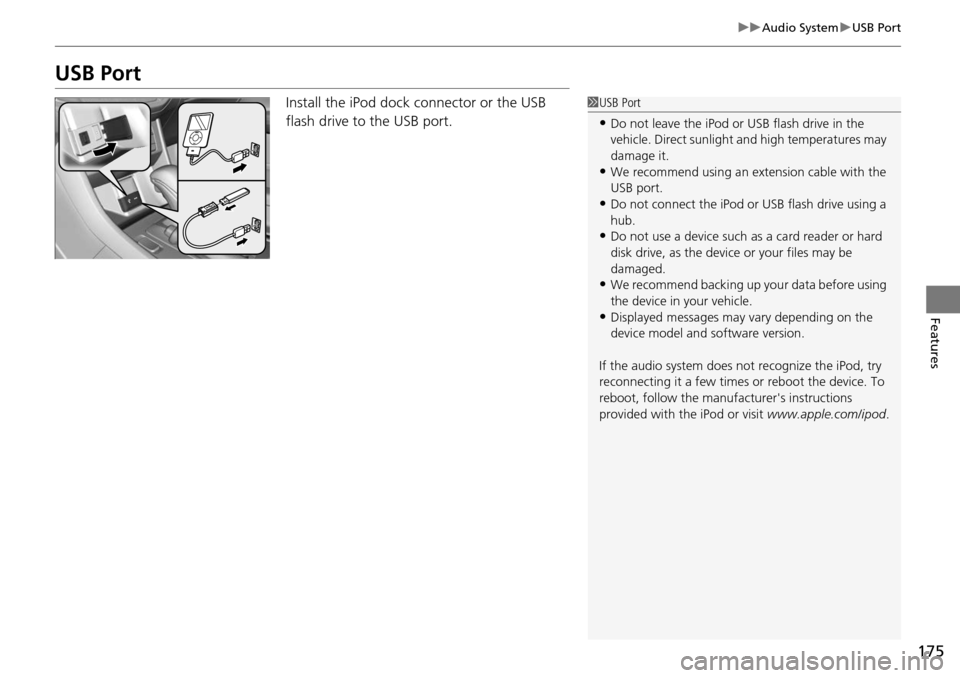
Install the iPod dock connector or the USB
flash drive to the USB port.1USB Port
•Do not leave the iPod or USB flash drive in the
vehicle. Direct sunlight and high temperatures may
damage it.
•We recommend using an ex tension cable with the
USB port.
•Do not connect the iPod or USB flash drive using a
hub.
•Do not use a device such as a card reader or hard
disk drive, as the device or your files may be
damaged.
•We recommend backing up yo ur data before using
the device in your vehicle.
•Displayed messages may vary depending on the
device model and software version.
If the audio system does not recognize the iPod, try
reconnecting it a few times or reboot the device. To
reboot, follow the manufac turer's instructions
provided with the iPod or visit www.apple.com/ipod.
Page 178 of 593
177
uuAudio System uAudio System Theft Protection*
Features
Audio System Theft Protection*
The audio system is disabled when it is disconnected from the power source, such as
when the battery is disconnected or goes dead.
■Reactivating the audio system
1. Set the power mode to ON, and turn on the audio system.
u If you set the power mode to ACCESSORY , you will be requested to enter the
audio security code. See step 3.
2. Press and hold the power button again for more than two seconds.
u The audio system is reactivated when the system’s control unit recognizes that
the system is in your vehicle.
If the control unit fails to recognize, Enter PIN Code appears on the audio/
information screen.
3. If the two steps do not work, you can en ter the audio security code using the
touch screen. If you enter an incorrect digi t, continue to the last digit, then try
again. If you do not enter code correctl y after 10 tries, leave the system for one
hour before trying again, or visit a dealer to have the system reset.
1Audio System Theft Protection*
Find the audio system's se curity code and serial
number label in your owner’s manual kit.
We recommend that you write down the serial
number in this owner’s manual.
Do not store the label in your vehicle. If you lose the
label, you must first retrie ve the serial number, and
then obtain the code.
You can find out about your serial number and
security code from a dealer.
You can register the securi ty code at Owner Link
(owners.honda.com. ), and find information on how
to retrieve the serial num ber and obtain the code at
radio-navicode.honda.com .
U.S. models
* Not available on all models
Page 189 of 593
uuAudio System Basic Operation uPlaying AM/FM Radio
188
Features
Provides text data information related to your selected RDS-capable FM station.
■To find an RDS station from Station List
1. Press while listening to an FM station.
2. Rotate to select the station, then press .
■Manual update
Updates your available station list at any time.
1. Press while listening to an FM station.
2. Rotate to select Refresh, then press .
■Radio text
Displays the radio text informat ion of the selected RDS station.
1. Press the MENU button.
2. Rotate to select Radio Text, then press .
■Scan
Samples each of the strongest stations on the selected band for 10 seconds.
1. Press the MENU button.
2. Rotate to select Scan, then press .
To turn off scan, press to select Stop, or press the BACK button.
■Radio Data System (RDS)1Playing AM/FM Radio
The ST indicator appears on the display indicating
stereo FM broadcasts.
Stereo reproduction in AM is not available.
Switching the Audio Mode
Press the SOURCE button on the steering wheel.
2 Audio Remote Controls P. 179
You can also switch the mode by pressing the MENU
button and selecting Change Source on the MENU
screen.
You can store 6 AM stations and 12 FM stations into
the preset memory.
1 Radio Data System (RDS)
When you select an RDS-capable FM station, the RDS
automatically turns on, and the frequency display
changes to the station name. However, when the
signals of that station become weak, the display
changes from the statio n name to the frequency.