2014 HONDA ACCORD COUPE service
[x] Cancel search: servicePage 295 of 593
294
Features
General Information on the Audio System
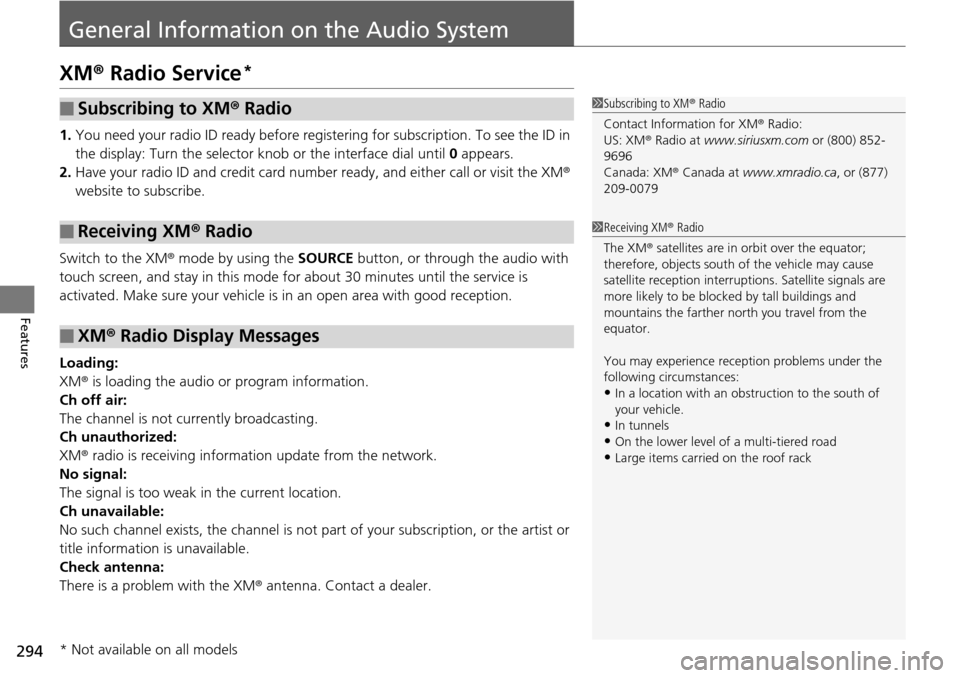
XM® Radio Service*
1. You need your radio ID ready before regist ering for subscription. To see the ID in
the display: Turn the selector kn ob or the interface dial until 0 appears.
2. Have your radio ID and credit card numbe r ready, and either call or visit the XM®
website to subscribe.
Switch to the XM ® mode by using the SOURCE button, or through the audio with
touch screen, and stay in this mode for about 30 minutes until the service is
activated. Make sure your vehicle is in an open area with good reception.
Loading:
XM ® is loading the audio or program information.
Ch off air:
The channel is not currently broadcasting.
Ch unauthorized:
XM ® radio is receiving information update from the network.
No signal:
The signal is too weak in the current location.
Ch unavailable:
No such channel exists, the channel is not pa rt of your subscription, or the artist or
title information is unavailable.
Check antenna:
There is a problem with the XM ® antenna. Contact a dealer.
■Subscribing to XM® Radio
■Receiving XM® Radio
■XM ® Radio Display Messages
1 Subscribing to XM ® Radio
Contact Information for XM ® Radio:
US: XM ® Radio at www.siriusxm.com or (800) 852-
9696
Canada: XM ® Canada at www.xmradio.ca , or (877)
209-0079
1 Receiving XM ® Radio
The XM ® satellites are in orbit over the equator;
therefore, objects south of the vehicle may cause
satellite reception interruptions. Sa tellite signals are
more likely to be blocked by tall buildings and
mountains the farther north you travel from the
equator.
You may experience rece ption problems under the
following circumstances:
•In a location with an obstruction to the south of
your vehicle.
•In tunnels•On the lower level of a multi-tiered road
•Large items carried on the roof rack
* Not available on all models
Page 310 of 593
309
uuCustomized Features u
Continued
Features
*1:Default Setting
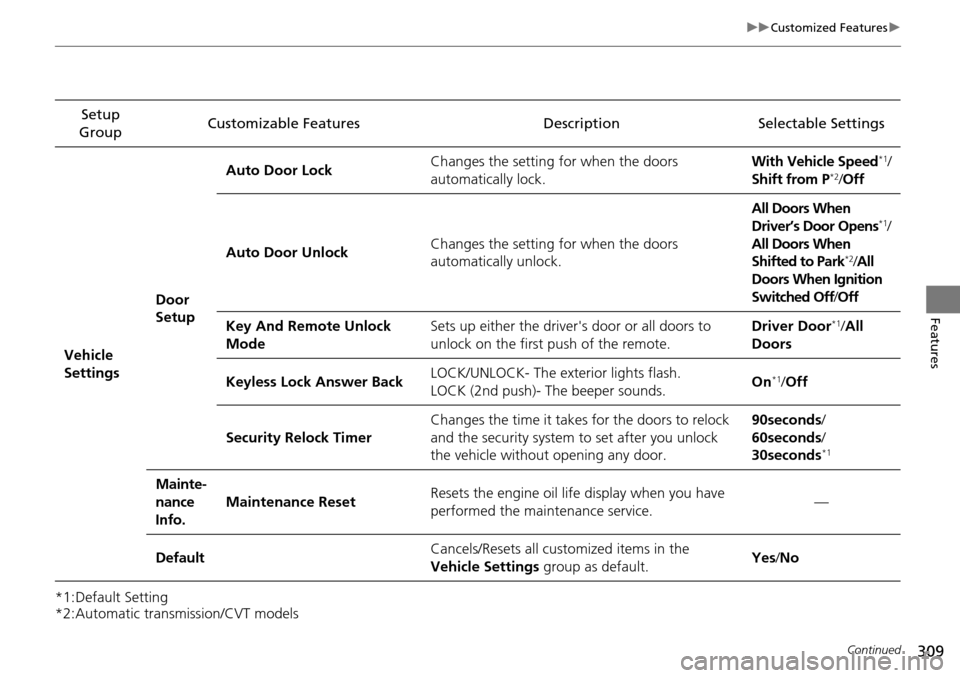
*2:Automatic transmission/CVT modelsSetup
Group Customizable Features Description Selectable Settings
Vehicle
Settings Door
SetupAuto Door Lock
Changes the setting
for when the doors
automatically lock. With Vehicle Speed
*1/
Shift from P*2/ Off
Auto Door Unlock Changes the setting
for when the doors
automatically unlock. All Doors When
Driver’s Door Opens
*1/
All Doors When
Shifted to Park
*2/ All
Doors When Ignition
Switched Off /Off
Key And Remote Unlock
Mode Sets up either the driver's door or all doors to
unlock on the first push of the remote. Driver Door
*1/
All
Doors
Keyless Lock Answer Back LOCK/UNLOCK- The exterior lights flash.
LOCK (2nd push)- The beeper sounds.
On
*1/
Off
Security Relock Timer Changes the time it takes for the doors to relock
and the security system to set after you unlock
the vehicle without opening any door. 90seconds
/
60seconds /
30seconds
*1
Mainte-
nance
Info. Maintenance Reset
Resets the engine oil life display when you have
performed the maintenance service. —
Default Cancels/Resets all customized items in the
Vehicle Settings
group as default. Yes
/No
Page 328 of 593
327
uuCustomized Features u
Continued
Features
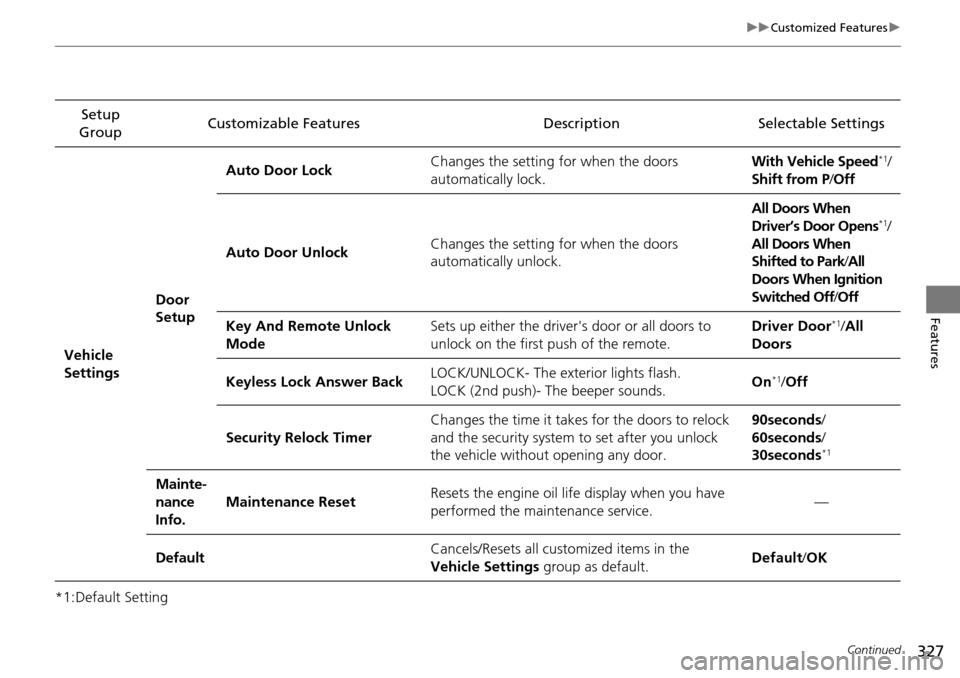
*1:Default SettingSetup
Group Customizable Features Description Selectable Settings
Vehicle
Settings Door
SetupAuto Door Lock
Changes the setting
for when the doors
automatically lock. With Vehicle Speed
*1/
Shift from P /Off
Auto Door Unlock Changes the setting
for when the doors
automatically unlock. All Doors When
Driver’s Door Opens
*1/
All Doors When
Shifted to Park /All
Doors When Ignition
Switched Off /Off
Key And Remote Unlock
Mode Sets up either the driver's door or all doors to
unlock on the first push of the remote. Driver Door
*1/
All
Doors
Keyless Lock Answer Back LOCK/UNLOCK- The exterior lights flash.
LOCK (2nd push)- The beeper sounds.
On
*1/
Off
Security Relock Timer Changes the time it takes for the doors to relock
and the security system to set after you unlock
the vehicle without opening any door. 90seconds
/
60seconds /
30seconds
*1
Mainte-
nance
Info. Maintenance Reset
Resets the engine oil life display when you have
performed the maintenance service. —
Default Cancels/Resets all customized items in the
Vehicle Settings
group as default. Default/
OK
Page 450 of 593
Continued449
uuWhen Driving uAdaptive Cruise Control (ACC)*
Driving
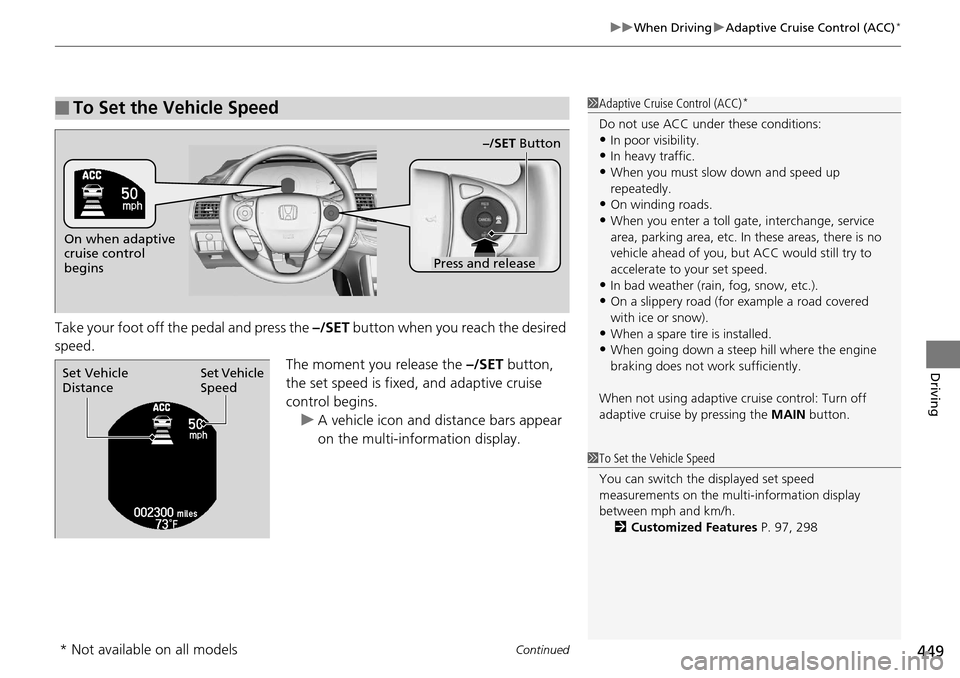
Take your foot off the pedal and press the –/SET button when you reach the desired
speed.
The moment you release the –/SET button,
the set speed is fixed, and adaptive cruise
control begins. u A vehicle icon and distance bars appear
on the multi-info rmation display.
■To Set the Vehicle Speed1Adaptive Cruise Control (ACC)*
Do not use ACC under these conditions:•In poor visibility.
•In heavy traffic.
•When you must slow down and speed up
repeatedly.
•On winding roads.
•When you enter a toll gate, interchange, service
area, parking area, etc. In these areas, there is no
vehicle ahead of you, but ACC would still try to
accelerate to your set speed.
•In bad weather (rain, fog, snow, etc.).
•On a slippery road (for example a road covered
with ice or snow).
•When a spare tire is installed.
•When going down a steep hill where the engine
braking does not work sufficiently.
When not using adaptive cr uise control: Turn off
adaptive cruise by pressing the MAIN button.
1To Set the Vehicle Speed
You can switch the displayed set speed
measurements on the mult i-information display
between mph and km/h. 2 Customized Features P. 97, 298
On when adaptive
cruise control
begins
Press and release–/SET Button
Set Vehicle
Speed
Set Vehicle
Distance
* Not available on all models
Page 480 of 593

479
Driving
Refueling
Fuel Information
■Fuel recommendation
Use of a lower octane gasoline can cause a persistent, heavy metallic knocking noise
that can lead to engine damage.
■Top tier detergent gasoline
Because the level of detergency and additive s in gasoline vary in the market, Honda
endorses the use of “TOP TIER Detergent Gasoline” where available to help
maintain the performance and reliability of your vehicle. TOP TIER Detergent
Gasoline meets a new gasoline standard jointly established by leading automotive
manufacturers to meet the needs of today’s advanced engines.
Qualifying gasoline retailers will, in most cases, identify their gasoline as having met
“TOP TIER Detergent Gasoline” standards at the retail location. This fuel is
guaranteed to contain the proper level of de tergent additives and be free of metallic
additives. The proper level of detergent additives, and absence of harmful metallic
additives in gasoline, help avoid build-up of deposits in your engine and emission
control system.
For further important fuel-related informati on for your vehicle, or on information on
gasoline that does not contain MMT, visit www.hondacars.com. In Canada, visit
www.honda.ca for additional information on gaso line. For more information on top
tier gasoline, visit www.toptiergas.com .
■Fuel tank capacity: 17.2 US gal (65 liters)
Unleaded gasoline, pump octane number 87 or higher
1Fuel Information
NOTICE
We recommend quality ga soline containing
detergent additives that help prevent fuel system and
engine deposits. In addition, in order to maintain
good performance, fuel economy, and emissions
control, we strongly reco mmend the use of gasoline
that does NOT contain harmful manganese-based
fuel additives such as MMT, if such gasoline is
available.
Use of gasoline with these additives may adversely
affect performance, a nd cause the malfunction
indicator lamp on your inst rument panel to come on.
If this happens, contact a dealer for service.
Some gasoline today is ble nded with oxygenates such
as ethanol. Your vehicle is designed to operate on
oxygenated gasoline containing up to 15% ethanol
by volume. Do not use gaso line containing methanol.
If you notice any undesira ble operating symptoms, try
another service station or sw itch to another brand of
gasoline.
Page 481 of 593
480
uuRefueling uHow to Refuel
Driving
How to Refuel
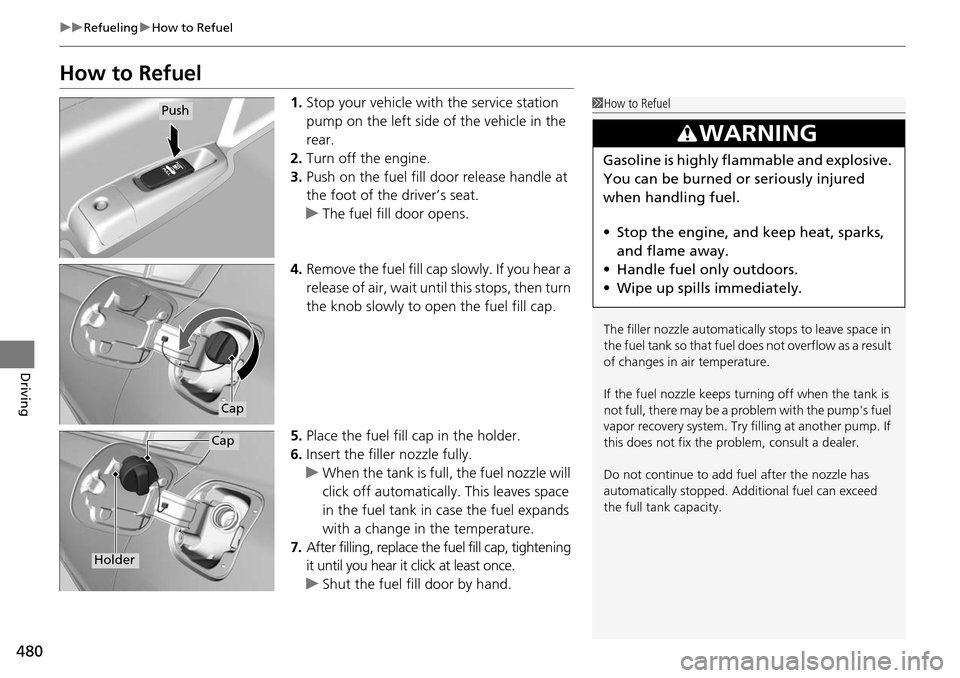
1. Stop your vehicle with the service station
pump on the left side of the vehicle in the
rear.
2. Turn off the engine.
3. Push on the fuel fill door release handle at
the foot of the driver’s seat.
u The fuel fill door opens.
4. Remove the fuel fill cap slowly. If you hear a
release of air, wait unt il this stops, then turn
the knob slowly to open the fuel fill cap.
5. Place the fuel fill cap in the holder.
6. Insert the filler nozzle fully.
u When the tank is full, the fuel nozzle will
click off automatically . This leaves space
in the fuel tank in case the fuel expands
with a change in the temperature.
7. After filling, replace the fuel fill cap, tightening
it until you hear it click at least once.
u Shut the fuel fill door by hand.1How to Refuel
The filler nozzle automatically stops to leave space in
the fuel tank so that fuel does not overflow as a result
of changes in air temperature.
If the fuel nozzle keeps turning off when the tank is
not full, there may be a problem with the pump's fuel
vapor recovery system. Try fi lling at another pump. If
this does not fix the problem, consult a dealer.
Do not continue to add fuel after the nozzle has
automatically stopped. Addi tional fuel can exceed
the full tank capacity.
3WARNING
Gasoline is highly flammable and explosive.
You can be burned or seriously injured
when handling fuel.
• Stop the engine, and keep heat, sparks,
and flame away.
• Handle fuel only outdoors.
• Wipe up spills immediately.
Push
Cap
Cap
Holder
Page 484 of 593

483
Maintenance
This chapter discusses basic maintenance.
Before Performing MaintenanceInspection and Maintenance ............ 484
Safety When Performing Maintenance..... 485Parts and Fluids Used in Maintenance Service ........................................... 486
Maintenance Minder
TM..................... 487
Maintenance Under the Hood
Maintenance Items Under the Hood ..... 495Opening the Hood ........................... 497
Recommended Engine Oil ................ 499
Oil Check ......................................... 500
Adding Engine Oil ............................ 502
Changing the Engine Oil and Oil Filter ..... 503
Engine Coolant ................................ 505
Transmission Fluid ............................ 507
Brake/Clutch Fluid ............................ 509
Refilling Window Wa sher Fluid......... 510
Replacing Light Bulbs ....................... 511
Checking and Maintaining Wiper
Blades .......................................... 521
Checking and Maintaining Tires
Checking Tires ................................. 523
Tire and Loading Information Label ...... 524Tire Labeling .................................... 524DOT Tire Quality Grading (U.S. Vehicles)....... 526Wear Indicators................................ 528 Tire Service Life ................................ 528
Tire and Wheel Replacement ........... 529
Tire Rotation .................................... 530
Winter Tires ..................................... 531
Battery ............................................... 532
Remote Transmitter Care
Replacing the Button Battery ........... 533
Heating and Cooling System
*/Climate
Control System* Maintenance ....... 535
Cleaning
Interior Care .................................... 536
Exterior Care.................................... 538
* Not available on all models
Page 485 of 593
484
Maintenance
Before Performing Maintenance
Inspection and Maintenance
For your safety, perform all listed inspections and maintenance to keep your vehicle
in good condition. If you become aware of any abnormality (noise, smell, insufficient
brake fluid, oil residue on the ground, etc.), have your vehicle inspected by a dealer.
(Note, however, that service at a dealer is not mandatory to keep your warranties in
effect.) Refer to the separate maintena nce booklet for detailed maintenance and
inspection information.
■Daily inspections
Perform inspections before long distance tri ps, when washing the vehicle, or when
refueling.
■Periodic inspections
• Check the brake fluid level monthly.
2 Brake/Clutch Fluid P. 509
•Check the tire pressure monthly. Examin e the tread for wear and foreign objects.
2Checking and Maintaining Tires P. 523
•Check the operation of the exterior lights monthly.
2 Replacing Light Bulbs P. 511
•Check the condition of the wiper bl ades at least every six months.
2Checking and Maintaining Wiper Blades P. 521
■Types of Inspection and Maintenance
1Inspection and Maintenance
Maintenance, replacement, or repair of
emissions control devices and systems may be
done by any automotive repair establishment or
individuals using parts that are “certified” to
EPA standards.
According to state and fede ral regulations, failure to
perform maintenance on the maintenance main
items marked with # will not void your emissions
warranties. However, all ma intenance services should
be performed in accordan ce with the intervals
indicated by the information display
*/multi-
information display*.
2 Maintenance Service Items P. 489, 493
If you want to perform complex maintenance tasks
that require more skills a nd tools, you can purchase a
subscription to the Service Express website at
www.techinfo.honda.com .
2 Authorized Manuals P. 579
If you want to perform ma intenance yourself, make
sure that you have the necessary tools and skills first.
After performing ma intenance, update the records in
the separate maintenance booklet.
U.S. models
* Not available on all models