Page 436 of 593

435
uuWhen Driving uShifting
Continued
Driving
Shifting
Change the shift position in accordance with your driving needs.
■Shift lever positions
*1: Models with the smart entry system have an ENGINE START/STOP button instead of an
ignition switch.
Automatic transmission (CVT) models with paddle shifters
1 Shifting
You cannot turn the ignition switch to LOCK
(0*1
and remove the key unless the shift lever is in
( P.
The vehicle may move forward very slightly even in
(N while the engine is cold.
Depress the brake pe dal firmly and, when necessary,
apply the parking brake.
When shifting positions in extremely low
temperatures (-22°F/-30°C), there may be a short
delay before the shift posit ion is displayed. Always
confirm you are in the corr ect shift position before
driving.
Reverse
Used when reversing
Drive
Used:
●For normal driving●When temporarily driving in the 7-speed
manual shift mode
Park
Used when parking or starting the engine
Neutral
Used when idling
Release Button
Drive (S)
Used:
●For better acceleration●To increase engine braking●When going up or down hills●When driving in the 7-speed manual
shift mode
Page 437 of 593

uuWhen Driving uShifting
436
Driving
■Shift Lever Operation1Shift Lever Operation
NOTICE
When you change the shift lever from (D to (R and
vice versa, come to a complete stop and keep the
brake pedal depressed.
Operating the shift lever be fore the vehicle has come
to a complete standstill can damage the transmission.
Use the shift lever position indicator to check the
lever position befo re pulling away.
If the transmission indicator blinks when driving, in
any shift position, there is a problem with the
transmission.
Avoid sudden acceleration and have the transmission
checked by a dealer as soon as possible.
The fuel supply may be cut of f if you drive at engine
speeds in or over the tac hometer's red zone (engine
speed limit). If this happe ns, you may experience a
slight jolt.
It may not be possible to operate the shift lever if the
brake pedal is applied while the shift lever release
button is held down.
Depress the brake pedal first.
Shift Lever Position Indicator
Depress the brake pedal and press the
shift lever release button to shift.
Shift without pressing the shift lever
release button.
Press the shift lever release button
and shift. Tachometer’s red zone
M
(7-Speed Manual Shift Mode)
Indicator/Shift Indicator
Page 439 of 593

uuWhen Driving uShifting
438
Driving
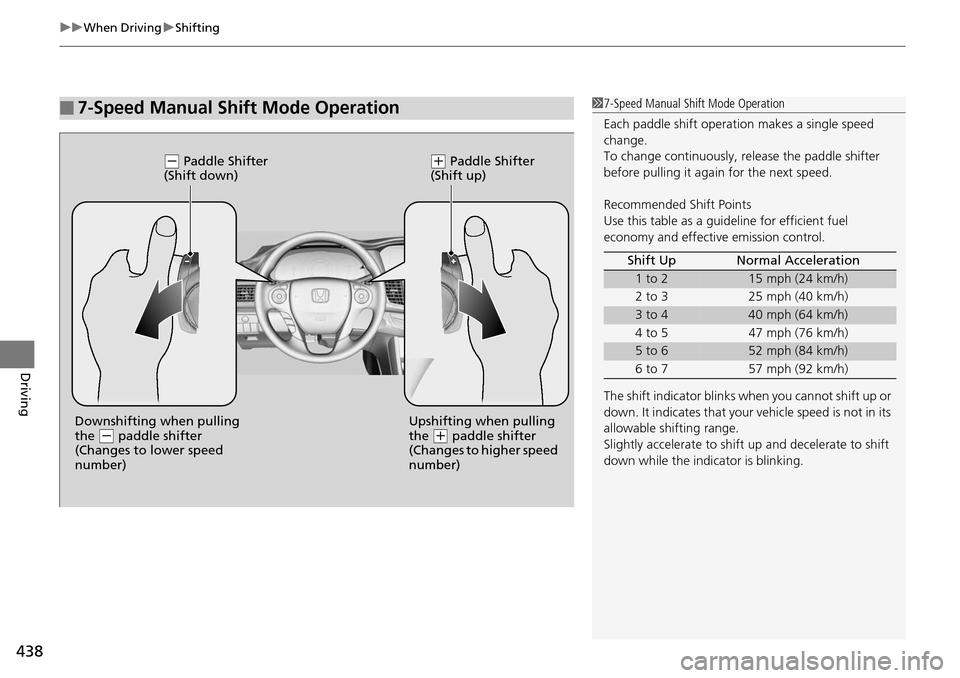
■7-Speed Manual Shift Mode Operation17-Speed Manual Shift Mode Operation
Each paddle shift operati on makes a single speed
change.
To change continuously, re lease the paddle shifter
before pulling it agai n for the next speed.
Recommended Shift Points
Use this table as a guideline for efficient fuel
economy and effectiv e emission control.
The shift indicator blinks when you cannot shift up or
down. It indicates that your vehicle speed is not in its
allowable shifting range.
Slightly accelerate to shift up and decelerate to shift
down while the indi cator is blinking.
Shift Up Normal Acceleration
1 to 215 mph (24 km/h)
2 to 3 25 mph (40 km/h)
3 to 440 mph (64 km/h)
4 to 5 47 mph (76 km/h)
5 to 652 mph (84 km/h)
6 to 7 57 mph (92 km/h)
(- Paddle Shifter
(Shift down)( + Paddle Shifter
(Shift up)
Downshifting when pulling
the
( - paddle shifter
(Changes to lower speed
number) Upshifting when pulling
the (
+ paddle shifter
(Changes to higher speed
number)
Page 440 of 593

439
uuWhen Driving uShifting
Continued
Driving
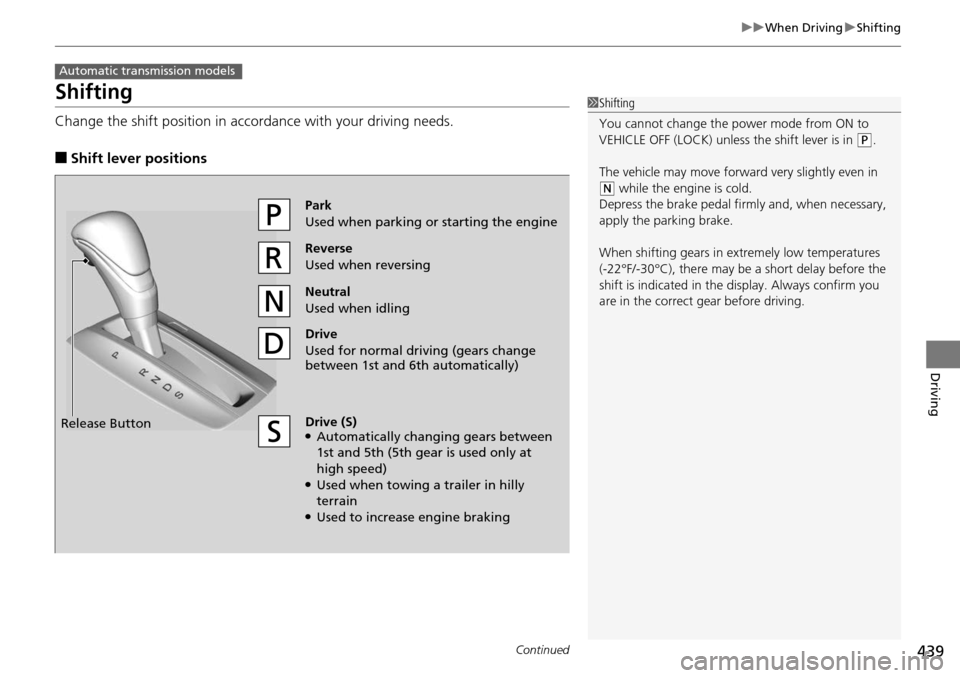
Shifting
Change the shift position in accordance with your driving needs.
■Shift lever positions
Automatic transmission models
1Shifting
You cannot change the power mode from ON to
VEHICLE OFF (LOCK) unless the shift lever is in
(P.
The vehicle may move forward very slightly even in
(N while the engine is cold.
Depress the brake pe dal firmly and, when necessary,
apply the parking brake.
When shifting gears in extremely low temperatures
(-22°F/-30°C), there may be a short delay before the
shift is indicated in the di splay. Always confirm you
are in the correct gear before driving.
Reverse
Used when reversing
Drive
Used for normal driving (gears change
between 1st and 6th automatically)
Park
Used when parking or starting the engine
Neutral
Used when idling
Release Button
Drive (S)●Automatically changing gears between
1st and 5th (5th gear is used only at
high speed)
●Used when towing a trailer in hilly
terrain
●Used to increase engine braking
Page 441 of 593

uuWhen Driving uShifting
440
Driving
■Shift Lever Operation1Shift Lever Operation
NOTICE
When you change the shift lever from (D to (R and
vice versa, come to a complete stop and keep the
brake pedal depressed.
Operating the shift lever be fore the vehicle has come
to a complete standstill can damage the transmission.
Use the shift lever position indicator to check the
lever position befo re pulling away.
If the transmission indicator blinks when driving, in
any shift position, there is a problem with the
transmission.
Avoid sudden acceleration and have the transmission
checked by a dealer as soon as possible.
The fuel supply may be cut of f if you drive at engine
speeds in or over the tac hometer’s red zone (engine
speed limit). If this happe ns, you may experience a
slight jolt.
It may not be possible to operate the shift lever if the
brake pedal is applied while the shift lever release
button is held down.
Depress the brake pedal first.
Tachometer's red zone
Shift Lever Position
Indicator
Models with information displayModels with multi-information display
Depress the brake pedal and press the
shift lever release button to shift.
Shift without pressi ng the shift lever
release button.
Press the shift lever release button
and shift.
Page 443 of 593
uuWhen Driving uShifting
442
Driving
When you are not shifting, do not rest your
foot on the clutch pedal. This can cause your
clutch to wear out faster. 1Shifting
Recommended Shift Points
Driving in the highest gear that allows the engine to
run and accelerate smoothly helps to optimize fuel
economy and effective emissions control. The
following shift points are recommended:
If you exceed the maximum speed for the gear you
are in, the engine speed will enter into the
tachometer's red zone. When this happens, you may
experience a slight jolt. Shift Up Normal Acceleration
1st to 2nd17 mph (27 km/h)
2nd to 3rd 29 mph (46 km/h)
3rd to 4th37 mph (60 km/h)
4th to 5th 43 mph (69 km/h)
5th to 6th49 mph (79 km/h)
Page 452 of 593

Continued451
uuWhen Driving uAdaptive Cruise Control (ACC)*
Driving
■There is no vehicle ahead
Your vehicle cruises at the set speed.
■A vehicle ahead is within ACC range and going slower than the set speed
Your vehicle slows down, and maintains the same speed as the speed of the vehicle
ahead to maintain the set following distance.
■A vehicle ahead is within ACC ra nge and going at a steady speed
Your vehicle follows the vehicle ahead of it, keeping a constant distance, without
going beyond the set speed.
■A vehicle ahead goes out of range
ACC accelerates your vehicle to th e set speed, and then maintains it.
■When you depress the accelerator pedal
You can temporarily increase the vehicle speed . In this case, there is no audible or
visual alerts even if a vehicle is in ACC range.
ACC stays on unless you cancel it. Once you release the accelerator pedal, the
system resumes the set speed.
1 When in Operation
Limitations
Be aware that ACC has limitations. For example, it is
not designed to operate wh en a vehicle ahead of
yours is going slower than 13 mph (20 km/h) or is
parked. Smaller vehicles, such as motorcycles, may
also be difficult for the sy stem to detect depending
on their size.
You must always be prepar ed to use the brake pedal
to maintain a safe distan ce with other vehicles.
ACC may momentarily apply brakes or sound an alert
if there is a vehicle or building adjacent to your
vehicle and:
•You make a sudden turn or are driving on a narrow
road.
•You abruptly move the steering wheel.•Your vehicle is unusuall y positioned within your
lane (e.g., at a slight diag onal to the lane direction).
Page 458 of 593

Continued457
uuWhen Driving uForward Collision Warning (FCW)*
Driving
1Forward Collision Warning (FCW)*
Never apply a film or attach any objects to the
windshield that could obs truct the FCW camera's
field of vision.
Scratches, nicks, and othe r damage to the windshield
within the FCW camera's fi eld of vision can cause the
system to operate abnormall y. If this occurs, we
recommend that you replac e the windshield with a
genuine Honda replacem ent windshield. Making
even minor repairs within th e camera's field of vision
or installing an aftermarket replacement windshield
may also cause the system to operate abnormally.
After replacing the winds hield, have a dealer
recalibrate the camera. Prop er calibration of the FCW
camera is necessary for the system to operate
properly.
Models with information display
1 How the system works
The heads-up warning uses a lens located at the front
end of the dashboard.
Do not cover the lens or spill any liquid on it.
Lens
*2
When your setting is:
Long : The heads-up warning
lights flash twice at Long
distance.
When the Short distance is
reached, the lights flash and the
beeper sounds continuously until
a possible collision is avoided. Beep
Radar-based system
Models with multi-information display
The radar sensor is
at the front right,
inside the grille.
Normal
: The heads-up warning
lights flash twice at the Normal
distance.
When the Short distance is
reached, the lights flash and the
beeper sounds continuously
until a possible collision is
avoided.
Short : The heads-up warning
lights flash and the beeper
sounds continuously until a
possible collision is avoided. When the lights flash at any setting:
The BRAKE
message appears until a
possible collision is avoided.
Heads-up
Warning
Lights
* Not available on all models