Page 49 of 360

Black plate (1,1)GMC Terrain/Terrain Denali Owner Manual (GMNA-Localizing-U.S./Canada/
Mexico-6081485) - 2014 - CRC - 12/6/13
Seats and Restraints 3-1
Seats and
Restraints
Head Restraints
Head Restraints . . . . . . . . . . . . . . . 3-2
Front Seats
Seat Adjustment . . . . . . . . . . . . . . 3-3
Power Seat Adjustment . . . . . . . 3-4
Lumbar Adjustment . . . . . . . . . . . 3-5
Reclining Seatbacks . . . . . . . . . . 3-5
Memory Seats . . . . . . . . . . . . . . . . 3-6
Heated Front Seats . . . . . . . . . . . 3-8
Rear Seats
Rear Seats . . . . . . . . . . . . . . . . . . . . 3-9
Safety Belts
Safety Belts . . . . . . . . . . . . . . . . . . 3-11
How to Wear Safety BeltsProperly . . . . . . . . . . . . . . . . . . . . 3-12
Lap-Shoulder Belt . . . . . . . . . . . 3-13 Safety Belt Use During
Pregnancy . . . . . . . . . . . . . . . . . . 3-17
Safety Belt Extender . . . . . . . . . 3-17
Safety System Check . . . . . . . . 3-17
Safety Belt Care . . . . . . . . . . . . . 3-18
Replacing Safety Belt System Parts after a Crash . . . . . . . . . 3-18
Airbag System
Airbag System . . . . . . . . . . . . . . . 3-19
Where Are the Airbags? . . . . . 3-20
When Should an AirbagInflate? . . . . . . . . . . . . . . . . . . . . . 3-22
What Makes an Airbag Inflate? . . . . . . . . . . . . . . . . . . . . . 3-23
How Does an Airbag Restrain? . . . . . . . . . . . . . . . . . . . 3-23
What Will You See after an Airbag Inflates? . . . . . . . . . . . . 3-23
Passenger Sensing System . . . . . . . . . . . . . . . . . . . . . 3-25
Servicing the Airbag-Equipped Vehicle . . . . . . . . . . . . . . . . . . . . . 3-29 Adding Equipment to the
Airbag-Equipped Vehicle . . . 3-30
Airbag System Check . . . . . . . . 3-30
Replacing Airbag System Parts after a Crash . . . . . . . . . 3-31
Child Restraints
Older Children . . . . . . . . . . . . . . . 3-31
Infants and Young
Children . . . . . . . . . . . . . . . . . . . . 3-33
Child Restraint Systems . . . . . 3-36
Where to Put the Restraint . . . 3-37
Lower Anchors and Tethers for Children (LATCH
System) . . . . . . . . . . . . . . . . . . . . 3-39
Replacing LATCH System Parts After a Crash . . . . . . . . . 3-44
Securing Child Restraints (Rear Seat) . . . . . . . . . . . . . . . . . 3-44
Securing Child Restraints (Front Passenger
Position) . . . . . . . . . . . . . . . . . . . 3-47
Page 50 of 360

Black plate (2,1)GMC Terrain/Terrain Denali Owner Manual (GMNA-Localizing-U.S./Canada/
Mexico-6081485) - 2014 - CRC - 12/6/13
3-2 Seats and Restraints
Head Restraints
Front Seats
The vehicle's front seats have head
restraints in the outboard seating
positions.
{Warning
With head restraints that are not
installed and adjusted properly,
there is a greater chance that
occupants will suffer a neck/
spinal injury in a crash. Do not
drive until the head restraints for
all occupants are installed and
adjusted properly.
Adjust the head restraint so that the
top of the restraint is at the same
height as the top of the occupant's
head. This position reduces the
chance of a neck injury in a crash.The height of the head restraint can
be adjusted. Pull the head restraint
up to raise it. Try to move the head
restraint to make sure that it is
locked in place.
To lower the head restraint, press
the button, located on the top of the
seatback, and push the head
restraint down. Try to move the
head restraint after the button is
released to make sure that it is
locked in place.
The front seat outboard head
restraints are not designed to be
removed.
Page 51 of 360
Black plate (3,1)GMC Terrain/Terrain Denali Owner Manual (GMNA-Localizing-U.S./Canada/
Mexico-6081485) - 2014 - CRC - 12/6/13
Seats and Restraints 3-3
Rear Seats
The vehicle's rear seat has head
restraints in the outboard seating
positions that cannot be adjusted.
Rear outboard head restraints are
not designed to be removed.
Front Seats
Seat Adjustment
{Warning
You can lose control of the
vehicle if you try to adjust a driver
seat while the vehicle is moving.
Adjust the driver seat only when
the vehicle is not moving.
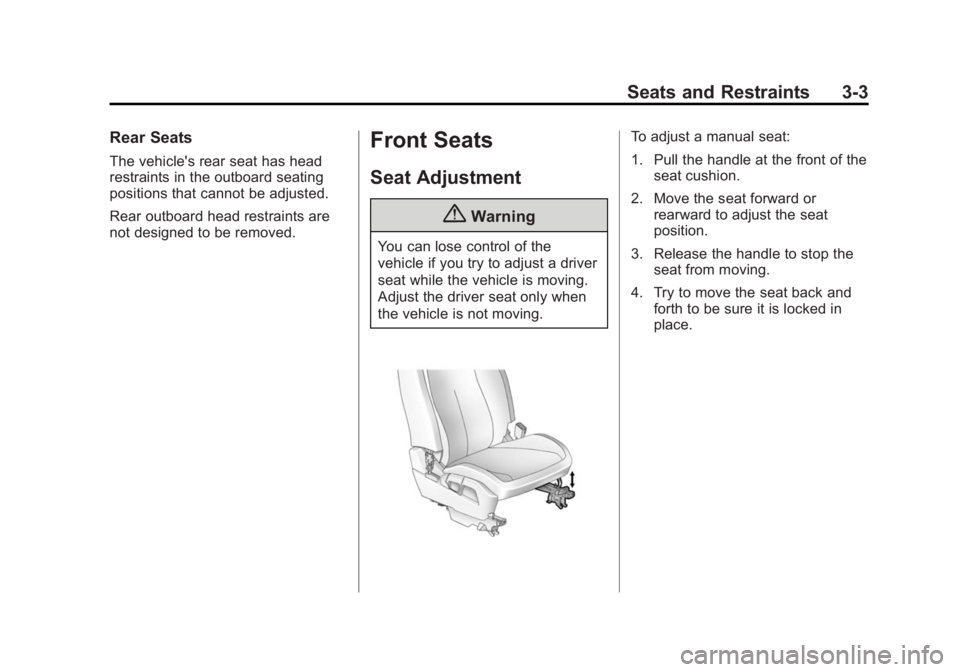
To adjust a manual seat:
1. Pull the handle at the front of theseat cushion.
2. Move the seat forward or rearward to adjust the seat
position.
3. Release the handle to stop the seat from moving.
4. Try to move the seat back and forth to be sure it is locked in
place.
Page 52 of 360

Black plate (4,1)GMC Terrain/Terrain Denali Owner Manual (GMNA-Localizing-U.S./Canada/
Mexico-6081485) - 2014 - CRC - 12/6/13
3-4 Seats and Restraints
Power Seat Adjustment
Four-Way Power Seat
1. Seat Position Handle
2. Height Adjustment Control
To adjust a power seat, if equipped:
.Move the seat forward or
rearward using the handle under
the front of the seat cushion (1).
SeeSeat Adjustment on
page 3-3.
.Raise or lower the entire seat by
moving the control (2) up
or down. To adjust the seatback, see
Reclining Seatbacks on page 3-5.
To adjust the lumbar support, see
Lumbar Adjustment on page 3-5.
Eight-Way Power Seats
To adjust a power seat, if equipped:
.Move the seat forward or
rearward by sliding the control
forward or rearward.
.Raise or lower the front part of
the seat cushion by moving the
front of the control up or down.
.Raise or lower the entire seat by
moving the rear of the control up
or down.
To adjust the seatback, see
Reclining Seatbacks on page 3-5.
To adjust the lumbar support, see
Lumbar Adjustment on page 3-5.
Page 53 of 360

Black plate (5,1)GMC Terrain/Terrain Denali Owner Manual (GMNA-Localizing-U.S./Canada/
Mexico-6081485) - 2014 - CRC - 12/6/13
Seats and Restraints 3-5
Lumbar Adjustment
Power Lumbar
Eight-Way Power Seat Shown,Four-Way Similar
If available, press and hold the front
or rear of the switch to increase or
decrease lumbar support. Release
the switch when the seatback
reaches the desired level of lumbar
support.
Reclining Seatbacks
{Warning
Sitting in a reclined position when
the vehicle is in motion can be
dangerous. Even when buckled
up, the safety belts cannot do
their job.
The shoulder belt will not be
against your body. Instead, it will
be in front of you. In a crash, you
could go into it, receiving neck or
other injuries.
The lap belt could go up over
your abdomen. The belt forces
would be there, not at your pelvic
bones. This could cause serious
internal injuries.
For proper protection when the
vehicle is in motion, have the
seatback upright. Then sit well
back in the seat and wear the
safety belt properly.
Do not have a seatback reclined if
the vehicle is moving.
Manual Reclining Seatbacks
{Warning
If either seatback is not locked, it
could move forward in a sudden
stop or crash. That could cause
injury to the person sitting there.
Always push and pull on the
seatbacks to be sure they are
locked.
Page 54 of 360

Black plate (6,1)GMC Terrain/Terrain Denali Owner Manual (GMNA-Localizing-U.S./Canada/
Mexico-6081485) - 2014 - CRC - 12/6/13
3-6 Seats and Restraints
To recline a manual seatback:
1. Lift the lever.
2. Move the seatback to thedesired position, and then
release the lever to lock the
seatback in place.
3. Push and pull on the seatback to make sure it is locked.
To return the seatback to the upright
position:
1. Lift the lever fully without applying pressure to the
seatback, and the seatback will
return to the upright position. 2. Push and pull on the seatback to
make sure it is locked.
Power Reclining Seatbacks
To adjust a power seatback,
if available:
.Tilt the top of the control
rearward to recline.
.Tilt the top of the control forward
to raise.
Memory Seats
If available, the “1,” “2,”and MEM
(Memory) buttons on the outboard
side of the driver seat are used to
manually save and recall the driver
seat and outside mirror positions.
These manually stored positions are
referred to as Button Memory
positions.
The vehicle will also automatically
save driver seat and outside mirror
positions to the current driver
Remote Keyless Entry (RKE)
transmitter when the ignition is
Page 55 of 360

Black plate (7,1)GMC Terrain/Terrain Denali Owner Manual (GMNA-Localizing-U.S./Canada/
Mexico-6081485) - 2014 - CRC - 12/6/13
Seats and Restraints 3-7
turned off. These automatically
stored positions are referred to as
RKE Memory positions. See
Remote Keyless Entry (RKE)
System Operation on page 2-3.
Storing Button Memory Positions
To save positions into Button
Memory:
1. Adjust the driver seat, seatbackrecliner, and both outside mirrors
to the desired driving positions.
2. Press and hold MEM (Memory) and “1”at the same time until a
beep sounds.
3. Repeat Steps 1 and 2 for a second driver using “2.”
Recalling Button Memory
Positions
To recall the Button Memory
positions, press and hold “1”or“2.”
The driver seat and outside mirrors
move to the positions stored to
those buttons when pressed. Releasing
“1”or“2” before the
stored positions are reached stops
the recall.
If something has blocked the driver
seat while recalling a memory
position, the recall may stop.
Remove the obstruction; then press
and hold the appropriate manual
control for the memory item that is
not recalling for two seconds. Try
recalling the memory position again
by pressing the appropriate memory
button. If the memory position is still
not recalling, see your dealer for
service.
Recalling RKE Memory Positions
(Memory Remote Recall)
The Memory Remote Recall feature
can recall the driver seat and
outside mirrors to previously stored
RKE Memory positions when
entering the vehicle.
Every time the ignition is turned off,
the positions of the driver seat and
outside mirrors are automatically
stored to the RKE transmitter that
was used to start the vehicle. These positions are called RKE Memory
positions and may be different than
the previously mentioned Button
Memory positions saved to the
“1”
or“2” buttons. To recall RKE
Memory positions, unlock the driver
door with the RKE transmitter and
open the driver door. If the driver
door is already open, pressing the
RKE transmitter
Kbutton will also
activate the RKE Memory recall.
The driver seat and outside mirrors
will move to the previously saved
RKE Memory positions.
This feature is turned on or off using
the vehicle personalization menu.
See Vehicle Personalization on
page 5-31.
To stop recall movement, press any
of the memory, power mirror,
or power seat controls.
If something has blocked the driver
seat while recalling a memory
position, the recall may stop.
Remove the obstruction; then press
and hold the appropriate manual
control for the memory item that is
Page 56 of 360

Black plate (8,1)GMC Terrain/Terrain Denali Owner Manual (GMNA-Localizing-U.S./Canada/
Mexico-6081485) - 2014 - CRC - 12/6/13
3-8 Seats and Restraints
not recalling for two seconds. Try
recalling the memory position again
by opening the driver door and
pressing the RKE
Kbutton. If the
memory position is still not recalling,
see your dealer for service.
Easy Exit Driver Seat
This feature moves the seat
rearward allowing the driver more
room to exit the vehicle.
To activate, turn the ignition off and
open the driver door. If the driver
door is already open, turning the
ignition off will activate the recall.
This feature can be turned on or off
using the vehicle personalization
menu. See Vehicle Personalization
on page 5-31.
To stop recall movement, press one
of the memory or power seat
controls.
If something has blocked the driver
seat while recalling the exit position,
the recall may stop. Remove the
obstruction; then press and hold the
power seat control rearward for two seconds. Try recalling the exit
position again. If the exit position is
still not recalling, see your dealer for
service.
Heated Front Seats
{Warning
If you cannot feel temperature
change or pain to the skin, the
seat heater may cause burns. To
reduce the risk of burns, people
with such a condition should use
care when using the seat heater,
especially for long periods of
time. Do not place anything on
the seat that insulates against
heat, such as a blanket, cushion,
cover, or similar item. This may
cause the seat heater to
overheat. An overheated seat
heater may cause a burn or may
damage the seat.
Uplevel Climate Control System
Shown, Base Similar
If available, the buttons are near the
climate controls. To operate, the
ignition must be in ON/RUN.
Press
zorJto heat the driver or
passenger seat cushion and
seatback.
Press the button once for the
highest setting. With each press of
the button, the heated seat will
change to the next lower setting,
and then the off setting. Three lights
indicate the highest setting, and one
light indicates the lowest.