2014 GMC SIERRA display
[x] Cancel search: displayPage 2 of 20

2
Integrated Trailer Brake ControlFCustomizable Driver Display
Telescoping Steering Wheel Control
Turn Signal/Windshield Wipers Lever4WD Control♦
Cruise Control Buttons/Heated Steering
Wheel Button
Audio Next/Previous Favorite Station Controls (behind steering
wheel)
Power Mirror Control/Door Lock Switch/ Window
Buttons
Instrument Panel
Tilt Steering Wheel Lever
Voice Recognition Buttons/Customizable
Driver Display Controls
Audio Volume Controls (behind
steering wheel)
Memory Seat Controls
Instrument Panel Illumination Control/Exterior Lamp Control
StabiliTrak Off
Antilock Brake System
StabiliTrak Active
Check Engine
Tow/Haul Mode
Hill Descent Control
Low Fuel
Traction Control Off
Oil Pressure
Engine Coolant Temperature
Charging System
Door Ajar
Lane Departure Warning
Cruise Control Set
Forward Collision Alert
Security
Symbols
Tow/Haul Button
Page 7 of 20

7
Customizable Driver Display
The Customizable Driver Display on the instrument cluster displays a variety of vehicle system information and warning messages.
Menu Items
Use the control pad on the right side of the steering wheel to view the \
Info (includes the trip odometers and fuel information), Audio, Phone, Navigation, and Set\
tings menus.
Press the or button to move between the display zones.
Press the or button to move through the menus.
Press to select/deselect a setting or clear a message.
Reset an Item
1. Use the control pad to display the item.
2. Press and hold to reset or clear the item.
Changing Display Themes
The Customizable Driver Display features three display themes: Standard, Technology, and Media. The style of the display will change depending on the selected theme.
1. Use the control pad to display the Settings menu.
2. Select Display Theme.
3. Select the desired theme.
See Instruments and Controls in your Owner Manual.
Page 8 of 20

8
Automatic Climate Controls
Automatic Operation
1. Press AUTO.
2. Set the temperature for the driver and front passenger. The system autom\
atically
controls the fan speed, air delivery, air conditioning and recirculation to reach the set temperature. Allow time for the system to reach the desired temperature.\
If the air delivery mode or fan speed is manually adjusted, automatic operation is turned off.
Recirculation Mode
Press Recirculation Mode to quickly cool the air inside the vehicle or prevent
outside odors from entering the vehicle. It is not available while the Defog or Defrost Mode is selected.
Sync Temperature Settings
Press SYNC to link the passenger’s temperature setting to the driver’s setting. When the passenger’s setting is adjusted, the different passenger’s temperature setting is displayed.\
See Climate Controls in your Owner Manual.
Driver’s Temperature Control Defog Mode
Defrost Mode
Passenger’s Temperature Control
AUTO Automatic Operation
Recirculation Mode
Floor Mode
SYNC Link passenger’s temperature setting to driver’s temperature setting
Bi-level ModeREAR Rear Window/ Outside Mirror Defogger
Fan Speed Control/On/Off Vent Mode
A/C Air Conditioning Control
Page 9 of 20

9
Windshield Wipers
Audio Steering Wheel Controls
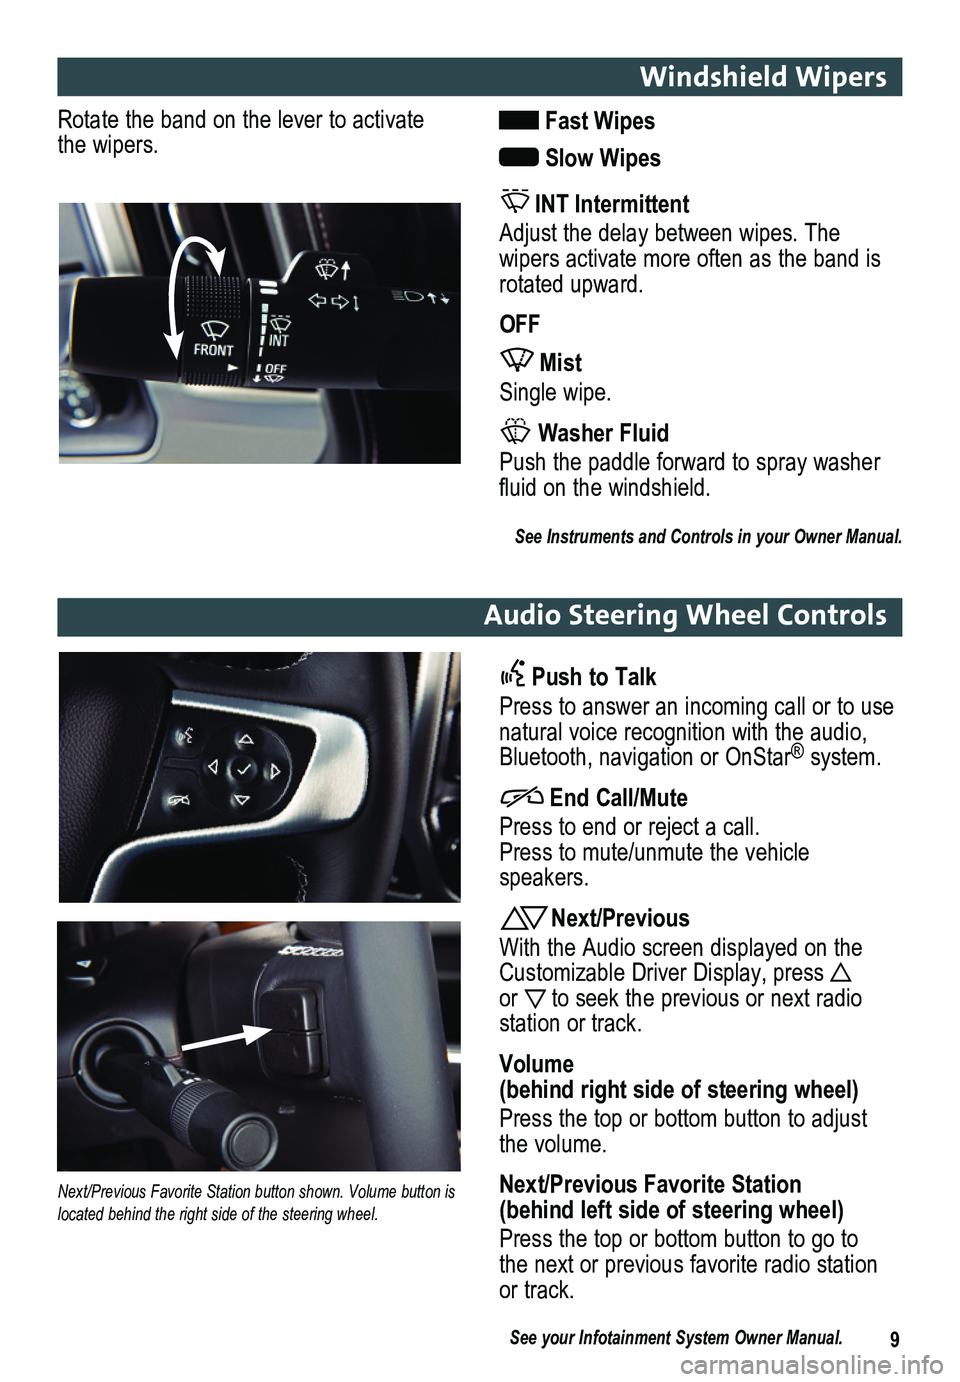
Rotate the band on the lever to activate the wipers. Fast Wipes
Slow Wipes
INT Intermittent
Adjust the delay between wipes. The
wipers activate more often as the band is rotated upward.
OFF
Mist
Single wipe.
Washer Fluid
Push the paddle forward to spray washer fluid on the windshield.
See Instruments and Controls in your Owner Manual.
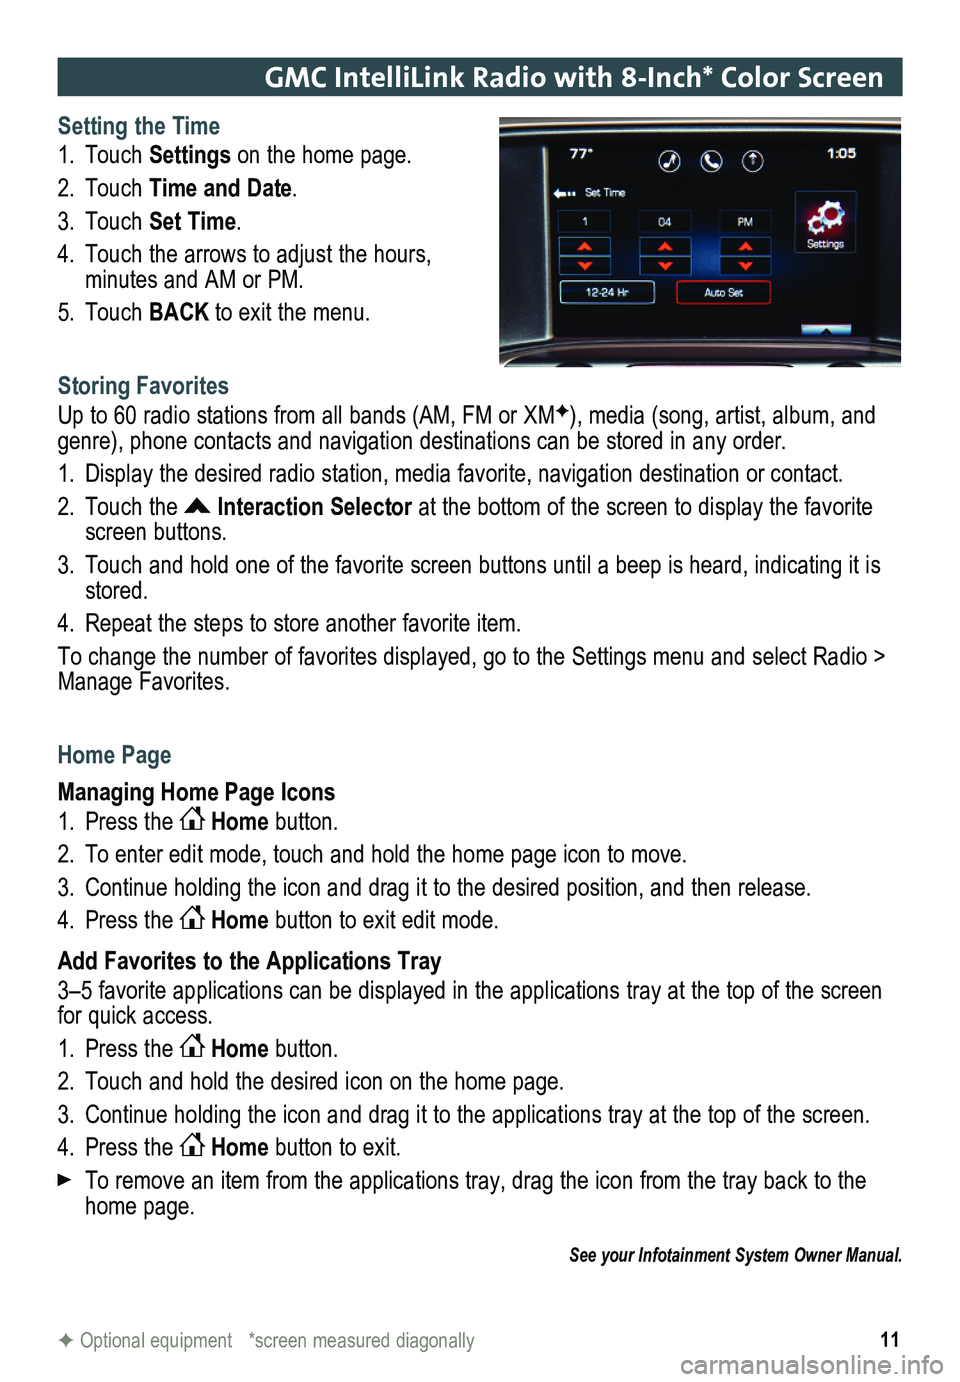
Push to Talk
Press to answer an incoming call or to use natural voice recognition with the audio, Bluetooth, navigation or OnStar® system.
End Call/Mute
Press to end or reject a call. Press to mute/unmute the vehicle speakers.
Next/Previous
With the Audio screen displayed on the Customizable Driver Display, press or to seek the previous or next radio
station or track.
Volume (behind right side of steering wheel)
Press the top or bottom button to adjust the volume.
Next/Previous Favorite Station (behind left side of steering wheel)
Press the top or bottom button to go to the next or previous favorite radio station or track.
Next/Previous Favorite Station button shown. Volume button is located behind the right side of the steering wheel.
See your Infotainment System Owner Manual.
Page 10 of 20

10F Optional equipment *screen measured diagonally
BACK: Move back one level in the menus
Home page
Eject disc
Interaction Selector: Touch to display the favorites list
TUNE/MENU: Tune radio stations/Open and select menus
Applications: Touch the screen icon to access the application
Additional Pages: Touch to view additional pages of applications (if available)
Power/ Volume
MEDIA: Select the media source
RADIO: Select AM, FM, XM♦
SEEK: Previous/Next radio station, track or file
Refer to your Owner Manual for important safety information about using \
the infotainment system while driving.
The GMC IntelliLink System is controlled by using the audio system buttons, touch screen, voice recognition and audio steering wheel controls.
See your Infotainment System Owner Manual.
GMC IntelliLink Radio with 8-Inch* Color Screen
Page 11 of 20

11
GMC IntelliLink Radio with 8-Inch* Color Screen
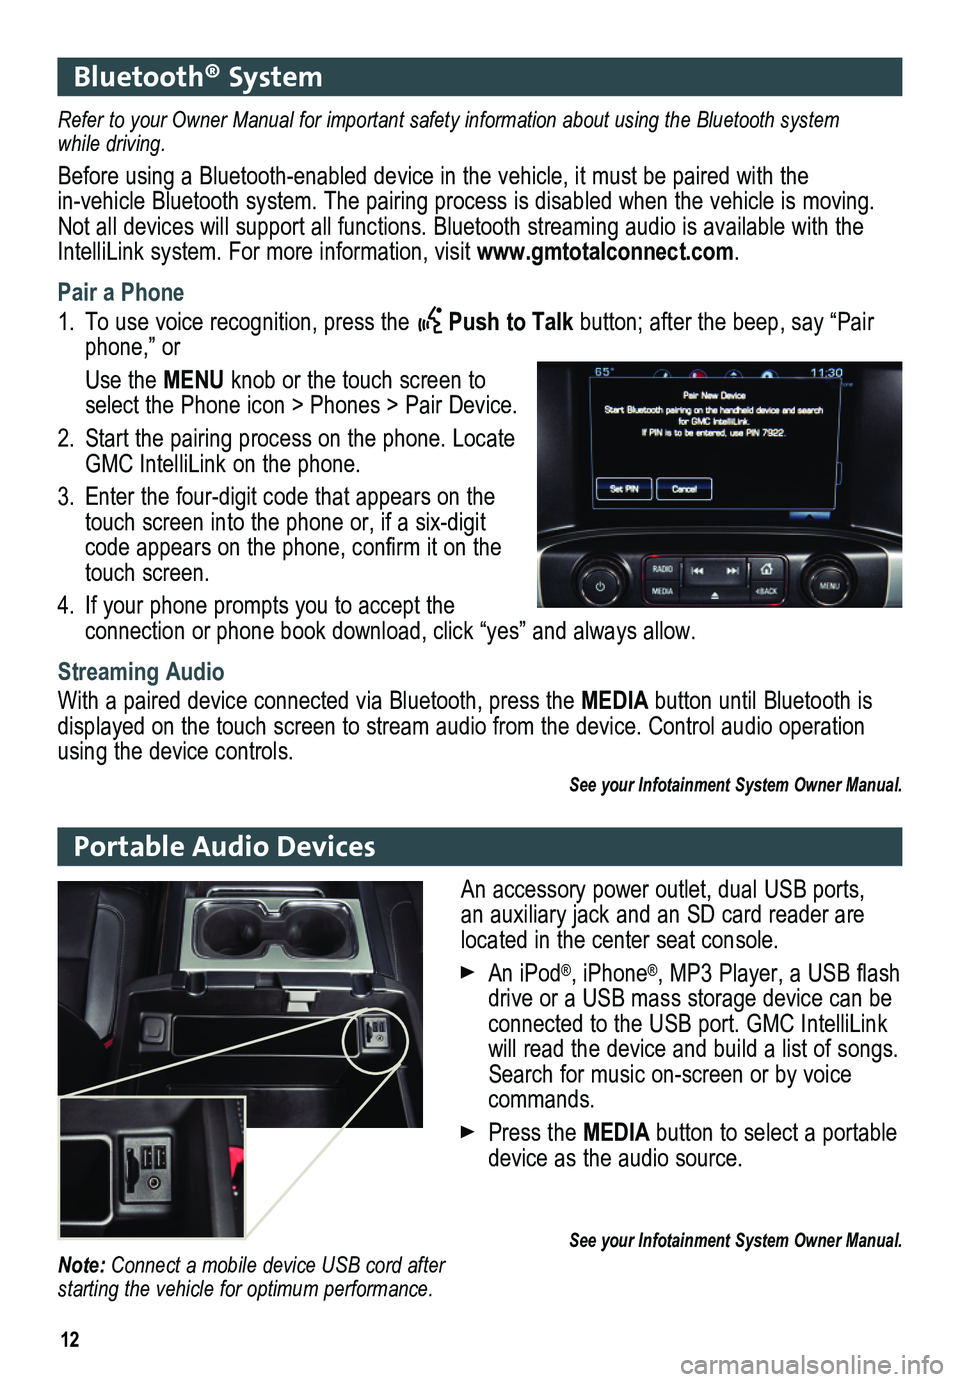
Setting the Time
1. Touch Settings on the home page.
2. Touch Time and Date.
3. Touch Set Time.
4. Touch the arrows to adjust the hours,
minutes and AM or PM.
5. Touch BACK to exit the menu.
Storing Favorites
Up to 60 radio stations from all bands (AM, FM or XMF), media (song, artist, album, and genre), phone contacts and navigation destinations can be stored in any order.
1. Display the desired radio station, media favorite, navigation destination or contact.
2. Touch the Interaction Selector at the bottom of the screen to display the favorite screen buttons.
3. Touch and hold one of the favorite screen buttons until a beep is heard,\
indicating it is stored.
4. Repeat the steps to store another favorite item.
To change the number of favorites displayed, go to the Settings menu and select Radio > Manage Favorites.
Home Page
Managing Home Page Icons
1. Press the Home button.
2. To enter edit mode, touch and hold the home page icon to move.
3. Continue holding the icon and drag it to the desired position, and then release.
4. Press the Home button to exit edit mode.
Add Favorites to the Applications Tray
3–5 favorite applications can be displayed in the applications tray at the top of the screen for quick access.
1. Press the Home button.
2. Touch and hold the desired icon on the home page.
3. Continue holding the icon and drag it to the applications tray at the top of the screen.
4. Press the Home button to exit.
To remove an item from the applications tray, drag the icon from the tray back to the home page.
See your Infotainment System Owner Manual.
F Optional equipment *screen measured diagonally
Page 12 of 20

12
Bluetooth® System
Portable Audio Devices
Refer to your Owner Manual for important safety information about using \
the Bluetooth system while driving.
Before using a Bluetooth-enabled device in the vehicle, it must be paired with the in-vehicle Bluetooth system. The pairing process is disabled when the vehicle is moving. Not all devices will support all functions. Bluetooth streaming audio is available with the IntelliLink system. For more information, visit www.gmtotalconnect.com.
Pair a Phone
1. To use voice recognition, press the Push to Talk button; after the beep, say “Pair phone,” or
Use the MENU knob or the touch screen to select the Phone icon > Phones > Pair Device.
2. Start the pairing process on the phone. Locate GMC IntelliLink on the phone.
3. Enter the four-digit code that appears on the touch screen into the phone or, if a six-digit code appears on the phone, confirm it on the touch screen.
4. If your phone prompts you to accept the
connection or phone book download, click “yes” and always allow.
Streaming Audio
With a paired device connected via Bluetooth, press the MEDIA button until Bluetooth is displayed on the touch screen to stream audio from the device. Control audio opera\
tion using the device controls.
See your Infotainment System Owner Manual.
An accessory power outlet, dual USB ports, an auxiliary jack and an SD card reader are located in the center seat console.
An iPod®, iPhone®, MP3 Player, a USB flash drive or a USB mass storage device can be connected to the USB port. GMC IntelliLink
will read the device and build a list of songs. Search for music on-screen or by voice commands.
Press the MEDIA button to select a portable device as the audio source.
See your Infotainment System Owner Manual.Note: Connect a mobile device USB cord after starting the vehicle for optimum performance.
Page 16 of 20

16
Range Selection Mode
Range Selection Mode allows the driver to select the range of gears desired for the current driving conditions.
1. Move the shift lever to the Manual (M) position.
2. Press the + (plus) or – (minus) button on the shift lever to select a lower or higher gear. An M and the current gear will be displayed on the Driver Information Center.
The transmission will be limited to the gear selected and lower gears. If vehicle speed is too high or too low for the requested gear, the shift will not occur.
Tow/Haul Mode
The Tow/Haul Mode adjusts the transmission shifts to reduce shift cycling, such as when towing or hauling heavy loads or driving on steep grades. When towing, u\
se the Tow/Haul Mode to prevent damage to the engine or transmission.
Press the Tow/Haul Mode button on the end of the shift lever to turn the system on or off.
GMC Trailering Guide App
The free trailering guide app includes maximum trailer weight ratings by model along with trailering information on hitches and equipment, GMC trailering technologies, safe trailering techniques and more. Currently available for the iPad®, download the mobile app from the iPad’s app store.
See Driving and Operating in your Owner Manual.
Automatic Transmission
The Low Tire Pressure warning light on the instrument cluster illuminates when one or more of the vehicle’s tires is significantly underinflated. Fill the tires to the proper tire pressures. The proper tire pressures for the vehicle are listed on the T\
ire and Loading Information label, located below the driver’s door latch. Current tir\
e pressures can be viewed in the Driver Information Center.
Tire pressure is affected by cold weather and distance driven. If the low tire pressure
warning light illuminates when the vehicle is first started in cooler temperatures and then turns off as the vehicle is driven, check for the proper tire pressures.\
Refer to your Owner Manual for additional information about normal monthly tire maintenance.
See Vehicle Care in your Owner Manual.
Tire Pressure Monitor