2014 GMC ACADIA lock
[x] Cancel search: lockPage 333 of 414

Black plate (63,1)GMC Acadia/Acadia Denali Owner Manual (GMNA-Localizing-U.S./Canada/
Mexico-6014315) - 2014 - crc - 8/15/13
Vehicle Care 10-63
9. Remove the plastic spare tireheat shield by pulling the rubber
latch. Store the plastic spare tire
heat shield. See “Storing the
Spare Tire” later in this section
for more information.
{Warning
Rust or dirt on a wheel, or on the
parts to which it is fastened, can
make wheel nuts become loose
after time. The wheel could come
off and cause an accident. When
(Continued)
Warning (Continued)
changing a wheel, remove any
rust or dirt from places where the
wheel attaches to the vehicle. In
an emergency, a cloth or a paper
towel can be used; however, use
a scraper or wire brush later to
remove all rust or dirt.
{Warning
Never use oil or grease on bolts
or nuts because the nuts might
come loose. The vehicle's wheel
could fall off, causing a crash.
10. Remove any rust or dirt from the wheel bolts, mounting
surfaces, and spare wheel.
11. Place the spare tire on the wheel mounting surface.
12. Put the nuts on by hand by turning them clockwise until the
wheel is held against the mounting surface. Make sure
the rounded end is toward the
wheel.
13. Lower the vehicle by attaching the wrench to the jack and
turning the wrench
counterclockwise. Lower the
jack completely.
{Warning
Wheel nuts that are improperly or
incorrectly tightened can cause
the wheels to become loose or
come off. The wheel nuts should
be tightened with a torque wrench
to the proper torque specification
after replacing. Follow the torque
specification supplied by the
aftermarket manufacturer when
using accessory locking wheel
nuts. See Capacities and
Specifications on page 12-2 for
original equipment wheel nut
torque specifications.
Page 337 of 414

Black plate (67,1)GMC Acadia/Acadia Denali Owner Manual (GMNA-Localizing-U.S./Canada/
Mexico-6014315) - 2014 - crc - 8/15/13
Vehicle Care 10-67
3. Turn the jack (3) on its side andplace down on the holding
bracket.
4. Reinstall the wing bolt (2) by turning clockwise.
5. To replace the cover, line up the tab at the front of the cover with
the notch in the cover opening.
Push the cover in place and
make sure that the rear clips are
in the slots and push the cover
closed.
Store the center cap or the plastic
bolt-on wheel covers until a full size
tire is put back on the vehicle. When
you replace the compact spare with
a full-size tire, reinstall the bolt-on
wheel covers or the center cap.
Hand-tighten them over the wheel
nuts, using the wrench.Compact Spare Tire
{Warning
Driving with more than one
compact spare tire at a time could
result in loss of braking and
handling. This could lead to a
crash and you or others could be
injured. Use only one compact
spare tire at a time.
If this vehicle has a compact spare
tire, it was fully inflated when new;
however, it can lose air over time.
Check the inflation pressure
regularly. It should be 420 kPa
(60 psi).
Stop as soon as possible and check
that the spare tire is correctly
inflated after being installed on the
vehicle. The compact spare tire is
designed for temporary use only. The vehicle will perform differently
with the spare tire installed and it is
recommended that the vehicle
speed be limited to 80 km/h
(50 mph). To conserve the tread of
the spare tire, have the standard tire
repaired or replaced as soon as
convenient and return the spare tire
to the storage area.
When using a compact spare tire,
the ABS and Traction Control
systems may engage until the spare
tire is recognized by the vehicle,
especially on slippery roads. Adjust
driving to reduce possible
wheel slip.
Performance of the All-Wheel
Drive (AWD) system will be
automatically reduced to protect the
system when using the compact
spare. To restore the AWD and
prevent excessive wear on the
clutch in the AWD, replace the
compact spare tire with a full-size
tire as soon as possible.
Page 343 of 414

Black plate (73,1)GMC Acadia/Acadia Denali Owner Manual (GMNA-Localizing-U.S./Canada/
Mexico-6014315) - 2014 - crc - 8/15/13
Vehicle Care 10-73
Dinghy Towing
If the vehicle is front-wheel-drive, it
can be dinghy towed from the front.
These vehicles may also be towed
by putting the front wheels on a
dolly. See“Dolly Towing” later in this
section.
If the vehicle is all-wheel-drive, it
can be dinghy towed from the front.
These vehicles can also be towed
by placing them on a platform trailer
with all four wheels off of the
ground. These vehicles cannot be
towed using a dolly. For vehicles being dinghy towed,
the vehicle should be run at the
beginning of each day and at each
RV fuel stop for about five minutes.
This will ensure proper lubrication of
transmission components. Reinstall
the fuse to start the vehicle.
To tow the vehicle from the front
with all four wheels on the ground:
1. Position the vehicle to be towed,
shift the transmission to
P (Park), and turn the ignition to
LOCK/OFF.
2. Secure the vehicle to the towing vehicle.
3. Set the parking brake.
4. Turn the ignition to ACC/ ACCESSORY.
5. Shift the transmission to N (Neutral). 6. To prevent the battery from
draining while the vehicle is
being towed, remove the 15 amp
ECM fuse and the 15 amp
Onstar fuse. These are in the
battery compartment behind the
passenger seat on the floor.
Also, remove the 50 amp BATT1
fuse from the underhood fuse
block and store all fuses in a
safe location. See Engine
Compartment Fuse Block on
page 10-28.
7. Release the parking brake.
{Caution
If the vehicle is towed without
performing each of the steps
listed under “Dinghy Towing,” the
automatic transmission could be
damaged. Be sure to follow all
steps of the dinghy towing
procedure prior to and after
towing the vehicle.
Page 344 of 414

Black plate (74,1)GMC Acadia/Acadia Denali Owner Manual (GMNA-Localizing-U.S./Canada/
Mexico-6014315) - 2014 - crc - 8/15/13
10-74 Vehicle Care
{Caution
If 105 km/h (65 mph) is exceeded
while towing the vehicle, it could
be damaged. Never exceed
105 km/h (65 mph) while towing
the vehicle.
Once the destination is reached:
1. Set the parking brake.
2. Reinstall the fuses.
3. Shift the transmission to P (Park), turn the ignition to
LOCK/OFF and remove the key
from the ignition.
4. Disconnect the vehicle from the towing vehicle.
{Caution
Do not tow a vehicle with the front
drive wheels on the ground if one
of the front tires is a compact
spare tire. Towing with two
(Continued)
Caution (Continued)
different tire sizes on the front of
the vehicle can cause severe
damage to the transmission.
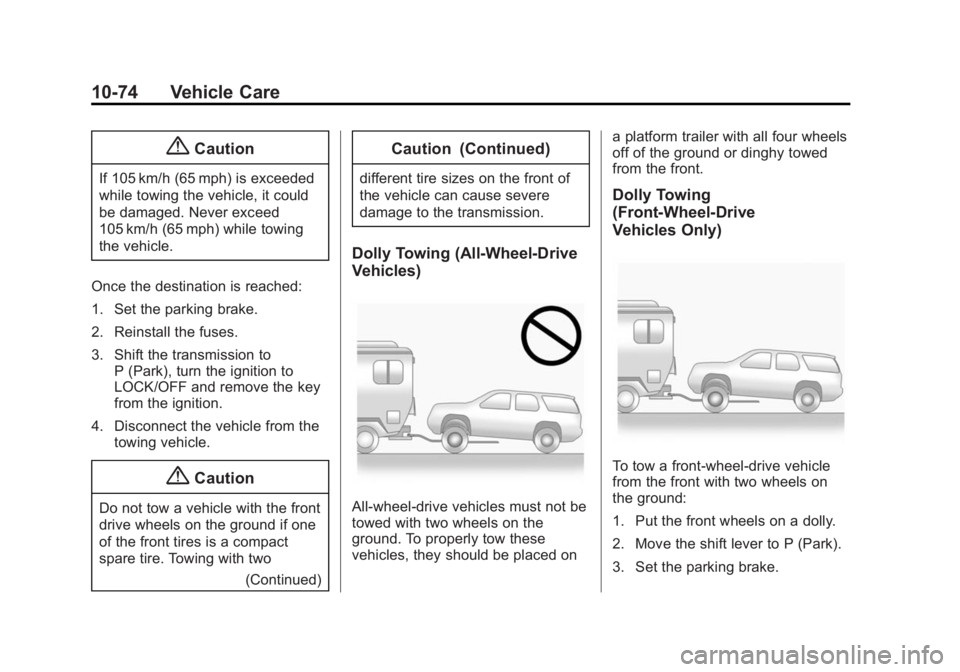
Dolly Towing (All-Wheel-Drive
Vehicles)
All-wheel-drive vehicles must not be
towed with two wheels on the
ground. To properly tow these
vehicles, they should be placed on a platform trailer with all four wheels
off of the ground or dinghy towed
from the front.
Dolly Towing
(Front-Wheel-Drive
Vehicles Only)
To tow a front-wheel-drive vehicle
from the front with two wheels on
the ground:
1. Put the front wheels on a dolly.
2. Move the shift lever to P (Park).
3. Set the parking brake.
Page 345 of 414

Black plate (75,1)GMC Acadia/Acadia Denali Owner Manual (GMNA-Localizing-U.S./Canada/
Mexico-6014315) - 2014 - crc - 8/15/13
Vehicle Care 10-75
4. Clamp the steering wheel in astraight-ahead position with a
clamping device designed for
towing.
5. Remove the key from the ignition.
6. Secure the vehicle to the dolly.
7. Release the parking brake.
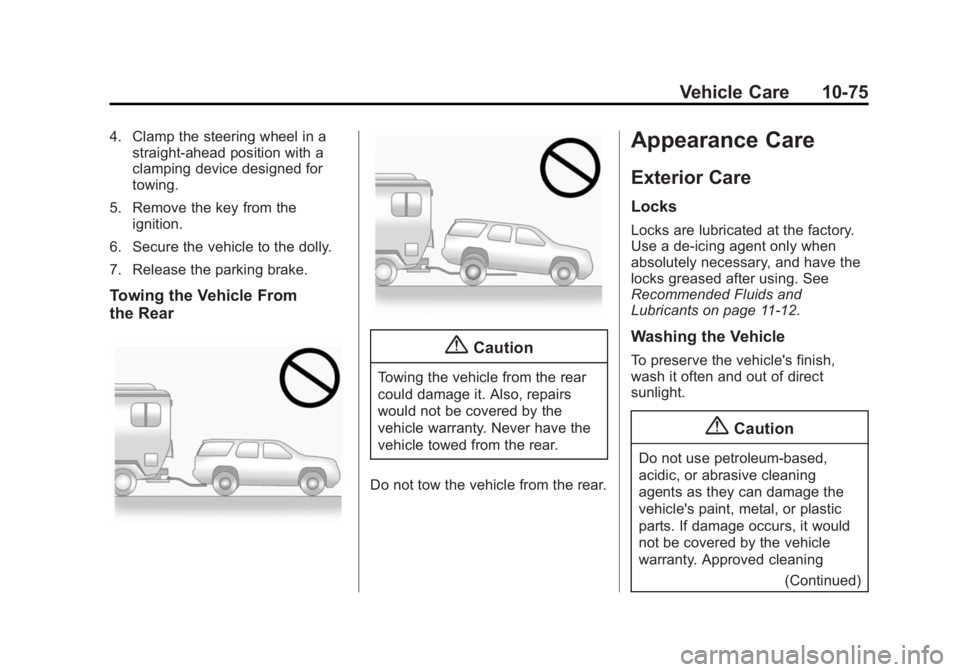
Towing the Vehicle From
the Rear
{Caution
Towing the vehicle from the rear
could damage it. Also, repairs
would not be covered by the
vehicle warranty. Never have the
vehicle towed from the rear.
Do not tow the vehicle from the rear.
Appearance Care
Exterior Care
Locks
Locks are lubricated at the factory.
Use a de-icing agent only when
absolutely necessary, and have the
locks greased after using. See
Recommended Fluids and
Lubricants on page 11-12.
Washing the Vehicle
To preserve the vehicle's finish,
wash it often and out of direct
sunlight.
{Caution
Do not use petroleum-based,
acidic, or abrasive cleaning
agents as they can damage the
vehicle's paint, metal, or plastic
parts. If damage occurs, it would
not be covered by the vehicle
warranty. Approved cleaning (Continued)
Page 349 of 414

Black plate (79,1)GMC Acadia/Acadia Denali Owner Manual (GMNA-Localizing-U.S./Canada/
Mexico-6014315) - 2014 - crc - 8/15/13
Vehicle Care 10-79
Wheels and Trim—Aluminum
or Chrome
Use a soft, clean cloth with mild
soap and water to clean the wheels.
After rinsing thoroughly with clean
water, dry with a soft, clean towel.
A wax may then be applied.
{Caution
Chrome wheels and other chrome
trim may be damaged if the
vehicle is not washed after driving
on roads that have been sprayed
with magnesium, calcium,
or sodium chloride. These
chlorides are used on roads for
conditions such as ice and dust.
Always wash the chrome with
soap and water after exposure.
{Caution
To avoid surface damage, do not
use strong soaps, chemicals,
abrasive polishes, cleaners,
brushes, or cleaners that contain
acid on aluminum or
chrome-plated wheels. Use only
approved cleaners. Also, never
drive a vehicle with aluminum or
chrome-plated wheels through an
automatic car wash that uses
silicone carbide tire cleaning
brushes. Damage could occur
and the repairs would not be
covered by the vehicle warranty.
Steering, Suspension, and
Chassis Components
Visually inspect steering,
suspension, and chassis
components for damaged, loose or
missing parts or signs of wear at
least once a year. Inspect the power
steering for proper hook-up, binding,
leaks, cracks, chafing, etc. Visually check constant velocity joints,
rubber boots, and axle seals for
leaks.
Body Component Lubrication
Lubricate all key lock cylinders,
hood hinges, liftgate hinges, and the
fuel door hinge unless the
components are plastic. Applying
silicone grease on weatherstrips
with a clean cloth will make them
last longer, seal better, and not stick
or squeak.
Underbody Maintenance
At least twice a year, Spring and
Fall, use plain water to flush dirt and
debris from the vehicle's underbody.
Your dealer or an underbody car
washing system can do this. If not
removed, rust and corrosion can
develop.
Sheet Metal Damage
If the vehicle is damaged and
requires sheet metal repair or
replacement, make sure the body
repair shop applies anti-corrosion
Page 354 of 414

Black plate (84,1)GMC Acadia/Acadia Denali Owner Manual (GMNA-Localizing-U.S./Canada/
Mexico-6014315) - 2014 - crc - 8/15/13
10-84 Vehicle Care
Use the following guidelines for
proper floor mat usage.
.The original equipment floor
mats were designed for your
vehicle. If the floor mats need
replacing, it is recommended
that GM certified floor mats be
purchased. Non-GM floor mats
may not fit properly and may
interfere with the accelerator or
brake pedal. Always check that
the floor mats do not interfere
with the pedals.
.Use the floor mat with the
correct side up. Do not turn
it over.
.Do not place anything on top of
the driver side floor mat.
.Use only a single floor mat on
the driver side.
.Do not place one floor mat on
top of another.
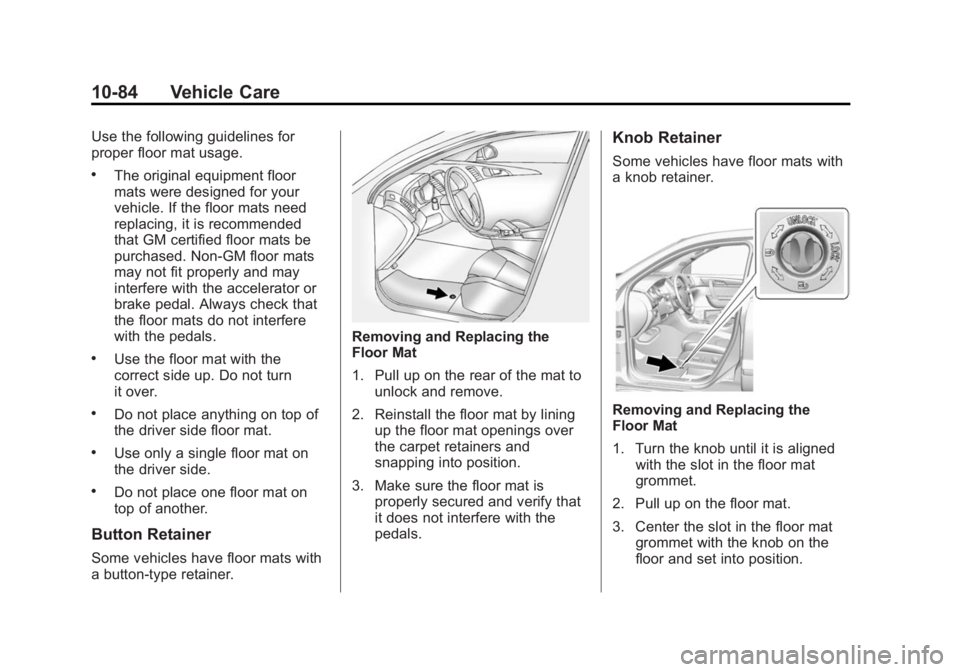
Button Retainer
Some vehicles have floor mats with
a button-type retainer.
Removing and Replacing the
Floor Mat
1. Pull up on the rear of the mat tounlock and remove.
2. Reinstall the floor mat by lining up the floor mat openings over
the carpet retainers and
snapping into position.
3. Make sure the floor mat is properly secured and verify that
it does not interfere with the
pedals.
Knob Retainer
Some vehicles have floor mats with
a knob retainer.
Removing and Replacing the
Floor Mat
1. Turn the knob until it is alignedwith the slot in the floor mat
grommet.
2. Pull up on the floor mat.
3. Center the slot in the floor mat grommet with the knob on the
floor and set into position.
Page 355 of 414

Black plate (85,1)GMC Acadia/Acadia Denali Owner Manual (GMNA-Localizing-U.S./Canada/
Mexico-6014315) - 2014 - crc - 8/15/13
Vehicle Care 10-85
4. Turn the knob until it isperpendicular to the slot in the
grommet to lock the mat in
place.
5. Make sure the floor mat is properly secured and verify that
it does not interfere with the
pedals.