2014 FORD SUPER DUTY ABS
[x] Cancel search: ABSPage 79 of 458

Anti-Lock Braking System
If it illuminates when you are
driving, this indicates a
malfunction. You will continue
to have the normal braking system
(without ABS) unless the brake system
warning lamp is also illuminated. Have the
system checked by your authorized dealer.
Battery If it illuminates while driving, it
indicates a malfunction. Switch
off all unnecessary electrical
equipment and have the system checked
by your authorized dealer immediately.
Brake System Illuminates when you engage the
parking brake with the ignition
on.
If it illuminates when you are driving, check
that the parking brake is not engaged. If
the parking brake is not engaged, this
indicates low brake fluid level or a brake
system malfunction. Have the system
checked immediately by your authorized
dealer. WARNING
Driving your vehicle with the warning
lamp on is dangerous. A significant
decrease in braking performance
may occur. It will take you longer to stop
your vehicle. Have your vehicle checked by
your authorized dealer immediately. Driving
extended distances with the parking brake
engaged can cause brake failure and the
risk of personal injury. Check Fuel Cap (If Equipped)
Illuminates when the fuel cap
may not be properly installed.
Continued driving with this light
on may cause the Service engine
soon warning indicator to come on.
Cruise Control
(If Equipped) Illuminates when you switch this
feature on. See
Using Cruise
Control (page 172).
Direction Indicator Illuminates when the left or right
turn signal or the hazard warning
flasher is turned on. If the
indicators stay on or flash faster, check for
a burned out bulb.
Door Ajar Displays when the ignition is on
and any door is not completely
closed.
Electronic Locking Differential Illuminates when using the
electronic locking differential.
Engine Coolant Temperature Illuminates when the engine
coolant temperature is high.
Stop the vehicle as soon as
possible, switch off the engine and let cool.
76
Super Duty (TFA) Instrument Cluster E144522 E71340 E163170
Page 111 of 458
WARNINGS
Install the head restraint properly to
help minimize the risk of neck injury
in the event of a crash.
Note:
Adjust the seat back to an upright
driving position before adjusting the head
restraint. Adjust the head restraint so that
the top of it is level with the top of your head
and as far forward as possible. Make sure
that you remain comfortable. If you are
extremely tall, adjust the head restraint to
its highest position.
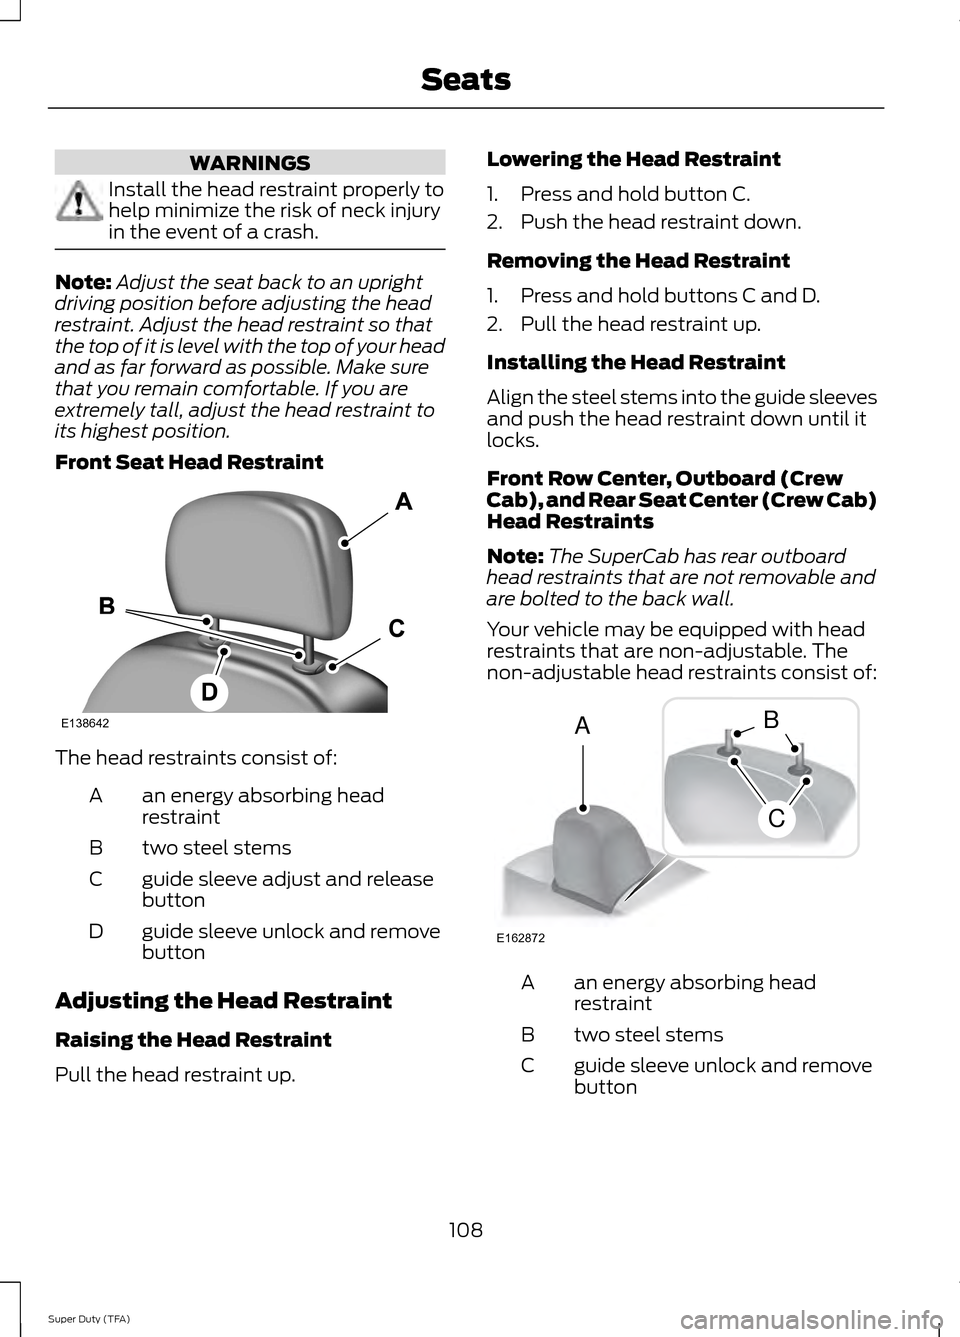
Front Seat Head Restraint The head restraints consist of:
an energy absorbing head
restraint
A
two steel stems
B
guide sleeve adjust and release
button
C
guide sleeve unlock and remove
button
D
Adjusting the Head Restraint
Raising the Head Restraint
Pull the head restraint up. Lowering the Head Restraint
1. Press and hold button C.
2. Push the head restraint down.
Removing the Head Restraint
1. Press and hold buttons C and D.
2. Pull the head restraint up.
Installing the Head Restraint
Align the steel stems into the guide sleeves
and push the head restraint down until it
locks.
Front Row Center, Outboard (Crew
Cab), and Rear Seat Center (Crew Cab)
Head Restraints
Note:
The SuperCab has rear outboard
head restraints that are not removable and
are bolted to the back wall.
Your vehicle may be equipped with head
restraints that are non-adjustable. The
non-adjustable head restraints consist of: an energy absorbing head
restraint
A
two steel stems
B
guide sleeve unlock and remove
button
C
108
Super Duty (TFA) SeatsE138642 E162872
A
C
B
Page 118 of 458

VENTILATED SEATS (IF EQUIPPED)
The ventilated seats will only function
when the engine is running. To operate the ventilated seats, press the
ventilated seat symbol to cycle through
the various cooling settings and off. Cooler
settings are indicated by more indicator
lights.
If the engine falls below 350 RPM while
the ventilated seats are on, the feature will
turn itself off. You will need to reactivate
it.
Heated and Ventilated Seats Air
Filter Replacement
(If Equipped)
The heated and ventilated seat system
includes air filters. You must replace them
periodically.
The filter is located under each front seat.
Access the filter from the second row
foot-well area. Move the front seats all the
way to the full front and full up positions
to ease access. To remove a filter:
1. Turn the vehicle off.
2. Push up on the outside rigid edge of
the filter until the tabs are released,
then remove the filter. To install a filter:
1. First, position the filter in its housing
making sure that the far forward end
is all the way up in the housing.
2. Push in on the center of the outside edge of the filter and rotate clockwise
into the housing until it clips into
position.
115
Super Duty (TFA) SeatsE146309 E146319 E146321
Page 136 of 458
SAFETY PRECAUTIONS
WARNINGS
Do not overfill the fuel tank. The
pressure in an overfilled tank may
cause leakage and lead to fuel spray
and fire. The fuel system may be under
pressure. If you hear a hissing sound
near the fuel filler door, do not refuel
until the sound stops. Otherwise, fuel may
spray out, which could cause serious
personal injury. Automotive fuels can cause serious
injury or death if you misuse or
mishandle them.
Fuel ethanol and gasoline may
contain benzene, which is a
cancer-causing agent.
When refueling always shut the
engine off and never allow sparks or
open flames near the filler neck.
Never smoke or use a cell phone while
refueling. Fuel vapor is extremely
hazardous under certain conditions. Avoid
inhaling excess fumes. The flow of fuel through a fuel pump
nozzle can produce static electricity,
which can cause a fire if you pump
fuel into an ungrounded fuel container. Observe the following guidelines when
handling automotive fuel: •
Extinguish all smoking materials and
any open flames before refueling your
vehicle.
• Automotive fuels can be harmful or
fatal if swallowed. Fuel such as
gasoline is highly toxic and if
swallowed can cause death or
permanent injury. If swallowed, call a
physician immediately, even if no
symptoms are immediately apparent.
The toxic effects of fuel may not be
visible for hours.
• Avoid inhaling fuel vapors. Inhaling too
much fuel vapor of any kind can lead
to eye and respiratory tract irritation.
In severe cases, excessive or prolonged
breathing of fuel vapor can cause
serious illness and permanent injury.
• Avoid getting fuel liquid in your eyes. If
you splash fuel in your eyes, remove
contact lenses (if worn), flush with
water for 15 minutes and seek medical
attention. Failure to seek proper
medical attention could lead to
permanent injury.
• Fuels can also be harmful if absorbed
through the skin. If you splash fuel on
your skin, clothing or both, promptly
remove contaminated clothing and
wash your skin thoroughly with soap
and water. Repeated or prolonged skin
contact with fuel liquid or vapor causes
skin irritation.
• Be particularly careful if you are taking
“Antabuse ” or other forms of disulfiram
for the treatment of alcoholism.
Breathing gasoline vapors, or skin
contact could cause an adverse
reaction. In sensitive individuals, serious
personal injury or sickness may result.
If you splash fuel on your skin, promptly
wash your skin thoroughly with soap
and water. Consult a physician
immediately if you experience an
adverse reaction.
133
Super Duty (TFA) Fuel and Refueling
Page 139 of 458

•
Keep the fuel pump nozzle in contact
with the fuel container while filling.
• Do not use a device that would hold
the fuel pump handle in the fill position.
Fuel Filler Cap WARNINGS
The fuel system may be under
pressure. If you hear a hissing sound
near the fuel filler door, do not refuel
until the sound stops. Otherwise, fuel may
spray out, which could cause serious
personal injury. If you do not use the proper fuel filler
cap, excessive pressure or vacuum
in the fuel tank may damage the fuel
system or cause the fuel cap to disengage
in a collision, which may result in possible
personal injury. Note:
If you must replace the fuel filler cap,
replace it with a fuel filler cap that is
designed for your vehicle. The customer
warranty may be void for any damage to the
fuel tank or fuel system if the correct
genuine Ford, Motorcraft® or other certified
fuel filler cap is not used.
Your fuel tank filler cap has an indexed
design with a 1/4th turn on and off feature.
When fueling your vehicle:
1. Put the vehicle in P (Park).
2. Turn the engine off.
3. Carefully turn the filler cap counterclockwise until it spins off.
4. Pull to remove the cap from the fuel filler pipe.
5. To install the cap, align the tabs on the
cap with the notches on the filler pipe.
6. Turn the filler cap clockwise 1/4 of a turn clockwise until it clicks at least
once. If the Check Fuel Cap light or a Check Fuel
Cap message appears in the instrument
cluster and stays on after you start the
engine, the fuel filler cap may not be
properly installed.
If the fuel cap light remains on, at the next
opportunity, safely pull off of the road,
remove the fuel filler cap, align the cap
properly and reinstall it. The check fuel cap
light or Check fuel cap message may not
reset immediately; it may take several
driving cycles for the indicators to turn off.
A driving cycle consists of an engine
start-up (after four or more hours with the
engine off) followed by normal city and
highway driving.
FUEL CONSUMPTION
Empty reserve is the amount of fuel
remaining in the tank after the fuel gauge
indicates empty. The amount of usable
fuel in the empty reserve varies and should
not be relied upon to increase driving range.
•
The usable capacity of the fuel tank is
the amount of fuel that can be added
into the tank after the gauge indicates
empty
• The advertised capacity is the total fuel
tank size. See
Capacities and
Specifications (page 292). It is the
combined usable capacity plus the
empty reserve.
• Due to the empty reserve, you may not
be able to refuel the full amount of the
advertised capacity of the fuel tank
even when the fuel gauge reads empty.
Filling the Tank
For consistent results when filling the fuel
tank:
136
Super Duty (TFA) Fuel and Refueling
Page 169 of 458
PRINCIPLE OF OPERATION
WARNINGS
Hill descent control cannot control
descent in all surface conditions and
circumstances, such as ice or
extremely steep grades. Hill descent
control is a driver assist system and cannot
substitute for good judgment by the driver.
Failure to do so may result in loss of vehicle
control, crash or serious injury. Hill descent control does not provide
hill hold at zero miles per hour (0
kilometers per hour). When stopped,
the parking brake must be applied or the
vehicle must be placed in P (Park) or it
may roll away. Hill descent control allows the driver to set
and maintain vehicle speed while
descending steep grades in various surface
conditions.
Hill descent control can maintain vehicle
speeds on downhill grades between 2 mph
(3 km/h) and 12 mph (20 km/h). Above 20
mph (32 km/h), the system remains
armed, but descent speed cannot be set
or maintained.
Hill descent control requires a cooling
down interval after a period of sustained
use. The amount of time that the feature
can remain active before cooling varies
with conditions. The system will provide a
warning in the message center and a chime
will sound when the system is about to
disengage for cooling. At this time,
manually apply the brakes as needed to
maintain descent speed. USING HILL DESCENT
CONTROL Press and release the hill
descent button located on the
instrument panel. A light in the
cluster will illuminate and a
chime will sound when this feature is
activated.
To increase descent speed, press the
accelerator pedal until the desired speed
is reached. To decrease descent speed,
press the brake pedal until the desired
speed is reached.
Whether accelerating or decelerating, once
the desired descent speed is reached,
remove your feet from the pedals and the
chosen vehicle speed will be maintained.
Note: Noise from the ABS pump motor may
be observed during hill descent control
operation. This is a normal characteristic of
the ABS and should be no reason for
concern.
Hill descent modes
• At speeds below 20 mph (32 km/h):
When the Hill Descent Control switch
is pressed and Hill Descent Control is
active, the Hill Descent Control telltale
will flash.
• At speeds below 20 mph (32 km/h):
When the Hill Descent Control switch
is pressed and conditions are not
correct for hill descent activation, the
Hill Descent Control system will be
enabled, the Hill Descent Control
telltale will be solid and a message will
display in the information display.
166
Super Duty (TFA) Terrain ResponseE163957
Page 198 of 458
Before using recovery hooks:
•
Make sure all attaching points are
secure and capable of withstanding
the applied load.
• Never use chains, cables or tow straps
with metal hook ends.
• Only use recovery straps that have a
minimum breaking strength two to
three times the gross vehicle weight of
the stuck vehicle.
• Make sure the recovery strap is in good
condition and free of visible cuts, tears
or damage.
• Use a damper device such as a tarp,
heavy blanket or piece of carpet
draped over the recovery strap to help
absorb the energy in the event the
strap breaks.
• Make sure the stuck vehicle is not
loaded heavier than its gross vehicle
weight rating specified on the
certification label.
• Always align the tow vehicle and stuck
vehicle in a straight line (within 10
degrees).
• Keep bystanders to the sides of the
vehicle, at a distance of at least twice
the length of the recovery strap. This
helps avoid injury from the hazard of a
recovery hook or strap breaking, or a
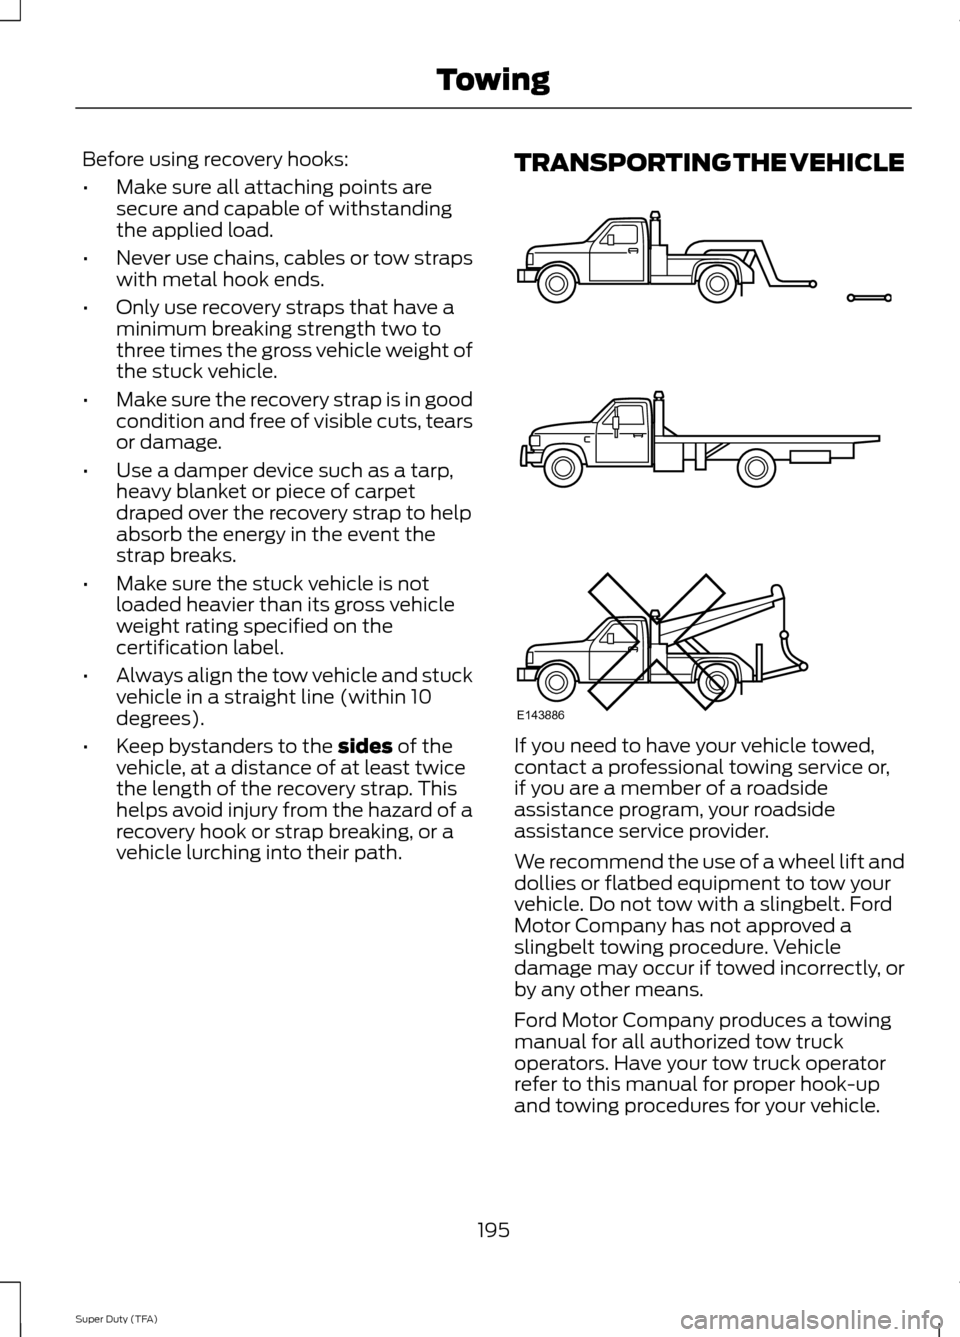
vehicle lurching into their path. TRANSPORTING THE VEHICLE
If you need to have your vehicle towed,
contact a professional towing service or,
if you are a member of a roadside
assistance program, your roadside
assistance service provider.
We recommend the use of a wheel lift and
dollies or flatbed equipment to tow your
vehicle. Do not tow with a slingbelt. Ford
Motor Company has not approved a
slingbelt towing procedure. Vehicle
damage may occur if towed incorrectly, or
by any other means.
Ford Motor Company produces a towing
manual for all authorized tow truck
operators. Have your tow truck operator
refer to this manual for proper hook-up
and towing procedures for your vehicle.
195
Super Duty (TFA) TowingE143886
Page 244 of 458
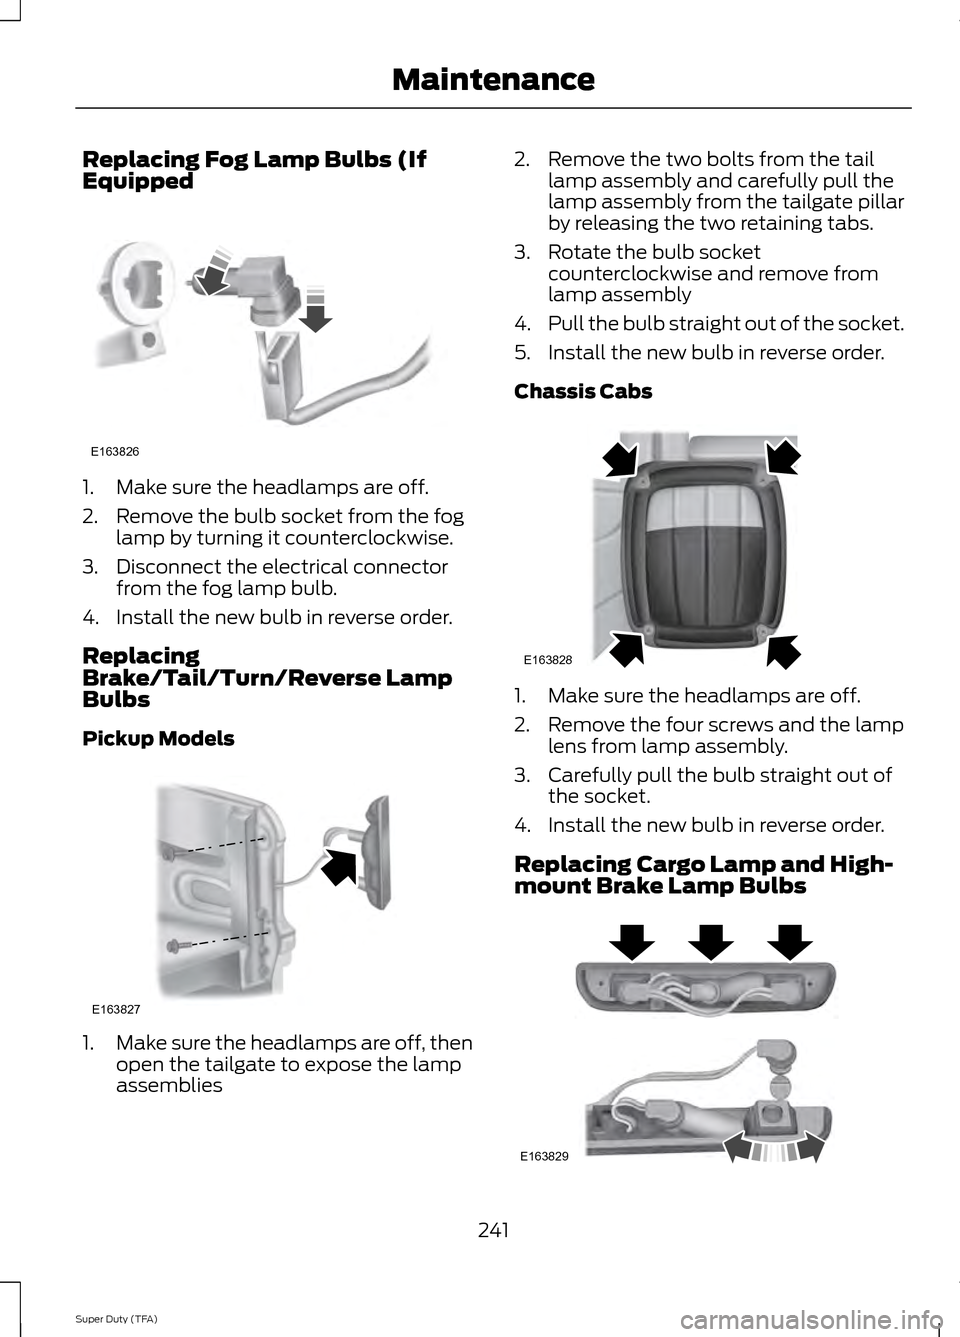
Replacing Fog Lamp Bulbs (If
Equipped
1. Make sure the headlamps are off.
2. Remove the bulb socket from the fog
lamp by turning it counterclockwise.
3. Disconnect the electrical connector from the fog lamp bulb.
4. Install the new bulb in reverse order.
Replacing
Brake/Tail/Turn/Reverse Lamp
Bulbs
Pickup Models 1.
Make sure the headlamps are off, then
open the tailgate to expose the lamp
assemblies 2. Remove the two bolts from the tail
lamp assembly and carefully pull the
lamp assembly from the tailgate pillar
by releasing the two retaining tabs.
3. Rotate the bulb socket counterclockwise and remove from
lamp assembly
4. Pull the bulb straight out of the socket.
5. Install the new bulb in reverse order.
Chassis Cabs 1. Make sure the headlamps are off.
2. Remove the four screws and the lamp
lens from lamp assembly.
3. Carefully pull the bulb straight out of the socket.
4. Install the new bulb in reverse order.
Replacing Cargo Lamp and High-
mount Brake Lamp Bulbs 241
Super Duty (TFA) MaintenanceE163826 E163827 E163828 E163829