2014 FORD SUPER DUTY automatic transmission
[x] Cancel search: automatic transmissionPage 233 of 458
•
the engine coolant temperature gauge
moves fully into the red (hot) area
• the coolant temperature warning light
illuminates
• the service engine soon indicator
illuminates. WARNING
Never remove the coolant reservoir
cap while the engine is running or hot.
1. Pull off the road as soon as safely
possible and place the vehicle in P
(Park).
2. Leave the engine running until the coolant temperature gauge needle
moves away from the H range. After
several minutes, if this does not
happen, follow the remaining steps.
3. Turn the engine off and wait for it to cool before checking the coolant level.
4. If the coolant level is normal, you may restart your engine and continue on.
5. If the coolant is low, add coolant, restart the engine and take your vehicle
to an authorized dealer. See Adding
engine coolant in this chapter for more
information. Refer to fail-safe cooling
for additional information.
AUTOMATIC TRANSMISSION
FLUID CHECK
Have an authorized dealer check and
change the transmission fluid and filter at
the correct service interval. See
Scheduled Maintenance (page 428).
Do not use supplemental transmission
fluid additives, treatments or cleaning
agents. The use of these materials may
affect transmission operation and result
in damage to internal transmission
components. Checking Automatic Transmission
Fluid (If Equipped)
For scheduled intervals of the fluid checks
and changes, See
Scheduled
Maintenance (page 428). Your
transmission does not consume fluid.
However, the fluid level should be checked
if the transmission is not working properly,
i.e., if the transmission slips or shifts slowly
or if you notice some sign of fluid leakage.
Automatic transmission fluid expands
when warmed. To obtain an accurate fluid
check, drive the vehicle until it is at normal
operating temperature (approximately
19 mi (30 km)
). Verify that the
transmission fluid temperature gauge,
located on the instrument cluster, is within
normal range.
1. Drive the vehicle
19 mi (30 km)until it
reaches normal operating temperature.
2. Park the vehicle on a level surface and
engage the parking brake.
3. With the engine running, parking brake
engaged and your foot on the brake
pedal, move the gearshift lever through
all of the gear ranges. Allow sufficient
time for each gear to engage.
4. Latch the gearshift lever in P and leave
the engine running.
5. Remove the dipstick, wiping it clean with a clean, dry lint free rag. If
necessary, refer to the Under Hood
Overview in this chapter for the
location of the dipstick.
6. Install the dipstick making sure it is fully
seated in the filler tube.
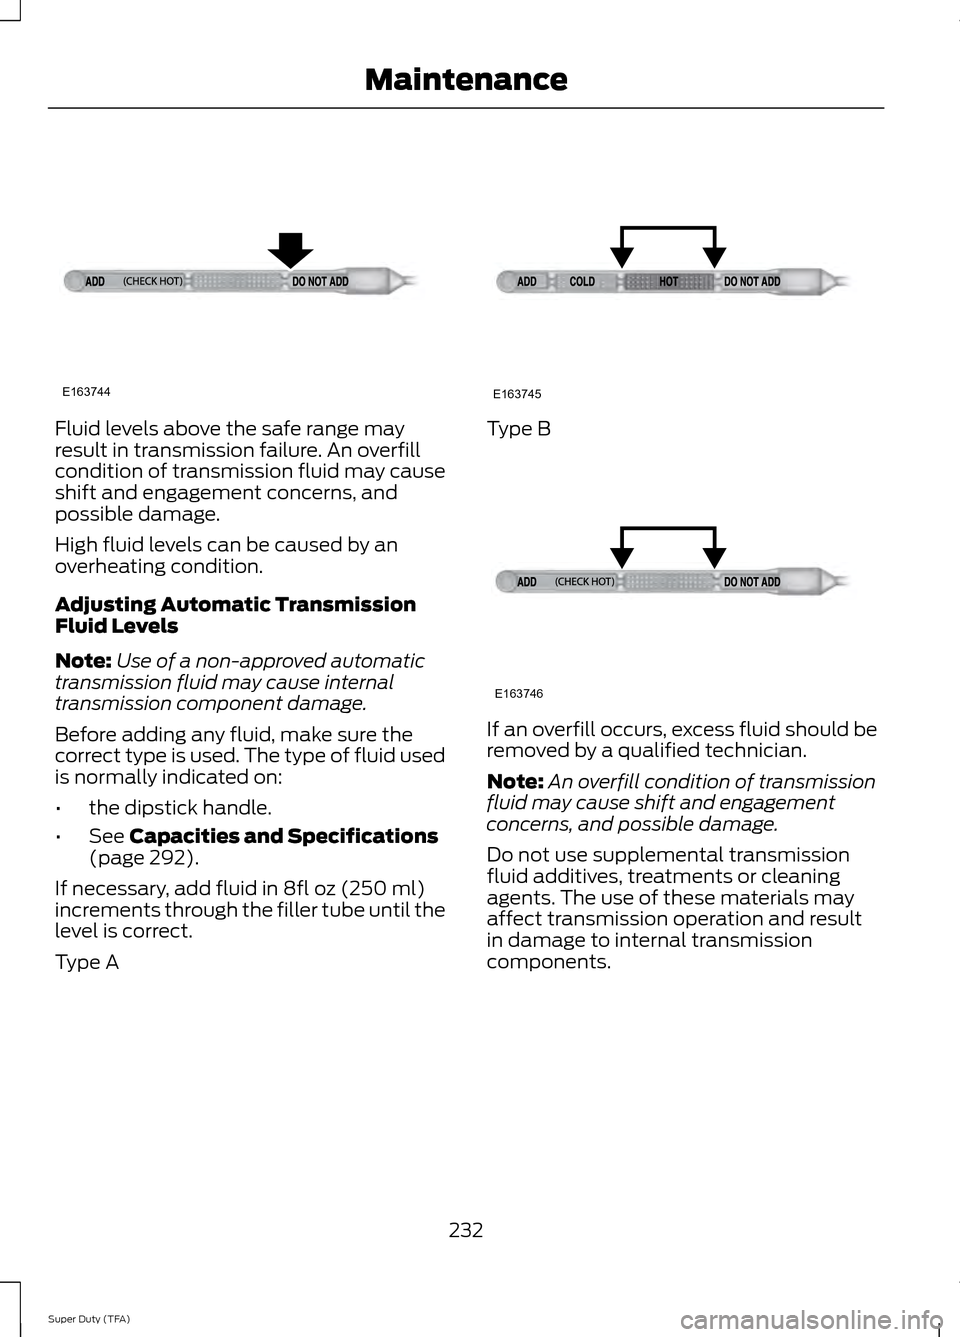
7. Remove the dipstick and inspect the fluid level. The fluid should be in the
designated area for normal operating
temperature or ambient temperature.
Low Fluid Level
Type A
230
Super Duty (TFA) Maintenance
Page 235 of 458
Fluid levels above the safe range may
result in transmission failure. An overfill
condition of transmission fluid may cause
shift and engagement concerns, and
possible damage.
High fluid levels can be caused by an
overheating condition.
Adjusting Automatic Transmission
Fluid Levels
Note:
Use of a non-approved automatic
transmission fluid may cause internal
transmission component damage.
Before adding any fluid, make sure the
correct type is used. The type of fluid used
is normally indicated on:
• the dipstick handle.
• See Capacities and Specifications
(page 292).
If necessary, add fluid in
8fl oz (250 ml)
increments through the filler tube until the
level is correct.
Type A Type B
If an overfill occurs, excess fluid should be
removed by a qualified technician.
Note:
An overfill condition of transmission
fluid may cause shift and engagement
concerns, and possible damage.
Do not use supplemental transmission
fluid additives, treatments or cleaning
agents. The use of these materials may
affect transmission operation and result
in damage to internal transmission
components.
232
Super Duty (TFA) MaintenanceE163744 E163745 E163746
Page 298 of 458
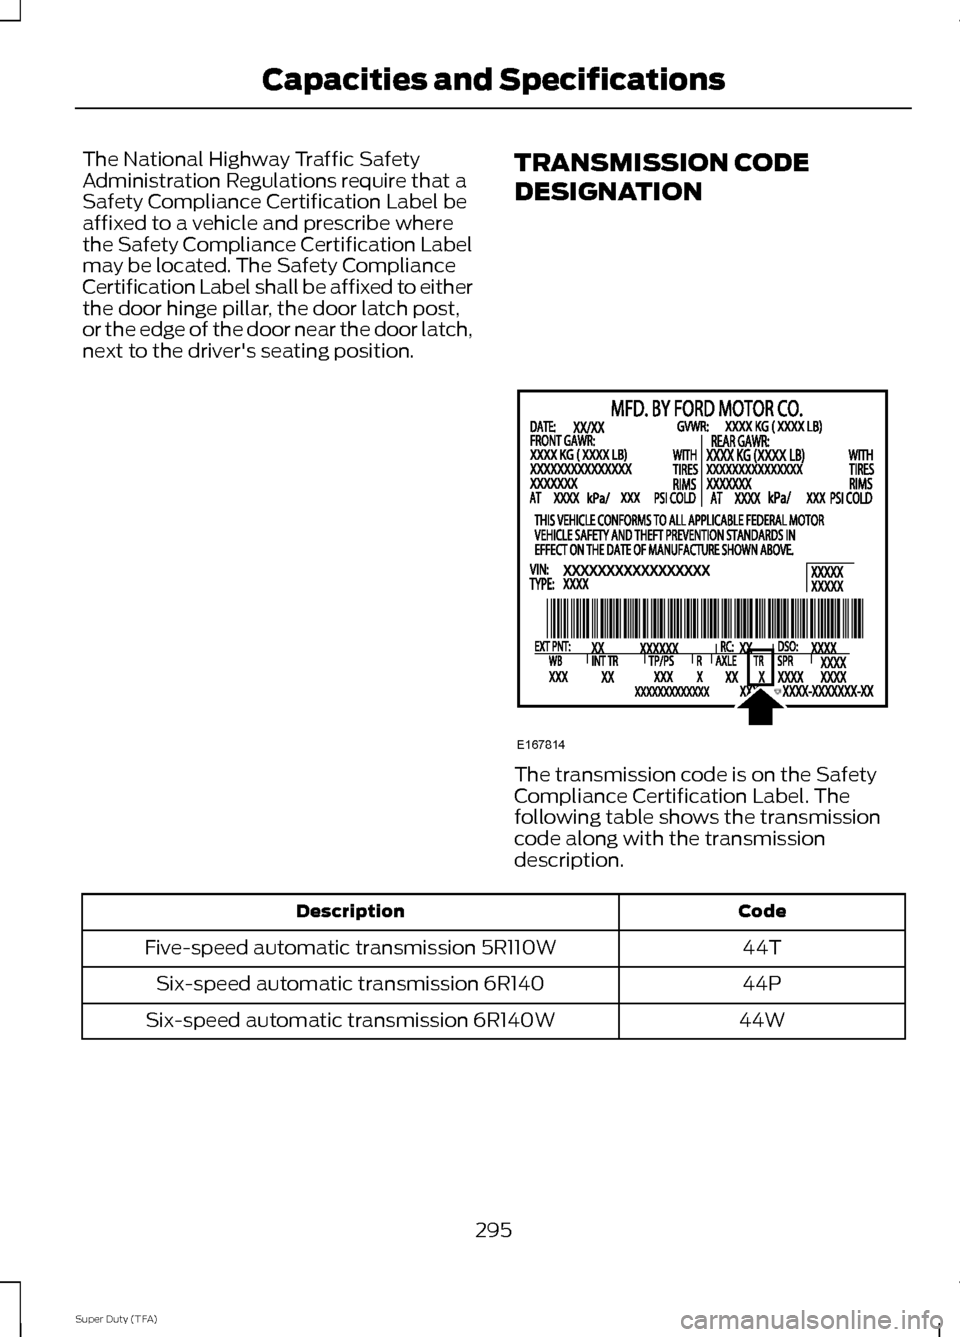
The National Highway Traffic Safety
Administration Regulations require that a
Safety Compliance Certification Label be
affixed to a vehicle and prescribe where
the Safety Compliance Certification Label
may be located. The Safety Compliance
Certification Label shall be affixed to either
the door hinge pillar, the door latch post,
or the edge of the door near the door latch,
next to the driver's seating position.
TRANSMISSION CODE
DESIGNATION The transmission code is on the Safety
Compliance Certification Label. The
following table shows the transmission
code along with the transmission
description.
Code
Description
44T
Five-speed automatic transmission 5R110W
44P
Six-speed automatic transmission 6R140
44W
Six-speed automatic transmission 6R140W
295
Super Duty (TFA) Capacities and SpecificationsE167814
Page 300 of 458
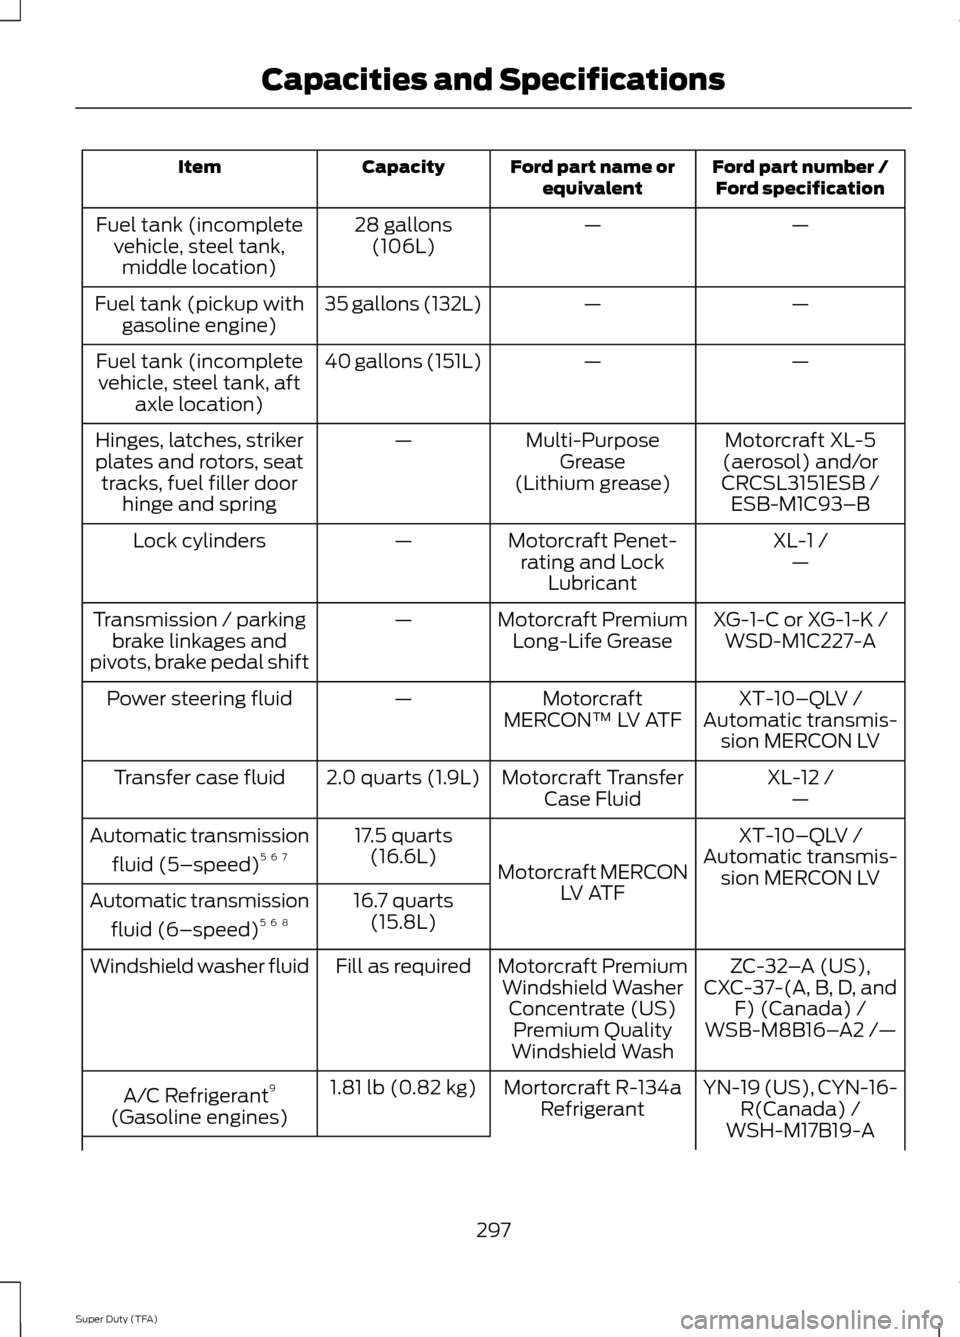
Ford part number /
Ford specification
Ford part name or
equivalent
Capacity
Item
—
—
28 gallons
(106L)
Fuel tank (incomplete
vehicle, steel tank,middle location)
—
—
35 gallons (132L)
Fuel tank (pickup with
gasoline engine)
—
—
40 gallons (151L)
Fuel tank (incomplete
vehicle, steel tank, aft axle location)
Motorcraft XL-5
(aerosol) and/or
CRCSL3151ESB /
Multi-Purpose
Grease
(Lithium grease)
—
Hinges, latches, striker
plates and rotors, seat
tracks, fuel filler door hinge and spring ESB-M1C93–B
XL-1 /
Motorcraft Penet-
rating and Lock Lubricant
—
Lock cylinders
—
XG-1-C or XG-1-K /
Motorcraft Premium
Long-Life Grease
—
Transmission / parking
brake linkages and
pivots, brake pedal shift WSD-M1C227-A
XT-10–QLV /
Motorcraft
MERCON™ LV ATF
—
Power steering fluid
Automatic transmis-sion MERCON LV
XL-12 /
Motorcraft Transfer
Case Fluid
2.0 quarts (1.9L)
Transfer case fluid
—
XT-10–QLV /
Motorcraft MERCON LV ATF
17.5 quarts
(16.6L)
Automatic transmission
fluid (5–speed) 5 6 7
Automatic transmis-
sion MERCON LV
16.7 quarts (15.8L)
Automatic transmission
fluid (6–speed) 5 6 8
ZC-32–A (US),
Motorcraft Premium
Windshield Washer Concentrate (US)Premium Quality
Windshield Wash
Fill as required
Windshield washer fluid
CXC-37-(A, B, D, andF) (Canada) /
WSB-M8B16– A2 /—
YN-19 (US), CYN-16- R(Canada) /
Mortorcraft R-134a
Refrigerant
1.81 lb (0.82 kg)
A/C Refrigerant 9
(Gasoline engines) WSH-M17B19-A
297
Super Duty (TFA) Capacities and Specifications
Page 302 of 458
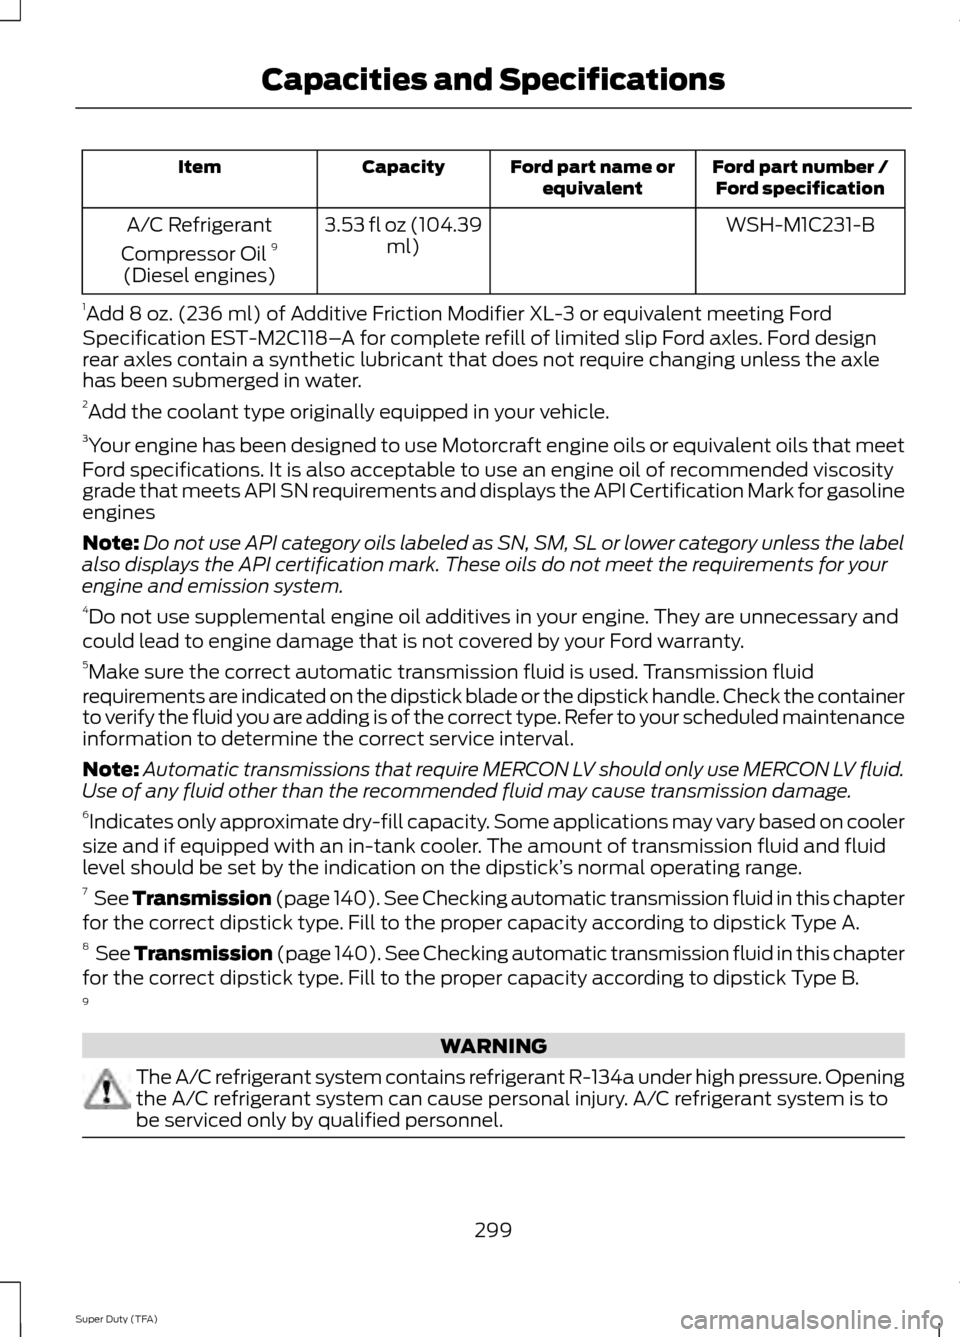
Ford part number /
Ford specification
Ford part name or
equivalent
Capacity
Item
WSH-M1C231-B
3.53 fl oz (104.39
ml)
A/C Refrigerant
Compressor Oil 9
(Diesel engines)
1 Add 8 oz. (236 ml) of Additive Friction Modifier XL-3 or equivalent meeting Ford
Specification EST-M2C118– A for complete refill of limited slip Ford axles. Ford design
rear axles contain a synthetic lubricant that does not require changing unless the axle
has been submerged in water.
2 Add the coolant type originally equipped in your vehicle.
3 Your engine has been designed to use Motorcraft engine oils or equivalent oils that meet
Ford specifications. It is also acceptable to use an engine oil of recommended viscosity
grade that meets API SN requirements and displays the API Certification Mark for gasoline
engines
Note: Do not use API category oils labeled as SN, SM, SL or lower category unless the label
also displays the API certification mark. These oils do not meet the requirements for your
engine and emission system.
4 Do not use supplemental engine oil additives in your engine. They are unnecessary and
could lead to engine damage that is not covered by your Ford warranty.
5 Make sure the correct automatic transmission fluid is used. Transmission fluid
requirements are indicated on the dipstick blade or the dipstick handle. Check the container
to verify the fluid you are adding is of the correct type. Refer to your scheduled maintenance
information to determine the correct service interval.
Note: Automatic transmissions that require MERCON LV should only use MERCON LV fluid.
Use of any fluid other than the recommended fluid may cause transmission damage.
6 Indicates only approximate dry-fill capacity. Some applications may vary based on cooler
size and if equipped with an in-tank cooler. The amount of transmission fluid and fluid
level should be set by the indication on the dipstick’ s normal operating range.
7 See Transmission (page 140). See Checking automatic transmission fluid in this chapter
for the correct dipstick type. Fill to the proper capacity according to dipstick Type A.
8 See Transmission (page 140). See Checking automatic transmission fluid in this chapter
for the correct dipstick type. Fill to the proper capacity according to dipstick Type B.
9 WARNING
The A/C refrigerant system contains refrigerant R-134a under high pressure. Opening
the A/C refrigerant system can cause personal injury. A/C refrigerant system is to
be serviced only by qualified personnel.
299
Super Duty (TFA) Capacities and Specifications
Page 320 of 458
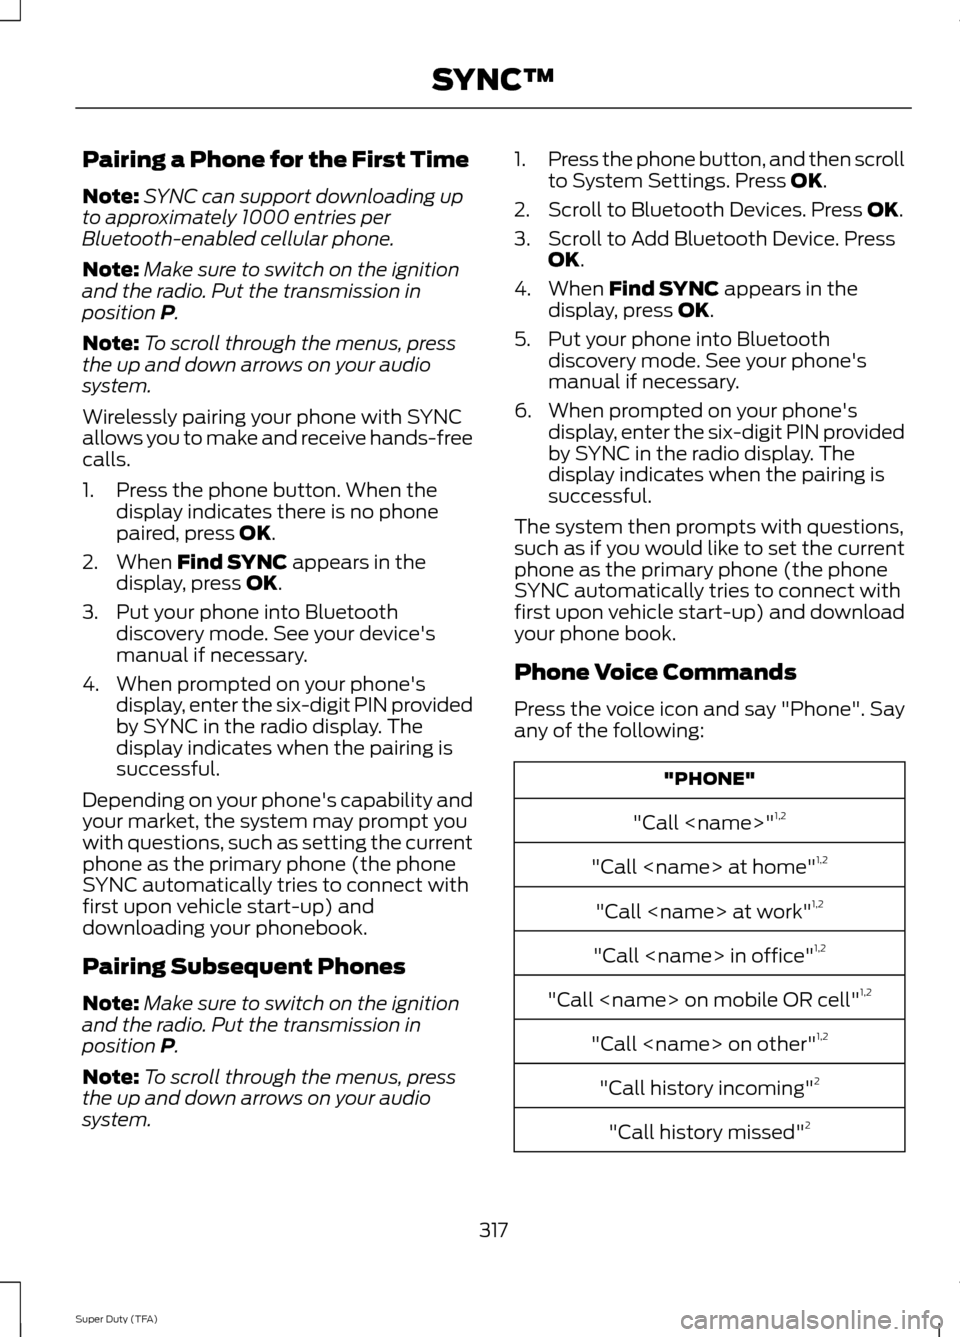
Pairing a Phone for the First Time
Note:
SYNC can support downloading up
to approximately 1000 entries per
Bluetooth-enabled cellular phone.
Note: Make sure to switch on the ignition
and the radio. Put the transmission in
position P.
Note: To scroll through the menus, press
the up and down arrows on your audio
system.
Wirelessly pairing your phone with SYNC
allows you to make and receive hands-free
calls.
1. Press the phone button. When the display indicates there is no phone
paired, press
OK.
2. When
Find SYNC appears in the
display, press OK.
3. Put your phone into Bluetooth discovery mode. See your device's
manual if necessary.
4. When prompted on your phone's display, enter the six-digit PIN provided
by SYNC in the radio display. The
display indicates when the pairing is
successful.
Depending on your phone's capability and
your market, the system may prompt you
with questions, such as setting the current
phone as the primary phone (the phone
SYNC automatically tries to connect with
first upon vehicle start-up) and
downloading your phonebook.
Pairing Subsequent Phones
Note: Make sure to switch on the ignition
and the radio. Put the transmission in
position
P.
Note: To scroll through the menus, press
the up and down arrows on your audio
system. 1.
Press the phone button, and then scroll
to System Settings. Press
OK.
2. Scroll to Bluetooth Devices. Press
OK.
3. Scroll to Add Bluetooth Device. Press OK
.
4. When
Find SYNC appears in the
display, press OK.
5. Put your phone into Bluetooth discovery mode. See your phone's
manual if necessary.
6. When prompted on your phone's display, enter the six-digit PIN provided
by SYNC in the radio display. The
display indicates when the pairing is
successful.
The system then prompts with questions,
such as if you would like to set the current
phone as the primary phone (the phone
SYNC automatically tries to connect with
first upon vehicle start-up) and download
your phone book.
Phone Voice Commands
Press the voice icon and say "Phone". Say
any of the following: "PHONE"
"Call
"Call
"Call
"Call
"Call
"Call
"Call history incoming" 2
"Call history missed" 2
317
Super Duty (TFA) SYNC™
Page 385 of 458

Phone
A
Quick Dial
B
Phonebook
C
History
D
Messaging
E
Settings
F
Hands-free calling is one of the main
features of SYNC. Once you pair your
phone, you can access many options using
the touchscreen or voice commands. While
the system supports a variety of features,
many are dependent on your cellular
phone ’s functionality.
At a minimum, most cellular phones with
Bluetooth wireless technology support the
following functions:
• Answering an incoming call
• Ending a call
• Using privacy mode
• Dialing a number
• Redialing
• Call waiting notification
• Caller ID.
Other features, such as text messaging
using Bluetooth and automatic phonebook
download, are phone-dependent features.
To check your phone ’s compatibility, see
your phone ’s user manual and visit
www.SYNCMyRide.com,
www.SYNCMyRide.ca or
www.syncmaroute.ca. Pairing Your Phone for the First
Time WARNING
Driving while distracted can result in
loss of vehicle control, crash and
injury. We strongly recommend that
you use extreme caution when using any
device that may take your focus off the
road. Your primary responsibility is the safe
operation of your vehicle. We recommend
against the use of any handheld device
while driving and encourage the use of
voice-operated systems when possible.
Make sure you are aware of all applicable
local laws that may affect the use of
electronic devices while driving. The first thing you must do to use the
phone features of SYNC is to pair your
Bluetooth-enabled cellular phone with
SYNC. This allows you to use your phone
in a hands-free manner.
Note:
Put the transmission in position P.
Turn on your vehicle ignition and the radio.
1. Touch
Add Phone in the upper left
corner of the touchscreen. Find SYNC
appears on the screen, and instructs
you to begin the pairing process from
your device.
2. Make sure that Bluetooth is set to
On
and that your cellular phone is in the
proper mode. See your phone ’s manual
if necessary.
382
Super Duty (TFA) MyFord Touch
™
(If Equipped)
Page 433 of 458
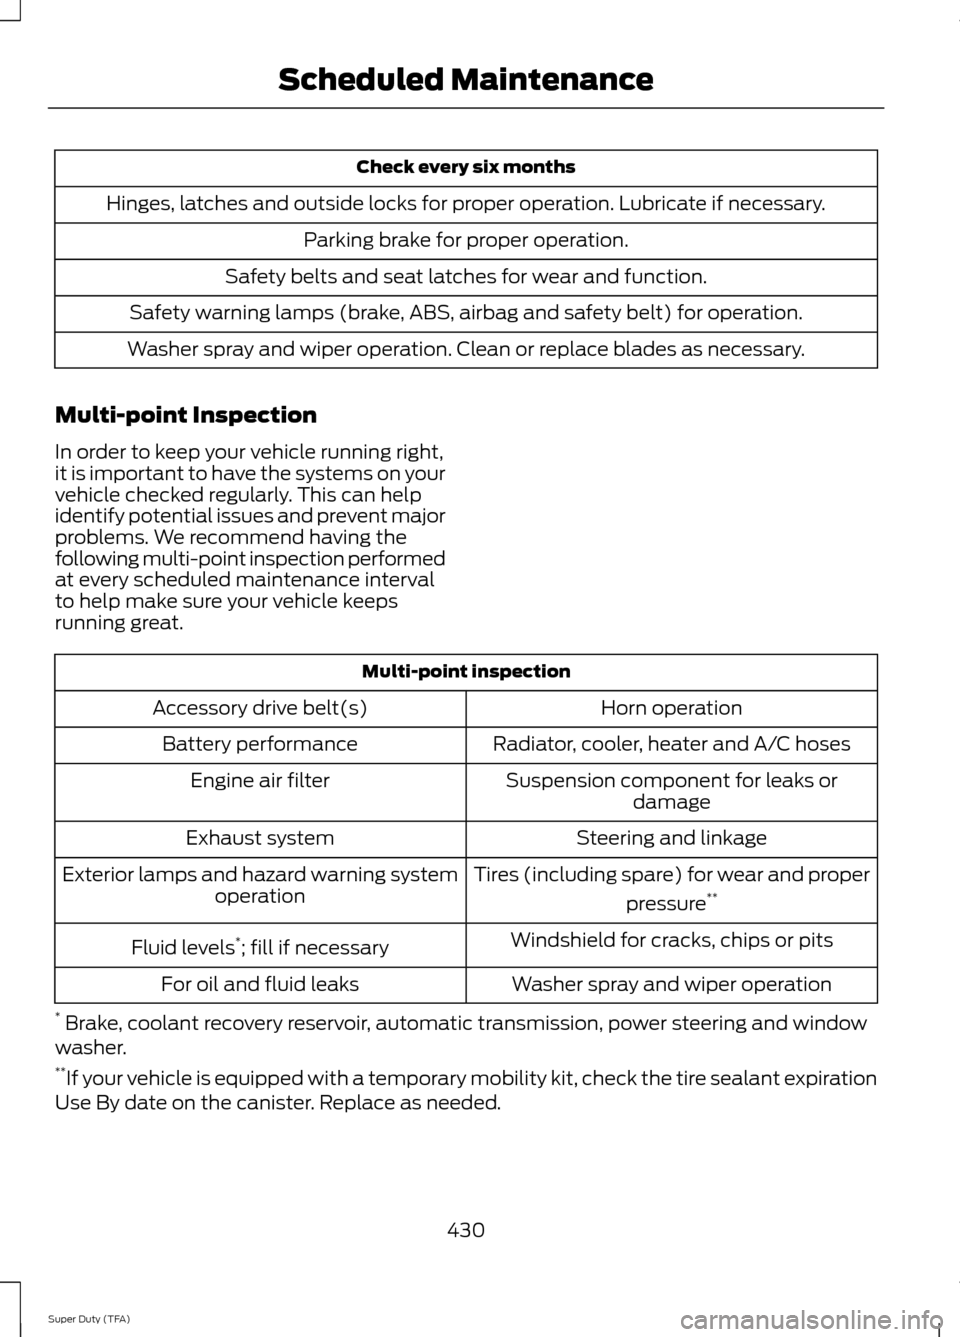
Check every six months
Hinges, latches and outside locks for proper operation. Lubricate if necessary. Parking brake for proper operation.
Safety belts and seat latches for wear and function.
Safety warning lamps (brake, ABS, airbag and safety belt) for operation.
Washer spray and wiper operation. Clean or replace blades as necessary.
Multi-point Inspection
In order to keep your vehicle running right,
it is important to have the systems on your
vehicle checked regularly. This can help
identify potential issues and prevent major
problems. We recommend having the
following multi-point inspection performed
at every scheduled maintenance interval
to help make sure your vehicle keeps
running great. Multi-point inspection
Horn operation
Accessory drive belt(s)
Radiator, cooler, heater and A/C hoses
Battery performance
Suspension component for leaks ordamage
Engine air filter
Steering and linkage
Exhaust system
Tires (including spare) for wear and properpressure**
Exterior lamps and hazard warning system
operation
Windshield for cracks, chips or pits
Fluid levels *
; fill if necessary
Washer spray and wiper operation
For oil and fluid leaks
* Brake, coolant recovery reservoir, automatic transmission, power steering and window
washer.
** If your vehicle is equipped with a temporary mobility kit, check the tire sealant expiration
Use By date on the canister. Replace as needed.
430
Super Duty (TFA) Scheduled Maintenance