2014 FORD MUSTANG instrument cluster
[x] Cancel search: instrument clusterPage 171 of 461
Position S
Moving the gearshift lever to position:
•Provides additional grade (engine) braking and extends lower gear
operation to enhance performance for uphill climbs, hilly terrain or
mountainous areas. This will increase engine RPM during engine
braking.
•Provides additional lower gear operation through the automatic
transmission shift strategy which reacts to vehicle inputs (vehicle
acceleration, accelerator pedal, brake pedal and vehicle speed).
•Gears are selected more quickly and at higher engine speeds.
Note:The system will stay in position S until the gear shift lever is
moved into another gear for example position P or position D.
SelectShift Automatic® Transmission
Your SelectShift automatic transmission gives you the ability to manually
change gears if you would like. To use SelectShift, move the gearshift
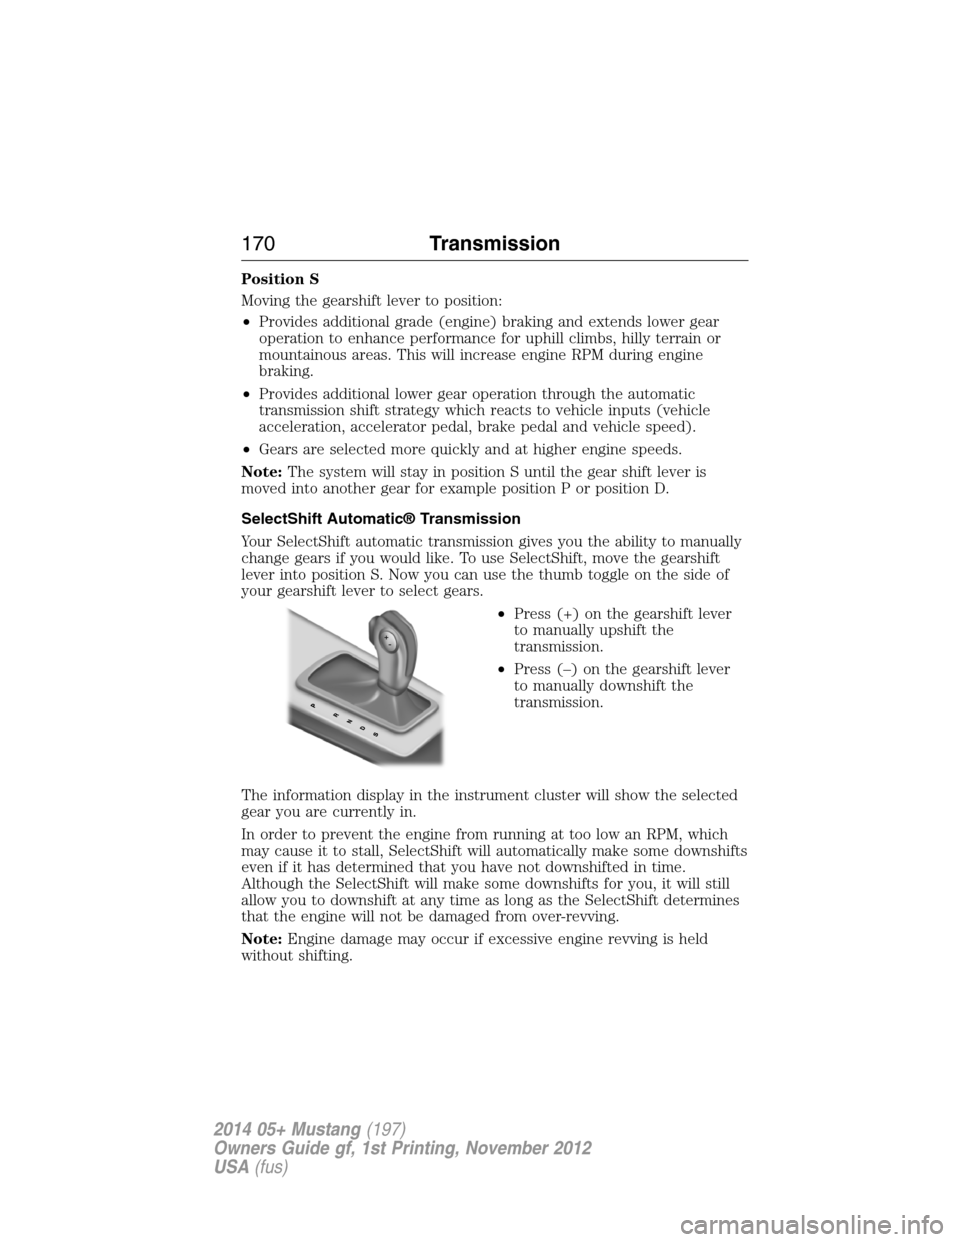
lever into position S. Now you can use the thumb toggle on the side of
your gearshift lever to select gears.
•Press (+) on the gearshift lever
to manually upshift the
transmission.
•Press (–) on the gearshift lever
to manually downshift the
transmission.
The information display in the instrument cluster will show the selected
gear you are currently in.
In order to prevent the engine from running at too low an RPM, which
may cause it to stall, SelectShift will automatically make some downshifts
even if it has determined that you have not downshifted in time.
Although the SelectShift will make some downshifts for you, it will still
allow you to downshift at any time as long as the SelectShift determines
that the engine will not be damaged from over-revving.
Note:Engine damage may occur if excessive engine revving is held
without shifting.
170Transmission
2014 05+ Mustang(197)
Owners Guide gf, 1st Printing, November 2012
USA(fus)
Page 179 of 461
5. Rotate the steering wheel at least one full turn to the right and return
the steering wheel to the original starting position.
6. Rotate the steering wheel at least one full turn to the left and return
the steering wheel to the original starting position.
7. Slowly press and release the brake pedal five times – ensure the brake
pedal is completely released each time.
When the procedure has been completed successfully, the ABS icon in
the instrument cluster will flash:
•three times indicating that the feature has been disabled.
•twice indicating it has been enabled.
Once the feature is programmed as desired, it will remain in that mode
until the above procedure is repeated.
Note:When the AdvanceTrac® system is disabled (see theTraction
Controlchapter in yourowner’s manualfor information on how to do
this), the hill start assist feature is also disabled for the duration that the
AdvanceTrac® system is in that mode. Re-enabling AdvanceTrac® will
also re-enable hill start assist.
Note:If you have used the above procedure to disable the hill start
assist feature, then enabling or disabling AdvanceTrac® will not effect
the hill start assist system.
178Transmission
2014 05+ Mustang(197)
Owners Guide gf, 1st Printing, November 2012
USA(fus)
Page 180 of 461
GENERAL INFORMATION
Note:Occasional brake noise is normal. If a metal-to-metal, continuous
grinding or continuous squeal sound is present, the brake linings may
be worn out and should be inspected by an authorized dealer. If your
vehicle has continuous vibration or shudder in the steering wheel while
braking, you should take it to an authorized dealer for inspection.
Note:Brake dust may accumulate on the wheels, even under normal
driving conditions. Some dust is inevitable as the brakes wear and does
not contribute to brake noise. See theVehicle Carechapter for wheel
cleaning instructions.
See theInstrument Clusterchapter for information on the
brake system warning light.
Wet brakes result in reduced braking efficiency. Gently press the brake
pedal a few times when driving from a car wash or standing water to dry
the brakes.
Brake Over Accelerator
If the accelerator pedal becomes stuck or entrapped, apply steady and firm
pressure to the brake pedal to slow your vehicle and reduce engine power.
If you experience this condition, apply the brakes and bring your vehicle to
a safe stop. Turn the engine off, shift to positionPand apply the parking
brake, then inspect the accelerator pedal for any interferences. If none are
found and the condition persists, have your vehicle towed to the nearest
authorized dealer.
Anti-Lock Brake System
This system helps you maintain steering control during emergency stops
by keeping the brakes from locking.
The anti-lock brake system lamp momentarily illuminates when
the ignition is turned on. If the light does not illuminate during
start-up, remains on or flashes, the anti-lock brake system may
be disabled and may need to be serviced.
If the anti-lock brake system is disabled, normal braking is still
effective. If the brake warning lamp illuminates with the parking
brake released, have your brake system serviced immediately.
Brakes179
2014 05+ Mustang(197)
Owners Guide gf, 1st Printing, November 2012
USA(fus)
Page 191 of 461
PRINCIPLES OF OPERATION
Cruise control lets you maintain a set speed without keeping your foot
on the accelerator pedal.
USING CRUISE CONTROL
WARNING:Do not use cruise control in heavy traffic or on
roads that are winding, slippery or unpaved.
Note:Vehicle speed may vary momentarily when driving up or down a
steep hill. Apply the brakes if your vehicle speed increases above the set
speed while driving downhill.
Note:Cruise control will disengage if your vehicle speed decreases more
than 10 mph (16 km/h) below your set speed while driving uphill.
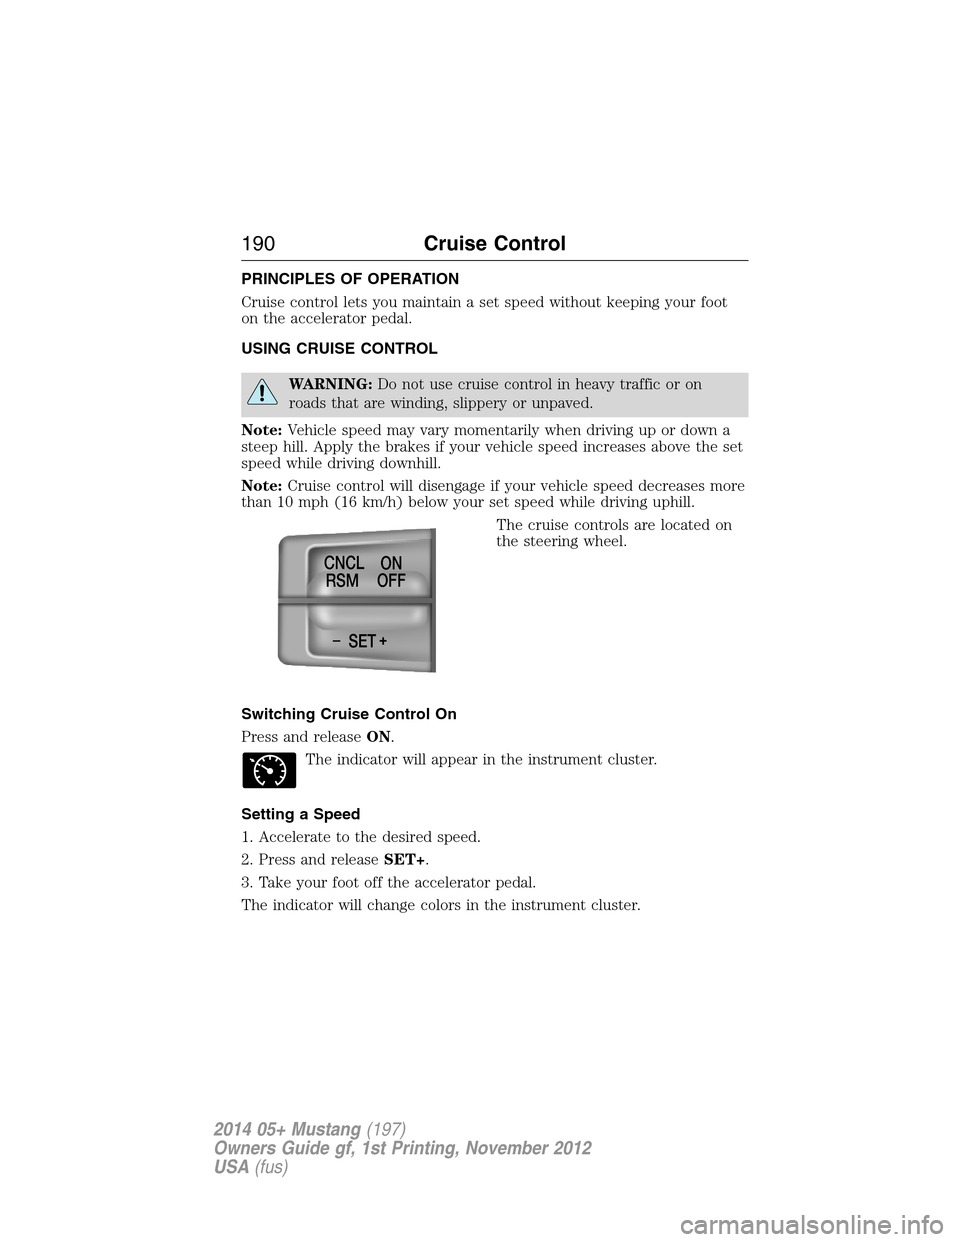
The cruise controls are located on
the steering wheel.
Switching Cruise Control On
Press and releaseON.
The indicator will appear in the instrument cluster.
Setting a Speed
1. Accelerate to the desired speed.
2. Press and releaseSET+.
3. Take your foot off the accelerator pedal.
The indicator will change colors in the instrument cluster.
-+SET CNCL
RSMON
OFF
190Cruise Control
2014 05+ Mustang(197)
Owners Guide gf, 1st Printing, November 2012
USA(fus)
Page 265 of 461
CLEANING THE INTERIOR
WARNING:Do not use cleaning solvents, bleach or dye on the
vehicle’s safety belts, as these actions may weaken the belt
webbing.
WARNING:On vehicles equipped with seat-mounted airbags, do
not use chemical solvents or strong detergents. Such products
could contaminate the side airbag system and affect performance of the
side airbag in a crash.
For fabric, carpets, cloth seats, safety belts and seats equipped with side
airbags:
•Remove dust and loose dirt with a vacuum cleaner.
•Remove light stains and soil with Motorcraft® Professional Strength
Carpet & Upholstery Cleaner.
•If grease or tar is present on the material, spot-clean the area first
with Motorcraft® Spot and Stain Remover. In Canada, use
Motorcraft® Multi-Purpose Cleaner.
•If a ring forms on the fabric after spot cleaning, clean the entire area
immediately (but do not oversaturate) or the ring will set.
•Do not use household cleaning products or glass cleaners, which can
stain and discolor the fabric and affect the flame retardant abilities of
the seat materials.
CLEANING THE INSTRUMENT PANEL AND INSTRUMENT
CLUSTER LENS
WARNING:Do not use chemical solvents or strong detergents
when cleaning the steering wheel or instrument panel to avoid
contamination of the airbag system.
Clean the instrument panel and cluster lens with a clean, damp, white,
cotton cloth, then use a clean and dry, white, cotton cloth to dry these
areas.
•Avoid cleaners or polishes that increase the gloss of the upper portion
of the instrument panel. The dull finish in this area helps protect the
driver from undesirable windshield reflection.
264Vehicle Care
2014 05+ Mustang(197)
Owners Guide gf, 1st Printing, November 2012
USA(fus)
Page 266 of 461
•Be certain to wash or wipe your hands clean if you have been in
contact with certain products, such as insect repellent and suntan
lotion, in order to avoid possible damage to the interior painted
surfaces.
•Do not use household or glass cleaners as these may damage the
finish of the instrument panel, interior trim and cluster lens.
•Do not allow air fresheners and hand sanitizers to spill on interior
surfaces. If a spill occurs, wipe off immediately. Damage may not be
covered by your warranty.
If a staining liquid like coffee or juice has been spilled on the instrument
panel or on interior trim surfaces, clean as follows:
1. Wipe up spilled liquid using a clean, white, cotton cloth.
2.
Wipe the surface with a damp, clean, white, cotton cloth. For more
thorough cleaning, use a mild soap and water solution. If the spot cannot
be completely cleaned by this method, the area may be cleaned using a
commercially available cleaning product designed for automotive interiors.
3. If necessary, apply more soap and water solution or cleaning product
to a clean, white, cotton cloth and press the cloth onto the soiled area;
allow this to set at room temperature for 30 minutes.
4. Remove the soaked cloth, and if it is not soiled badly, use this cloth to
clean the area by using a rubbing motion for 60 seconds.
5. Following this, wipe area dry with a clean, white, cotton cloth.
CLEANING LEATHER SEATS (IF EQUIPPED)
•Remove dust and loose dirt with a vacuum cleaner.
•Clean spills and stains as quickly as possible.
•For routine cleaning, wipe the surface with a soft, damp cloth. For
more thorough cleaning, wipe the surface with a mild soap and water
solution. In Canada, use Motorcraft® Vinyl Cleaner. Dry the area with
a soft cloth.
•If the leather cannot be completely cleaned using a mild soap and
water solution, the leather may be cleaned using a commercially
available leather cleaning product designed for automotive interiors.
•To check for compatibility, first test any cleaner or stain remover on
an inconspicuous part of the leather.
•Do not use household cleaning products, alcohol solutions, solvents or
cleaners intended for rubber, vinyl and plastics or petroleum-based
leather conditioners. These products may cause premature wearing or
damage to the leather.
Vehicle Care265
2014 05+ Mustang(197)
Owners Guide gf, 1st Printing, November 2012
USA(fus)
Page 320 of 461

Protecting Your Investment
Maintenance is an investment that will pay dividends in the form of
improved reliability, durability and resale value. To maintain the proper
performance of your vehicle and its emission control systems, it is
imperative that scheduled maintenance be completed at the designated
intervals.
Your vehicle is equipped with the Intelligent Oil Life Monitor® (IOLM)
system which displays a message in the information display at the proper
oil change service interval; this interval may be up to one year or
10000 miles (16000 kilometers). When ENGINE OIL CHANGE DUE or
OIL CHANGE REQUIRED appears in the information display, it’s time
for an oil change; the oil change must be done within two weeks or
500 miles (800 kilometers) of the ENGINE OIL CHANGE DUE or OIL
CHANGE REQUIRED message appearing. The Intelligent Oil Life
Monitor® must be reset after each oil change; see theInstrument
Clusterchapter.
If your message center is prematurely reset or becomes inoperative, you
should perform the oil change interval at six months or 5000 miles
(8000 kilometers) from your last oil change. Never exceed one year or
10000 miles (16000 kilometers) between oil change intervals.
Note:The Shelby® GT500® does not have an IOLM system; see your
Shelby GT500supplement for oil change service intervals.
Your vehicle is very sophisticated and built with multiple, complex,
performance systems. Every manufacturer develops these systems using
different specifications and performance features. That is why it is
important to rely upon your dealership to properly diagnose and repair
your vehicle.
Ford strongly recommends the use of genuine Ford replacement parts.
Parts other than Ford, Motorcraft® or Ford-authorized remanufactured
parts that are used for maintenance replacement or for the service of
components affecting emission control must be equivalent to genuine
Ford Motor Company parts in performance and durability. It is the
owner’s responsibility to determine the equivalency of such parts. Please
consult yourWarranty Guidefor complete warranty information.
Ford strongly recommends the use of only genuine Ford, Motorcraft® or
Ford-authorized remanufactured replacement parts because they are
engineered for your vehicle.
Scheduled Maintenance319
2014 05+ Mustang(197)
Owners Guide gf, 1st Printing, November 2012
USA(fus)
Page 325 of 461

Normal Scheduled Maintenance*
At every oil change
interval as indicated by
the information displayChange engine oil and filter.**
Rotate tires, inspect tire wear and measure
tread depth.
Perform multi-point inspection
(recommended).
Inspect automatic transmission fluid level.
Consult dealer for requirements.
Inspect brake pads, shoes, rotors, drums,
brake linings, hoses and parking brake.
Inspect engine cooling system strength and
hoses.
Inspect exhaust system and heat shields.
Inspect half-shaft boots.
Inspect rear axle and U-joints. Lubricate if
equipped with grease fittings.
Inspect steering linkage, ball joints,
suspension, tie-rod ends, driveshaft and
U-joints. Lubricate if equipped with grease
fittings.
Inspect wheels and related components for
abnormal noise, wear, looseness or drag.
*Do not exceed one year or 10000 miles (16000 kilometers) between
service intervals.
**Reset your Intelligent Oil-Life Monitor after each engine oil and filter
change. See theInstrument Clusterchapter.
324Scheduled Maintenance
2014 05+ Mustang(197)
Owners Guide gf, 1st Printing, November 2012
USA(fus)