2014 FORD MUSTANG turn signal
[x] Cancel search: turn signalPage 131 of 461
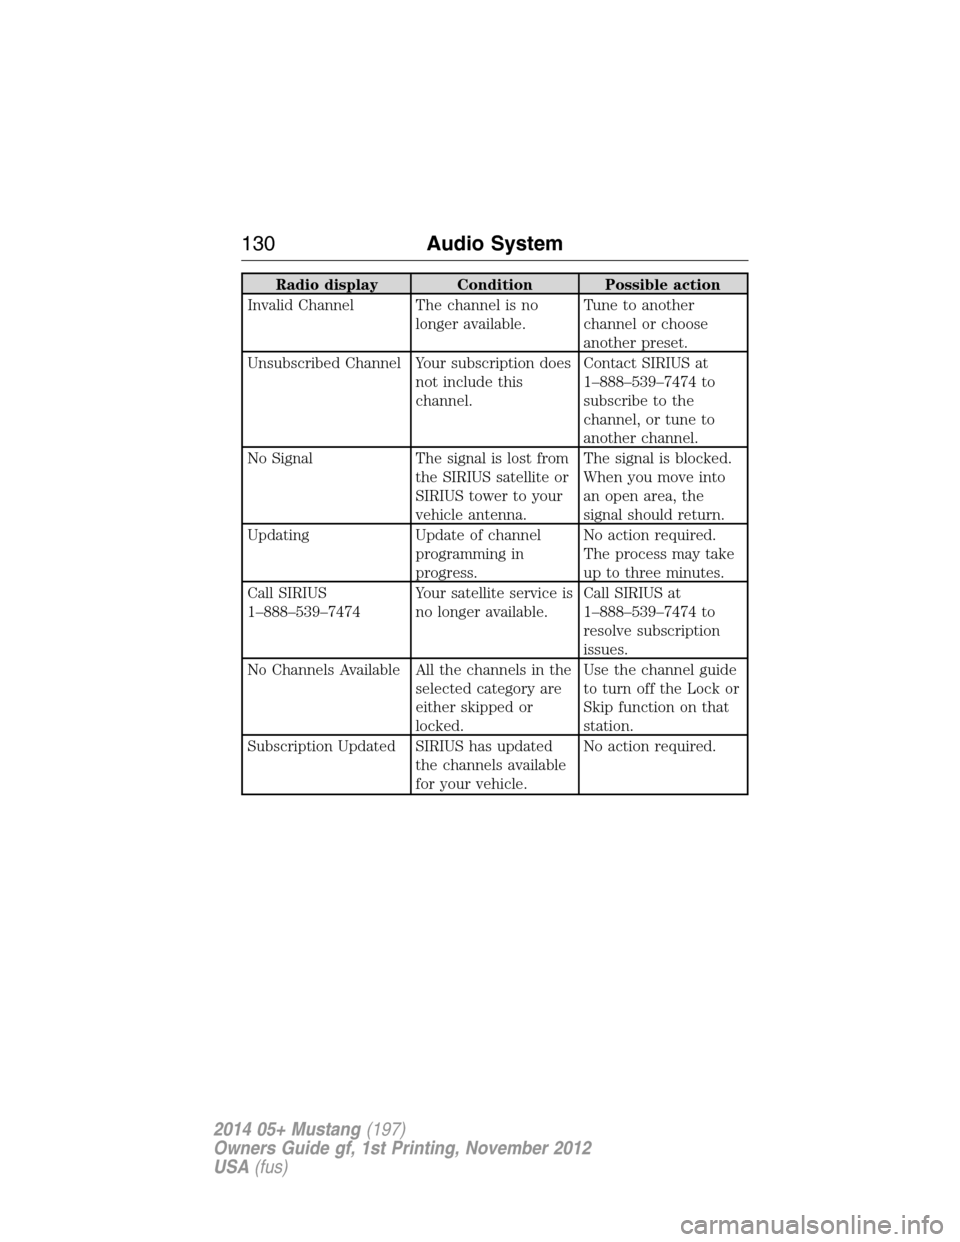
Radio display Condition Possible action
Invalid Channel The channel is no
longer available.Tune to another
channel or choose
another preset.
Unsubscribed Channel Your subscription does
not include this
channel.Contact SIRIUS at
1–888–539–7474 to
subscribe to the
channel, or tune to
another channel.
No Signal The signal is lost from
the SIRIUS satellite or
SIRIUS tower to your
vehicle antenna.The signal is blocked.
When you move into
an open area, the
signal should return.
Updating Update of channel
programming in
progress.No action required.
The process may take
up to three minutes.
Call SIRIUS
1–888–539–7474Your satellite service is
no longer available.Call SIRIUS at
1–888–539–7474 to
resolve subscription
issues.
No Channels Available All the channels in the
selected category are
either skipped or
locked.Use the channel guide
to turn off the Lock or
Skip function on that
station.
Subscription Updated SIRIUS has updated
the channels available
for your vehicle.No action required.
130Audio System
2014 05+ Mustang(197)
Owners Guide gf, 1st Printing, November 2012
USA(fus)
Page 149 of 461
Programming
Note:Put a new battery in the hand-held transmitter. This will ensure
quicker training and accurate transmission of the radio-frequency signal.
1. With your vehicle parked outside of the garage and your key in the
ignition, turn the key so that the ignition is in the on position.
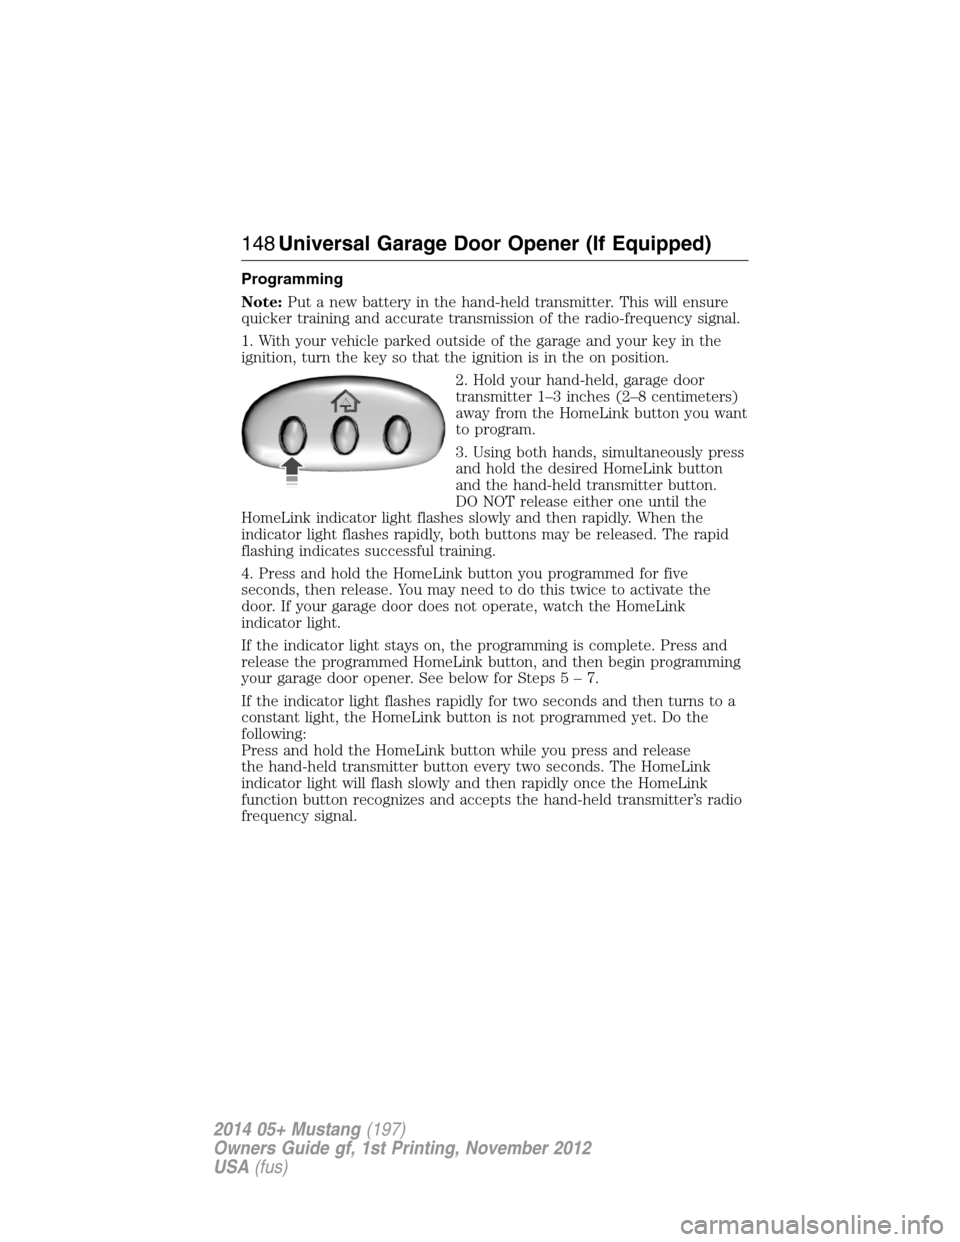
2. Hold your hand-held, garage door
transmitter 1–3 inches (2–8 centimeters)
away from the HomeLink button you want
to program.
3. Using both hands, simultaneously press
and hold the desired HomeLink button
and the hand-held transmitter button.
DO NOT release either one until the
HomeLink indicator light flashes slowly and then rapidly. When the
indicator light flashes rapidly, both buttons may be released. The rapid
flashing indicates successful training.
4. Press and hold the HomeLink button you programmed for five
seconds, then release. You may need to do this twice to activate the
door. If your garage door does not operate, watch the HomeLink
indicator light.
If the indicator light stays on, the programming is complete. Press and
release the programmed HomeLink button, and then begin programming
your garage door opener. See below for Steps5–7.
If the indicator light flashes rapidly for two seconds and then turns to a
constant light, the HomeLink button is not programmed yet. Do the
following:
Press and hold the HomeLink button while you press and release
the hand-held transmitter button every two seconds. The HomeLink
indicator light will flash slowly and then rapidly once the HomeLink
function button recognizes and accepts the hand-held transmitter’s radio
frequency signal.
148Universal Garage Door Opener (If Equipped)
2014 05+ Mustang(197)
Owners Guide gf, 1st Printing, November 2012
USA(fus)
Page 204 of 461
Hitches
Do not use a hitch that either clamps onto the bumper or attaches to the
axle.
Distribute the trailer load so 10-15% of the total trailer weight is on the
tongue.
Safety Chains
Note:Never attach safety chains to the bumper.
Always connect the safety chains to the hook retainers of your vehicle
hitch.
To connect the safety chains, cross them under the trailer tongue and
allow enough slack for turning tight corners. Do not allow the chains to
drag on the ground.
Trailer Brakes
WARNING:Do not connect a trailer’s hydraulic brake system
directly to your vehicle’s brake system. Your vehicle may not have
enough braking power and your chances of having a collision greatly
increase.
Electric brakes and manual, automatic or surge-type trailer brakes are
safe if you install them properly and adjust them to the manufacturer’s
specifications. The trailer brakes must meet local and federal regulations.
The rating for the tow vehicle’s braking system operation is at
the gross vehicle weight rating, not the gross combined weight
rating.
Trailer Lamps
WARNING:Never connect any trailer lamp wiring to the
vehicle’s tail lamp wiring; this may damage the electrical system
resulting in a fire. Contact an authorized dealer as soon as possible for
assistance in proper trailer tow wiring installation. Additional electrical
equipment may be required.
Trailer lamps are required on most towed vehicles. Make sure all running
lights, brake lights, turn signals and hazard lights are working.
Before Towing a Trailer
Practice turning, stopping and backing up to get the feel of your
vehicle-trailer combination before starting on a trip. When turning, make
wider turns so the trailer wheels clear curbs and other obstacles.
Towing203
2014 05+ Mustang(197)
Owners Guide gf, 1st Printing, November 2012
USA(fus)
Page 218 of 461
Vehicles Sold in the U.S.: Using Roadside Assistance
Complete the roadside assistance identification card and place it in your
wallet for quick reference. This card is found in the owner’s manual
portfolio in the glove compartment.
U.S. Ford vehicle customers who require Roadside Assistance, call
1-800-241-3673.
If you need to arrange roadside assistance for yourself, Ford Motor
Company will reimburse a reasonable amount for towing to the nearest
dealership within 35 miles (56 kilometers). To obtain reimbursement
information, U.S. Ford vehicle customers call 1-800-241-3673. Customers
will be asked to submit their original receipts.
Vehicles Sold in Canada: Getting Roadside Assistance
Canadian customers who require roadside assistance, call
1–800–665–2006.
Vehicles Sold in Canada: Using Roadside Assistance
Complete the roadside assistance identification card and place it in your
wallet for quick reference. In Canada, the card is found in the warranty
information in the glove box.
Canadian roadside coverage and benefits may differ from the U.S.
coverage. Please see your warranty information or visit our website at
www.ford.ca for information on Canadian services and benefits.
Canadian customers who need to obtain roadside information, call
1-800-665-2006 or visit our website at www.ford.ca.
HAZARD WARNING FLASHERS
The hazard flasher control is located on the center console
next to the gearshift lever. Use it when your vehicle is disabled
and is creating a safety hazard for other motorists.
•Press the flasher control and all front and rear direction signals will
flash.
•Press the flasher control again to turn them off.
Note:With extended use, the flasher may run down your battery.
Roadside Emergencies217
2014 05+ Mustang(197)
Owners Guide gf, 1st Printing, November 2012
USA(fus)
Page 237 of 461

Fuse or relay
numberFuse amp
ratingProtected components
6 20A Turn signals, Hazard flashers
7 10A Left low beam headlamp
8 10A Right low beam headlamp
9 15A Courtesy lamps
10 15A Switch illumination, Pony
projection lights
11 10A Security module
12 7.5A Power mirrors
13 5A Not used (spare)
14 10A Center information display,
Electronic finish panel, Global
position system
15 10A Climate control
16 15A Not used (spare)
17 20A Power door locks, Trunk release
18 20A Not used (spare)
19 25A Not used (spare)
20 15A Diagnostic connector
21 15A Fog lamps
22 15A Park lamps, License lamps
23 15A High beam headlamps
24 20A Horn
25 10A Demand lighting (battery saver),
Visor vanity lamps
26 10A Cluster (battery)
27 20A Ignition switch feed
28 5A Audio mute (start)
29 5A Camera (run/start)
30 5A Temperature sensor motor
31 10A Restraints control module
236Fuses
2014 05+ Mustang(197)
Owners Guide gf, 1st Printing, November 2012
USA(fus)
Page 256 of 461
5. Then usea7mmAllenwrench or a Phillips screwdriver to adjust the
vertical aim of the headlamp. HORIZONTAL AIM IS NOT REQUIRED
FOR THIS VEHICLE AND IS NON-ADJUSTABLE.
6. Close the hood and turn off the lamps.
CHANGING A BULB
Lamp Assembly Condensation
Exterior lamps are vented to accommodate normal changes in pressure.
Condensation can be a natural by-product of this design. When moist air
enters the lamp assembly through the vents, there is a possibility that
condensation can occur when the temperature is cold. When normal
condensation occurs, a thin film of mist can form on the interior of the
lens. The thin mist eventually clears and exits through the vents during
normal operation. Clearing time may take as long as 48 hours under dry
weather conditions.
These are examples of acceptable condensation:
•Presence of thin mist (no streaks, drip marks or droplets).
•Fine mist covers less than 50% of the lens.
These are examples of unacceptable moisture (usually caused by a lamp
water leak):
•Water puddle inside the lamp.
•Large water droplets, drip marks or streaks present on the interior of
the lens.
Take your vehicle to a dealer for service if any of the above conditions of
unacceptable moisture are present.
Replacing HID Headlamp Bulbs
The headlamps on your vehicle use a high intensity discharge source.
These lamps operate at a high voltage. When the bulb is burned out, the
bulb and starter capsule assembly must be replaced by your authorized
dealer.
Replacing Front Parking Lamp/Turn Signal Bulbs
1. Make sure the headlamp control is in the off position and open the
hood.
2. Remove the hex head screws attaching the beauty shield at the top,
forward edge of the engine compartment just aft of the headlamps.
3. Remove the beauty shield to gain access to the front parking lamp and
turn signal assembly.
Maintenance255
2014 05+ Mustang(197)
Owners Guide gf, 1st Printing, November 2012
USA(fus)
Page 258 of 461

Replacing Fog Lamp Bulbs (V6) (if equipped)
1. Make sure the headlamp control is in the off position and open the
hood.
2. Remove the hex head screws
attaching the underbody forward
aeroshield.
3. Remove the underbody forward
aeroshield to gain access to the fog
lamp assembly.
4. Disconnect the electrical
connector from the bulb by pulling
it straight off.
5. Rotate the bulb counterclockwise and remove from the lamp assembly.
Install the new bulb in reverse order.
Replacing Fog Lamp Bulbs (GT)
Your vehicle is equipped with LED fog lamp bulbs. It is designed to last
the life of the vehicle. If replacement is required, it is recommended that
you see your authorized dealer.
Replacing Tail Lamp/Brake/Rear Turn Signal Lamps
Your vehicle is equipped with LED tail lamp, brake and rear turn signal
lamps. It is designed to last the life of the vehicle. If replacement is
required, it is recommended that you see your authorized dealer.
Replacing Backup Bulbs
Your vehicle is equipped with LED backup lamps. They are designed to
last the life of the vehicle. If replacement is required, it is recommended
that you see your authorized dealer.
Maintenance257
2014 05+ Mustang(197)
Owners Guide gf, 1st Printing, November 2012
USA(fus)
Page 287 of 461

When the malfunction indicator is illuminated, the system may not be
able to detect or signal low tire pressure as intended. TPMS malfunctions
may occur for a variety of reasons, including the installation of
replacement or alternate tires or wheels on the vehicle that prevent the
TPMS from functioning properly. Always check the TPMS malfunction
telltale after replacing one or more tires or wheels on your vehicle to
ensure that the replacement or alternate tires and wheels allow the
TPMS to continue to function properly.
The tire pressure monitoring system complies with part 15 of the FCC
rules and with RSS-210 of Industry Canada. Operation is subject to
the following two conditions: (1) This device may not cause harmful
interference, and (2) This device must accept any interference received,
including interference that may cause undesired operation.
Changing Tires with a Tire Pressure Monitoring System
Note:
Each road tire is equipped
with a tire pressure sensor located
inside the tire and wheel assembly
cavity. The pressure sensor is
attached to the valve stem. The
pressure sensor is covered by the
tire and is not visible unless the tire
is removed. Take care when changing
the tire to avoid damaging the
sensor.
You should always have your tires serviced by an authorized dealer.
Check the tire pressure periodically (at least monthly) using an accurate
tire gauge. SeeInflating Your Tiresin this chapter.
Understanding Your Tire Pressure Monitoring System
The tire pressure monitoring system measures pressure in your four road
tires and sends the tire pressure readings to your vehicle. The low tire
pressure warning light will turn on if the tire pressure is significantly low.
Once the light is illuminated, your tires are under-inflated and need to be
inflated to the manufacturer’s recommended tire pressure. Even if the
light turns on and a short time later turns off, your tire pressure still
needs to be checked.
When Your Temporary Spare Tire Is Installed
When one of your road tires needs to be replaced with the temporary
spare, the system will continue to identify an issue to remind you that
the damaged road wheel and tire assembly needs to be repaired and put
back on your vehicle.
286Wheels and Tires
2014 05+ Mustang(197)
Owners Guide gf, 1st Printing, November 2012
USA(fus)