2014 FORD MONDEO change wheel
[x] Cancel search: change wheelPage 41 of 446
Downloaded from www.Manualslib.com manuals search engine 1. Insert the key you want to program intothe ignition. If your vehicle is equipped witha push-button start, place the intelligentaccess key fob into the backup slot. Thelocation of your backup slot is in anotherchapter. See Starting and Stopping theEngine (page 138).
2. Switch the ignition on.
3. Access the main menu on theinformation display controls, and selectSettings then MyKey by pressing OK orthe > button.
4. Press OK or the > button to selectCreate MyKey.
5. When prompted, hold the OK buttonuntil you see a message informing you tolabel this key as a MyKey. The key will berestricted at the next start.
MyKey is successfully created. Make sureyou label it so you can distinguish it fromthe admin keys.
You can also program configurablesettings for the key(s). SeeProgramming/Changing ConfigurableSettings.
Programming/ChangingConfigurable Settings
Use the information display to access yourconfigurable MyKey settings.
1.Switch the ignition on using an adminkey or fob.
2.Access the main menu on theinformation display controls, and selectSettings, then MyKey by pressing OKor > button.
3.Use the arrow buttons to get to afeature.
4.Press OK or > to make a selection.
Note:You can clear or change your MyKeysettings at any time during the same keycycle as you created the MyKey. Once youhave switched the vehicle off, however, youwill need an admin key to change or clearyour MyKey settings.
CLEARING ALL MYKEYS
You can clear or change your MyKeysettings using the information displaycontrol on the steering wheel. SeeInformation Displays (page 86).
Switch the ignition on using an admin keyor fob.
To clear all MyKeys of all MyKey settings, press the left arrow button to accessthe main menu and scroll to:
Action and DescriptionMessage
Press the OK button.Settings
Press the OK button.MyKey
Press and hold the OK button until the following messagedisplays.Clear MyKey
39Mondeo (CNG) Vehicles Built From: 08-09-2014 Vehicles Built Up To: 19-04-2015, CG3633en enGBR, Edition date: 10/2014, First PrintingMyKey™
Page 106 of 446
Downloaded from www.Manualslib.com manuals search engine Lane Keeping System
ActionMessage
The system has malfunctioned. Contact an authorized dealeras soon as possible.Lane Keeping Sys.Malfunction ServiceRequired
The system has detected a condition that has caused thesystem to be temporarily unavailable.Front Camera Tempor-arily Not Available
The system has detected a condition that requires you toclean the windshield in order for it to operate properly.Front Camera Low Visib-ility Clean Screen
The system has malfunctioned. Contact an authorized dealeras soon as possible.Front Camera Malfunc-tion Service Required
The system requests you to keep your hands on the steeringwheel.Keep Hands on SteeringWheel
Maintenance
ActionMessage
Stop your vehicle as soon as safely possible and turn off theengine. Check the oil level. If the warning stays on or continuesto come on with your engine running, contact an authorizeddealer.
Low Engine Oil Pressure
The engine oil life remaining is 10% or less. See Engine OilDipstick (page 245).Change Engine Oil Soon
Displays when the engine oil life is depleted and requires achange. See Engine Oil Check (page 246).Oil Change Required
Indicates the brake fluid level is low and the brake systemshould be inspected immediately. See Brake and ClutchFluid Check (page 248).
Brake Fluid Level Low
The brake system needs servicing. Stop your vehicle in a safeplace. Contact an authorized dealer.Check Brake System
The engine coolant temperature is excessively high.Engine Coolant OverTemperature
104Mondeo (CNG) Vehicles Built From: 08-09-2014 Vehicles Built Up To: 19-04-2015, CG3633en enGBR, Edition date: 10/2014, First PrintingInformation Displays
Page 158 of 446
Downloaded from www.Manualslib.com manuals search engine In this position, power is not transmittedto the driven wheels and the transmissionis locked. You can start the engine with thegearshift lever in this position.
Note:A warning tone sounds if you openthe driver door and you have not shifted thegearshift lever to park (P).
Reverse (R)
WARNINGS
Shift the gearshift lever to reverse(R) only when your vehicle isstationary and the engine is at idlespeed.
Always come to a complete stopbefore shifting the gearshift lever outof reverse (R).
Shift the gearshift lever to reverse (R) toallow your vehicle to move backward.
Neutral (N)
In this position, power is not transmittedto the driven wheels but the transmissionis not locked. You can start the engine withthe gearshift lever in this position.
Drive (D)
Shift the gearshift lever to drive (D) toallow your vehicle to move forward andshift automatically through the forwardgears.
The transmission will shift to theappropriate gear for optimum performancebased on ambient temperature, roadgradient, vehicle load and your input.
Grade Assist
To activate Grade Assist, pressthe button on the gearshift lever.The grade assist indicator lightwill illuminate in the instrument display.
The grade assist feature:
•Provides additional grade braking witha combination of engine motoring andhigh-voltage battery charging to helpmaintain vehicle speed whendescending a grade.
•As your vehicle determines the amountof engine motoring and high-voltagebattery charging, you may notice theengine speed increasing and/ordecreasing to help maintain yourvehicle speed while descending agrade.
To deactivate Grade Assist, press thebutton on the gearshift lever when GradeAssist is active. The grade assist light willdeactivate.
Sport Mode (S)
Switch on sport mode by shifting thegearshift lever to Sport (S).
Note:In sport mode the transmissionoperates as normal but gears are selectedmore quickly and at higher engine speeds.
SelectShift Automatic™Transmission (If Equipped)
Your vehicle is equipped with a SelectShiftAutomatic transmission gearshift lever.The SelectShift Automatic transmissiongives you the ability to change gears up ordown (without a clutch) as desired.
In order to prevent the engine from runningat too low an RPM, which may cause it tostall, SelectShift still automatically makessome downshifts if it has determined thatyou have not downshifted in time.Although SelectShift makes somedownshifts for you, it still allows you todownshift at any time as long as theSelectShift determines that damage willnot be caused to the engine fromover-revving.
156Mondeo (CNG) Vehicles Built From: 08-09-2014 Vehicles Built Up To: 19-04-2015, CG3633en enGBR, Edition date: 10/2014, First PrintingTransmission
Page 181 of 446
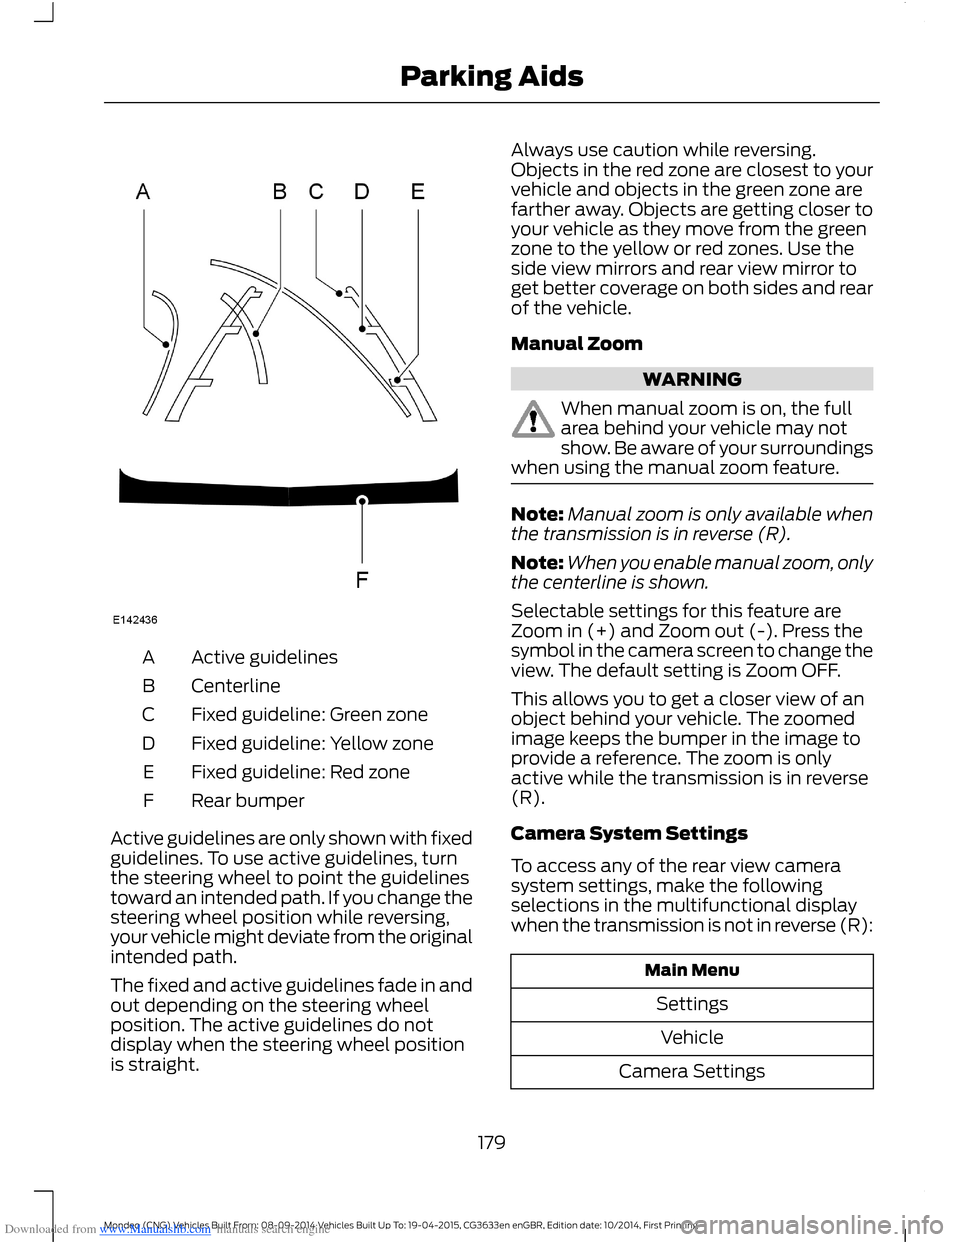
Downloaded from www.Manualslib.com manuals search engine Active guidelinesA
CenterlineB
Fixed guideline: Green zoneC
Fixed guideline: Yellow zoneD
Fixed guideline: Red zoneE
Rear bumperF
Active guidelines are only shown with fixedguidelines. To use active guidelines, turnthe steering wheel to point the guidelinestoward an intended path. If you change thesteering wheel position while reversing,your vehicle might deviate from the originalintended path.
The fixed and active guidelines fade in andout depending on the steering wheelposition. The active guidelines do notdisplay when the steering wheel positionis straight.
Always use caution while reversing.Objects in the red zone are closest to yourvehicle and objects in the green zone arefarther away. Objects are getting closer toyour vehicle as they move from the greenzone to the yellow or red zones. Use theside view mirrors and rear view mirror toget better coverage on both sides and rearof the vehicle.
Manual Zoom
WARNING
When manual zoom is on, the fullarea behind your vehicle may notshow. Be aware of your surroundingswhen using the manual zoom feature.
Note:Manual zoom is only available whenthe transmission is in reverse (R).
Note:When you enable manual zoom, onlythe centerline is shown.
Selectable settings for this feature areZoom in (+) and Zoom out (-). Press thesymbol in the camera screen to change theview. The default setting is Zoom OFF.
This allows you to get a closer view of anobject behind your vehicle. The zoomedimage keeps the bumper in the image toprovide a reference. The zoom is onlyactive while the transmission is in reverse(R).
Camera System Settings
To access any of the rear view camerasystem settings, make the followingselections in the multifunctional displaywhen the transmission is not in reverse (R):
Main Menu
Settings
Vehicle
Camera Settings
179Mondeo (CNG) Vehicles Built From: 08-09-2014 Vehicles Built Up To: 19-04-2015, CG3633en enGBR, Edition date: 10/2014, First PrintingParking Aids
Page 183 of 446
Downloaded from www.Manualslib.com manuals search engine PRINCIPLE OF OPERATION
Cruise control lets you maintain a setspeed without keeping your foot on theaccelerator pedal. You can use cruisecontrol when your vehicle speed is greaterthan 20 mph (30 km/h).
USING CRUISE CONTROL
WARNINGS
Do not use cruise control on windingroads, in heavy traffic or, when theroad surface is slippery. This couldresult in loss of vehicle control, seriousinjury or death.
When you are going downhill, yourvehicle speed may increase abovethe set speed. The system will notapply the brakes but a warning displays.
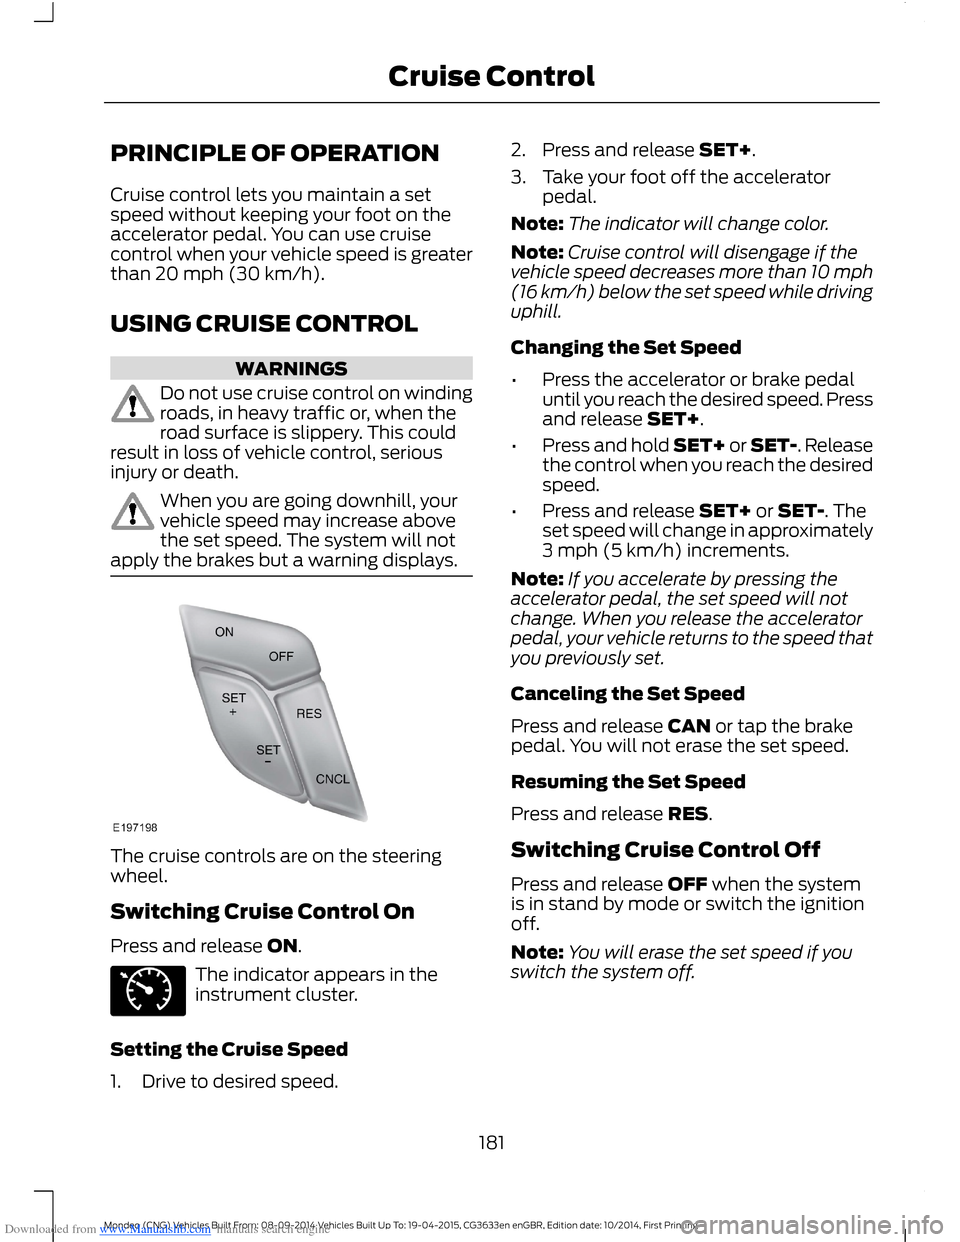
The cruise controls are on the steeringwheel.
Switching Cruise Control On
Press and release ON.
The indicator appears in theinstrument cluster.
Setting the Cruise Speed
1.Drive to desired speed.
2.Press and release SET+.
3.Take your foot off the acceleratorpedal.
Note:The indicator will change color.
Note:Cruise control will disengage if thevehicle speed decreases more than 10 mph(16 km/h) below the set speed while drivinguphill.
Changing the Set Speed
•Press the accelerator or brake pedaluntil you reach the desired speed. Pressand release SET+.
•Press and hold SET+ or SET-. Releasethe control when you reach the desiredspeed.
•Press and release SET+ or SET-. Theset speed will change in approximately3 mph (5 km/h) increments.
Note:If you accelerate by pressing theaccelerator pedal, the set speed will notchange. When you release the acceleratorpedal, your vehicle returns to the speed thatyou previously set.
Canceling the Set Speed
Press and release CAN or tap the brakepedal. You will not erase the set speed.
Resuming the Set Speed
Press and release RES.
Switching Cruise Control Off
Press and release OFF when the systemis in stand by mode or switch the ignitionoff.
Note:You will erase the set speed if youswitch the system off.
181Mondeo (CNG) Vehicles Built From: 08-09-2014 Vehicles Built Up To: 19-04-2015, CG3633en enGBR, Edition date: 10/2014, First PrintingCruise Control
Page 185 of 446

Downloaded from www.Manualslib.com manuals search engine Use the steering wheel controls to operatethe system.
Switching the System On
Press and release the Adaptive CruiseControl CAN/OFF button.
The cruise control indicator,SET mph(kph), the current gap setting indicatorand Standby displays in the instrumentcluster.
Setting a Speed
1.Drive to desired speed.
2.Press and release SET-.
3.The information display shows a greenindicator light, current gap setting anddesired set speed.
4.Take your foot off the acceleratorpedal.
5.When the system detects a vehicle infront of you, it will be displayed abovethe horizontal bars.
Note:When adaptive cruise control isactive, the set speed displayed in theinformation display may vary slightly fromthe speedometer.
Changing the Set Speed
•Press the accelerator or brake pedaluntil you reach the desired speed. Pressand release SET-.
•Press and hold RES+ or SET- until thedesired set speed shows on theinformation display. The vehicle speedwill gradually change to the selectedspeed.
•Press and release RES+ or SET-. Theset speed changes in 1 mph (1 km/h)increments.
The system may apply the brakes to slowthe vehicle to the new set speed. The setspeed displays continuously in theinformation display while the system isactive.
Canceling the Set Speed
Press the brake pedal or the clutch pedalfor an extended period, or press andrelease the Adaptive Cruise ControlCAN/OFF button. The last set speeddisplays with a strikethrough.
183Mondeo (CNG) Vehicles Built From: 08-09-2014 Vehicles Built Up To: 19-04-2015, CG3633en enGBR, Edition date: 10/2014, First PrintingCruise Control
Page 194 of 446
Downloaded from www.Manualslib.com manuals search engine Note:The system may assist you whendriving on fast main roads and freeways.
Note:The system may not operate duringhard braking or acceleration and when youare intentionally steering your vehicle.
Note:The system will operate with aminimum of one tracked lane marking.
Note:The system will only operate abovevehicle speeds of approximately 40 mph(65 km/h).
The sensor is located behind the interiormirror. It continuously monitors conditionsto alert you of unintentional lane driftingat high speeds.
The system will automatically detect andtrack the lane markings on the road. If yourvehicle unintentionally drifts toward theroad lane markings, a warning will beshown in the display. There is also awarning given in the form of a vibration feltthrough the steering wheel.
Using Lane Keeping Alert
Switching the System On and Off
Note:When you switch the system off, awarning indicator will remain illuminated inthe information display. See WarningLamps and Indicators (page 81).
Note:The system status and settings willremain unchanged when you switch theignition on and off.
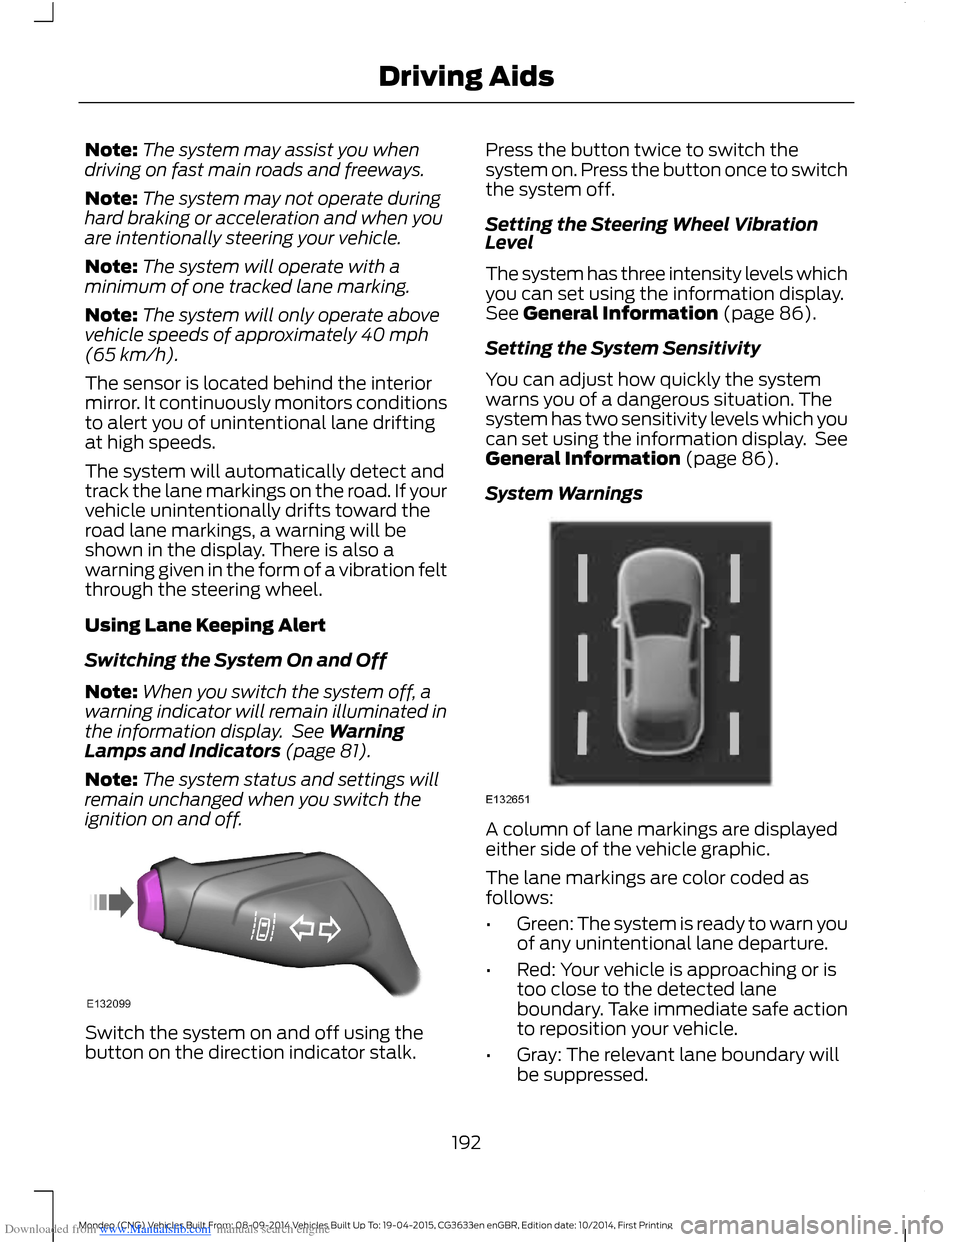
Switch the system on and off using thebutton on the direction indicator stalk.
Press the button twice to switch thesystem on. Press the button once to switchthe system off.
Setting the Steering Wheel VibrationLevel
The system has three intensity levels whichyou can set using the information display.See General Information (page 86).
Setting the System Sensitivity
You can adjust how quickly the systemwarns you of a dangerous situation. Thesystem has two sensitivity levels which youcan set using the information display. SeeGeneral Information (page 86).
System Warnings
A column of lane markings are displayedeither side of the vehicle graphic.
The lane markings are color coded asfollows:
•Green: The system is ready to warn youof any unintentional lane departure.
•Red: Your vehicle is approaching or istoo close to the detected laneboundary. Take immediate safe actionto reposition your vehicle.
•Gray: The relevant lane boundary willbe suppressed.
192Mondeo (CNG) Vehicles Built From: 08-09-2014 Vehicles Built Up To: 19-04-2015, CG3633en enGBR, Edition date: 10/2014, First PrintingDriving Aids
Page 217 of 446
Downloaded from www.Manualslib.com manuals search engine TOWING A TRAILER
WARNINGS
Do not exceed 60 mph (100 km/h).This could result in the loss of vehiclecontrol, serious personal injury ordeath.
The rear tire pressures must beincreased by 3 psi (0.2 bar) abovespecification. Do not exceed themaximum pressure stated on the tiresidewall. This could cause serious personalinjury. See Wheels and Tires (page 260).
Do not exceed the maximum grosstrain weight stated on your vehicleidentification plate. This could resultin the loss of vehicle control, seriouspersonal injury or death. See VehicleIdentification Plate (page 280).
Do not exceed the maximumpermissible trailer nose weight(vertical weight on the tow ball) asstated in the vehicle specification chart.This could result in the loss of vehiclecontrol, serious personal injury or death.See Capacities and Specifications(page 277).
The anti-lock braking system doesnot control the overrun brake on thetrailer. This could result in the loss ofvehicle control, serious personal injury ordeath.
When towing a trailer:
•Obey country specific regulations fortowing a trailer.
•Do not exceed 60 mph (100 km/h)even if a country allows higher speedsunder certain conditions.
•Place loads as low as possible andcentral to the axle of your trailer. If youare towing with an unladen vehicle,place the load in your trailer toward thenose, within the maximum nose load,as this gives the best stability. SeeCapacities and Specifications (page277).
•The trailer nose weight (vertical weighton the tow ball), is essential for thedriving stability of your vehicle andtrailer.
•The vertical weight on the tow ballshould be at least 4% of the trailerweight and not exceed the maximumpermissable weight. See Capacitiesand Specifications (page 277).
•Reduce speed immediately if the trailershows any sign of swaying. See TrailerSway Control (page 216).
•Use a low gear when descending asteep downhill gradient.
Note:The maximum permissible trailernose weight on the trailer identificationplate is the trailer manufacturer’s testingvalue. The vehicle maximum permissibletrailer nose weight may be lower.
The stability of your vehicle to trailercombination is very much dependent onthe quality of the trailer.
Towing a trailer changes the vehiclehandling characteristics and increasesstopping distances. Adapt your speed anddriving behavior to the load of the trailer.
The gross train weight stated on thevehicle identification plate applies for roadgradients up to 12% and altitudes up to3280 ft (1,000 m) when towing a trailer.In mountainous regions, the engineperformance decreases due to lower airdensity with increasing altitude. In highaltitude regions above 3280 ft (1,000 m),you must reduce the stipulated maximumpermitted gross train weight by 10% forevery extra 3280 ft (1,000 m).
215Mondeo (CNG) Vehicles Built From: 08-09-2014 Vehicles Built Up To: 19-04-2015, CG3633en enGBR, Edition date: 10/2014, First PrintingTowing