2014 FORD FUSION HYBRID belt
[x] Cancel search: beltPage 110 of 473

ActionMessage
Displays when the motor electronics are overheating. Stop
the vehicle as soon as safely possible, turn off the vehicle and
let it cool. If the warning stays on or continues to come on,
contact your authorized dealer as soon as possible.Motor Coolant Overtem-
perature
Displays when the engine has reduced power in order to help
reduce high coolant temperatures.Power Reduced to
Lower Engine Temp
Displayed when the kit needs service. See your authorized
dealer.Service Tire Mobility Kit
Displays to indicate that the vehicle is still in Transport or
Factory mode. This may not allow some features to operate
properly. See your authorized dealer.Transport / Factory
Mode
Informs the driver that the powertrain needs service due to a
powertrain malfunction.See Manual
Displays when EV functionality is disabled and the engine is
running to maintain oil quality. See Engine Oil Check (page
244).Oil Maintenance
MyKey ActionMessage
Displayed during key programming when MyKey cannot be
programmed.MyKey Not Created
Displays when MyKey is active.MyKey Active Drive
Safely
Displays when starting the vehicle and MyKey is in use and
the MyKey speed limit is on.Speed Limited to XX
MPH/km/h
Displays when a MyKey is in use and the MyKey speed limit is
on and the vehicle speed is approaching 80 mph (130 km/h).Near Vehicle Top Speed
Displays when a MyKey is in use and the MyKey speed limit is
reached.Vehicle at Top Speed of
MyKey Setting
Displays when MyKey is active.Check Speed Drive
Safely
Displays when a MyKey is in use and Belt-Minder is activated.Buckle Up to Unmute
Audio
107Information Displays
Page 124 of 473

SITTING IN THE CORRECT
POSITION WARNINGS
Sitting improperly, out of position or
with the seat back reclined too far
can take weight off the seat cushion
and affect the decision of the passenger
sensing system, resulting in serious injury
or death in the event of a crash. Always sit
upright against your seat back, with your
feet on the floor.
Do not recline the seat back as this
can cause the occupant to slide
under the safety belt, resulting in
serious injury in the event of a crash.
Do not place objects higher than the
seat back to reduce the risk of
serious injury in the event of a crash
or during heavy braking.
E68595
When you use them properly, the seat,
head restraint, safety belt and air bags will
provide optimum protection in the event
of a crash. We recommend that you follow these
guidelines:
• Sit in an upright position with the base
of your spine as far back as possible.
• Do not recline the seat back more than
30 degrees.
• Adjust the head restraint so that the
top of it is level with the top of your
head and as far forward as possible.
Make sure that you remain
comfortable.
• Keep sufficient distance between
yourself and the steering wheel. We
recommend a minimum of 10 inches
(25 centimeters) between your
breastbone and the air bag cover.
• Hold the steering wheel with your arms
slightly bent.
• Bend your legs slightly so that you can
press the pedals fully.
• Position the shoulder strap of the
safety belt over the center of your
shoulder and position the lap strap
tightly across your hips.
Make sure that your driving position is
comfortable and that you can maintain full
control of your vehicle.
HEAD RESTRAINTS WARNINGS
Fully adjust the head restraint before
you sit in or operate your vehicle. This
will help minimize the risk of neck
injury in the event of a collision. Do not
adjust the head restraint when your vehicle
is moving.
The head restraint is a safety device.
Whenever possible it should be
installed and properly adjusted when
the seat is occupied.
121Seats
Page 126 of 473

E144727
1. Adjust the seat back to an upright
driving or riding position.
2. Pivot the head restraint forward toward
your head to the desired position.
After the head restraint reaches the
forward-most tilt position, pivoting it
forward again will then release it to the
rearward, un-tilted position.
MANUAL SEATS WARNINGS
Do not adjust the driver's seat or seat
back when your vehicle is moving.
Rock the seat backward and forward
after releasing the lever to make sure
that it is fully engaged. WARNINGS
Reclining the seat back can cause an
occupant to slide under the seat's
safety belt, resulting in severe
personal injuries in the event of a crash.
The manual front seats consist of:
A B E157060
a bar to move the seat backward
and forwardA
a lever to adjust the angle of the
seat back.B
POWER SEATS (IF EQUIPPED)
WARNINGS
Do not adjust the driver's seat or
seatback when your vehicle is
moving.
Do not place cargo or any objects
behind the seatback before returning
it to the original position.
123Seats
Page 129 of 473

REAR SEATS Note: Your vehicle may have split seat
backs that must be folded individually.
To lower the seat back(s) from inside the
vehicle, do the following:
E144634
1. Pull the handle to release the seat
back.
2. Push the seat back forward. E164098
3. Stow the safety belt in the stowage
clip. This will prevent the safety belt
from getting caught in the seat latch.
When raising the seat back(s), make sure
you hear the seat latch into place.
126Seats
Page 140 of 473

Ignition Modes E169299
The keyless starting system has three
modes:
• Off: Turns the ignition off.
• Without applying the brake pedal,
press and release the button once
when the ignition is in the on mode,
or when the engine is running but
the vehicle is not moving.
• On: All electrical circuits are
operational and the warning lamps and
indicators illuminate.
• Without applying the brake pedal,
press and release the button once.
• Start: Starts the vehicle. The engine
may not start when the vehicle starts.
• Press the brake pedal, and then
press the button for any length of
time. An indicator light on the
button illuminates when then
ignition is on and when the engine
starts.
STARTING A GASOLINE
ENGINE When the engine starts for the first time
on your drive, the idle speed increases, this
helps to warm up the engine. If the engine
idle speed does not slow down
automatically, have your vehicle checked
by an authorized dealer. Note: You can crank the engine for a total
of 60 seconds (without the engine starting)
before the starting system temporarily
disables. The 60 seconds does not have to
be all at once. For example, if you crank the
engine three times for 20 seconds each
time, without the engine starting, you
reached the 60-second time limit. A
message appears in the information display
alerting you that you exceeded the cranking
time. You cannot attempt to start the engine
for at least 15 minutes. After 15 minutes, you
are limited to a 15-second engine cranking
time. You need to wait 60 minutes before
you can crank the engine for 60 seconds
again.
Before starting the vehicle, check the
following:
• Make sure all occupants have fastened
their safety belts.
• Make sure the headlamps and
electrical accessories are off.
• Make sure the parking brake is on.
• Move the transmission selector lever
to position P .
• Turn the ignition key to position II . If
your vehicle is equipped with a keyless
ignition, see the following instructions.
Vehicles with an Ignition Key Note: Do not touch the accelerator pedal.
1. Fully press the brake pedal.
2. Turn the key to position III to start the
vehicle. Release the key when the
vehicle starts.
Note: The engine may continue cranking
for up to 15 seconds or until it starts.
Note: If you cannot start the engine on the
first try, wait for a short period and try again.
Vehicles with Keyless Start
Note: Do not touch the accelerator pedal.
137Starting and Stopping the Engine
Page 175 of 473

Automatic release - drive away release
Note: The driver's door must be closed and
the driver's safety belt must be fastened
before this feature will operate.
Note: If the electric parking brake warning
lamp stays illuminated, the electric parking
brake will not automatically release. You
must release the electric parking brake using
the electric parking brake switch.
Note: The engine must be running and the
accelerator pedal must be pressed before
the drive away release feature will operate.
Note: On hybrid vehicles, the vehicle must
be Ready-to-Drive as indicated by the green
Ready indicator light.
The brake system warning lamp will go off
to confirm that the electric parking brake
has been released.
Note: The electric parking brake drive away
release makes starting on a hill easier. This
feature will release the parking brake
automatically when the vehicle has
sufficient drive force to move up the hill. To
assure drive away release when starting
uphill, press the accelerator pedal quickly.
Battery With No Charge WARNING
You will not be able to apply or
release the electric parking brake if
the battery is low or has no charge.
If the battery is low or has no charge, use
jumper cables and a booster battery.
HILL START ASSIST WARNINGS
The system does not replace the
parking brake. When you leave your
vehicle, always apply the parking
brake and put the vehicle in position P. WARNINGS
You must remain in your vehicle once
you have activated the system.
During all times, you are responsible
for controlling your vehicle,
supervising the system and
intervening, if required.
If the engine is revved excessively, or
if a malfunction is detected, the
system will be deactivated.
The system makes it easier to pull away
when your vehicle is on a slope without the
need to use the parking brake.
When the system is active, your vehicle will
remain stationary on the slope for two to
three seconds after you release the brake
pedal. This allows you time to move your
foot from the brake to the accelerator
pedal. The brakes are released
automatically once the engine has
developed sufficient drive to prevent your
vehicle from rolling down the slope. This
is an advantage when pulling away on a
slope, (for example from a car park ramp,
traffic lights or when reversing uphill into
a parking space).
The system will activate automatically on
any slope that will cause significant vehicle
rollback.
Using Hill Start Assist 1. Press the brake pedal to bring your
vehicle to a complete standstill. Keep
the brake pedal pressed.
2. If the sensors detect that your vehicle
is on a slope, the system will activate
automatically.
172Brakes
Page 216 of 473
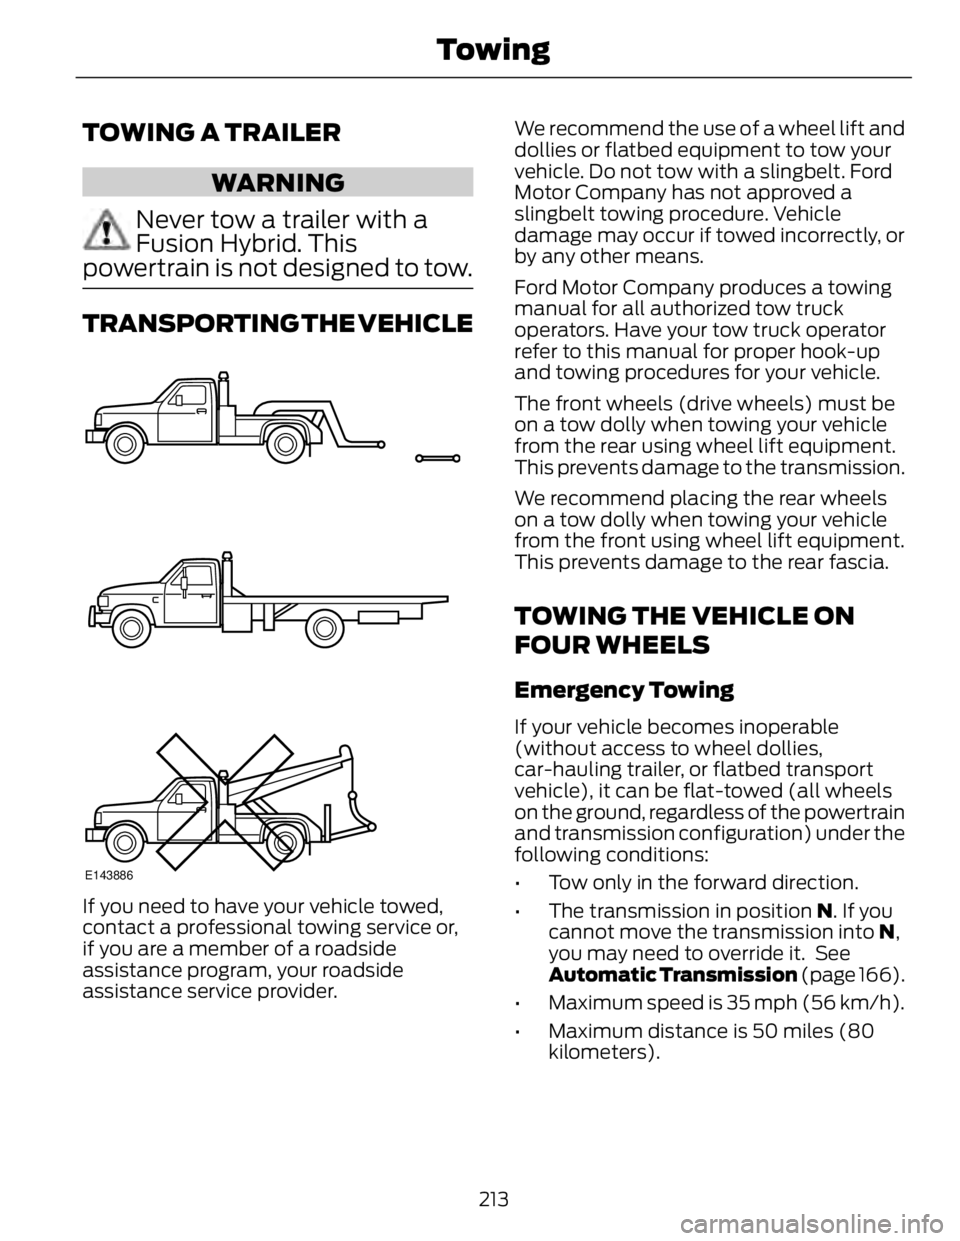
TOWING A TRAILER
WARNING
Never tow a trailer with a
Fusion Hybrid. This
powertrain is not designed to tow.
TRANSPORTING THE VEHICLE
E143886
If you need to have your vehicle towed,
contact a professional towing service or,
if you are a member of a roadside
assistance program, your roadside
assistance service provider. We recommend the use of a wheel lift and
dollies or flatbed equipment to tow your
vehicle. Do not tow with a slingbelt. Ford
Motor Company has not approved a
slingbelt towing procedure. Vehicle
damage may occur if towed incorrectly, or
by any other means.
Ford Motor Company produces a towing
manual for all authorized tow truck
operators. Have your tow truck operator
refer to this manual for proper hook-up
and towing procedures for your vehicle.
The front wheels (drive wheels) must be
on a tow dolly when towing your vehicle
from the rear using wheel lift equipment.
This prevents damage to the transmission.
We recommend placing the rear wheels
on a tow dolly when towing your vehicle
from the front using wheel lift equipment.
This prevents damage to the rear fascia.
TOWING THE VEHICLE ON
FOUR WHEELS Emergency Towing If your vehicle becomes inoperable
(without access to wheel dollies,
car-hauling trailer, or flatbed transport
vehicle), it can be flat-towed (all wheels
on the ground, regardless of the powertrain
and transmission configuration) under the
following conditions:
• Tow only in the forward direction.
• The transmission in position N . If you
cannot move the transmission into N ,
you may need to override it. See
Automatic Transmission (page 166).
• Maximum speed is 35 mph (56 km/h).
• Maximum distance is 50 miles (80
kilometers).
213Towing
Page 230 of 473

E148861
1. Connect the positive (+) jumper cable
to the positive (+) prong (B) of the
discharged battery.
2. Connect the other end of the positive
(+) cable to the positive (+) terminal
of the assisting battery.
3. Connect the negative (-) cable to the
negative (-) terminal of the assisting
battery.
4. Make the final connection of the
negative (-) cable to the negative (-)
prong (A) of your vehicle.
Note: Do not attach the negative (-) cable
to fuel lines, engine rocker covers, the intake
manifold or electrical components as
grounding points. WARNING
Do not connect the end of the
second cable to the negative (-)
terminal of the battery to be jumped.
A spark may cause an explosion of the
gases that surround the battery.
Ensure that the cables are clear of fan
blades, belts, moving parts of both engines,
or any fuel delivery system parts.
Jump Starting 1. Start the booster vehicle and press the
accelerator moderately.
2. Start the disabled vehicle.
3. Once the disabled vehicle has been
started, run both vehicles for an
additional three minutes before
disconnecting the jumper cables.
Removing the Jumper Cables Remove the jumper cables in the reverse
order that they were connected.
Note: In the illustration, the vehicle on the
bottom is used to designate the assisting
(boosting) battery.
227Roadside Emergencies