2014 FORD F150 key
[x] Cancel search: keyPage 150 of 472
AUTOMATIC TRANSMISSION
WARNINGS
Always set the parking brake fully
and make sure the gearshift is
latched in P (Park). Turn the ignition
to the off position and remove the key
whenever you leave your vehicle. Do not use the tow/haul feature
when driving in icy or slippery
conditions as the increased engine
braking can cause the rear wheels to slide
and the vehicle to swing around with the
possible loss of vehicle control. Understanding the Shift Positions
of a 6–
Speed Automatic
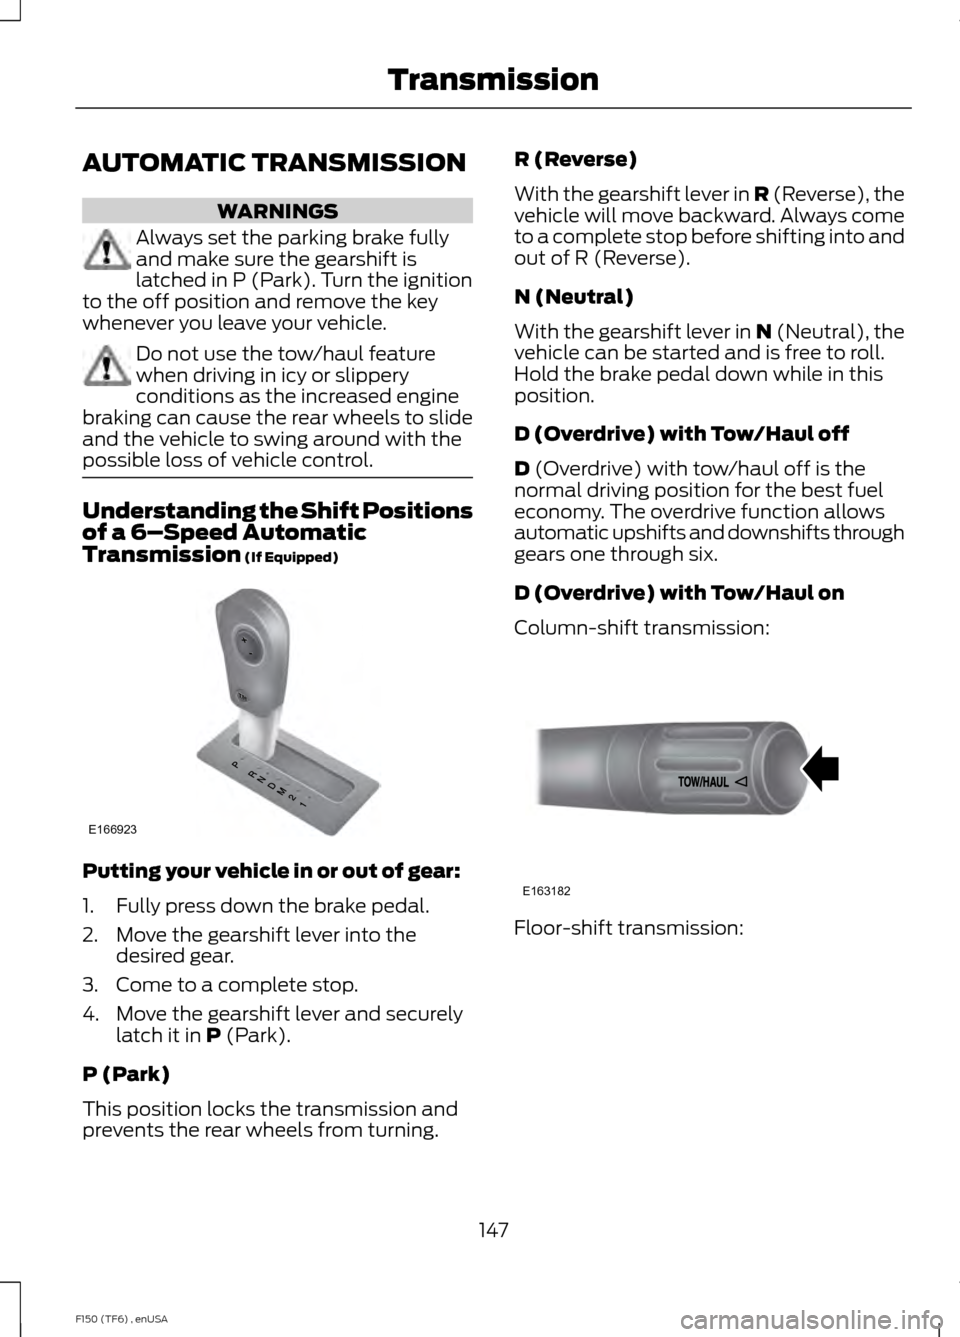
Transmission (If Equipped) Putting your vehicle in or out of gear:
1. Fully press down the brake pedal.
2. Move the gearshift lever into the
desired gear.
3. Come to a complete stop.
4. Move the gearshift lever and securely latch it in
P (Park).
P (Park)
This position locks the transmission and
prevents the rear wheels from turning. R (Reverse)
With the gearshift lever in R (Reverse), the
vehicle will move backward. Always come
to a complete stop before shifting into and
out of R (Reverse).
N (Neutral)
With the gearshift lever in N (Neutral), the
vehicle can be started and is free to roll.
Hold the brake pedal down while in this
position.
D (Overdrive) with Tow/Haul off
D
(Overdrive) with tow/haul off is the
normal driving position for the best fuel
economy. The overdrive function allows
automatic upshifts and downshifts through
gears one through six.
D (Overdrive) with Tow/Haul on
Column-shift transmission: Floor-shift transmission:
147
F150 (TF6) , enUSA TransmissionE166923 E163182
Page 154 of 472
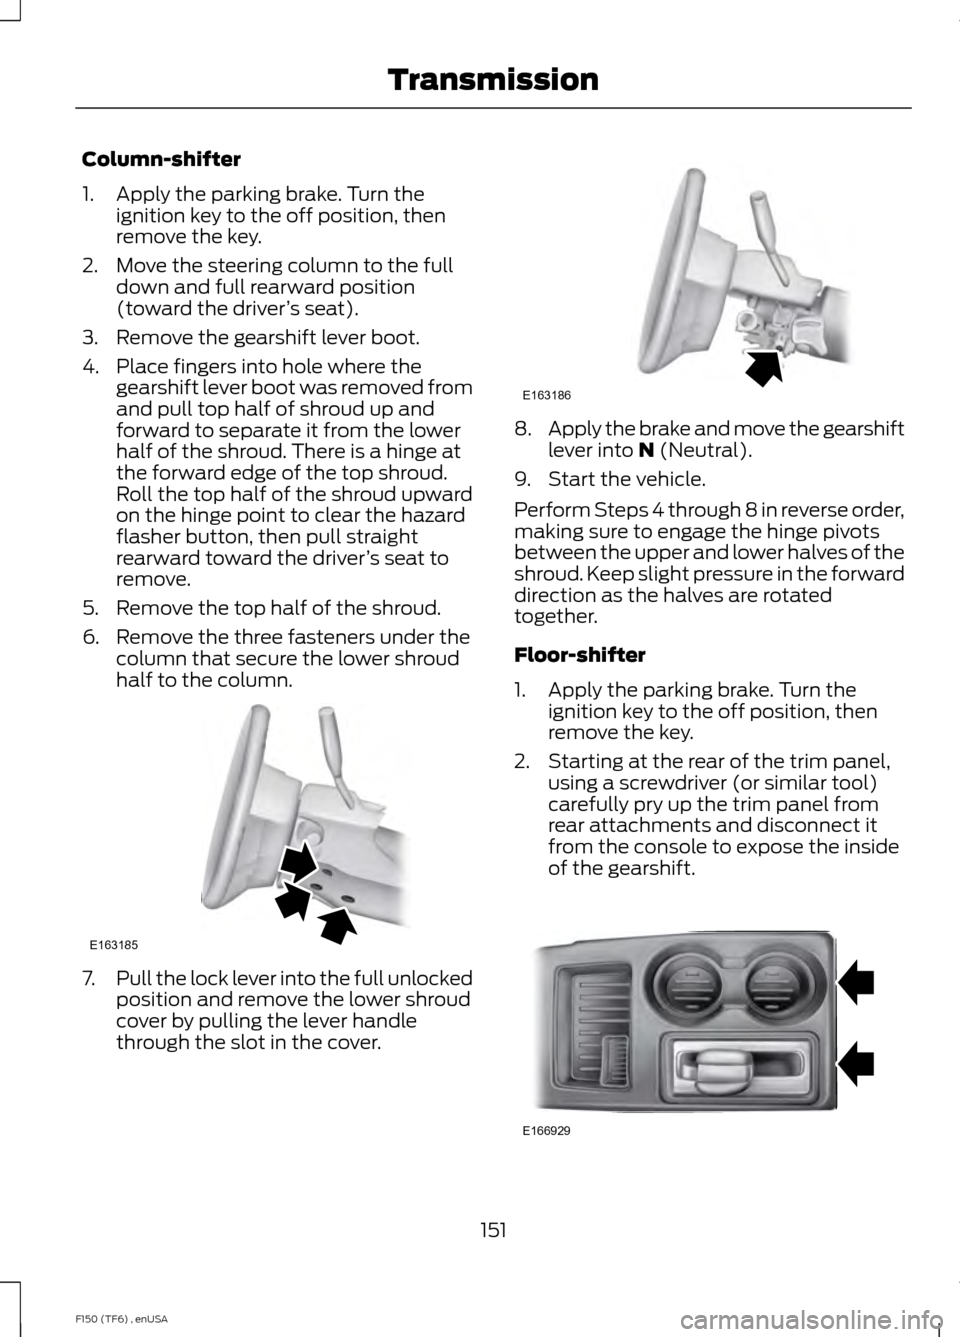
Column-shifter
1. Apply the parking brake. Turn the
ignition key to the off position, then
remove the key.
2. Move the steering column to the full down and full rearward position
(toward the driver ’s seat).
3. Remove the gearshift lever boot.
4. Place fingers into hole where the gearshift lever boot was removed from
and pull top half of shroud up and
forward to separate it from the lower
half of the shroud. There is a hinge at
the forward edge of the top shroud.
Roll the top half of the shroud upward
on the hinge point to clear the hazard
flasher button, then pull straight
rearward toward the driver ’s seat to
remove.
5. Remove the top half of the shroud.
6. Remove the three fasteners under the column that secure the lower shroud
half to the column. 7.
Pull the lock lever into the full unlocked
position and remove the lower shroud
cover by pulling the lever handle
through the slot in the cover. 8.
Apply the brake and move the gearshift
lever into N (Neutral).
9. Start the vehicle.
Perform Steps 4 through 8 in reverse order,
making sure to engage the hinge pivots
between the upper and lower halves of the
shroud. Keep slight pressure in the forward
direction as the halves are rotated
together.
Floor-shifter
1. Apply the parking brake. Turn the ignition key to the off position, then
remove the key.
2. Starting at the rear of the trim panel, using a screwdriver (or similar tool)
carefully pry up the trim panel from
rear attachments and disconnect it
from the console to expose the inside
of the gearshift. 151
F150 (TF6) , enUSA TransmissionE163185 E163186 E166929
Page 163 of 472
WARNINGS
Always set the parking brake fully
and make sure the gearshift is
latched in P (Park). Turn the ignition
to the off position and remove the key
whenever you leave your vehicle. On some Four-wheel drive vehicles, when
the transfer case is in the N (Neutral)
position, the engine and transmission are
disconnected from the rest of the driveline.
Therefore, the vehicle is free to roll even if
the automatic transmission is in P (Park)
or the manual transmission is in gear. Do
not leave the vehicle unattended with the
transfer case in the N (Neutral) position.
Always set the parking brake fully and turn
off the ignition when leaving the vehicle.
Maintenance and Modifications
The suspension and steering systems on
your vehicle have been designed and
tested to provide predictable performance
whether loaded or empty. For this reason,
we strongly recommend that you do not
make modifications such as adding or
removing parts (i.e. lift kits or stabilizer
bars) or by using replacement parts not
equivalent to the original factory
equipment.
We recommend that you use caution when
your vehicle has either a high load or device
(i.e. ladder or luggage racks). Any
modifications to your vehicle that raise the
center of gravity may cause your vehicle
to roll over when there is a loss of vehicle
control.
Failure to maintain your vehicle correctly
may void the warranty, increase your repair
cost, reduce vehicle performance and
operational capabilities and adversely
affect you and your passenger's safety. We
recommend you frequently inspect your
vehicle's chassis components when your
vehicle is subject to off road usage.
160
F150 (TF6) , enUSA Four-Wheel Drive (If Equipped)
Page 167 of 472

PARKING BRAKE
WARNING
Always set the parking brake fully
and make sure the transmission is
placed in park (P). Failure to set the
parking brake and engage park could result
in vehicle roll-away, property damage or
bodily injury. Turn the ignition to the lock
position and remove the key whenever you
leave your vehicle. Apply the parking brake whenever your
vehicle is parked. Press the pedal
downward to set the parking brake. The
brake warning lamp in the instrument
cluster will illuminate and remains
illuminated until the parking brake is
released.
To release, pull the brake release lever
located at the lower left side of the
instrument panel.
If you are parking your vehicle on a grade
or with a trailer, press and hold the brake
pedal down, then set the parking brake.
There may be a little vehicle movement as
the parking brake sets to hold the vehicle's
weight. This is normal and should be no
reason for concern. If needed, press and
hold the service brake pedal down, then
try reapplying the parking brake. Chock the
wheels if required. If the parking brake
cannot hold the weight of the vehicle, the
parking brake may need to be serviced or
the vehicle may be overloaded.
HILL START ASSIST
WARNINGS
The system does not replace the
parking brake. When you leave your
vehicle, always apply the parking
brake and put the transmission in park (P). WARNINGS
You must remain in your vehicle once
you have activated the system.
During all times, you are responsible
for controlling your vehicle,
supervising the system and
intervening, if required. If the engine is revved excessively, or
if a malfunction is detected, the
system will be deactivated.
The system makes it easier to pull away
when your vehicle is on a slope without the
need to use the parking brake.
When the system is active, your vehicle will
remain stationary on the slope for two to
three seconds after you release the brake
pedal. This allows you time to move your
foot from the brake to the accelerator
pedal. The brakes are released
automatically once the engine has
developed sufficient drive to prevent your
vehicle from rolling down the slope. This
is an advantage when pulling away on a
slope, (for example from a car park ramp,
traffic lights or when reversing uphill into
a parking space).
The system will activate automatically on
any slope that will cause significant vehicle
rollback.
Using Hill Start Assist
1. Press the brake pedal to bring your
vehicle to a complete standstill. Keep
the brake pedal pressed.
2. If the sensors detect that your vehicle is on a slope, the system will activate
automatically.
3. When you remove your foot from the brake pedal, your vehicle will remain
on the slope without rolling away for
about two or three seconds. This hold
time will automatically be extended if
you are in the process of driving off.
164
F150 (TF6) , enUSA Brakes
Page 175 of 472

PARKING AID (IF EQUIPPED)
WARNINGS
To help avoid personal injury, please
read and understand the limitations
of the system as contained in this
section. Sensing is only an aid for some
(generally large and fixed) objects when
moving in reverse on a flat surface at
parking speeds. Traffic control systems,
inclement weather, air brakes, and external
motors and fans may also affect the
function of the sensing system; this may
include reduced performance or a false
activation. To help avoid personal injury, always
use caution when in R (Reverse) and
when using the sensing system.
This system is not designed to
prevent contact with small or moving
objects. The system is designed to
provide a warning to assist the driver in
detecting large stationary objects to avoid
damaging the vehicle. The system may not
detect smaller objects, particularly those
close to the ground. Certain add-on devices such as large
trailer hitches, bike or surfboard racks
and any device that may block the
normal detection zone of the system, may
create false beeps. Note:
Keep the sensors, located on the
bumper or fascia, free from snow, ice and
large accumulations of dirt. If the sensors
are covered, the system ’s accuracy can be
affected. Do not clean the sensors with
sharp objects.
Note: If your vehicle sustains damage to
the bumper or fascia, leaving it misaligned
or bent, the sensing zone may be altered
causing inaccurate measurement of
obstacles or false alarms. Note:
If your vehicle is equipped with
MyKey ™, it is possible to prevent turning
the sensing system off. See MyKey ™
(page
53).
Note: If your vehicle is equipped with a fully
integrated electronic trailer brake controller
(TBC) and a trailer with electric trailer
brakes is connected to your vehicle, the RSS
will be disabled. When the vehicle is shifted
into reverse, the information display will
remain in the Rear Park Aid Off selection.
For more information on the TBC, See
Trailer Sway Control
(page 192).
The sensing system warns the driver of
obstacles within a certain range of the
bumper area. The system turns on
automatically whenever the ignition is
switched on.
When receiving a detection warning, the
radio volume is reduced to a
predetermined level. After the warning
goes away, the radio volume returns to the
previous level.
Rear Sensing System
The rear sensors are only active when the
transmission is in R (Reverse). As the
vehicle moves closer to the obstacle, the
rate of the audible warning increases.
When the obstacle is fewer than 12 inches
(30 centimeters) away, the warning
sounds continuously. If a stationary or
receding object is detected farther than 12
inches (30 centimeters) from the side of
the vehicle, the tone sounds for only three
seconds. Once the system detects an
object approaching, the warning sounds
again.
172
F150 (TF6) , enUSA Parking Aids
Page 189 of 472
be: 635 kilograms - (2 x 99
kilograms) - (12 x 45 kilograms) =
635 - 198 - 540 = -103 kilograms.
You will need to reduce the load
weight by at least 240 pounds
(104 kilograms). If you remove
three 100-pound (45-kilogram)
cement bags, then the load
calculation would be:1400 - (2 x
220) - (9 x 100) = 1400 - 440 -
900 = 60 pounds. Now you have
the load capacity to transport the
cement and your friend home. In
metric units, the calculation would
be: 635 kilograms - (2 x 99
kilograms) - (9 x 45 kilograms) =
635 - 198 - 405 = 32 kilograms.
The above calculations also
assume that the loads are
positioned in your vehicle in a
manner that does not overload
the Front or the Rear Gross Axle
Weight Rating specified for your
vehicle on the Safety Compliance
Certification Label. The label shall
be affixed to either the door hinge
pillar, door-latch post, or the door
edge that meets the door-latch
post, next to the driver's seating
position.
Special Loading Instructions
for Owners of Pick-up Trucks
and Utility-type Vehicles WARNING
Loaded vehicles may handle
differently than unloaded
vehicles. Extra precautions, such
as slower speeds and increased
stopping distance, should be
taken when driving a heavily
loaded vehicle. Your vehicle can haul more cargo
and people than most passenger
cars. Depending upon the type
and placement of the load,
hauling cargo and people may
raise the center of gravity of the
vehicle.
TAILGATE
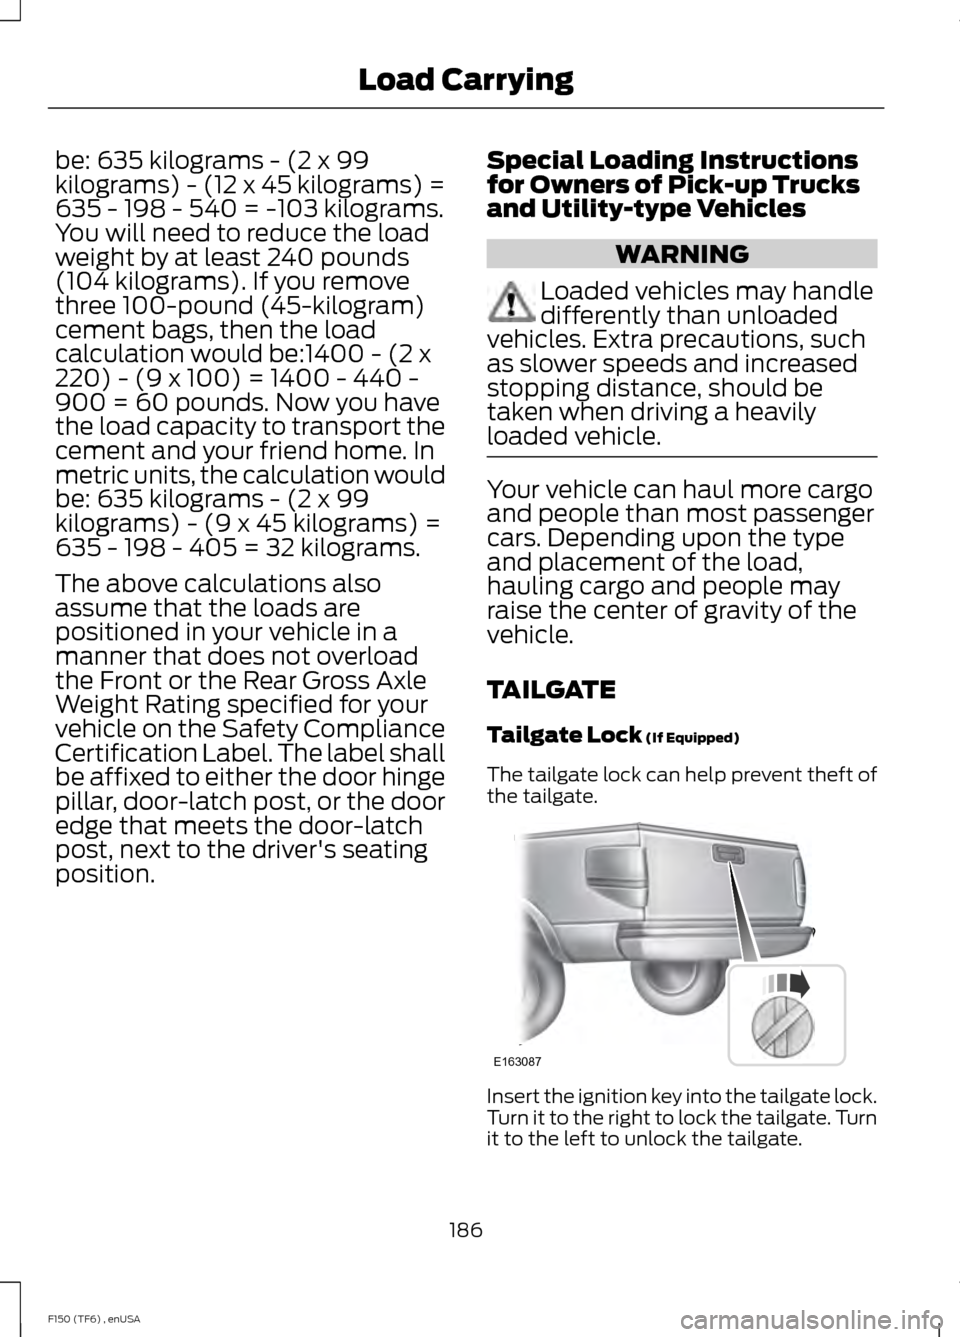
Tailgate Lock (If Equipped)
The tailgate lock can help prevent theft of
the tailgate. Insert the ignition key into the tailgate lock.
Turn it to the right to lock the tailgate. Turn
it to the left to unlock the tailgate.
186
F150 (TF6) , enUSA Load CarryingE163087
Page 212 of 472
Note:
You may hear an audible noise as the
transfer case shifts into its neutral position.
This is normal.
6. Leave the transmission in position N
and turn the ignition as far as it will go
toward the off position (it will not turn
fully off when the transmission is in
position
N. You must leave the key in
the ignition while towing. To lock and
unlock your vehicle, use the keyless
entry keypad or extra set of keys.
7. Release the brake pedal. WARNINGS
Do not disconnect the battery during
recreational towing. Doing so will
prevent the transfer case from
shifting properly and may cause the vehicle
to roll even if the transmission is in P
(Park). Shifting the transfer case to its
neutral position for recreational
towing may cause the vehicle to be
able to roll even if the transmission is in P
(Park). The driver or others could be
injured. Make sure the foot brake is
depressed and the vehicle is in a secure
and safe position while the transfer case
is being shifted to its neutral position. Failing to put the transfer case in its
neutral position will damage vehicle
components.
Note:
You can check four-wheel-down
towing status at any time by opening the
driver's door or turning the ignition to the
accessory or on position and verifying the
NEUTRAL TOW ENABLED
message
displays in the cluster.
To exit four-wheel-down towing and return
the transfer case to its
2H position:
1. With your vehicle still properly secured
to the tow vehicle, press and hold the
brake pedal. 2.
Turn the ignition to the on position. Do
not start the engine.
3. Shift the transmission out of N and into
any gear.
4. Release the brake pedal.
Note: If completed successfully, the
instrument cluster displays
4X2, and
NEUTRAL TOW DISABLED.
Note: If the indicator light and message do
not display, you must perform the procedure
again from the beginning.
Note: You may hear an audible noise as the
transfer case shifts out of its neutral
position. This is normal.
5. Apply the parking brake, and then disconnect the vehicle from the tow
vehicle.
6. Release the parking brake, start the engine, and shift the transmission to
position
D to make sure the transfer
case is out of position N.
7. If the transfer case does not successfully shift out of position N, set
the parking brake until you can have
your vehicle serviced.
209
F150 (TF6) , enUSA Towing
Page 218 of 472
ROADSIDE ASSISTANCE
Vehicles Sold In The U.S.: Getting
Roadside Assistance
To fully assist you should you have a
vehicle concern, Ford Motor Company
offers a complimentary roadside
assistance program. This program is
separate from the New Vehicle Limited
Warranty. The service is available:
•
24 hours, seven days a week.
• for the coverage period listed on the
Roadside Assistance Card included in
your Owner's Manual portfolio.
Roadside assistance will cover:
• a flat tire change with a good spare, if
provided with the vehicle (except
vehicles that have been supplied with
a tire inflation kit).
• battery jump start.
• lock-out assistance (key replacement
cost is the customer's responsibility).
• fuel delivery — Independent Service
Contractors, if not prohibited by state,
local or municipal law, shall deliver up
to 2.0 gallons (7.5 liters) of gasoline or
5.0 gallons (18.9 liters) of diesel fuel
to a disabled vehicle. Fuel delivery
service is limited to two no-charge
occurrences within a 12-month period.
• winch out — available within 100 feet
(30.5 meters) of a paved or county
maintained road, no recoveries.
• towing — Ford and Lincoln eligible
vehicles towed to an authorized dealer
within 35 miles (56.3 kilometers) of the
disablement location or to the nearest
authorized dealer. If a member
requests to be towed to an authorized
dealer more than 35 miles (56.3
kilometers) from the disablement
location, the member shall be
responsible for any mileage costs in
excess of 35 miles (56.3 kilometers). Trailers shall be covered up to $200 if the
disabled eligible vehicle requires service at
the nearest authorized dealer. If the trailer
is disabled, but the towing vehicle is
operational, the trailer does not qualify for
any roadside services.
Vehicles Sold In The U.S. : Using
Roadside Assistance
Complete the roadside assistance
identification card and place it in your
wallet for quick reference. This card is
found in the owner's information portfolio
in the glove compartment.
U.S. Ford vehicle customers who require
Roadside Assistance, call 1-800-241-3673.
If you need to arrange roadside assistance
for yourself, Ford Motor Company will
reimburse a reasonable amount for towing
to the nearest dealership within 35 miles
(56.3 kilometers). To obtain
reimbursement information, U.S. Ford
vehicle customers call 1-800-241-3673.
Customers will be asked to submit their
original receipts.
Vehicles Sold In Canada : Getting
Roadside Assistance
Canadian customers who require roadside
assistance, call 1-800-665-2006.
Vehicles Sold In Canada : Using
Roadside Assistance
For your convenience, you may complete
the roadside assistance identification card
found in the centerfold of your warranty
guide and retain for future reference.
Canadian roadside coverage and benefits
may differ from the U.S. coverage. If you
require more information, please refer to
the coverage section of your warranty
guide, call us in Canada at
1-800-665-2006, or visit our website at
www.ford.ca.
215
F150 (TF6) , enUSA Roadside Emergencies