2014 FORD F150 parking brake
[x] Cancel search: parking brakePage 153 of 472
In order to prevent the engine from running
at too low an RPM, which may cause it to
stall, SelectShift will still automatically
make some downshifts if it has determined
that you have not downshifted in time.
Although SelectShift will make some
downshifts for you, it will still allow you to
downshift at any time as long as the
SelectShift determines that the engine will
not be damaged from over-revving.
SelectShift will not automatically upshift,
even if the engine is approaching the RPM
limit. It must be shifted manually by
pressing the + button.
Note:
Engine damage may occur if
excessive engine revving is held without
shifting.
PRS (Progressive Range Selection)
With the gearshift lever in D (Drive), press
the – button to active PRS. The available
and selected gears will be indicated on the
instrument cluster.
All available gears will be displayed with
the current gear indicated. Press the –
button again to lock out gears beginning
with the highest gear. Example: press the
– button twice to lock out 6th and 5th
gears. Only the available gears will be
displayed and the transmission will
automatically shift between the available
gears. Press the + button to unlock gears
to allow the transmission to shift to higher
gears. The transmission will shift
automatically within the gear range you
select.
Automatic Transmission Adaptive
Learning
This feature is designed to increase
durability and provide consistent shift feel
over the life of the vehicle. A new vehicle
or transmission may have firm shifts, soft
shifts or both. This operation is considered
normal and will not affect function or durability of the transmission. Over time,
the adaptive learning process will fully
update transmission operation.
Additionally, whenever the battery is
disconnected or a new battery installed,
the strategy must be relearned.
Brake-Shift Interlock
WARNINGS
Do not drive your vehicle until you
verify that the brake lamps are
working.
When doing this procedure, you will
be taking the vehicle out of park
which means the vehicle can roll
freely. To avoid unwanted vehicle
movement, always fully set the parking
brake prior to doing this procedure. Use
wheel chocks if appropriate. If the parking brake is fully released,
but the brake warning lamp remains
illuminated, the brakes may not be
working properly. See your authorized
dealer. Your vehicle is equipped with a brake-shift
interlock feature that prevents the
gearshift lever from being moved from
P
(Park) when the ignition is in the on
position and the brake pedal is not pressed.
If you cannot move the gearshift lever out
of P (Park) position with the ignition in the
on position and the brake pedal pressed,
a malfunction may have occurred. It is
possible that a fuse has blown or the
vehicle ’s brake lamps are not operating
properly. See
Fuse Specification Chart
(page 225).
If the fuse is not blown and the brake
lamps are working properly, the following
procedure will allow you to move the
gearshift lever from
P (Park):
150
F150 (TF6) , enUSA Transmission
Page 154 of 472
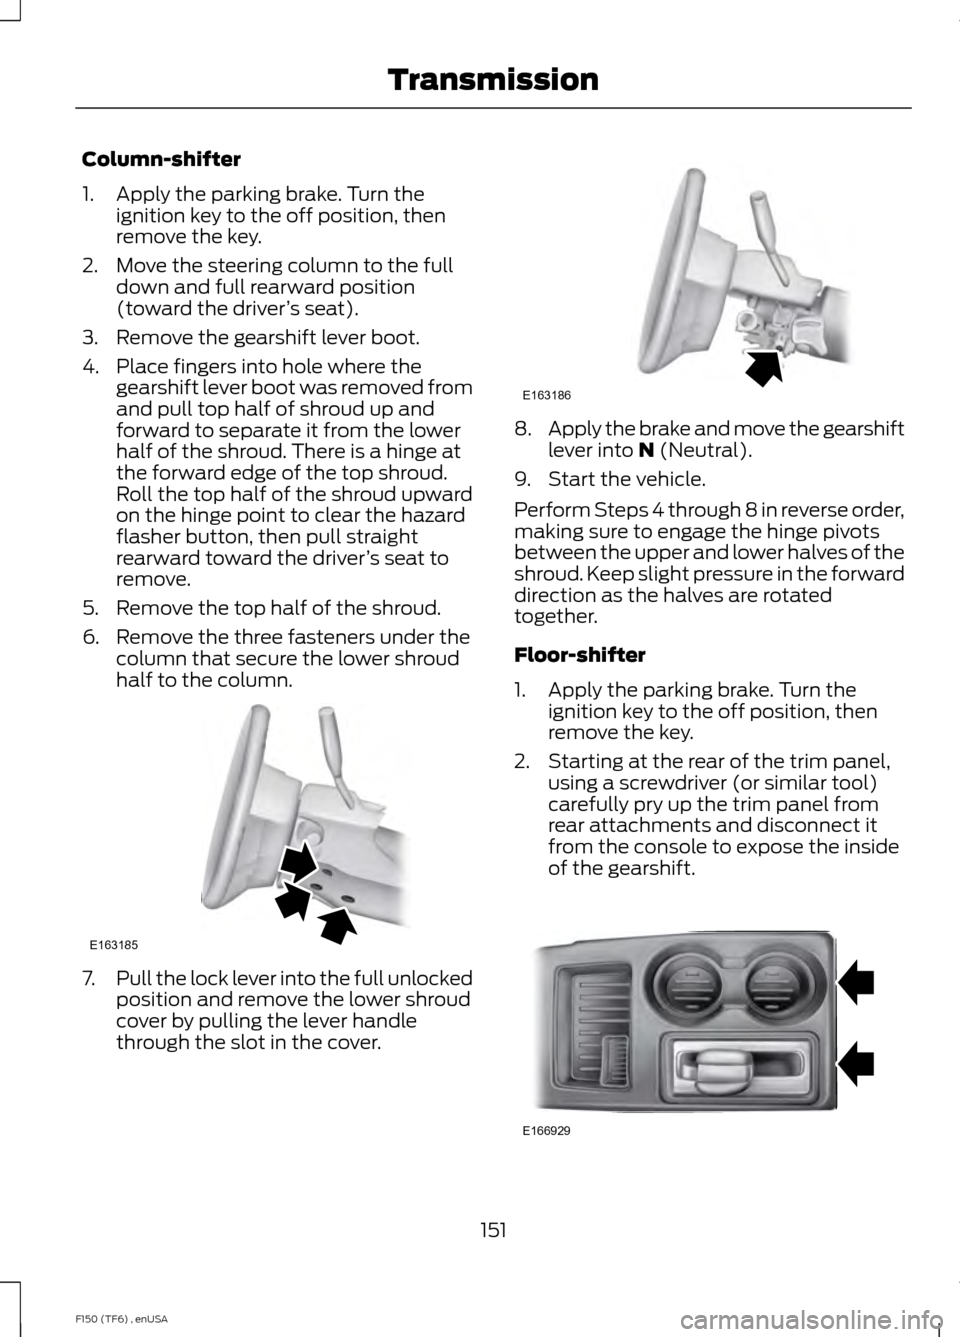
Column-shifter
1. Apply the parking brake. Turn the
ignition key to the off position, then
remove the key.
2. Move the steering column to the full down and full rearward position
(toward the driver ’s seat).
3. Remove the gearshift lever boot.
4. Place fingers into hole where the gearshift lever boot was removed from
and pull top half of shroud up and
forward to separate it from the lower
half of the shroud. There is a hinge at
the forward edge of the top shroud.
Roll the top half of the shroud upward
on the hinge point to clear the hazard
flasher button, then pull straight
rearward toward the driver ’s seat to
remove.
5. Remove the top half of the shroud.
6. Remove the three fasteners under the column that secure the lower shroud
half to the column. 7.
Pull the lock lever into the full unlocked
position and remove the lower shroud
cover by pulling the lever handle
through the slot in the cover. 8.
Apply the brake and move the gearshift
lever into N (Neutral).
9. Start the vehicle.
Perform Steps 4 through 8 in reverse order,
making sure to engage the hinge pivots
between the upper and lower halves of the
shroud. Keep slight pressure in the forward
direction as the halves are rotated
together.
Floor-shifter
1. Apply the parking brake. Turn the ignition key to the off position, then
remove the key.
2. Starting at the rear of the trim panel, using a screwdriver (or similar tool)
carefully pry up the trim panel from
rear attachments and disconnect it
from the console to expose the inside
of the gearshift. 151
F150 (TF6) , enUSA TransmissionE163185 E163186 E166929
Page 155 of 472
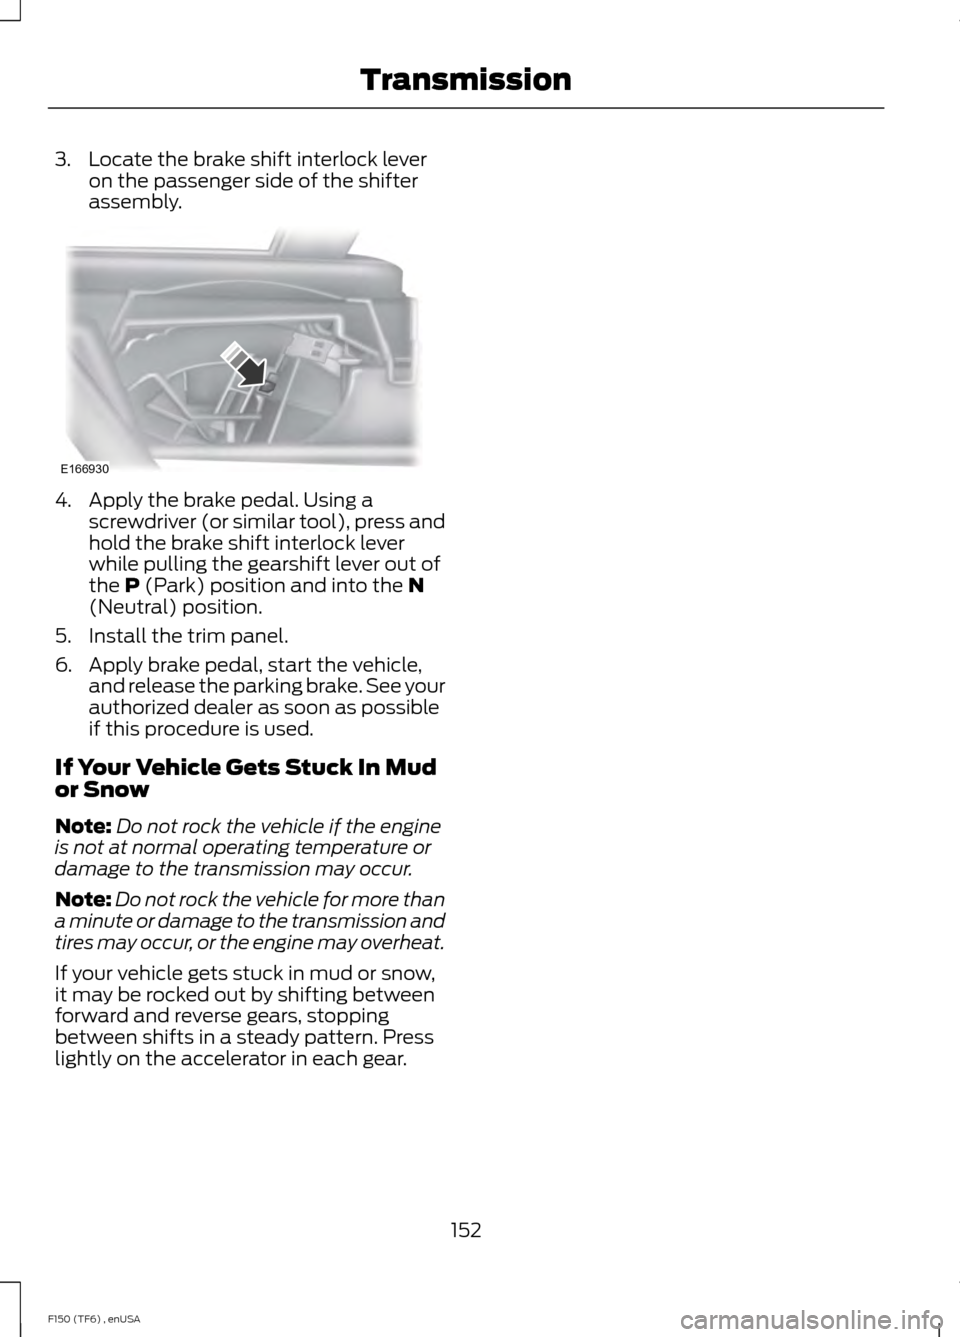
3. Locate the brake shift interlock lever
on the passenger side of the shifter
assembly. 4. Apply the brake pedal. Using a
screwdriver (or similar tool), press and
hold the brake shift interlock lever
while pulling the gearshift lever out of
the P (Park) position and into the N
(Neutral) position.
5. Install the trim panel.
6. Apply brake pedal, start the vehicle, and release the parking brake. See your
authorized dealer as soon as possible
if this procedure is used.
If Your Vehicle Gets Stuck In Mud
or Snow
Note: Do not rock the vehicle if the engine
is not at normal operating temperature or
damage to the transmission may occur.
Note: Do not rock the vehicle for more than
a minute or damage to the transmission and
tires may occur, or the engine may overheat.
If your vehicle gets stuck in mud or snow,
it may be rocked out by shifting between
forward and reverse gears, stopping
between shifts in a steady pattern. Press
lightly on the accelerator in each gear.
152
F150 (TF6) , enUSA TransmissionE166930
Page 162 of 472
Descend a hill in the same gear you would
use to climb up the hill to avoid excessive
brake application and brake overheating.
Do not descend in neutral. Disengage
overdrive or move the transmission
selector lever to a lower gear. When
descending a steep hill, avoid sudden hard
braking as you could lose control. The front
wheels have to be turning in order to steer
your vehicle.
If your vehicle has anti-lock brakes, apply
the brakes steadily. Do not pump the
brakes.
Driving on Snow and Ice
WARNING
If you are driving in slippery
conditions that require tire chains or
cables, then it is critical that you drive
cautiously. Keep speeds down, allow for
longer stopping distances and avoid
aggressive steering to reduce the chances
of a loss of vehicle control which can lead
to serious injury or death. If the rear end of
your vehicle slides while cornering, steer in
the direction of the slide until you regain
control of your vehicle. Note:
Excessive tire slippage can cause
transmission damage.
Four-wheel drive vehicles have advantages
over two-wheel drive vehicles in snow and
ice but can skid like any other vehicle.
Should you start to slide while driving on
snowy or icy roads, turn the steering wheel
in the direction of the slide until you regain
control.
Avoid sudden applications of power and
quick changes of direction on snow and
ice. Apply the accelerator slowly and
steadily when starting from a full stop. Avoid sudden braking. Although a
four-wheel drive vehicle may accelerate
better than a two-wheel drive vehicle in
snow and ice, it will not stop any faster as
braking occurs at all four wheels. Do not
become overconfident as to road
conditions.
Make sure you allow sufficient distance
between you and other vehicles for
stopping. Drive slower than usual and
consider using one of the lower gears. In
emergency stopping situations, apply the
brake steadily. Do not pump the brake
pedal. See Hints on Driving With
Anti-Lock Brakes (page 163).
If Your Vehicle Gets Stuck In Mud or
Snow WARNING
Do not spin the wheels at over 35
mph (56 km/h). The tires may fail
and injure a passenger or bystander.
If your vehicle gets stuck in mud or snow,
it may be rocked out by shifting between
forward and reverse gears, stopping
between shifts in a steady pattern. Press
lightly on the accelerator in each gear.
Note:
Do not rock your vehicle if the engine
is not at normal operating temperature,
damage to the transmission may occur.
Note: Do not rock your vehicle for more
than a minute, damage to the transmission
and tires may occur or the engine may
overheat.
Parking WARNINGS
If the parking brake is fully released,
but the brake warning lamp remains
illuminated, the brakes may not be
working properly. See your authorized
dealer.
159
F150 (TF6) , enUSA Four-Wheel Drive
(If Equipped)
Page 163 of 472
WARNINGS
Always set the parking brake fully
and make sure the gearshift is
latched in P (Park). Turn the ignition
to the off position and remove the key
whenever you leave your vehicle. On some Four-wheel drive vehicles, when
the transfer case is in the N (Neutral)
position, the engine and transmission are
disconnected from the rest of the driveline.
Therefore, the vehicle is free to roll even if
the automatic transmission is in P (Park)
or the manual transmission is in gear. Do
not leave the vehicle unattended with the
transfer case in the N (Neutral) position.
Always set the parking brake fully and turn
off the ignition when leaving the vehicle.
Maintenance and Modifications
The suspension and steering systems on
your vehicle have been designed and
tested to provide predictable performance
whether loaded or empty. For this reason,
we strongly recommend that you do not
make modifications such as adding or
removing parts (i.e. lift kits or stabilizer
bars) or by using replacement parts not
equivalent to the original factory
equipment.
We recommend that you use caution when
your vehicle has either a high load or device
(i.e. ladder or luggage racks). Any
modifications to your vehicle that raise the
center of gravity may cause your vehicle
to roll over when there is a loss of vehicle
control.
Failure to maintain your vehicle correctly
may void the warranty, increase your repair
cost, reduce vehicle performance and
operational capabilities and adversely
affect you and your passenger's safety. We
recommend you frequently inspect your
vehicle's chassis components when your
vehicle is subject to off road usage.
160
F150 (TF6) , enUSA Four-Wheel Drive (If Equipped)
Page 166 of 472
GENERAL INFORMATION
Note:
Occasional brake noise is normal. If
a metal-to-metal, continuous grinding or
continuous squeal sound is present, the
brake linings may be worn-out. Have the
system checked by an authorized dealer. If
your vehicle has continuous vibration or
shudder in the steering wheel while braking,
have it checked by an authorized dealer.
Note: Brake dust may accumulate on the
wheels, even under normal driving
conditions. Some dust is inevitable as the
brakes wear and does not contribute to
brake noise. See Cleaning the Alloy
Wheels (page 264). See
Warning Lamps and
Indicators (page 82).
Wet brakes result in reduced braking
efficiency. Gently press the brake pedal a
few times when driving from a car wash or
standing water to dry the brakes.
Brake Over Accelerator
In the event the accelerator pedal
becomes stuck or entrapped, apply steady
and firm pressure to the brake pedal to
slow the vehicle and reduce engine power.
If you experience this condition, apply the
brakes and bring your vehicle to a safe
stop. Move the transmission selector lever
to position
P, switch the engine off and
apply the parking brake. Inspect the
accelerator pedal for any interference. If
none are found and the condition persists,
have your vehicle towed to the nearest
authorized dealer. Brake Assist
Brake assist detects when you brake
rapidly by measuring the rate at which you
press the brake pedal. It provides
maximum braking efficiency as long as you
press the pedal, and can reduce stopping
distances in critical situations.
Anti-lock Brake System
This system helps you maintain steering
control during emergency stops by keeping
the brakes from locking.
This lamp momentarily
illuminates when you turn the
ignition on. If the light does not
illuminate during start up, remains on or
flashes, the system may be disabled. Have
the system checked by an authorized
dealer. If the system is disabled, normal
braking is still effective. If the
brake warning lamp illuminates
when you release the parking brake, have
the system checked by an authorized
dealer.
HINTS ON DRIVING WITH
ANTI-LOCK BRAKES
Note: When the system is operating, the
brake pedal will pulse and may travel
further. Maintain pressure on the brake
pedal. You may also hear a noise from the
system. This is normal.
The anti-lock braking system will not
eliminate the risks when:
• you drive too closely to the vehicle in
front of you
• your vehicle is hydroplaning
• you take corners too fast
• the road surface is poor.
163
F150 (TF6) , enUSA BrakesE144522 E144522
Page 167 of 472

PARKING BRAKE
WARNING
Always set the parking brake fully
and make sure the transmission is
placed in park (P). Failure to set the
parking brake and engage park could result
in vehicle roll-away, property damage or
bodily injury. Turn the ignition to the lock
position and remove the key whenever you
leave your vehicle. Apply the parking brake whenever your
vehicle is parked. Press the pedal
downward to set the parking brake. The
brake warning lamp in the instrument
cluster will illuminate and remains
illuminated until the parking brake is
released.
To release, pull the brake release lever
located at the lower left side of the
instrument panel.
If you are parking your vehicle on a grade
or with a trailer, press and hold the brake
pedal down, then set the parking brake.
There may be a little vehicle movement as
the parking brake sets to hold the vehicle's
weight. This is normal and should be no
reason for concern. If needed, press and
hold the service brake pedal down, then
try reapplying the parking brake. Chock the
wheels if required. If the parking brake
cannot hold the weight of the vehicle, the
parking brake may need to be serviced or
the vehicle may be overloaded.
HILL START ASSIST
WARNINGS
The system does not replace the
parking brake. When you leave your
vehicle, always apply the parking
brake and put the transmission in park (P). WARNINGS
You must remain in your vehicle once
you have activated the system.
During all times, you are responsible
for controlling your vehicle,
supervising the system and
intervening, if required. If the engine is revved excessively, or
if a malfunction is detected, the
system will be deactivated.
The system makes it easier to pull away
when your vehicle is on a slope without the
need to use the parking brake.
When the system is active, your vehicle will
remain stationary on the slope for two to
three seconds after you release the brake
pedal. This allows you time to move your
foot from the brake to the accelerator
pedal. The brakes are released
automatically once the engine has
developed sufficient drive to prevent your
vehicle from rolling down the slope. This
is an advantage when pulling away on a
slope, (for example from a car park ramp,
traffic lights or when reversing uphill into
a parking space).
The system will activate automatically on
any slope that will cause significant vehicle
rollback.
Using Hill Start Assist
1. Press the brake pedal to bring your
vehicle to a complete standstill. Keep
the brake pedal pressed.
2. If the sensors detect that your vehicle is on a slope, the system will activate
automatically.
3. When you remove your foot from the brake pedal, your vehicle will remain
on the slope without rolling away for
about two or three seconds. This hold
time will automatically be extended if
you are in the process of driving off.
164
F150 (TF6) , enUSA Brakes
Page 173 of 472
PRINCIPLE OF OPERATION
WARNINGS
Hill descent control cannot control
descent in all surface conditions and
circumstances, such as ice or
extremely steep grades. Hill descent
control is a driver assist system and cannot
substitute for good judgment by the driver.
Failure to do so may result in loss of vehicle
control, crash or serious injury. Hill descent control does not provide
hill hold at zero miles per hour (0
kilometers per hour). When stopped,
the parking brake must be applied or the
vehicle must be placed in P (Park) or it
may roll away. Hill descent control allows the driver to set
and maintain vehicle speed while
descending steep grades in various surface
conditions.
Hill descent control can maintain vehicle
speeds on downhill grades between 2 mph
(3 km/h) and 12 mph (20 km/h). Above 20
mph (32 km/h), the system remains
armed, but descent speed cannot be set
or maintained.
Hill descent control requires a cooling
down interval after a period of sustained
use. The amount of time that the feature
can remain active before cooling varies
with conditions. The system will provide a
warning in the message center and a chime
will sound when the system is about to
disengage for cooling. At this time,
manually apply the brakes as needed to
maintain descent speed. USING HILL DESCENT
CONTROL Press and release the hill
descent button located on the
instrument panel. A light in the
cluster will illuminate and a
chime will sound when this feature is
activated.
To increase descent speed, press the
accelerator pedal until the desired speed
is reached. To decrease descent speed,
press the brake pedal until the desired
speed is reached.
Whether accelerating or decelerating, once
the desired descent speed is reached,
remove your feet from the pedals and the
chosen vehicle speed will be maintained.
Note: Noise from the ABS pump motor may
be observed during hill descent control
operation. This is a normal characteristic of
the ABS and should be no reason for
concern.
Hill descent modes
• At speeds below 20 mph (32 km/h):
When the Hill Descent Control switch
is pressed and Hill Descent Control is
active, the Hill Descent Control telltale
will flash.
• At speeds below 20 mph (32 km/h):
When the Hill Descent Control switch
is pressed and conditions are not
correct for hill descent activation, the
Hill Descent Control system will be
enabled, the Hill Descent Control
telltale will be solid and a message will
display in the information display.
170
F150 (TF6) , enUSA Terrain Response
(If Equipped)E163957