2014 FORD F150 set clock
[x] Cancel search: set clockPage 251 of 472
6. Release the parking brake. With your
foot on the brake pedal and with the
air conditioning on, put your vehicle in
D (Drive) and allow the engine to idle
for at least one minute.
• If you do not allow the engine to
relearn its idle trim, the idle quality
of your vehicle may be adversely
affected until the idle trim is
eventually relearned.
7. Drive your vehicle to complete the relearning process
•Your vehicle may need to be driven
10 miles (16 kilometers) or more to
relearn the idle and fuel trim
strategy along with the ethanol
content for flexible fuel vehicles.
• For flexible fuel vehicles, if you are
operating on E85, you may
experience poor starts or an
inability to start the engine and
driveability problems until the fuel
trim and ethanol content have been
relearned.
If the battery has been disconnected or a
new battery has been installed, the clock
and radio settings must be reset once the
battery is reconnected.
Always dispose of automotive
batteries in a responsible manner.
Follow your local authorized standards
for disposal. Call your local authorized
recycling center to find out more about
recycling automotive batteries.
Battery Management System (If
Equipped)
The battery management system (BMS)
monitors battery conditions and takes
actions to extend battery life. If excessive
battery drain is detected, the system may
temporarily disable certain electrical
features to protect the battery. Those
electrical accessories affected include the
rear defrost, heated/cooled seats, climate control fan, heated steering wheel, audio
and navigation system. A message may be
shown in the information displays to alert
the driver that battery protection actions
are active. These messages are only for
notification that an action is taking place,
and not intended to indicate an electrical
problem or that the battery requires
replacement.
Electrical accessory installation
To ensure proper operation of the Battery
Management System, any electrical
devices that are added to your vehicle
should not have their ground connection
made directly at the negative battery post.
A connection at the negative battery post
can cause inaccurate measurements of
the battery condition and potential
incorrect system operation.
Note:
Electrical or electronic accessories
added to your vehicle by the dealer or the
owner, may adversely affect battery
performance and durability, and may affect
the performance of other electrical systems
in your vehicle.
When a battery replacement is required,
the battery should only be replaced with
a Ford-recommended replacement battery
that matches the electrical requirements
of your vehicle. After battery replacement,
or in some cases after charging the battery
with the external charger, the Battery
Management System requires eight hours
of vehicle sleep time (key off with doors
closed) to relearn the new battery state of
charge. Prior to relearning the state of
charge, the Battery Management System
may disable electrical features (to protect
the battery) earlier than normal.
248
F150 (TF6) , enUSA Maintenance
Page 291 of 472

•
To reduce the chances of interference
from another vehicle, perform the
system reset procedure at least three
feet (one meter) away from another
Ford Motor Company vehicle
undergoing the system reset procedure
at the same time.
• Do not wait more than two minutes
between resetting each tire sensor or
the system will time-out and the entire
procedure will have to be repeated on
all four wheels.
• A double horn will sound indicating the
need to repeat the procedure.
Performing the System Reset Procedure
Read the entire procedure before
attempting.
1. Drive the vehicle above 20 mph (32 km/h) for at least two minutes, then
park in a safe location where you can
easily get to all four tires and have
access to an air pump.
2. Place the ignition in the off position and
keep the key in the ignition.
3. Cycle the ignition to the on position with the engine off.
4. Turn the hazard flashers on then off three times. You must accomplish this
within 10 seconds. If the reset mode
has been entered successfully, the horn
will sound once, the system indicator
will flash and a message is shown in
the information display. If this does not
occur, please try again starting at Step
2. If after repeated attempts to enter
the reset mode, the horn does not
sound, the system indicator does not
flash and no message is shown in the
information display, seek service from
your authorized dealer. 5. Train the tire pressure monitoring
system sensors in the tires using the
following system reset sequence
starting with the left front tire in the
following clockwise order: Left front
(driver's side front tire), Right front
(passenger's side front tire), Right rear
(passenger's side rear tire), Left rear
(driver's side rear tire)
6. Remove the valve cap from the valve stem on the left front tire. Decrease the
air pressure until the horn sounds.
Note: The single horn chirp confirms
that the sensor identification code has
been learned by the module for this
position. If a double horn is heard, the
reset procedure was unsuccessful, and
you must repeat it.
7. Remove the valve cap from the valve stem on the right front tire. Decrease
the air pressure until the horn sounds.
8. Remove the valve cap from the valve stem on the right rear tire. Decrease the
air pressure until the horn sounds.
9. Remove the valve cap from the valve stem on the left rear tire. Decrease the
air pressure until the horn sounds.
Training is complete after the horn
sounds for the last tire trained (driver's
side rear tire), the system indicator
stops flashing, and a message is shown
in the information display.
10. Turn the ignition off. If two short horn
beeps are heard, the reset procedure
was unsuccessful and you must
repeat it. If after repeating the
procedure and two short beeps are
heard when the ignition is turned to
off, seek assistance from your
authorized dealer.
288
F150 (TF6) , enUSA Wheels and Tires
Page 294 of 472
Tire Change Procedure
WARNINGS
When one of the front wheels is off
the ground, the transmission alone
will not prevent the vehicle from
moving or slipping off the jack, even if the
transmission selector lever is in position P. To help prevent the vehicle from
moving when you change a tire, be
sure to place the transmission
selector lever in position P, set the parking
brake and block (in both directions) the
wheel that is diagonally opposite (other
side and end of the vehicle) to the tire
being changed. Never get underneath a vehicle that
is supported only by a jack. If the
vehicle slips off the jack, you or
someone else could be seriously injured. Do not attempt to change a tire on
the side of the vehicle close to
moving traffic. Pull far enough off the
road to avoid the danger of being hit when
operating the jack or changing the wheel. Always use the jack provided as
original equipment with your vehicle.
If using a jack other than the one
provided as original equipment with your
vehicle, make sure the jack capacity is
adequate for the vehicle weight, including
any vehicle cargo or modifications. Disable the power running boards
before jacking, lifting, or placing any
object under the vehicle. Never place
your hand between the power running
board and the vehicle as extended power
running boards will retract when the doors
are closed. Failure to follow these
instructions may result in personal injury. Note:
Passengers should not remain in the
vehicle when the vehicle is being jacked. Park on a level surface, activate the hazard
flashers and set the parking brake. Then,
place the transmission selector lever in
position P and turn the engine off.
To remove the jack on Regular Cab and
SuperCab models:
Remove the wing nut and turn the jack
screw counterclockwise to release
pressure before removing the jack from the
bracket.
To remove the jack on SuperCrew
models:
1. Lift both rear seat cushions.
2. Remove the insert containing the Easy
Fuel funnel from the driver's side.
3. Remove the two small wing nuts on the passenger side.
4. Slide the plastic box toward the driver's
side and remove.
See the instruction sheet (located with the
jack) for detailed tire change instructions.
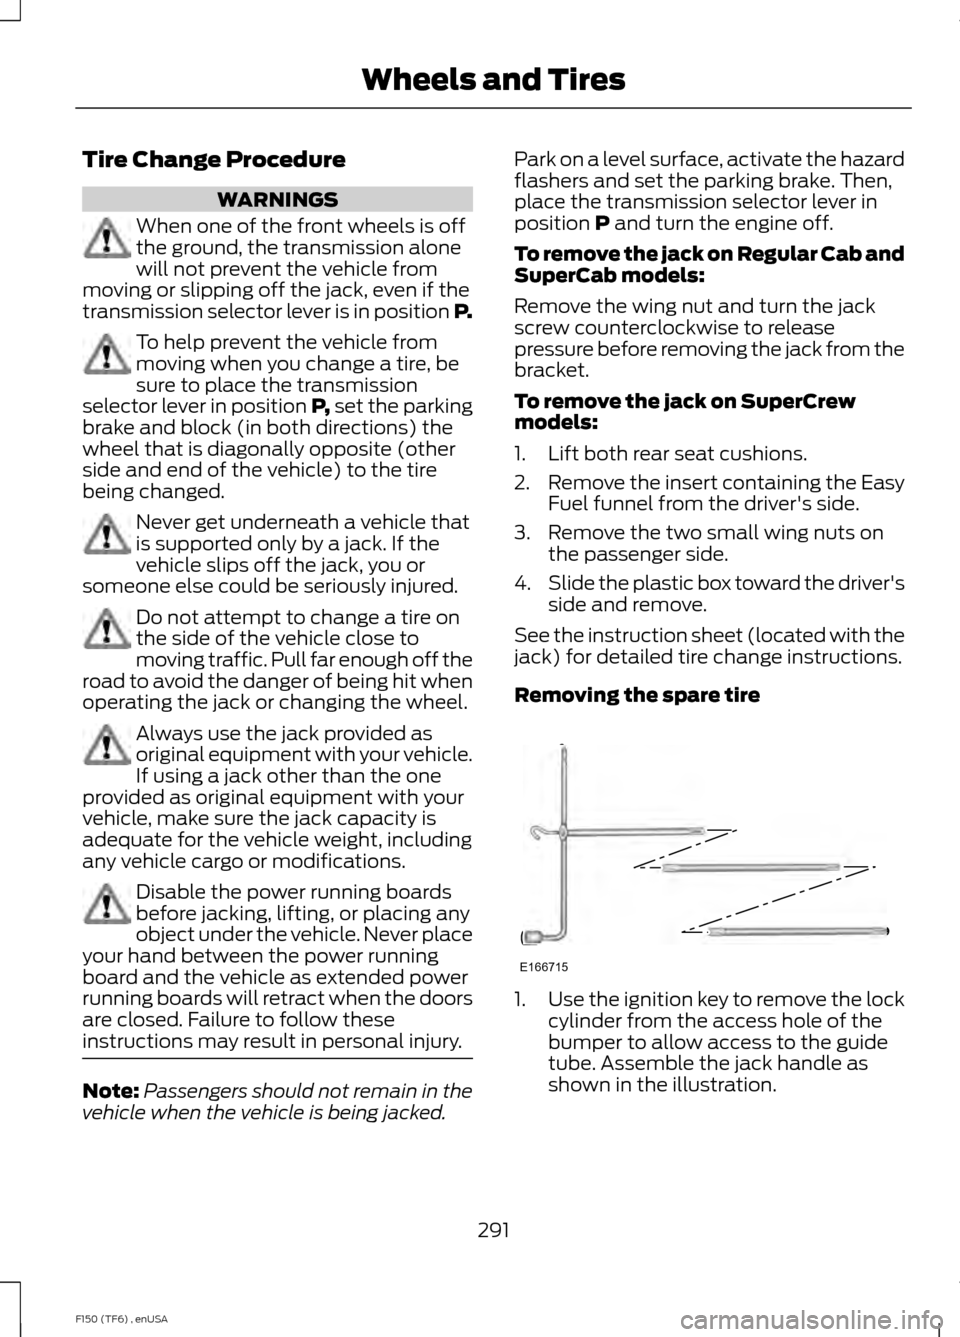
Removing the spare tire 1.
Use the ignition key to remove the lock
cylinder from the access hole of the
bumper to allow access to the guide
tube. Assemble the jack handle as
shown in the illustration.
291
F150 (TF6) , enUSA Wheels and TiresE166715
Page 311 of 472
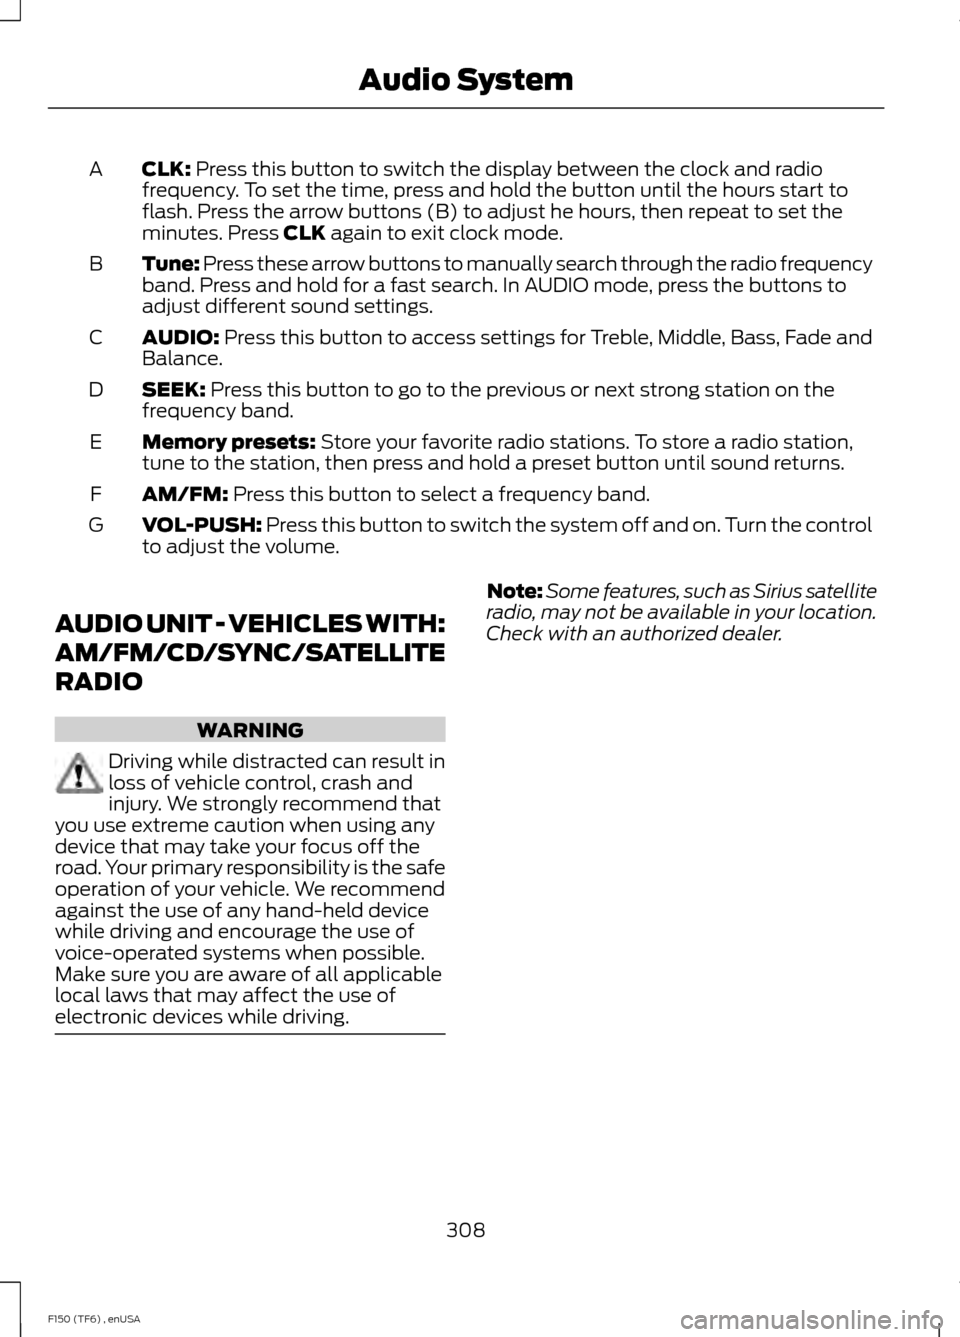
CLK: Press this button to switch the display between the clock and radio
frequency. To set the time, press and hold the button until the hours start to
flash. Press the arrow buttons (B) to adjust he hours, then repeat to set the
minutes. Press
CLK again to exit clock mode.
A
Tune: Press these arrow buttons to manually search through the radio frequency
band. Press and hold for a fast search. In AUDIO mode, press the buttons to
adjust different sound settings.
B
AUDIO:
Press this button to access settings for Treble, Middle, Bass, Fade and
Balance.
C
SEEK:
Press this button to go to the previous or next strong station on the
frequency band.
D
Memory presets:
Store your favorite radio stations. To store a radio station,
tune to the station, then press and hold a preset button until sound returns.
E
AM/FM:
Press this button to select a frequency band.
F
VOL-PUSH:
Press this button to switch the system off and on. Turn the control
to adjust the volume.
G
AUDIO UNIT - VEHICLES WITH:
AM/FM/CD/SYNC/SATELLITE
RADIO WARNING
Driving while distracted can result in
loss of vehicle control, crash and
injury. We strongly recommend that
you use extreme caution when using any
device that may take your focus off the
road. Your primary responsibility is the safe
operation of your vehicle. We recommend
against the use of any hand-held device
while driving and encourage the use of
voice-operated systems when possible.
Make sure you are aware of all applicable
local laws that may affect the use of
electronic devices while driving. Note:
Some features, such as Sirius satellite
radio, may not be available in your location.
Check with an authorized dealer.
308
F150 (TF6) , enUSA Audio System
Page 313 of 472
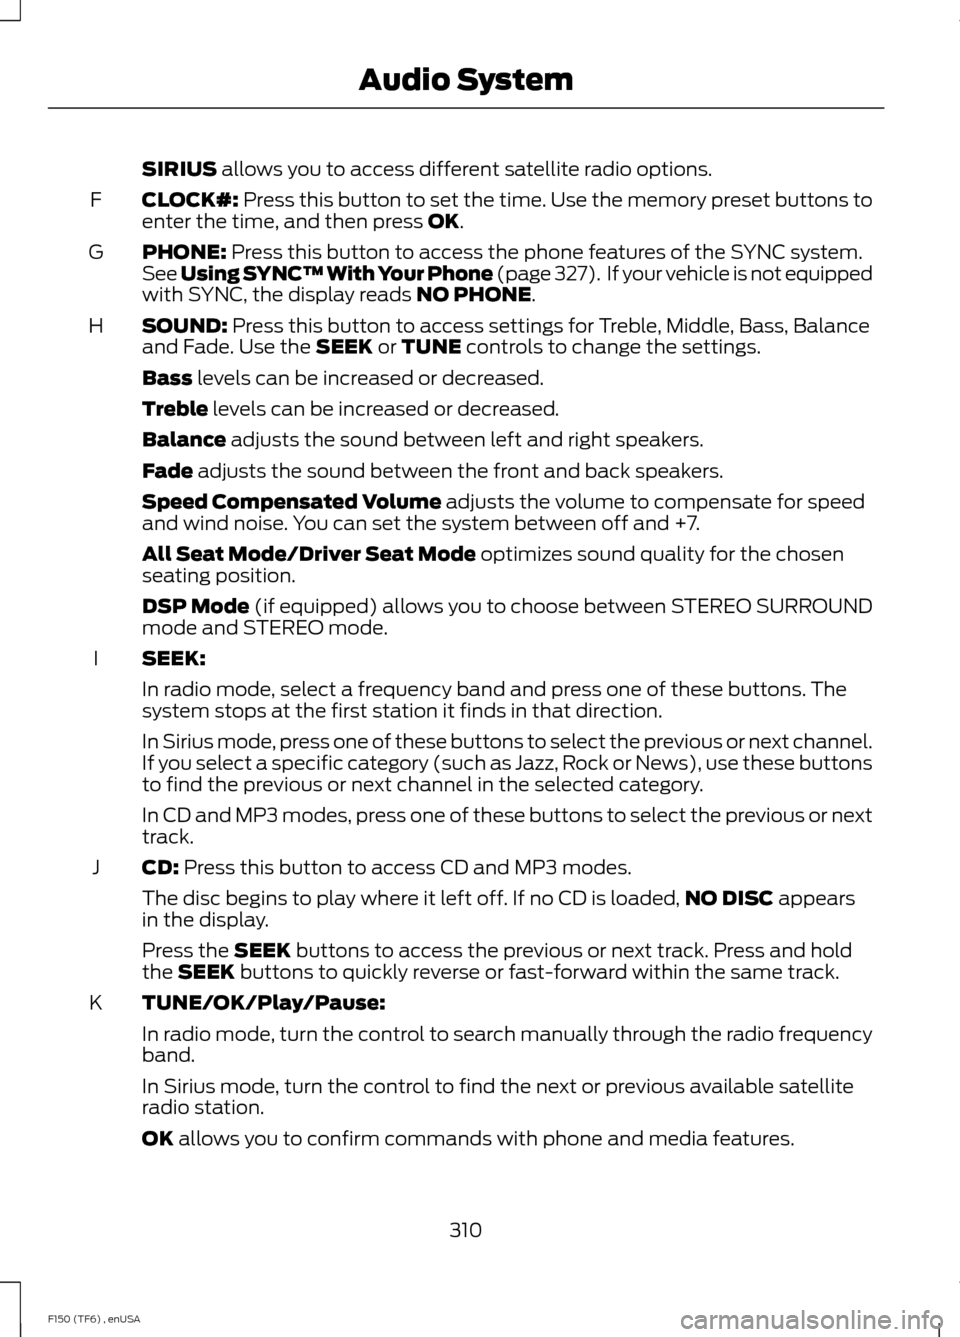
SIRIUS allows you to access different satellite radio options.
CLOCK#:
Press this button to set the time. Use the memory preset buttons to
enter the time, and then press OK.
F
PHONE:
Press this button to access the phone features of the SYNC system.
See Using SYNC™ With Your Phone (page 327). If your vehicle is not equipped
with SYNC, the display reads NO PHONE.
G
SOUND:
Press this button to access settings for Treble, Middle, Bass, Balance
and Fade. Use the SEEK or TUNE controls to change the settings.
H
Bass
levels can be increased or decreased.
Treble
levels can be increased or decreased.
Balance
adjusts the sound between left and right speakers.
Fade
adjusts the sound between the front and back speakers.
Speed Compensated Volume
adjusts the volume to compensate for speed
and wind noise. You can set the system between off and +7.
All Seat Mode/Driver Seat Mode
optimizes sound quality for the chosen
seating position.
DSP Mode
(if equipped) allows you to choose between STEREO SURROUND
mode and STEREO mode.
SEEK:
I
In radio mode, select a frequency band and press one of these buttons. The
system stops at the first station it finds in that direction.
In Sirius mode, press one of these buttons to select the previous or next channel.
If you select a specific category (such as Jazz, Rock or News), use these buttons
to find the previous or next channel in the selected category.
In CD and MP3 modes, press one of these buttons to select the previous or next
track.
CD:
Press this button to access CD and MP3 modes.
J
The disc begins to play where it left off. If no CD is loaded, NO DISC
appears
in the display.
Press the
SEEK buttons to access the previous or next track. Press and hold
the SEEK buttons to quickly reverse or fast-forward within the same track.
TUNE/OK/Play/Pause:
K
In radio mode, turn the control to search manually through the radio frequency
band.
In Sirius mode, turn the control to find the next or previous available satellite
radio station.
OK
allows you to confirm commands with phone and media features.
310
F150 (TF6) , enUSA Audio System
Page 317 of 472

In radio mode, select a frequency band and press one of these buttons. The
system stops at the first station it finds in that direction. Press and hold one of
these buttons to move quickly in that direction to the next strong radio station
or memory preset.
In Sirius mode, press one of these buttons to select the previous or next channel.
If you select a specific category (such as Jazz, Rock or News), use these buttons
to find the previous or next channel in the selected category. Press and hold
one of these buttons to move quickly in that direction to the next channel or
category.
In CD mode, press one of these buttons to select the previous or next track.
Press and hold one of these buttons to move quickly in that direction within the
current track.
OK and arrow buttons: Press the up and down or left and right arrow buttons
to browse menu selections. Press OK to confirm menu selections.
G
Eject:
Press this button to eject a CD.
H
Power and Volume:
Press this button to switch the system off and on. Turn
it to adjust the volume.
I
CLOCK:
Press this button to access the clock setting. Use the center arrow
controls to change the hours and minutes.
J
SOUND:
Press this button to adjust settings for Treble, Middle, Bass, Balance
and Fade.
K
MENU:
Press this button to access different audio system features. See Menu
Structure later in this section.
L
PHONE:
Press this button to access the phone features of the SYNC system.
See Using SYNC™ With Your Phone (page 327).
M
AUX:
Press this button to access your auxiliary input jack or switch between
devices you plug into the input jack or USB port. See Using SYNC™ With Your
Media Player
(page 345).
N
SIRIUS:
Press this button to listen to Sirius satellite radio.
O
314
F150 (TF6) , enUSA Audio System
Page 363 of 472
This system uses a four-corner strategy to
provide quick access to several vehicle
features and settings. The touchscreen
provides easy interaction with your cellular
phone, multimedia, climate control and
navigation system. The corners display any
active modes within those menus, such as
phone status or the climate temperature.
Note:
Some features are not available while
your vehicle is moving.
Note: Your system is equipped with a
feature that allows you to access and
control audio features for 30 minutes after
you switch the ignition off (and no doors
open).
PHONE
Press to select any of the following:
• Phone
• Quick Dial
• Phonebook
• History
• Messaging
• Settings
NAVIGATION
Press to select any of the following:
• My Home
• Favorites
• Previous Destinations
• Point of Interest
• Emergency
• Street Address
• Intersection
• City Center
• Map
• Edit Route
• Cancel Route
CLIMATE Press to select any of the following:
•
Driver Settings
• Recirculated Air
• Auto
• Dual
• Passenger Settings
• A/C
• Defrost SETTINGS
Press to select any of the following:
• Clock
• Display
• Sound
• Vehicle
• Settings
• Help HOME
Press to access your home
screen. Depending on your
vehicle ’s option package and software,
your screens may vary in appearance from
the descriptions in this section. Your
features may also be limited depending on
your market. Check with an authorized
dealer for availability. INFORMATION
Press to select any of the following:
• Services
• Travel Link
• Alerts
• Calendar
• Apps
ENTERTAINMENT
360
F150 (TF6) , enUSA MyFord Touch
™ (If Equipped)E142607 E142613 E142608
Page 369 of 472
Voice settings using voice commands
"Interaction mode novice"
"Media candidate lists off" "Media candidate lists on"
"Phone candidate lists off" "Phone candidate lists on" "Help" Using Voice Commands with the
Touchscreen Options
Your voice system has a dual mode feature
which allows you to switch between using
voice commands and making on-screen
selections. This is available only when the
system displays a list of candidates
generated during a voice session. For
example, when entering in a street address
or trying to call a contact from the phone
you paired to the system.
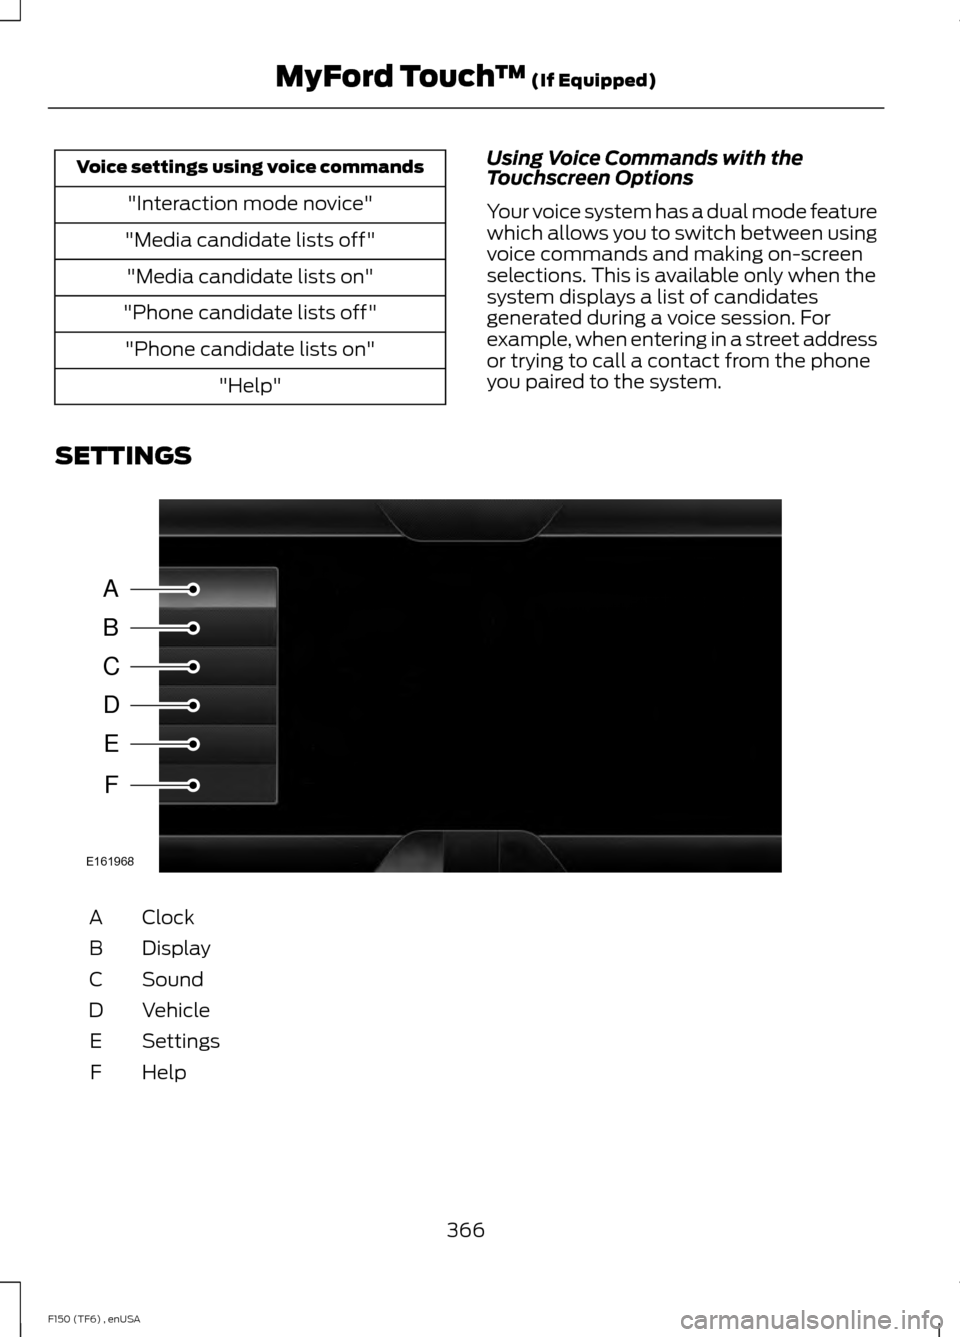
SETTINGS Clock
A
Display
B
Sound
C
Vehicle
D
Settings
E
HelpF
366
F150 (TF6) , enUSA MyFord Touch
™ (If Equipped)A
B
C
D
E
F
E161968