2014 FORD F SERIES MOTORHOME AND COMMERCIAL CHASSIS clock
[x] Cancel search: clockPage 27 of 143

REFUELING
WARNINGS
Fuel vapor burns violently and a fuelfire can cause severe injuries.
Read and follow all the instructionson the pump island.
Turn off your engine when you arerefueling.
Do not smoke if you are near fuel orrefueling your vehicle.
Keep sparks, flames and smokingmaterials away from fuel.
Stay outside your vehicle and do notleave the fuel pump unattendedwhen refueling your vehicle. This isagainst the law in some places.
Keep children away from the fuelpump; never let children pump fuel.
Do not use personal electronicdevices while refueling.
Wait at least 10 seconds beforeremoving the fuel pump nozzle toallow any residual fuel to drain intothe fuel tank.
Stop refueling after the fuel pumpnozzle automatically shuts off for thesecond time. Failure to follow thiswill fill the expansion space in the fuel tankand could lead to fuel overflowing.
Do not remove the fuel pump nozzlefrom its fully inserted position whenrefueling.
Use the following guidelines to avoidelectrostatic charge build-up when fillingan ungrounded fuel container:
•Place approved fuel container on theground.
•Do not fill a fuel container while it is inthe vehicle (including the cargo area).
•Keep the fuel pump nozzle in contactwith the fuel container while filling.
•Do not use a device that would holdthe fuel pump handle in the fill position.
Fuel Filler Cap
WARNINGS
The fuel system may be underpressure. If you hear a hissing soundnear the fuel filler door, do not refueluntil the sound stops. Otherwise, fuel mayspray out, which could cause seriouspersonal injury.
If you do not use the proper fuel fillercap, excessive pressure or vacuumin the fuel tank may damage the fuelsystem or cause the fuel cap to disengagein a collision, which may result in possiblepersonal injury.
Note:If you must replace the fuel filler cap,replace it with a fuel filler cap that isdesigned for your vehicle. The customerwarranty may be void for any damage to thefuel tank or fuel system if the correctgenuine Ford, Motorcraft or other certifiedfuel filler cap is not used.
Your fuel tank filler cap has an indexeddesign with a 1/4th turn on and off feature.When fueling your vehicle:
1.Put your vehicle in park (P).
2.Switch the engine off.
3.Carefully turn the filler capcounterclockwise until it spins off.
4.Pull to remove the cap from the fuelfiller pipe.
24Motorhome (TY3) , enUSAFuel and Refueling
Page 28 of 143

5.To install the cap, align the tabs on thecap with the notches on the filler pipe.
6.Turn the filler cap clockwise 1/4 of aturn clockwise until it clicks at leastonce.
If the Check Fuel Cap light or a Check FuelCap message appears in the instrumentcluster and stays on after you start theengine, you may not have installed the fuelfiller properly.
If the fuel cap light remains on, at the nextopportunity, safely pull off of the road,remove the fuel filler cap, align the capproperly and reinstall it. The check fuel caplight or Check fuel cap message may notreset immediately. It may take severaldriving cycles for the indicators to turn off.A driving cycle consists of an enginestart-up (after four or more hours with theengine off) followed by normal city andhighway driving.
FUEL CONSUMPTION
Empty reserve is the amount of fuelremaining in the tank after the fuel gaugeindicates empty. The amount of usablefuel in the empty reserve varies and shouldnot be relied upon to increase driving range.
•The usable capacity of the fuel tank isthe amount of fuel that can be addedinto the tank after the gauge indicatesempty
•The advertised capacity is the total fueltank size. See Capacities andSpecifications (page 111). It is thecombined usable capacity plus theempty reserve.
•Due to the empty reserve, you may notbe able to refuel the full amount of theadvertised capacity of the fuel tankeven when the fuel gauge reads empty.
Filling the Tank
For consistent results when filling the fueltank:
•Turn the ignition off before fueling; aninaccurate reading results if the engineis left running.
•Use the same fill rate(low-medium-high) each time the tankis filled.
•Allow no more than two automaticclick-offs when filling.
Results are most accurate when the fillingmethod is consistent.
Calculating Fuel Economy
Do not measure fuel economy during thefirst 1000 miles (1600 kilometers) ofdriving (this is your engine’s break-inperiod); a more accurate measurement isobtained after 2000 miles - 3000 miles(3200 kilometers - 4800 kilometers). Also,fuel expense, frequency of fill ups or fuelgauge readings are not accurate ways tomeasure fuel economy.
1.Fill the fuel tank completely and recordthe initial odometer reading.
2.Each time you fill the tank, record theamount of fuel added.
3.After at least 3 to 5 tank fill ups, fill thefuel tank and record the currentodometer reading.
4.Subtract your initial odometer readingfrom the current odometer reading.
5.Calculate fuel economy by dividingmiles traveled by gallons used (ForMetric: Multiply liters used by 100, thendivide by kilometers traveled).
25Motorhome (TY3) , enUSAFuel and Refueling
Page 88 of 143

•The transmission must relearn itsadaptive strategy. As a result of this,the transmission may shift firmly. Thisoperation is considered normal and willnot affect function or durability of thetransmission. Over time the adaptivelearning process will fully updatetransmission operation to its optimumshift feel.
•The clock and the preset radio stationsmust be reset once the battery isreconnected.
•Your vehicle’s engine is electronicallycontrolled by a computer, some controlconditions are maintained by powerfrom the battery, the engine mustrelearn its idle and fuel trim strategy.
When the battery is disconnected or a newbattery is installed, begin the batteryrelearn process:
1.With the vehicle at a complete stop,set the parking brake.
2.Put the gearshift lever in P (Park), turnoff all accessories and start the engine.
3.Run the engine until it reaches normaloperating temperature.
4.Allow the engine to idle for at least oneminute.
5.Turn the A/C on and allow the engineto idle for at least one minute.
6.Drive the vehicle to complete therelearning process.
•The vehicle may need to be drivento relearn the idle and fuel trimstrategy.
CHANGING THE ENGINE AIR
FILTER
WARNING
To reduce the risk of vehicle damageand personal burn injuries, do notstart your engine with the air cleanerremoved and do not remove it while theengine is running.
Change the air filter element at the properinterval. See Scheduled Maintenance(page 121).
When changing the air filter element, useonly the air filter element listed. SeeCapacities and Specifications (page111).
Note:Failure to use the correct air filterelement may result in severe enginedamage. The customer warranty may bevoid for any damage to the engine if thecorrect air filter element is not used.
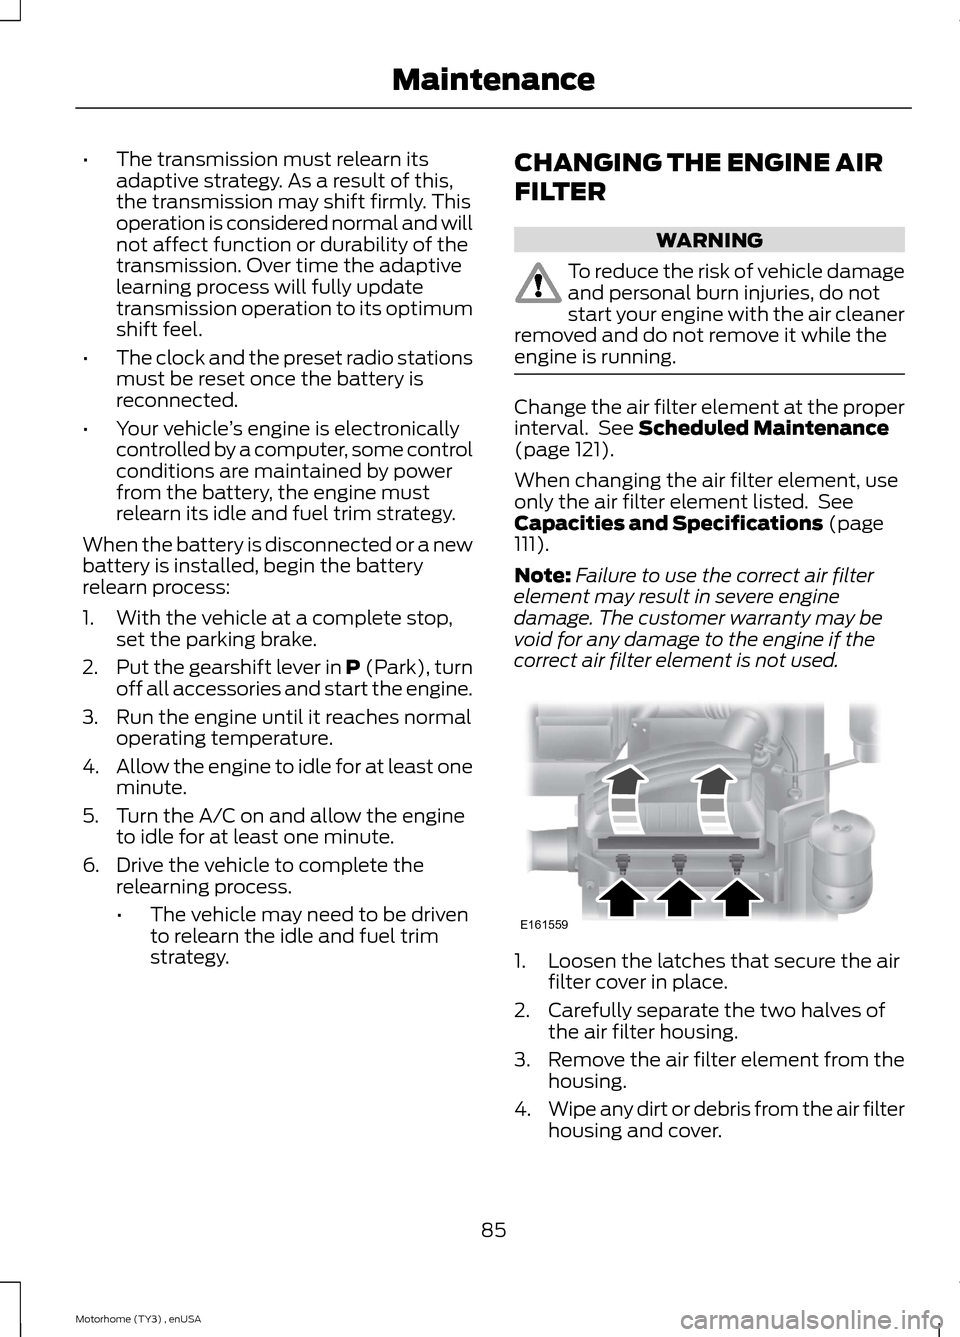
1.Loosen the latches that secure the airfilter cover in place.
2.Carefully separate the two halves ofthe air filter housing.
3.Remove the air filter element from thehousing.
4.Wipe any dirt or debris from the air filterhousing and cover.
85Motorhome (TY3) , enUSAMaintenanceE161559
Page 112 of 143

3.Block the diagonally opposite wheel.The parking brake is on thetransmission. Therefore, the vehicle willnot be prevented from moving when arear wheel is lifted, even if the parkingbrake is applied. Be sure to block bothdirections of the wheel that isdiagonally opposite to the wheel thatis being lifted.
4.Remove the spare tire and jack fromthe storage location.
5.Loosen the wheel nut by pulling up onthe handle of the lug nut wrench aboutone-half turn (counterclockwise). Donot remove the wheel lug nuts until youraise the tire off the ground.
6.Position the jack to raise the front orrear wheel. Raise the vehicle with thejack applied to the axle(s).
Note:Never use the rear differential as ajacking point.
7.Raise the vehicle until the wheel iscompletely off the ground.
8.Remove the lug nuts with the lug nutwrench.
9.Replace the flat tire with the spare tire.
10.Use the lug nut wrench to screw thelug nut snugly against the wheel.
11.Lower the vehicle.
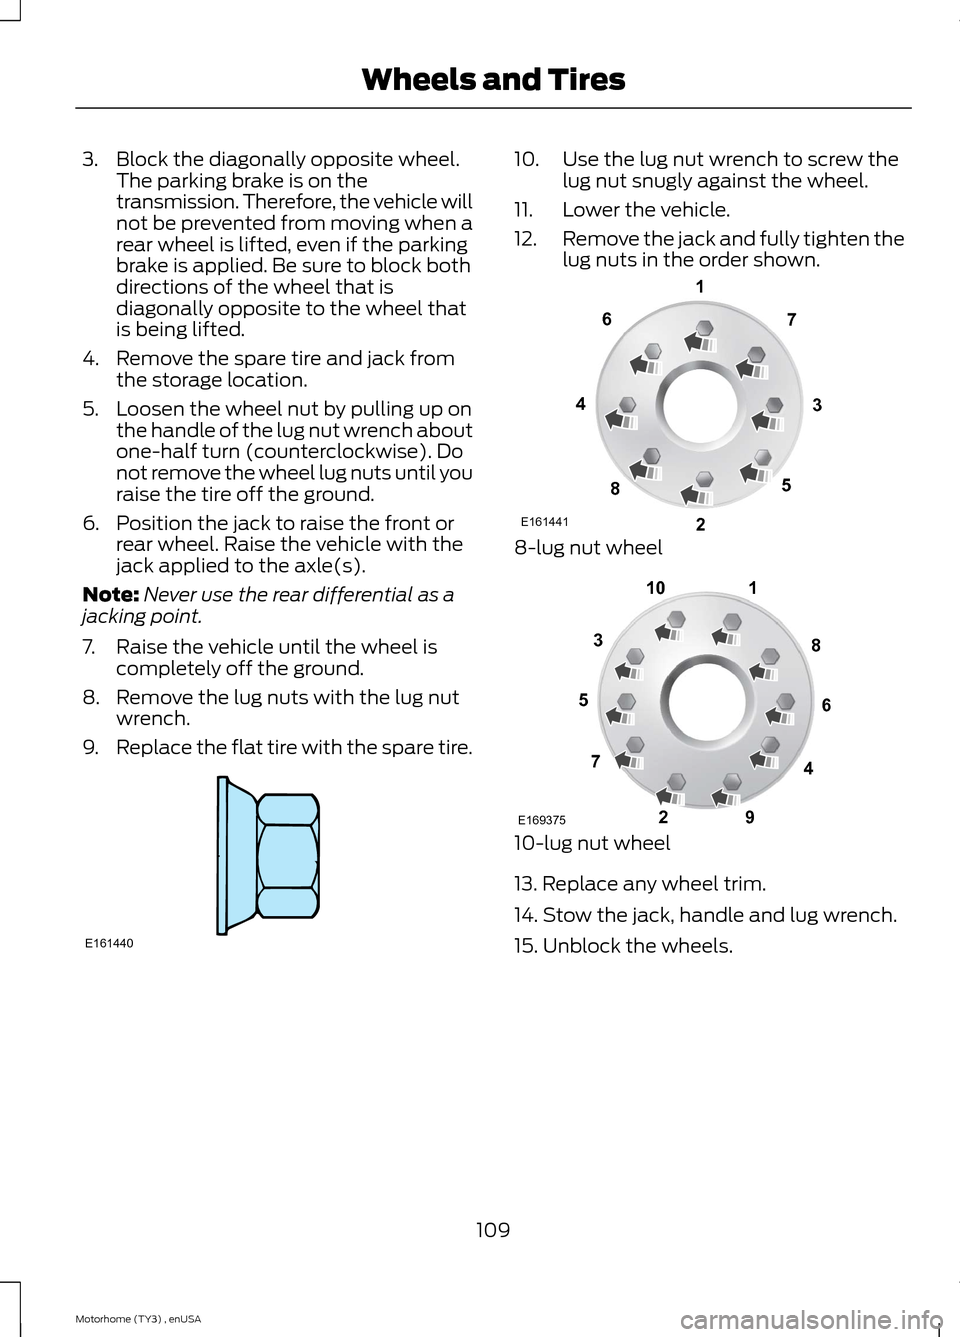
12.Remove the jack and fully tighten thelug nuts in the order shown.
8-lug nut wheel
10-lug nut wheel
13. Replace any wheel trim.
14. Stow the jack, handle and lug wrench.
15. Unblock the wheels.
109Motorhome (TY3) , enUSAWheels and TiresE161440 E16144113427658 12345678910E169375