2014 FORD EXPLORER key battery
[x] Cancel search: key batteryPage 205 of 586

These temporary malfunctions can be corrected by filling the fuel tank
with good quality fuel, properly closing the fuel fill inlet or letting the
electrical system dry out. After three driving cycles without these or any
other temporary malfunctions present, the service engine soon indicator
should stay off the next time the engine is started. A driving cycle
consists of a cold engine start-up followed by mixed city or highway
driving. No additional vehicle service is required.
If the service engine soon indicator remains on, have your vehicle
serviced at the first available opportunity. Although some malfunctions
detected by the OBD-II may not have symptoms that are apparent,
continued driving with the service engine soon indicator on can result in
increased emissions, lower fuel economy, reduced engine and
transmission smoothness, and can lead to more costly repairs.
Readiness for Inspection/Maintenance (I/M) Testing
Some state, provincial and local governments may have
Inspection/Maintenance (I/M) programs to inspect the emission control
equipment on your vehicle. Failure to pass this inspection could prevent
you from getting a vehicle registration.
If the service engine soon indicator is on or the bulb does not
work, the vehicle may need to be serviced. SeeOn-board
Diagnostics (OBD-II)in this chapter.
Your vehicle may not pass the I/M test if the service engine soon
indicator is on or not working properly (bulb is burned out), or if the
OBD-II system has determined that some of the emission control systems
have not been properly checked. In this case, the vehicle is considered
not ready for I/M testing.
If the vehicle’s engine or transmission has just been serviced, or the
battery has recently run down or been replaced, the OBD-II system may
indicate that the vehicle is not ready for I/M testing. To determine if the
vehicle is ready for I/M testing, turn the ignition key to the on position
for 15 seconds without cranking the engine. If the service engine soon
indicator blinks eight times, it means that the vehicle is not ready for I/M
testing; if the service engine soon indicator stays on solid, it means that
the vehicle is ready for I/M testing.
204Fuel and Refueling
2014 Explorer(exp)
Owners Guide gf, 1st Printing, April 2013
USA(fus)
Page 212 of 586

Apply the parking brake, turn the ignition key to the off position, and
remove the key.
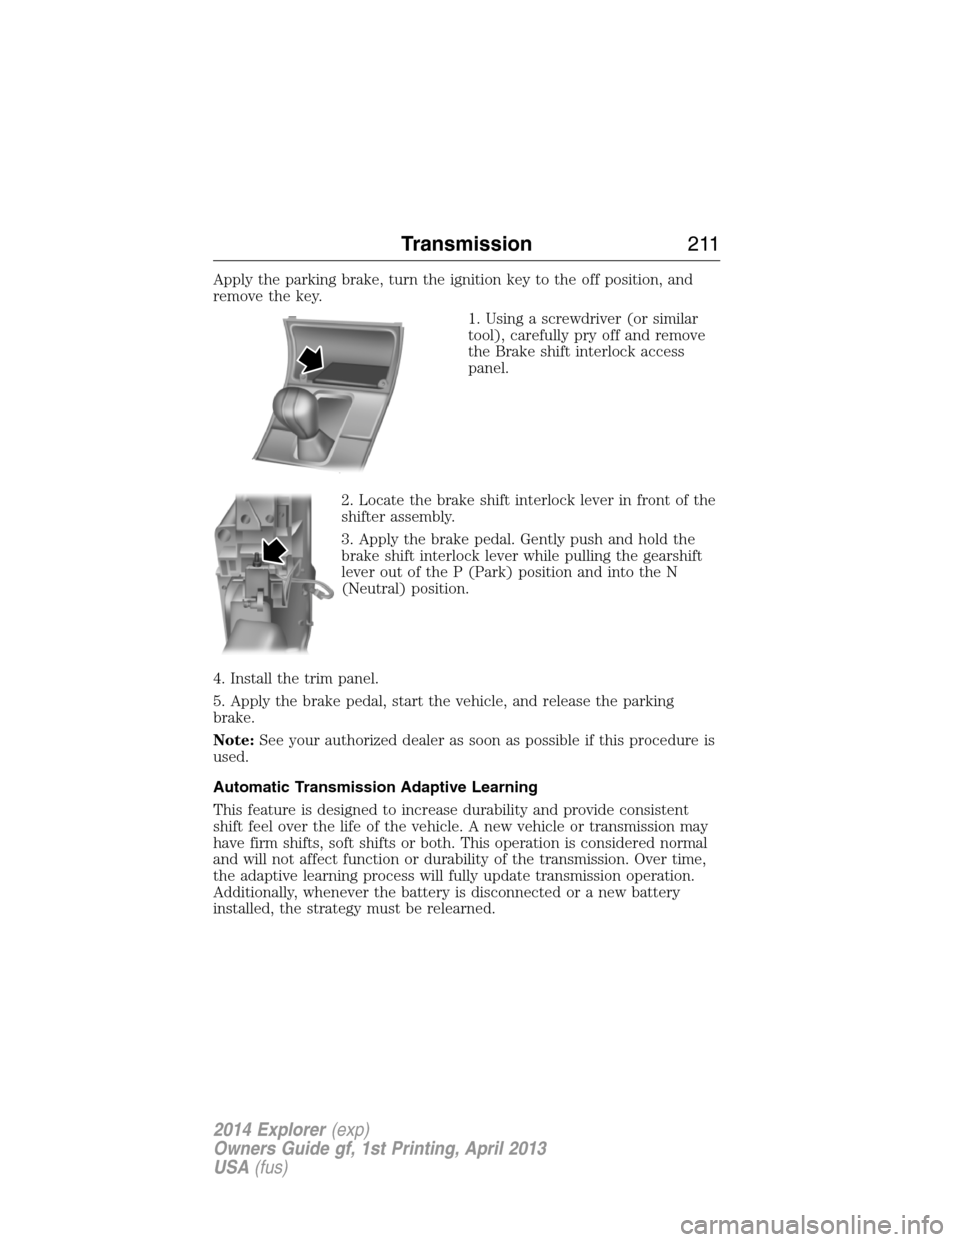
1. Using a screwdriver (or similar
tool), carefully pry off and remove
the Brake shift interlock access
panel.
2. Locate the brake shift interlock lever in front of the
shifter assembly.
3. Apply the brake pedal. Gently push and hold the
brake shift interlock lever while pulling the gearshift
lever out of the P (Park) position and into the N
(Neutral) position.
4. Install the trim panel.
5. Apply the brake pedal, start the vehicle, and release the parking
brake.
Note:See your authorized dealer as soon as possible if this procedure is
used.
Automatic Transmission Adaptive Learning
This feature is designed to increase durability and provide consistent
shift feel over the life of the vehicle. A new vehicle or transmission may
have firm shifts, soft shifts or both. This operation is considered normal
and will not affect function or durability of the transmission. Over time,
the adaptive learning process will fully update transmission operation.
Additionally, whenever the battery is disconnected or a new battery
installed, the strategy must be relearned.
Transmission211
2014 Explorer(exp)
Owners Guide gf, 1st Printing, April 2013
USA(fus)
Page 290 of 586

ROADSIDE ASSISTANCE
Vehicles Sold in the U.S.: Getting Roadside Assistance
To fully assist you should you have a vehicle concern, Ford Motor
Company offers a complimentary roadside assistance program. This
program is separate from the New Vehicle Limited Warranty. The service
is available:
•24 hours a day, seven days a week
•for the coverage period listed on the Roadside Assistance Card
included in your owner’s manual portfolio.
Roadside assistance will cover:
•a flat tire change with a good spare (except vehicles that have been
supplied with a tire inflation kit).
•battery jump start.
•lock-out assistance (key replacement cost is the customer’s
responsibility).
•fuel delivery – Independent Service Contractors, if not prohibited by
state, local or municipal law, shall deliver up to 2.0 gallons (7.5 liters)
of gasoline or 5.0 gallons (18.9 liters) of diesel fuel to a disabled
vehicle. Fuel delivery service is limited to two no-charge occurrences
within a 12-month period.
•winch out – available within 100 feet (30.5 meters) of a paved or
county maintained road, no recoveries.
•towing – Ford and Lincoln eligible vehicles towed to an authorized
dealer within 35 miles (56 kilometers) of the disablement location or
to the nearest authorized dealer. If a member requests to be towed to
an authorized dealer more than 35 miles (56 kilometers) from the
disablement location, the member shall be responsible for any mileage
costs in excess of 35 miles (56 kilometers).
Trailers shall be covered up to $200 if the disabled eligible vehicle
requires service at the nearest authorized dealer. If the trailer is disabled,
but the towing vehicle is operational, the trailer does not qualify for any
roadside services.
Vehicles Sold in the U.S.: Using Roadside Assistance
Complete the roadside assistance identification card and place it in your
wallet for quick reference. This card is found in the owner’s manual
portfolio in the glove compartment.
Roadside Emergencies289
2014 Explorer(exp)
Owners Guide gf, 1st Printing, April 2013
USA(fus)
Page 313 of 586

GENERAL INFORMATION
Have your vehicle serviced regularly to help maintain its roadworthiness
and resale value. There is a large network of Ford authorized dealers
who are there to help you with their professional servicing expertise.
We believe that their specially trained technicians are best qualified to
service your vehicle properly and expertly. They are supported by a wide
range of highly specialized tools developed specifically for servicing your
vehicle.
To help you service your vehicle, we provideScheduled Maintenance
Informationwhich makes tracking routine service easy.
If your vehicle requires professional service, your authorized dealer
can provide the necessary parts and service. Check your warranty
information to find out which parts and services are covered.
Use only recommended fuels, lubricants, fluids and service parts
conforming to specifications. Motorcraft® parts are designed and built to
provide the best performance in your vehicle.
Precautions
•Do not work on a hot engine.
•Make sure that nothing gets caught in moving parts.
•Do not work on a vehicle with the engine running in an enclosed
space, unless you are sure you have enough ventilation.
•Keep all open flames and other burning material (such as cigarettes)
away from the battery and all fuel related parts.
Working with the Engine Off
1. Set the parking brake and shift toP(Park).
2. Turn off the engine and remove the key (if equipped).
3. Block the wheels.
Working with the Engine On
WARNING:To reduce the risk of vehicle damage or personal
burn injuries, do not start your engine with the air cleaner
removed and do not remove it while the engine is running.
1. Set the parking brake and shift to positionP.
2. Block the wheels.
312Maintenance
2014 Explorer(exp)
Owners Guide gf, 1st Printing, April 2013
USA(fus)
Page 333 of 586

Note:Electrical or electronic accessories added to the vehicle by the
dealer or the owner may adversely affect battery performance and
durability and may also affect the performance of other electrical
systems in the vehicle.
When a battery replacement is required, the battery should be replaced
with a Ford recommended replacement battery that matches the
electrical requirements of the vehicle. After battery replacement, or in
some cases after charging the battery with an external charger, the BMS
requires eight hours of vehicle sleep time (key off with doors closed) to
relearn the new battery state of charge. Prior to relearning state of
charge, the BMS may disable electrical features (to protect the battery)
earlier than normal.
CHECKING THE WIPER BLADES
Run the tip of your fingers over the edge of the blade
to check for roughness.
Clean the wiper blades with washer fluid or water
applied with a soft sponge or cloth.
CHANGING THE WIPER BLADES
1. Pull the wiper blade and arm away from
the glass.
2. Squeeze the locking tabs to release the
blade from the arm and pull the blade away
from the arm to remove it.
3. Attach the new blade to the arm and snap
it into place.
Replace wiper blades at least once per year
for optimum performance.
Poor wiper quality can be improved by cleaning the wiper blades and the
windshield.
To prolong the life of the wiper blades, it is highly recommended to
scrape off the ice on the windshield before turning on the wipers. The
layer of ice has many sharp edges and can damage the micro edge of the
wiper rubber element.
332Maintenance
2014 Explorer(exp)
Owners Guide gf, 1st Printing, April 2013
USA(fus)