Page 21 of 519
WARNING:Never place, or allow a child to place, the shoulder
belt under a child’s arm or behind the back because it reduces
the protection for the upper part of the body and may increase the risk
of injury or death in a crash.
WARNING:To avoid risk of injury, do not leave children or pets
unattended in your vehicle.
Restraint
TypeCombined
weight of
child and
child
restraint
seatUse any attachment method as indicated
below by X.
LATCH
(lower
anchors
and top
tether
anchor)LATCH
(lower
anchors
only)Safety
belt
and
top
tether
anchorSafety
belt and
LATCH
(lower
anchors
and top
tether
anchor)Safety
belt
only
Rear-facing
child seatUp to
65 lb
(29.5 kg)XX
Rear-facing
child seatOver 65 lb
(29.5 kg)X
Forward-
facing child
seatUp to
65 lb
(29.5 kg)XXX
Forward-
facing child
seatOver 65 lb
(29.5 kg)XX
Note:The child seat must rest tightly against the vehicle seat upon
which it is installed. It may be necessary to lift or remove the head
restraint. See theSeatschapter for information on head restraints.
20Child Safety
2014 Expedition(exd)
Owners Guide gf, 1st Printing, June 2013
USA(fus)
Page 23 of 519
Types of Booster Seats
•Backless booster seats
If your backless booster seat has a removable shield, remove the shield.
If a vehicle seating position has a low seat back or no head restraint, a
backless booster seat may place your child’s head (as measured at the
tops of the ears) above the top of the seat. In this case, move the
backless booster to another seating position with a higher seat back or
head restraint and lap and shoulder belts, or consider using a high back
booster seat.
•High back booster seats
If, with a backless booster seat, you cannot find a seating position that
adequately supports your child’s head, a high back booster seat would be
a better choice.
22Child Safety
2014 Expedition(exd)
Owners Guide gf, 1st Printing, June 2013
USA(fus)
Page 27 of 519
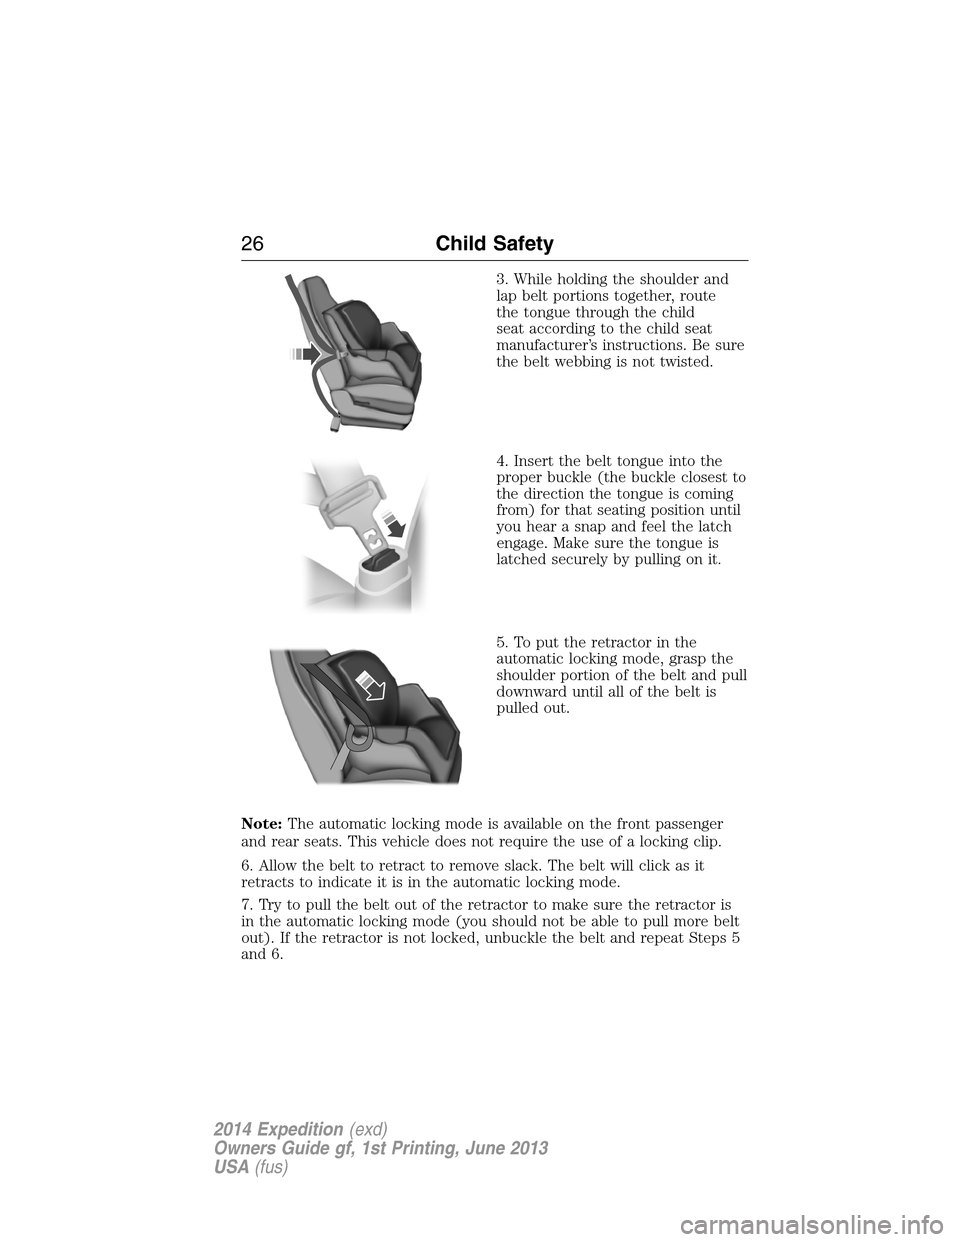
3. While holding the shoulder and
lap belt portions together, route
the tongue through the child
seat according to the child seat
manufacturer’s instructions. Be sure
the belt webbing is not twisted.
4. Insert the belt tongue into the
proper buckle (the buckle closest to
the direction the tongue is coming
from) for that seating position until
you hear a snap and feel the latch
engage. Make sure the tongue is
latched securely by pulling on it.
5. To put the retractor in the
automatic locking mode, grasp the
shoulder portion of the belt and pull
downward until all of the belt is
pulled out.
Note:The automatic locking mode is available on the front passenger
and rear seats. This vehicle does not require the use of a locking clip.
6. Allow the belt to retract to remove slack. The belt will click as it
retracts to indicate it is in the automatic locking mode.
7. Try to pull the belt out of the retractor to make sure the retractor is
in the automatic locking mode (you should not be able to pull more belt
out). If the retractor is not locked, unbuckle the belt and repeat Steps 5
and 6.
26Child Safety
2014 Expedition(exd)
Owners Guide gf, 1st Printing, June 2013
USA(fus)
Page 131 of 519
GENERAL OPERATING TIPS
Manual Heating and Air Conditioning System
•To reduce fog build-up on the windshield during humid weather,
select Defrost. Temperature and fan speed can also be increased to
improve clearing.
•To reduce humidity build-up inside the vehicle, do not drive with the
system off or with recirculated air engaged.
•Do not put objects under the front seats that will interfere with the
airflow to the back seats.
•Remove any snow, ice or leaves from the air intake area at the base
of the windshield.
Cooling the interior quickly:
1. Adjust the fan speed to the highest speed setting initially and then
adjust it to suit the desired comfort level.
2. Adjust the temperature control to the lowest temperature setting.
3. Adjust the air distribution control toMAX A/C.
Recommended settings for cooling:
1. Select Panel/Floor.
2. SelectA/C.
3. Adjust the temperature control to maintain comfort.
If your vehicle stationary for extended periods during extreme high
ambient temperatures
•SelectMAX A/C.
For maximum cooling performance, turn the air distribution control to
MAX A/C.
To aid in side window defogging and demisting in cold or humid weather:
1. Select Panel/Floor.
2. SelectA/C.
3. Adjust the temperature control to maintain comfort.
4. Set the fan speed to the highest setting.
5. Direct the outer instrument panel vents toward the side windows.
6. To increase airflow to the outer instrument panel vents, close the
vents located in the middle of the instrument panel.
130Climate Control
2014 Expedition(exd)
Owners Guide gf, 1st Printing, June 2013
USA(fus)
Page 132 of 519
Dual Automatic Temperature Control System
•To reduce fog build-up on the windshield during humid weather,
select Defrost. Temperature and fan speed can also be increased to
improve clearing.
•To reduce humidity build-up inside the vehicle, do not drive with the
system off or with recirculated air engaged.
•Do not put objects under the front seats that will interfere with the
airflow to the back seats.
•Remove any snow, ice or leaves from the air intake area at the base
of the windshield.
Cooling the interior quickly:
1. Adjust the fan speed to the highest speed setting initially and then
adjust it to suit the desired comfort level.
2. Adjust the temperature control to the lowest temperature setting.
3. Adjust the air distribution control toMAX A/C.
Recommended settings for cooling:
1. Select Panel/Floor.
2. SelectA/C.
3. Adjust the temperature control to maintain comfort.
If your vehicle stationary for extended periods during extreme high
ambient temperatures
•SelectMAX A/C.
For maximum cooling performance in manual override control:
1. Choose Panel, A/C, and recirc controls.
2. Set the temperature to LO.
3. Set the fan to the highest blower setting.
To aid in side window defogging and demisting in cold or humid weather:
1. Select Panel/Floor.
2. SelectA/C.
3. Adjust the temperature control to maintain comfort.
4. Set the fan speed to the highest setting.
5. Direct the outer instrument panel vents toward the side windows.
6. To increase airflow to the outer instrument panel vents, close the
vents located in the middle of the instrument panel.
Climate Control131
2014 Expedition(exd)
Owners Guide gf, 1st Printing, June 2013
USA(fus)
Page 135 of 519
HEAD RESTRAINTS
WARNING:To minimize the risk of neck injury in the event of a
crash, you and the passenger occupants should not sit in or
operate the vehicle, until the head restraint is placed in its proper
position. Never adjust the head restraint while the vehicle is in motion.
WARNING:The adjustable head restraint is a safety device.
Whenever possible it should be installed and properly adjusted
when the seat is occupied.
WARNING:Install the head restraint properly to minimize the
risk of neck injury in the event of a crash.
Note:Adjust the seat back to an upright driving position before
adjusting any head restraint. Properly adjust the head restraint so that
the top of the head restraint is even with the top of your head and
positioned as close as possible to the back of your head. For occupants
of extremely tall stature, adjust the head restraint to its full up position.
Front Seat Head Restraints
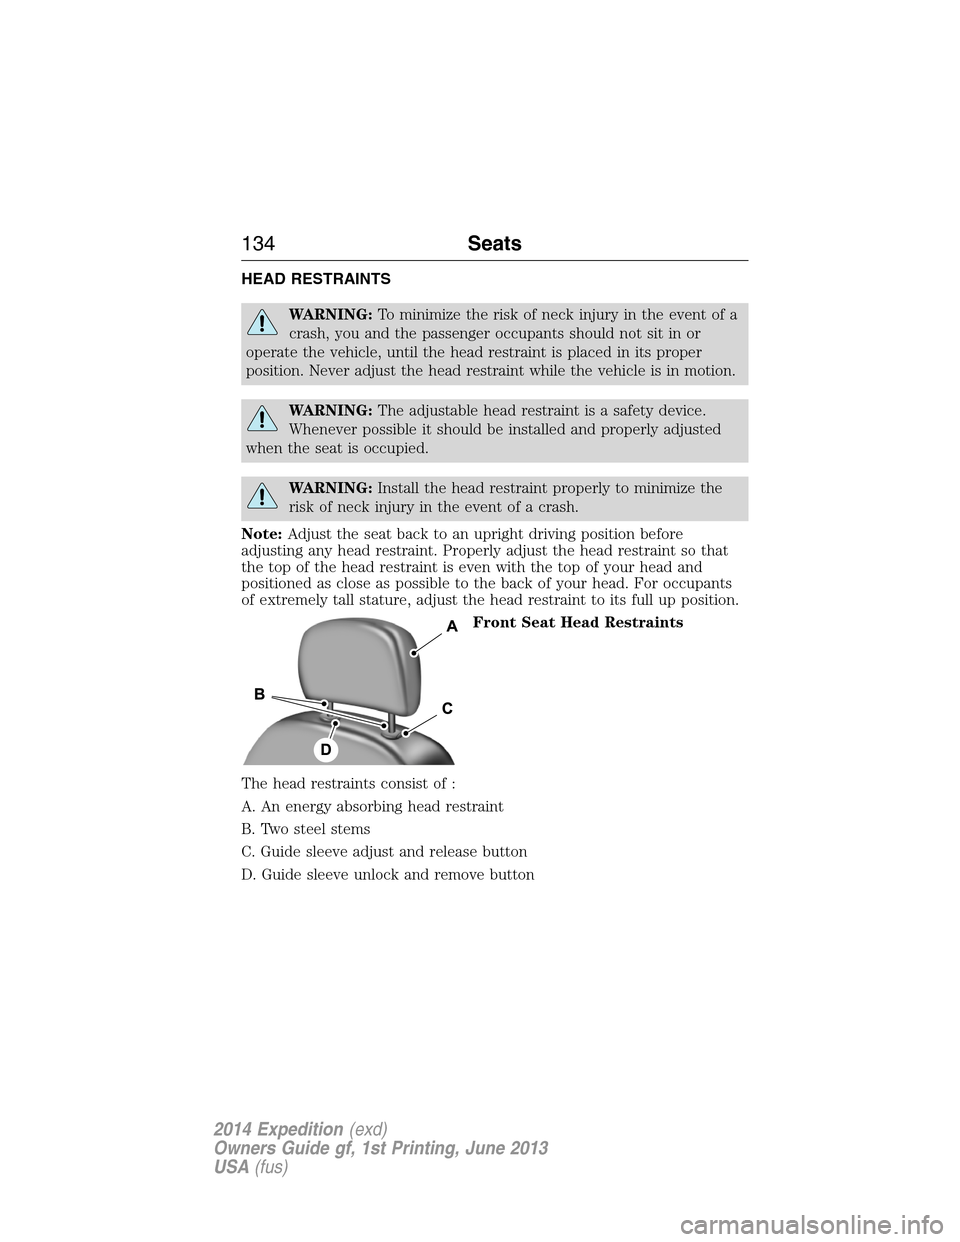
The head restraints consist of :
A. An energy absorbing head restraint
B. Two steel stems
C. Guide sleeve adjust and release button
D. Guide sleeve unlock and remove button
134Seats
2014 Expedition(exd)
Owners Guide gf, 1st Printing, June 2013
USA(fus)
Page 136 of 519
Adjusting the Head Restraint
Raise: Pull up the head restraint.
Lower:
1. Press and hold button C.
2. Push down on the head restraint.
Remove:
1. Pull up the head restraint until it reaches the highest adjustment
position.
2. Press and hold buttons C and D.
3. Pull up the head restraint.
Reinstall Align the steel stems into the guide sleeves and push the head
restraint down until it locks.
Second row outboard seat head restraints –The outboard head
restraints are non-adjustable, but you can fold them.
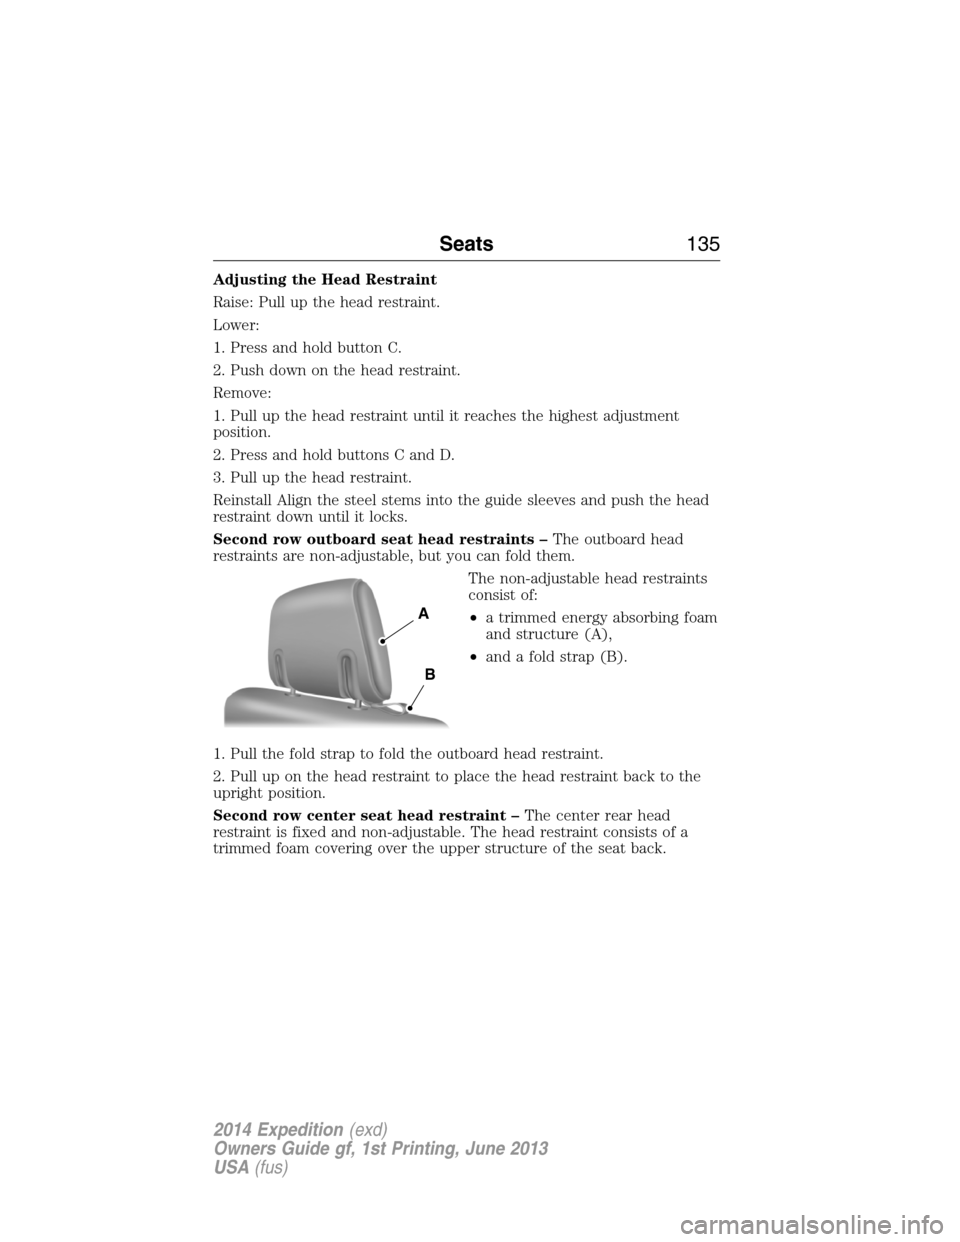
The non-adjustable head restraints
consist of:
•a trimmed energy absorbing foam
and structure (A),
•and a fold strap (B).
1. Pull the fold strap to fold the outboard head restraint.
2. Pull up on the head restraint to place the head restraint back to the
upright position.
Second row center seat head restraint –The center rear head
restraint is fixed and non-adjustable. The head restraint consists of a
trimmed foam covering over the upper structure of the seat back.
A
B
Seats135
2014 Expedition(exd)
Owners Guide gf, 1st Printing, June 2013
USA(fus)
Page 141 of 519
Recalling Saved Memory Positions
To recall position 1 settings, press and release memory button 1.
The memory features will move to the saved memory 1 position.
You can also recall the memory positions when you:
•press your remote control transmitter unlock button (if the remote
control is programmed to a memory position) or,
•enter a valid Securicode personal entry code that is programmed to a
memory position.
If the easy entry and exit feature is on, the mirrors and pedals will move
to the programmed memory position and the seat will move to the easy
entry position. The seat will move to the driving memory position when
the ignition is activated.
You can recall a programmed memory position:
•in any gearshift position if the ignition is not on.
•only in positionPorNif the ignition is on.
Easy Entry and Exit Feature (If Equipped)
If you enable the easy entry and exit feature, it automatically moves the
driver’s seat 2 inches (5 centimeters) rearward when the transmission
selector lever is in positionPand the key is removed from the ignition.
Note:If the seat is located less than 2 inches (5 centimeters) from
the rear of the seat track, the seat travel will be less than 2 inches
(5 centimeters) rearward.
The driver’s seat will return to the previous position when the key is put
in the ignition.
Enable or disable this feature through the information display. See the
Information Displayschapter for more information.
140Seats
2014 Expedition(exd)
Owners Guide gf, 1st Printing, June 2013
USA(fus)