Page 264 of 519
Fuse or relay
locationFuse amp
ratingProtected circuits
33 40A** 110–volt AC power point
34 30A** Auxiliary blower motor
35 30A** Powertrain control module relay
36 30A** Power liftgate
37 — Trailer tow left hand stop/turn
relay
38 — Trailer tow right hand stop/turn
relay
39 — Backup lamps relay
40 — Electronic fan 2 relay
41 10A* Powertrain control module
keep-alive power
42 — Not used
43 5A* Brake on/off switch
44 20A* Fuel pump relay
45 25A* Trailer tow stop/turn lamps relay
46 — Not used
47 — Not used
48 — Not used
49 — Not used
50 30A** Front wiper motor relay
51 40A** Rear window defroster and
heated mirror relay
52 10A* Anti-lock brake system run/start
feed
53 — Not used
54 — Not used
55 5A* Fuel pump relay coil run/start
feed
56 30A* Passenger compartment fuse
panel run/start feed
57 10A* Blower motor relay coil
Fuses263
2014 Expedition(exd)
Owners Guide gf, 1st Printing, June 2013
USA(fus)
Page 267 of 519
The fuses are coded as follows:
Fuse or relay
locationFuse amp
ratingProtected circuits
1 30A Driver window
2 15A Driver side memory module
3 15A Audio rear seat controls, Satellite
radio, SYNC
4 30A Not used (spare)
5 10A Keypad illumination, 3rd row seat
enable, Brake shift interlock,
Smart fuse panel logic power
6 20A Turn signals
7 10A Low beam headlamps (left)
8 10A Low beam headlamps (right)
9 15A Interior lights
10 15A Switch backlighting, Puddle lamps
266Fuses
2014 Expedition(exd)
Owners Guide gf, 1st Printing, June 2013
USA(fus)
Page 269 of 519
Fuse or relay
locationFuse amp
ratingProtected circuits
38 20A Subwoofer
39 20A Radio
40 20A Navigation amplifier
41 15A Power windows, Power vents,
Power moonroof, Auto dimming
rear view mirror, 110 volt AC
power point
42 10A Not used (spare)
43 10A Rear wiper logic, Rain sensor
44 10A Trailer tow battery charge relay
coil
45 5A Front wiper logic
46 7.5A Climate control, Auxiliary relay
control
47 30A Circuit
BreakerPower windows, Moonroof
48 — Delayed accessory relay
268Fuses
2014 Expedition(exd)
Owners Guide gf, 1st Printing, June 2013
USA(fus)
Page 283 of 519

CHANGING THE WIPER BLADES
Replace wiper blades at least once per year for optimum performance.
To replace the wiper blades:
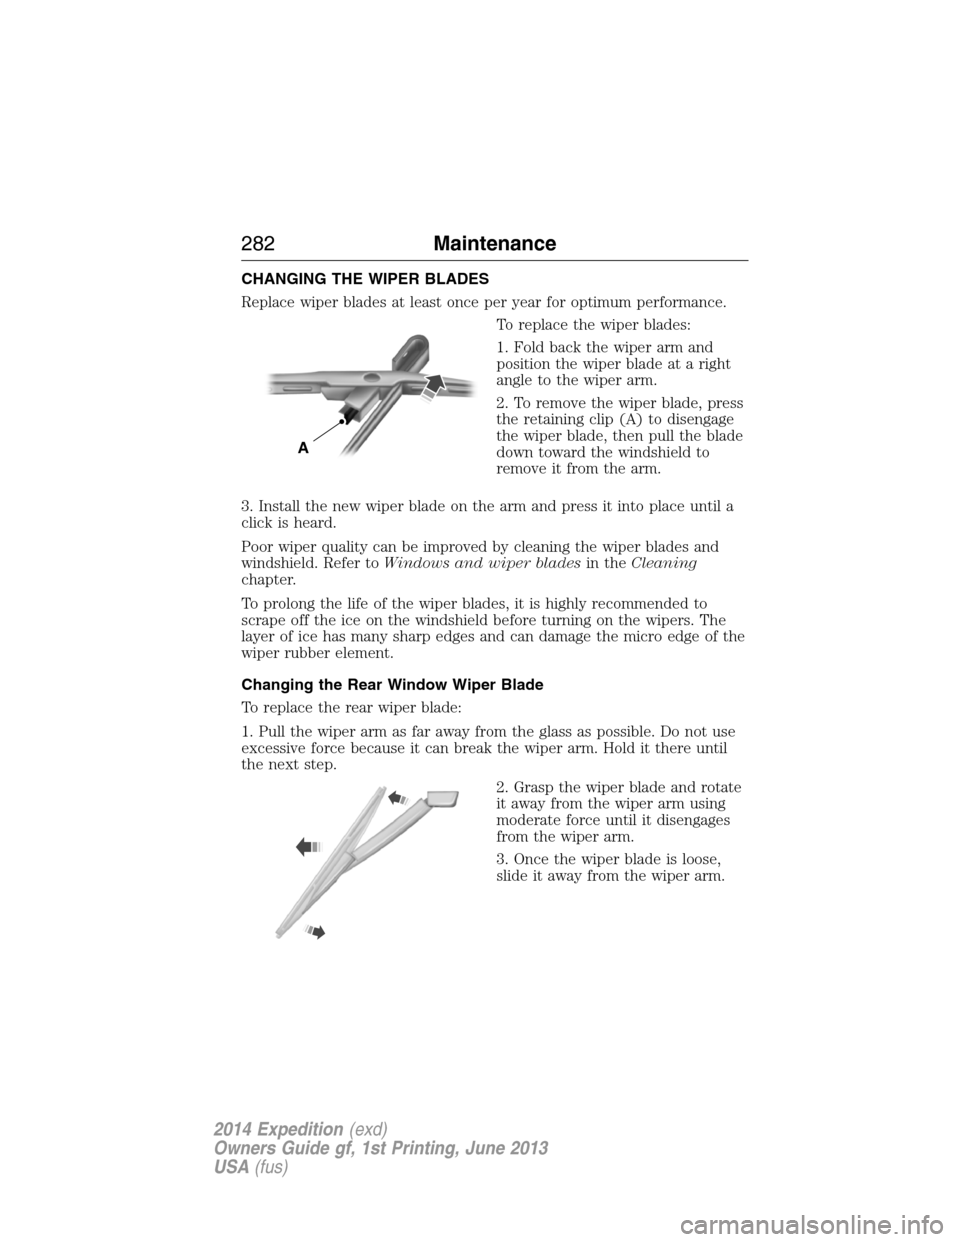
1. Fold back the wiper arm and
position the wiper blade at a right
angle to the wiper arm.
2. To remove the wiper blade, press
the retaining clip (A) to disengage
the wiper blade, then pull the blade
down toward the windshield to
remove it from the arm.
3. Install the new wiper blade on the arm and press it into place until a
click is heard.
Poor wiper quality can be improved by cleaning the wiper blades and
windshield. Refer toWindows and wiper bladesin theCleaning
chapter.
To prolong the life of the wiper blades, it is highly recommended to
scrape off the ice on the windshield before turning on the wipers. The
layer of ice has many sharp edges and can damage the micro edge of the
wiper rubber element.
Changing the Rear Window Wiper Blade
To replace the rear wiper blade:
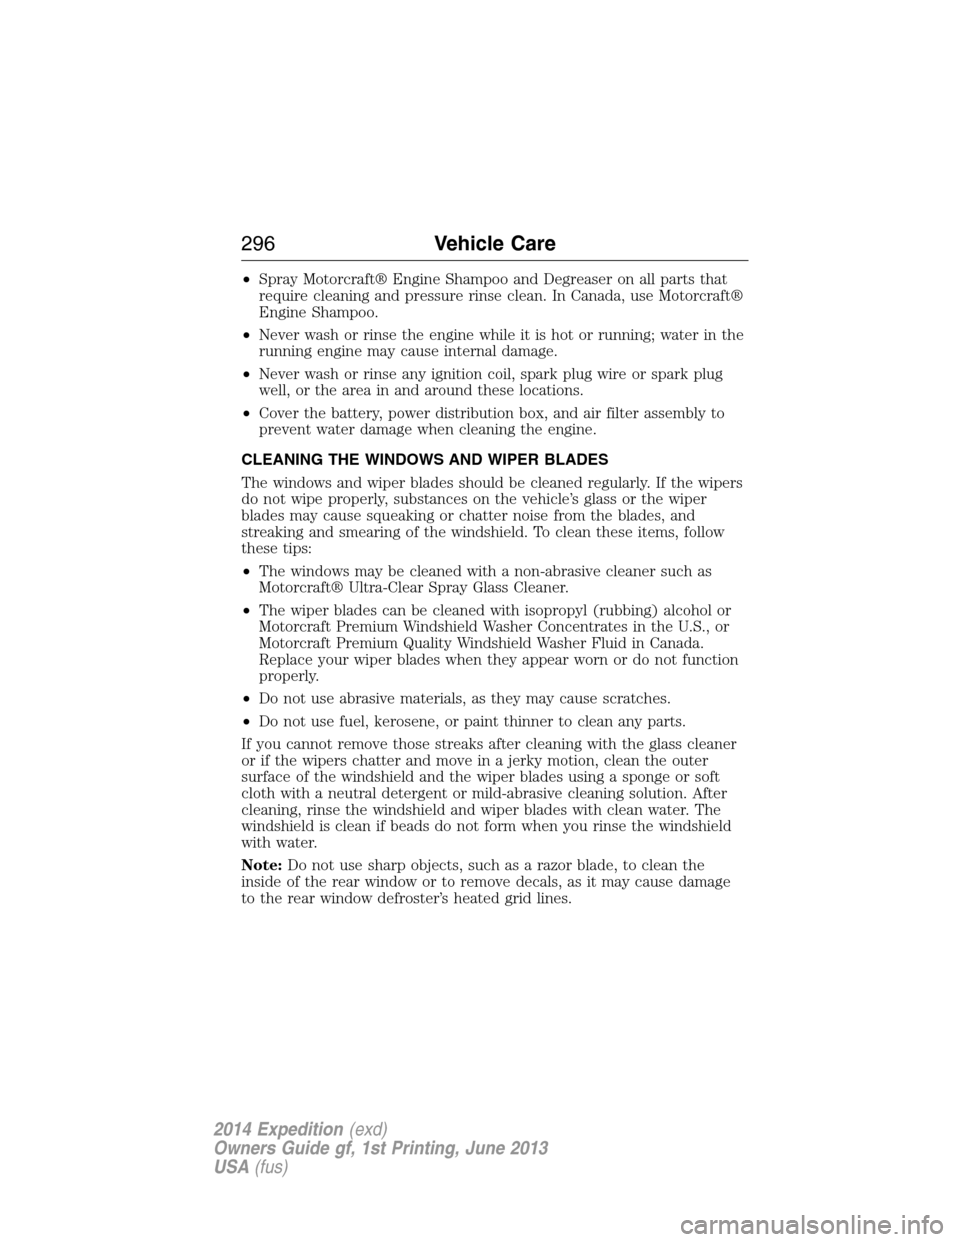
1. Pull the wiper arm as far away from the glass as possible. Do not use
excessive force because it can break the wiper arm. Hold it there until
the next step.
2. Grasp the wiper blade and rotate
it away from the wiper arm using
moderate force until it disengages
from the wiper arm.
3. Once the wiper blade is loose,
slide it away from the wiper arm.
A
282Maintenance
2014 Expedition(exd)
Owners Guide gf, 1st Printing, June 2013
USA(fus)
Page 297 of 519

•Spray Motorcraft® Engine Shampoo and Degreaser on all parts that
require cleaning and pressure rinse clean. In Canada, use Motorcraft®
Engine Shampoo.
•Never wash or rinse the engine while it is hot or running; water in the
running engine may cause internal damage.
•Never wash or rinse any ignition coil, spark plug wire or spark plug
well, or the area in and around these locations.
•Cover the battery, power distribution box, and air filter assembly to
prevent water damage when cleaning the engine.
CLEANING THE WINDOWS AND WIPER BLADES
The windows and wiper blades should be cleaned regularly. If the wipers
do not wipe properly, substances on the vehicle’s glass or the wiper
blades may cause squeaking or chatter noise from the blades, and
streaking and smearing of the windshield. To clean these items, follow
these tips:
•The windows may be cleaned with a non-abrasive cleaner such as
Motorcraft® Ultra-Clear Spray Glass Cleaner.
•The wiper blades can be cleaned with isopropyl (rubbing) alcohol or
Motorcraft Premium Windshield Washer Concentrates in the U.S., or
Motorcraft Premium Quality Windshield Washer Fluid in Canada.
Replace your wiper blades when they appear worn or do not function
properly.
•Do not use abrasive materials, as they may cause scratches.
•Do not use fuel, kerosene, or paint thinner to clean any parts.
If you cannot remove those streaks after cleaning with the glass cleaner
or if the wipers chatter and move in a jerky motion, clean the outer
surface of the windshield and the wiper blades using a sponge or soft
cloth with a neutral detergent or mild-abrasive cleaning solution. After
cleaning, rinse the windshield and wiper blades with clean water. The
windshield is clean if beads do not form when you rinse the windshield
with water.
Note:Do not use sharp objects, such as a razor blade, to clean the
inside of the rear window or to remove decals, as it may cause damage
to the rear window defroster’s heated grid lines.
296Vehicle Care
2014 Expedition(exd)
Owners Guide gf, 1st Printing, June 2013
USA(fus)
Page 304 of 519
Removing Vehicle from Storage
When your vehicle is ready to come out of storage, do the following:
•Wash your vehicle to remove any dirt or grease film build-up on
window surfaces.
•Check windshield wipers for any deterioration.
•Check under the hood for any foreign material that may have collected
during storage (mice/squirrel nests).
•Check the exhaust for any foreign material that may have collected
during storage.
•Check tire pressures and set tire inflation per the Tire Label.
•Check brake pedal operation. Drive the vehicle 15 feet (4.5 meters)
back and forth to remove rust build-up.
•Check fluid levels (including coolant, oil and gas) to make sure there
are no leaks and fluids are at recommended levels.
•If the battery was removed, clean the battery cable ends and inspect.
Contact your authorized dealer if you have any concerns or issues.
Vehicle Care303
2014 Expedition(exd)
Owners Guide gf, 1st Printing, June 2013
USA(fus)
Page 367 of 519

D.STOP*:Press this button to stop playing the disc.
E.PLAY*:Press this button to play the disc.
F.Headphone jack:Plug in your wired headphones with a 1/8-inch
(3.5 millimeter) stereo connector plug to listen to audio from the
program.
G.Video input jack (red):Connect an RCA cable to this port.
H.Video input jack (white):Connect an RCA cable to this port.
I.Video input jack (yellow):Connect an RCA cable to this port.
J.USB port (optional):Listen to music or view images you stored on a
USB device such as a USB memory stick or a memory card reader.
K.SOURCE:Press this button to select Monitor A, Monitor B, AUX/TV
(if available), and AUX 2 (if available).
L.POWER:Press this button to turn the system off and on.
M.TFT LCD panel:Seven-inch TFT LCD panel.
N.Level lock and release latch:Use this latch to change the viewing
angle of the LCD panel or lock the panel into the secured position.
O.Infrared sensor - forward sensor eye:This allows the remote
control to navigate the on-screen display.
Remote Control
Note:The remote control uses infrared light to send commands to the
DVD player, just as many home video systems do. Just point the remote
control at the DVD player infrared window located above each screen in
order to control that DVD player. While you can connect a second device
such as a VCR through the auxiliary inputs, and view the playback on
the screen, you cannot control that device by aiming its remote control
at the Ford DVD player. The Ford DVD system remote control is the
only remote control you can use with the system. For example, if you
connect a VCR to the DVD system, you must point the VCR remote
control at the VCR to control it.
Installing the Battery
Before using your remote control, install the batteries as follows:
1. Turn the remote control face down. Press down on the ridged area of
the battery cover and slide it off.
2. Install two AAA batteries. Make sure you install the batteries
properly, with the + and – facing the correct way, as shown in the
battery compartment.
3. Slide the cover back until it clicks.
366Audio System
2014 Expedition(exd)
Owners Guide gf, 1st Printing, June 2013
USA(fus)
Page 386 of 519

Adjusting the Interaction Level
Push the voice icon; when prompted, say “Voice settings”, then
any of the following:
When you say: The system:
“Interaction mode standard” Provides more detailed interaction and
guidance.
“Interaction mode advanced” Provides less audible interaction and
more tone prompts.
The system defaults to the standard interaction mode.
Confirmation prompts are short questions the system asks when it is not
sure of your request or when there are multiple possible responses to your
request. (For example, the system may ask “Phone, is that correct?”) If
turned off, the system simply makes a best guess as to what you requested
and you may still occasionally be asked to confirm settings.
“Confirmation prompts on”
“Confirmation prompts off”
The system creates candidate lists when it has the same confidence level
of several options based on your voice command. When turned on, you
may be prompted with as many as four possibilities for clarification.
For example, “Say 1 after the tone to call John Doe at home. Say 2 after
the tone to call Johnny Doe on mobile. Say 3 after the tone to call Jane
Doe at home.” Or, “Say 1 after the tone to play John Doe, Say 2 after the
tone to play Johnny Doe.”
“Phone candidate lists on”
“Phone candidate lists off”
“Media candidate lists on”
“Media candidate lists off”
Helpful Hints
•Make sure the interior of the vehicle is as quiet as possible. Wind
noise from open windows and road vibrations may prevent the system
from correctly recognizing spoken commands.
•After pressing the voice icon, wait until after the tone sounds and
Listening appears before saying a command. Any command spoken
prior to this does not register with the system.
SYNC®385
2014 Expedition(exd)
Owners Guide gf, 1st Printing, June 2013
USA(fus)