Page 201 of 519
GENERAL INFORMATION
Note:Occasional brake noise is normal. If a metal-to-metal, continuous
grinding or continuous squeal sound is present, the brake linings may be
worn out. Have them inspected by an authorized dealer. If your vehicle
has continuous vibration or shudder in the steering wheel while braking,
have your vehicle inspected by an authorized dealer.
Note:Brake dust may accumulate on the wheels, even under normal
driving conditions. Some dust is inevitable as the brakes wear and does
not contribute to brake noise. See theVehicle Carechapter for wheel
cleaning instructions.
See theInstrument Clusterchapter for information on the
brake system warning light.
Wet brakes result in reduced braking efficiency. Gently press the brake
pedal a few times when driving from a car wash or standing water to dry
the brakes.
Brake Over Accelerator
In the event the accelerator pedal becomes stuck or entrapped, apply
steady and firm pressure to the brake pedal to slow your vehicle and
reduce engine power. If you experience this condition, apply the brakes
and bring your vehicle to a safe stop. Turn the engine off, shift to
positionPand apply the parking brake, then inspect the accelerator
pedal for any interferences. If none are found and the condition persists,
have your vehicle towed to the nearest authorized dealer.
Anti-Lock Brake System
This system helps you maintain steering control during emergency stops
by keeping the brakes from locking.
This lamp momentarily illuminates when you turn the ignition
on. If the light does not illuminate during start-up, remains on
or flashes, the anti-lock brake system may be disabled and may
need to be serviced.
If the anti-lock brake system is disabled, normal braking is still
effective. If the brake warning lamp illuminates with the parking
brake released, have your brake system serviced immediately.
200Brakes
2014 Expedition(exd)
Owners Guide gf, 1st Printing, June 2013
USA(fus)
Page 204 of 519

PRINCIPLES OF OPERATION
WARNING:Vehicle modifications involving braking system,
aftermarket roof racks, suspension, steering system, tire
construction or wheel and tire size may change the handling
characteristics of the vehicle and may adversely affect the performance
of the AdvanceTrac® system. In addition, installing any stereo
loudspeakers may interfere with and adversely affect the AdvanceTrac®
system. Install any aftermarket stereo loudspeaker as far as possible
from the front center console, the tunnel, and the front seats in order
to minimize the risk of interfering with the AdvanceTrac® sensors.
Reducing the effectiveness of the AdvanceTrac® system could lead to
an increased risk of loss of vehicle control, vehicle rollover, personal
injury and death.
WARNING:Remember that even advanced technology cannot
defy the laws of physics. It’s always possible to lose control of a
vehicle due to inappropriate driver input for the conditions. Aggressive
driving on any road condition can cause you to lose control of your
vehicle increasing the risk of personal injury or property damage.
Activation of the AdvanceTrac® system is an indication that at least
some of the tires have exceeded their ability to grip the road; this could
reduce the operator’s ability to control the vehicle potentially resulting
in a loss of vehicle control, vehicle rollover, personal injury and death.
If your AdvanceTrac® system activates, SLOW DOWN.
The AdvanceTrac® with Roll Stability Control™ system helps you keep
control of your vehicle when on a slippery surface. The electronic
stability control portion of the system helps avoid skids and lateral slides
and roll stability control helps avoid a vehicle rollover. The traction
control system helps avoid drive wheel spin and loss of traction. See the
Traction Controlchapter for details on traction control system
operation.
Stability Control203
2014 Expedition(exd)
Owners Guide gf, 1st Printing, June 2013
USA(fus)
Page 211 of 519
Guidelines and the Centerline
Note:Fixed guidelines are only available when the transmission is in R
(Reverse).
Note:The centerline is only available if fixed guidelines are on.
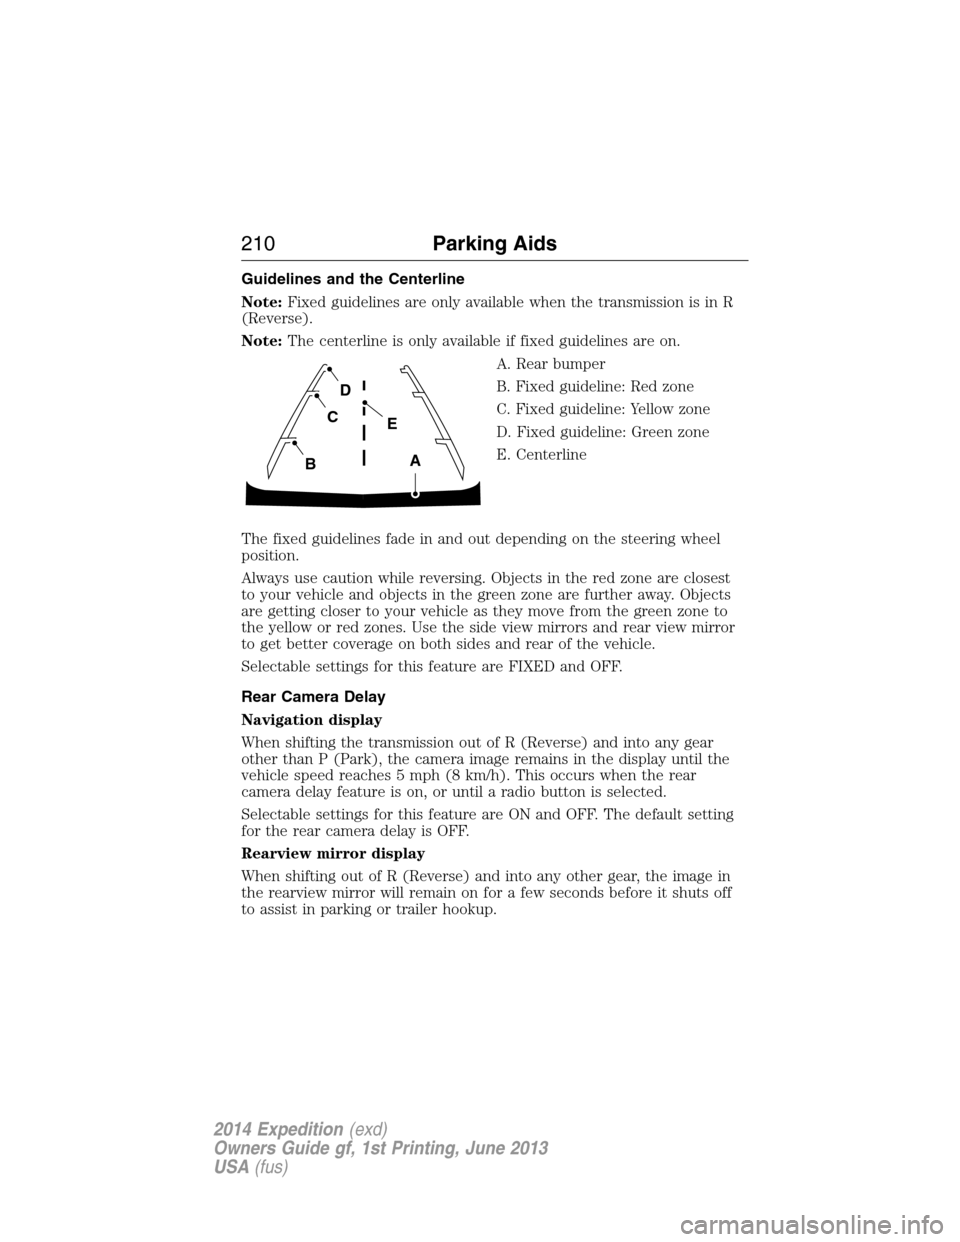
A. Rear bumper
B. Fixed guideline: Red zone
C. Fixed guideline: Yellow zone
D. Fixed guideline: Green zone
E. Centerline
The fixed guidelines fade in and out depending on the steering wheel
position.
Always use caution while reversing. Objects in the red zone are closest
to your vehicle and objects in the green zone are further away. Objects
are getting closer to your vehicle as they move from the green zone to
the yellow or red zones. Use the side view mirrors and rear view mirror
to get better coverage on both sides and rear of the vehicle.
Selectable settings for this feature are FIXED and OFF.
Rear Camera Delay
Navigation display
When shifting the transmission out of R (Reverse) and into any gear
other than P (Park), the camera image remains in the display until the
vehicle speed reaches 5 mph (8 km/h). This occurs when the rear
camera delay feature is on, or until a radio button is selected.
Selectable settings for this feature are ON and OFF. The default setting
for the rear camera delay is OFF.
Rearview mirror display
When shifting out of R (Reverse) and into any other gear, the image in
the rearview mirror will remain on for a few seconds before it shuts off
to assist in parking or trailer hookup.
A
E
D
C
B
210Parking Aids
2014 Expedition(exd)
Owners Guide gf, 1st Printing, June 2013
USA(fus)
Page 212 of 519
PRINCIPLES OF OPERATION
Cruise control lets you maintain a set speed without keeping your foot
on the accelerator pedal.
USING CRUISE CONTROL
WARNING:Do not use cruise control in heavy traffic, on
winding roads or when the road surface is slippery. This could
result in loss of vehicle control, serious injury or death.
WARNING:When you are going downhill, your vehicle speed
may increase above the set speed. The system will not apply the
brakes. Change down a gear to assist the system in maintaining the set
speed. Failure to do so could result in loss of vehicle control, serious
injury or death.
Note:Cruise control will disengage if your vehicle speed decreases more
than 10 mph (16 km/h) below your set speed while driving uphill.
The cruise controls are located on
the steering wheel.
Switching On Cruise Control
Press and releaseON.
+SETRES
O
F
FO
N
Cruise Control211
2014 Expedition(exd)
Owners Guide gf, 1st Printing, June 2013
USA(fus)
Page 214 of 519
STEERING
Your vehicle is equipped with power steering. Power steering uses energy
from the engine to decrease the driver’s effort in steering the vehicle.
To help prevent damage to the power steering pump:
•Never hold the steering wheel to the extreme right or the extreme left
for more than a few seconds when the engine is running.
•Do not operate the vehicle with the power steering pump fluid level
below the MIN mark on the reservoir.
•Some noise is normal during operation. If the noise is excessive, check
for low power steering pump fluid level before seeking service by your
authorized dealer.
•Heavy or uneven steering efforts may be caused by low power steering
pump fluid level. Check for low power steering pump fluid level before
seeking service by your authorized dealer.
•Do not fill the power steering pump reservoir above the MAX mark on
the reservoir, as this may result in leaks from the reservoir.
If the power steering system breaks down (or if the engine is turned
off), you can steer the vehicle manually, but it takes more effort.
If the steering wanders or pulls, check for:
•Underinflated tire(s) on any wheel(s)
•Uneven vehicle loading
•High crown in center of road
•High crosswinds
•Wheels out of alignment
•Loose or worn suspension components
Driving Aids213
2014 Expedition(exd)
Owners Guide gf, 1st Printing, June 2013
USA(fus)
Page 215 of 519
AUTO LEVELING SUSPENSION SYSTEM (if equipped)
The automatic leveling suspension system is designed to improve ride,
handling and general vehicle performance during:
•Certain road conditions
•Steering maneuvers
•Braking
•Acceleration
•Towing
This system keeps the rear of your vehicle at a constant level through a
hydraulic pump inside each rear shock. Depending on the payload or
road surface conditions it will take approximately 2 miles (3.2 km) for
the leveling to complete.
If the loaded vehicle is not moved for approximately 12 hours, the
leveling system may bleed down to a lower height. This can be especially
apparent if a trailer is left attached to the parked vehicle for long periods
of time. You must drive your vehicle in order to re-level the suspension.
If a self-equalizing hitch is being used, your vehicle should be drive
approximately 2 miles (3.2 km) with the trailer prior to adjusting
(leveling) the hitch.
214Driving Aids
2014 Expedition(exd)
Owners Guide gf, 1st Printing, June 2013
USA(fus)
Page 240 of 519
•If you are towing a trailer frequently in hot weather, hilly conditions,
at the gross combined weight rating (or any combination of these
factors), consider refilling your rear axle with synthetic gear lubricant
(if the axle is not already filled with it). See theCapacities and
Specificationschapter for the lubricant specification.
•Allow more distance for stopping with a trailer attached. Anticipate
stops and brake gradually.
•Avoid parking on a grade. However, if you must park on a grade:
1. Turn the steering wheel to point your vehicle tires away from
traffic flow.
2. Set your vehicle parking brake.
3. Place the automatic transmission in positionP.
4. Place wheel chocks in front and back of the trailer wheels.
(Chocks not included with vehicle.)
Your vehicle may be equipped with a temporary or conventional spare
tire. A “temporary” spare tire is different in size (diameter or width),
tread-type (All-Season or All-Terrain) or is from a different manufacturer
than the road tires on your vehicle. Consult information on the tire label
or Safety Compliance label for limitations when using.
Launching or Retrieving a Boat or Personal Watercraft (PWC)
Note:Disconnect the wiring to the trailerbeforebacking the trailer into
the water.
Note:Reconnect the wiring to the trailerafterremoving the trailer from
the water.
When backing down a ramp during boat launching or retrieval:
•Do not allow the static water level to rise above the bottom edge of
the rear bumper.
•Do not allow waves to break higher than 6 inches (15 centimeters)
above the bottom edge of the rear bumper.
Exceeding these limits may allow water to enter vehicle components:
•Causing internal damage to the components.
•Affecting driveability, emissions, and reliability.
Replace the rear axle lubricant anytime the rear axle submerges in
water. Water may have contaminated the rear axle lubricant, which does
not normally require checking or changing unless it is leaking or other
axle repair is required.
Towing239
2014 Expedition(exd)
Owners Guide gf, 1st Printing, June 2013
USA(fus)
Page 272 of 519
UNDER HOOD OVERVIEW
5.4L V8
A. Windshield washer fluid reservoir
B. Engine oil dipstick
C. Brake fluid reservoir
D. Engine coolant reservoir
E. Air filter assembly
F. Power steering fluid reservoir
G. Power distribution box
H. Engine oil filler cap
I. Battery
ABCD
EFGHI
Maintenance271
2014 Expedition(exd)
Owners Guide gf, 1st Printing, June 2013
USA(fus)