2014 FORD EXPEDITION stop start
[x] Cancel search: stop startPage 174 of 519
The heater acts as a starting aid by warming the engine coolant. This
allows the climate control system to respond quickly. The equipment
includes a heater element (installed in the engine block) and a wire
harness. You can connect the system to a grounded 120–volt A/C
electrical source.
We recommend that you do the following for safe and correct operation:
•
Use a 16-gauge outdoor extension cord that is product certified by
Underwriter’s Laboratory or Canadian Standards Association. This
extension cord must be suitable for use outdoors, in cold temperatures,
and be clearly markedSuitable for Use with Outdoor Appliances.Never
use an indoor extension cord outdoors; it could result in an electric shock
or become a fire hazard.
•Use as short an extension cord as possible.
•Do not use multiple extension cords.
•Make sure that when in operation, the extension cord plug and the
heater cord plug connections are free and clear of water. This could
cause an electric shock or fire.
•Make sure your vehicle is parked in a clean area, clear of
combustibles.
•Make sure the heater, heater cord and extension cord are firmly
connected.
•Check for heat anywhere in the electrical hookup once the system has
been operating for approximately 30 minutes.
•Make sure the system is unplugged and properly stowed before driving
your vehicle. Make sure the protective cover seals the prongs of the
block heater cord plug when not in use.
•Keep plug terminals clean and free of dirt and corrosion.
•Make sure the heater system is checked for proper operation before
winter.
Using the Engine Block Heater
Make sure the receptacle terminals are clean and dry before use.
To clean them, use a dry cloth.
The heater uses 0.4 to 1.0 kilowatt-hours of energy per hour of use. The
system does not have a thermostat. It achieves maximum temperature after
approximately three hours of operation. Using the heater longer than three
hours does not improve system performance and unnecessarily uses
electricity.
Starting and Stopping the Engine173
2014 Expedition(exd)
Owners Guide gf, 1st Printing, June 2013
USA(fus)
Page 180 of 519
Easy Fuel® “No Cap” Fuel System
WARNING:The fuel system may be under pressure. If you hear
a hissing sound near the fuel filler door, do not refuel until the
sound stops. Otherwise, fuel may spray out, which could cause serious
personal injury.
When fueling your vehicle:
1. Turn the engine off.
2. Open the fuel door by pulling the indent on the door.
3. Insert the fuel plug key (if equipped) into the locking plug and turn it
counterclockwise to unlock it.
4. Slowly insert the fuel filler nozzle fully into the fuel system, and leave
the nozzle fully inserted until you are done pumping.
5. After you are done pumping fuel, slowly remove the fuel filler
nozzle—allow about ten seconds after pumping fuel before removing the
fuel filler nozzle. This allows residual fuel to drain back into the fuel tank
and not spill onto the vehicle.
6. Reinstall the plug (if equipped) into the fuel fill inlet and turn the key
clockwise to lock.
Note:Do not overfill the tank or fuel spillage will occur.
If the fuel fill inlet was not properly closed, a Check Fuel Fill Inlet
message may appear on the information display. See theInformation
Displayschapter for more information.
At the next opportunity, do the following:
1. Safely pull off the road.
2. Turn off the engine.
3. Open the fuel filler door and remove any visible debris from the fuel
fill opening.
4. Insert either the fuel fill nozzle or the fuel fill funnel provided with the
vehicle several times to dislodge any debris and/or allow the inlet to
close properly.
If this action corrects the problem, the message may not reset
immediately. It may take several driving cycles for the message to turn
off. A driving cycle consists of an engine start-up (after four or more
hours with the engine off) followed by city/highway driving. Continuing
to drive with the message on may cause the service engine soon lamp to
turn on as well.
Fuel and Refueling179
2014 Expedition(exd)
Owners Guide gf, 1st Printing, June 2013
USA(fus)
Page 184 of 519
Readiness for Inspection/Maintenance (I/M) Testing
Some state, provincial and local governments may have
Inspection/Maintenance (I/M) programs to inspect the emission control
equipment on your vehicle. Failure to pass this inspection could prevent
you from getting a vehicle registration.
If the service engine soon indicator is on or the bulb does not
work, the vehicle may need to be serviced. SeeOn-board
Diagnostics (OBD-II)in this chapter.
Your vehicle may not pass the I/M test if the service engine soon
indicator is on or not working properly (bulb is burned out), or if the
OBD-II system has determined that some of the emission control systems
have not been properly checked. In this case, the vehicle is considered
not ready for I/M testing.
If the vehicle’s engine or transmission has just been serviced, or the
battery has recently run down or been replaced, the OBD-II system may
indicate that the vehicle is not ready for I/M testing. To determine if the
vehicle is ready for I/M testing, turn the ignition key to the on position
for 15 seconds without cranking the engine. If the service engine soon
indicator blinks eight times, it means that the vehicle is not ready for I/M
testing; if the service engine soon indicator stays on solid, it means that
the vehicle is ready for I/M testing.
The OBD-II system is designed to check the emission control system
during normal driving. A complete check may take several days. If the
vehicle is not ready for I/M testing, the following driving cycle consisting
of mixed city and highway driving may be performed:
15 minutes of steady driving on an expressway or highway followed by
20 minutes of stop-and-go driving with at least four 30-second idle
periods.
Allow the vehicle to sit for at least eight hours without starting the
engine. Then, start the engine and complete the above driving cycle. The
engine must warm up to its normal operating temperature. Once the
engine is started, do not turn off the engine until the above driving cycle
is complete. If the vehicle is still not ready for I/M testing, the above
driving cycle will have to be repeated.
Fuel and Refueling183
2014 Expedition(exd)
Owners Guide gf, 1st Printing, June 2013
USA(fus)
Page 185 of 519
AUTOMATIC TRANSMISSION
WARNING:Always set the parking brake fully and make sure
the gearshift is latched in P (Park). Turn the ignition to the off
position and remove the key whenever you leave your vehicle.
WARNING:Do not use the Tow/Haul feature when driving in icy
or slippery conditions as the increased engine braking can cause
the rear wheels to slide and the vehicle to swing around with the
possible loss of vehicle control.
Your vehicle is equipped with an Adaptive Transmission Shift Strategy.
The Adaptive Transmission Shift Strategy offers the optimal transmission
operation and shift quality. When the engine is turned off, the shift data
which includes the adaptive information will be stored automatically in
the Powertrain Control Module. If the battery is disconnected for any
reason, the stored information from the last time the key was turned to
OFF will be read. This way, no information will be lost with any battery
removal or battery disconnect.
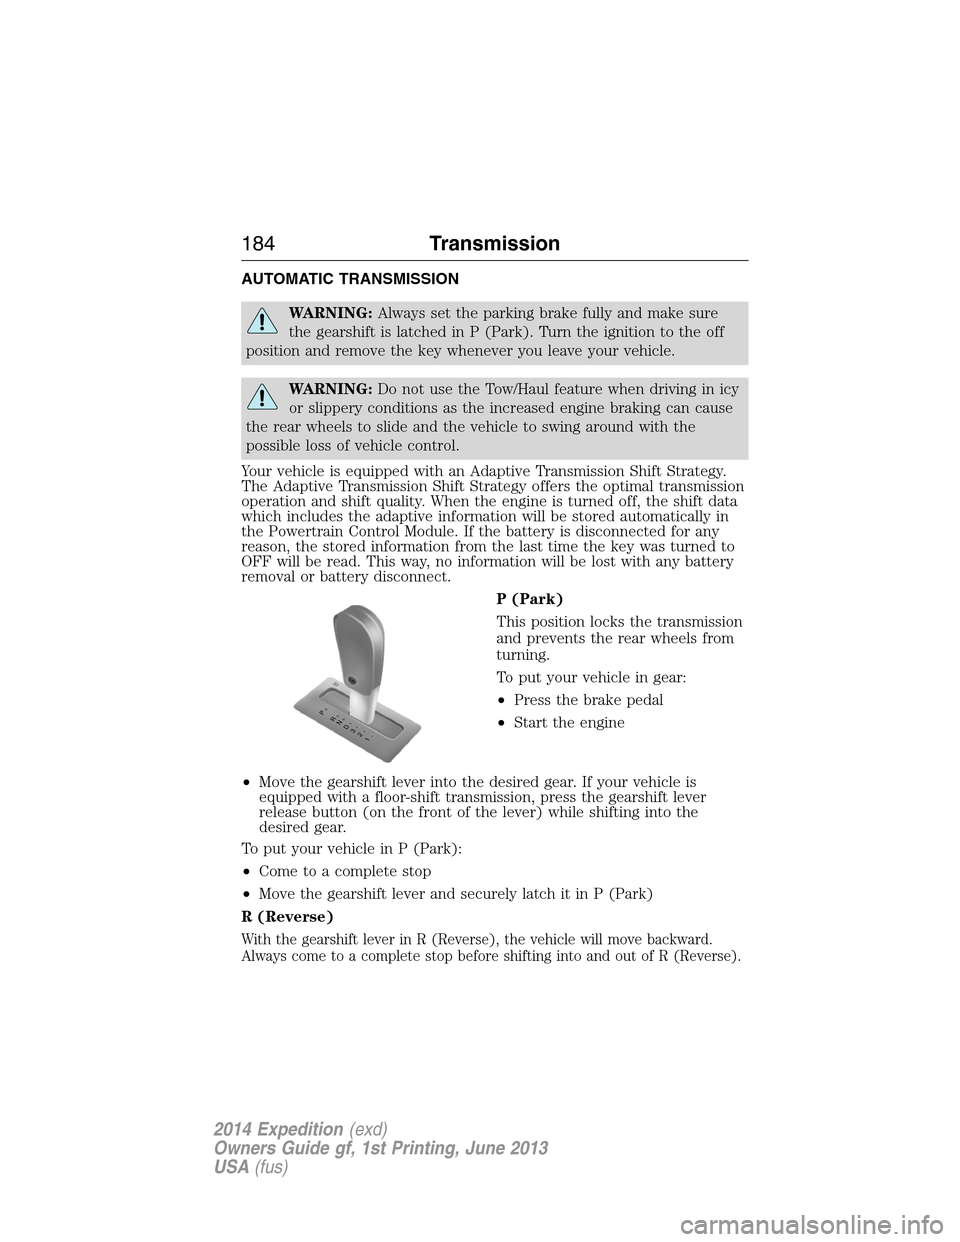
P (Park)
This position locks the transmission
and prevents the rear wheels from
turning.
To put your vehicle in gear:
•Press the brake pedal
•Start the engine
•Move the gearshift lever into the desired gear. If your vehicle is
equipped with a floor-shift transmission, press the gearshift lever
release button (on the front of the lever) while shifting into the
desired gear.
To put your vehicle in P (Park):
•Come to a complete stop
•Move the gearshift lever and securely latch it in P (Park)
R (Reverse)
With the gearshift lever in R (Reverse), the vehicle will move backward.
Always come to a complete stop before shifting into and out of R (Reverse).
T/H
PR
N
D
3
2
1
184Transmission
2014 Expedition(exd)
Owners Guide gf, 1st Printing, June 2013
USA(fus)
Page 190 of 519
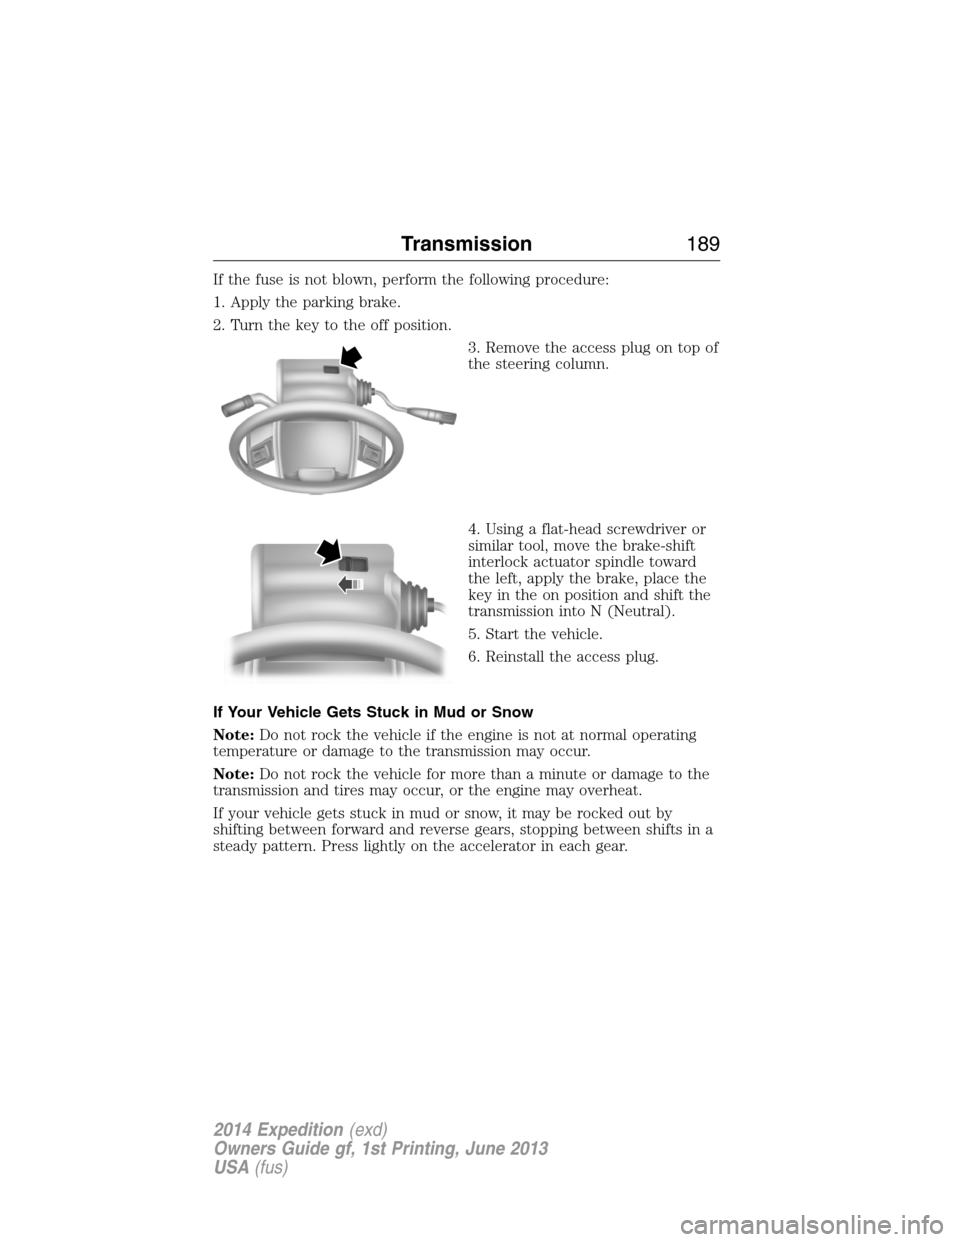
If the fuse is not blown, perform the following procedure:
1. Apply the parking brake.
2. Turn the key to the off position.
3. Remove the access plug on top of
the steering column.
4. Using a flat-head screwdriver or
similar tool, move the brake-shift
interlock actuator spindle toward
the left, apply the brake, place the
key in the on position and shift the
transmission into N (Neutral).
5. Start the vehicle.
6. Reinstall the access plug.
If Your Vehicle Gets Stuck in Mud or Snow
Note:Do not rock the vehicle if the engine is not at normal operating
temperature or damage to the transmission may occur.
Note:Do not rock the vehicle for more than a minute or damage to the
transmission and tires may occur, or the engine may overheat.
If your vehicle gets stuck in mud or snow, it may be rocked out by
shifting between forward and reverse gears, stopping between shifts in a
steady pattern. Press lightly on the accelerator in each gear.
Transmission189
2014 Expedition(exd)
Owners Guide gf, 1st Printing, June 2013
USA(fus)
Page 199 of 519
Driving on snow and ice
WARNING:If you are driving in slippery conditions that require
tire chains or cables, then it is critical that you drive cautiously.
Keep speeds down, allow for longer stopping distances and avoid
aggressive steering to reduce the chances of a loss of vehicle control
which can lead to serious injury or death. If the rear end of the vehicle
slides while cornering, steer in the direction of the slide until you
regain control of the vehicle.
4WD vehicles have advantages over 2WD vehicles in snow and ice but
can skid like any other vehicle.
Should you start to slide while driving on snowy or icy roads, turn the
steering wheel in the direction of the slide until you regain control.
Avoid sudden applications of power and quick changes of direction on
snow and ice. Apply the accelerator slowly and steadily when starting
from a full stop.
Avoid sudden braking as well. Although a 4WD vehicle may accelerate
better than a two-wheel drive vehicle in snow and ice, it won’t stop any
faster, because as in other vehicles, braking occurs at all four wheels. Do
not become overconfident as to road conditions.
Make sure you allow sufficient distance between you and other vehicles
for stopping. Drive slower than usual and consider using one of the lower
gears. In emergency stopping situations, apply the brake steadily. Do not
pump the brakes. Refer to theBrakessection of this chapter for
additional information on the operation of the Anti-lock Brake System
(ABS).
198Four-Wheel Drive (If Equipped)
2014 Expedition(exd)
Owners Guide gf, 1st Printing, June 2013
USA(fus)
Page 201 of 519
GENERAL INFORMATION
Note:Occasional brake noise is normal. If a metal-to-metal, continuous
grinding or continuous squeal sound is present, the brake linings may be
worn out. Have them inspected by an authorized dealer. If your vehicle
has continuous vibration or shudder in the steering wheel while braking,
have your vehicle inspected by an authorized dealer.
Note:Brake dust may accumulate on the wheels, even under normal
driving conditions. Some dust is inevitable as the brakes wear and does
not contribute to brake noise. See theVehicle Carechapter for wheel
cleaning instructions.
See theInstrument Clusterchapter for information on the
brake system warning light.
Wet brakes result in reduced braking efficiency. Gently press the brake
pedal a few times when driving from a car wash or standing water to dry
the brakes.
Brake Over Accelerator
In the event the accelerator pedal becomes stuck or entrapped, apply
steady and firm pressure to the brake pedal to slow your vehicle and
reduce engine power. If you experience this condition, apply the brakes
and bring your vehicle to a safe stop. Turn the engine off, shift to
positionPand apply the parking brake, then inspect the accelerator
pedal for any interferences. If none are found and the condition persists,
have your vehicle towed to the nearest authorized dealer.
Anti-Lock Brake System
This system helps you maintain steering control during emergency stops
by keeping the brakes from locking.
This lamp momentarily illuminates when you turn the ignition
on. If the light does not illuminate during start-up, remains on
or flashes, the anti-lock brake system may be disabled and may
need to be serviced.
If the anti-lock brake system is disabled, normal braking is still
effective. If the brake warning lamp illuminates with the parking
brake released, have your brake system serviced immediately.
200Brakes
2014 Expedition(exd)
Owners Guide gf, 1st Printing, June 2013
USA(fus)
Page 228 of 519
TRAILER SWAY CONTROL
WARNING:Turning off trailer sway control increases the risk of
loss of vehicle control, serious injury or death. Ford does not
recommend disabling this feature except in situations where speed
reduction may be detrimental (such as hill climbing), the driver has
significant trailer towing experience, and can control trailer sway and
maintain safe operation.
Note:This feature does not prevent trailer sway, but reduces it once it
begins.
Note:This feature cannot stop all trailers from swaying.
Note:In some cases, if vehicle speed is too high, the system may turn
on multiple times, gradually reducing vehicle speed.
This feature applies your vehicle brakes at individual wheels and, if
necessary, reduces engine power. If the trailer begins to sway, the
stability control light flashes and the messageTRAILER SWAY
REDUCE SPEEDappears in the information display. The first thing to
do is slow your vehicle down, then pull safely to the side of the road and
check for proper tongue load and trailer load distribution. See theLoad
Carryingchapter for specific loading information.
RECOMMENDED TOWING WEIGHTS
Note:Do not exceed the trailer weight for your vehicle configuration
listed in the chart below.
Note:Make sure to take into consideration trailer frontal area. Do not
exceed:
•36.5 feet
2(3.39 meters2) trailer frontal area for vehicles equipped
with the standard towing package.
•60.0 feet
2(5.57 meters2) trailer frontal area for vehicles equipped
with the optional towing package.
Note:Exceeding this limitation may significantly reduce the
performance of your towing vehicle. Selecting a trailer with a low
aerodynamic drag and rounded front design helps optimize performance
and fuel economy.
Note:For high altitude operation, reduce the gross combined weight by
2% per 1000 feet (300 meters) starting at the 1000 foot (300 meter)
elevation point.
Towing227
2014 Expedition(exd)
Owners Guide gf, 1st Printing, June 2013
USA(fus)