Page 137 of 438

REAR VIEW CAMERA SYSTEM (IF EQUIPPED)
WARNING:The rear view camera system is a reverse aid
supplement device that still requires the driver to use it in
conjunction with the interior and exterior mirrors for maximum
coverage.
WARNING:Objects that are close to either corner of the
bumper or under the bumper, might not be seen on the screen
due to the limited coverage of the camera system.
WARNING:Back up as slow as possible since higher speeds
might limit your reaction time to stop the vehicle.
WARNING:Use caution when using the rear video camera and
the liftgate is ajar. If the liftgate is ajar, the camera will be out of
position and the video image may be incorrect. All guidelines (if
enabled) have been removed when the liftgate is ajar.
WARNING:Use caution when turning camera features on or off
while in R (Reverse). Make sure the vehicle is not moving.
The rear view camera system provides a video image of the area behind
the vehicle.
During operation, lines appear in the display which represent your
vehicle’s path and proximity to objects behind the vehicle.
The camera is located on the back
door.
XX XXXX
XXXXXXXX
136Parking Aids
2014 Econoline(eco)
Owners Guide gf, 1st Printing, November 2012
USA(fus)
Page 138 of 438

Using the Rear View Camera System
The rear view camera system displays what is behind your vehicle when
you place the transmission in R (Reverse). The system uses two types of
guides to help you see what is behind your vehicle:
1. Fixed guidelines: Show the actual path the vehicle is moving in while
reversing in a straight line, which can be helpful when backing into a
parking space or aligning the vehicle with another object behind the
vehicle.
2. Centerline: Helps align the center of the vehicle with an object (i.e. a
trailer).
Note:If the image comes on while the transmission is not in R
(Reverse), have the system inspected by your authorized dealer.
Note:When towing, the camera only sees what is being towed behind
the vehicle. This might not provide adequate coverage as it usually
provides in normal operation and some objects might not be seen. In
some vehicles, the guidelines may disappear once the trailer tow
connector is engaged.
Note:The camera may not operate correctly under the following conditions:
•Nighttime or dark areas if one or both reverse lamps are not operating.
•The camera’s view is obstructed by mud, water or debris. Clean the lens
with a soft, lint-free cloth and non-abrasive cleaner.
•The rear of the vehicle is hit or damaged, causing the camera to become
misaligned.
Adjusting the Rear View Camera Settings
Touch screen display:
To access the rear view camera system settings, make the following
selections when the transmission is not in R (Reverse):
1. Menu
2. Vehicle
3. Rear View Camera
After changing a system setting, the touch screen shows a preview of the
feature(s) selected.
Rearview mirror display:
To access the rear view camera system settings see theInformation
Displaychapter.
The guidelines options are FIXED and OFF. If the vehicle is equipped
with a rearview mirror display and a standard instrument cluster, the
fixed guidelines will always remain on. There is no option to turn the
fixed guidelines off.
Parking Aids137
2014 Econoline(eco)
Owners Guide gf, 1st Printing, November 2012
USA(fus)
Page 139 of 438

Guidelines and the Centerline
Note:Fixed guidelines are only available when the transmission is in R
(Reverse).
Note:The centerline is only available if fixed guidelines are on.
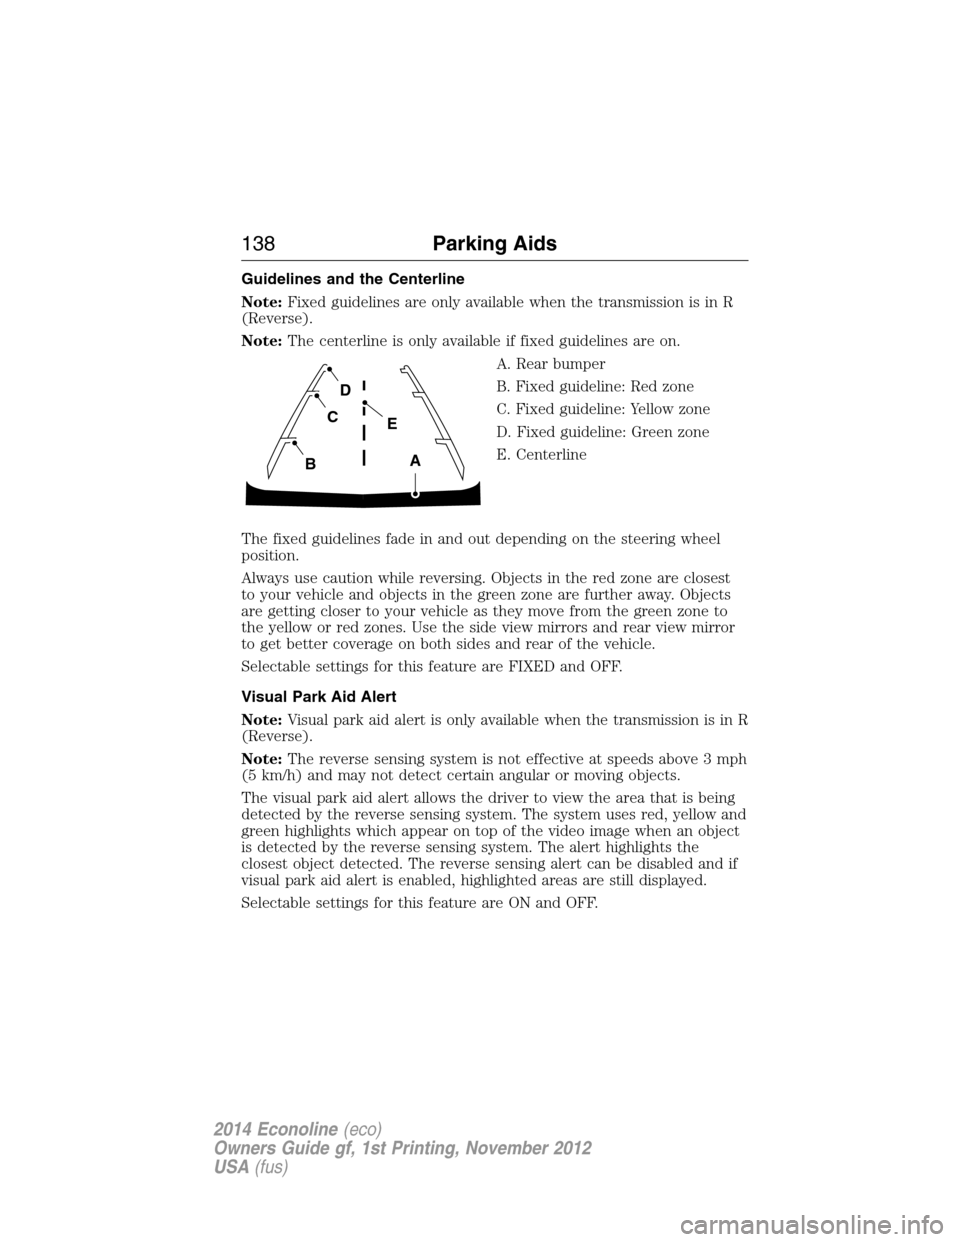
A. Rear bumper
B. Fixed guideline: Red zone
C. Fixed guideline: Yellow zone
D. Fixed guideline: Green zone
E. Centerline
The fixed guidelines fade in and out depending on the steering wheel
position.
Always use caution while reversing. Objects in the red zone are closest
to your vehicle and objects in the green zone are further away. Objects
are getting closer to your vehicle as they move from the green zone to
the yellow or red zones. Use the side view mirrors and rear view mirror
to get better coverage on both sides and rear of the vehicle.
Selectable settings for this feature are FIXED and OFF.
Visual Park Aid Alert
Note:Visual park aid alert is only available when the transmission is in R
(Reverse).
Note:The reverse sensing system is not effective at speeds above 3 mph
(5 km/h) and may not detect certain angular or moving objects.
The visual park aid alert allows the driver to view the area that is being
detected by the reverse sensing system. The system uses red, yellow and
green highlights which appear on top of the video image when an object
is detected by the reverse sensing system. The alert highlights the
closest object detected. The reverse sensing alert can be disabled and if
visual park aid alert is enabled, highlighted areas are still displayed.
Selectable settings for this feature are ON and OFF.
A
E
D
C
B
138Parking Aids
2014 Econoline(eco)
Owners Guide gf, 1st Printing, November 2012
USA(fus)
Page 140 of 438

Manual Zoom
WARNING:When manual zoom is on, the full area behind the
vehicle is not shown. Be aware of your surroundings when using
the manual zoom feature.
Note:Manual zoom is only available when the transmission is in R
(Reverse).
Note:When manual zoom is enabled, only the centerline is shown.
Allows the driver to get a closer view of an object behind the vehicle.
The zoomed image keeps the bumper in the image to provide a
reference. The zoom is only active while the transmission is in R
(Reverse), When the transmission is shifted out of R (Reverse), the
feature automatically turns off and must be reset when it is used again.
Selectable settings for this feature are OFF, Level 1, Level 2 or Level 3.
Press the up and down arrows to change the view. The selection level
appears between the buttons (i.e. Level 1). The default setting for the
manual zoom is OFF.
Rear Camera Delay
When shifting the transmission out of R (Reverse) and into any gear
other than P (Park), the camera image remains in the display until the
vehicle speed reaches 6 mph (10 km/h). This occurs when the rear
camera delay feature is on, or until a radio button is selected.
Selectable settings for this feature are ON and OFF. The default setting
for the rear camera delay is OFF.
Parking Aids139
2014 Econoline(eco)
Owners Guide gf, 1st Printing, November 2012
USA(fus)
Page 141 of 438

PRINCIPLES OF OPERATION
Cruise control lets you maintain a set speed without keeping your foot
on the accelerator pedal.
USING CRUISE CONTROL (IF EQUIPPED)
WARNING:Do not use cruise control in heavy traffic, on
winding roads or when the road surface is slippery. This could
result in loss of vehicle control, serious injury or death.
WARNING:When you are going downhill, your vehicle speed
may increase above the set speed. The system will not apply the
brakes. Change down a gear to assist the system in maintaining the set
speed. Failure to do so could result in loss of vehicle control, serious
injury or death.
Note:Cruise control will disengage if your vehicle speed decreases more
than 10 mph (16 km/h) below your set speed while driving uphill.
The cruise controls are located on
the steering wheel.
Switching Cruise Control On
Press and releaseON.
The indicator will turn on in the instrument cluster.
R
E
S
S
E
T
A
C
C
E
L
C
OA
S
T
ON
OFF
140Cruise Control
2014 Econoline(eco)
Owners Guide gf, 1st Printing, November 2012
USA(fus)
Page 142 of 438

Setting a Speed
1. Accelerate to the desired speed.
2. Press and releaseSET ACCEL.
3. Take your foot off the accelerator pedal.
Changing the Set Speed
Note:If you accelerate by pressing the accelerator pedal, the set speed
will not change. When you release the accelerator pedal, you will return
to the speed that you previously set.
•Press and holdSET ACCELto increase orCOASTto decrease the
set speed. Release the control when you reach the desired speed.
•Press and releaseSET ACCELto increase orCOASTto decrease.
The set speed will change in approximately 1 mph (2 km/h)
increments.
•Press the accelerator or brake pedal until you reach the desired
speed. Press and releaseSET ACCEL.
Canceling the Set Speed
Tap the brake pedal. You will not erase the set speed.
Resuming the Set Speed
Press and releaseRES.
Switching Cruise Control Off
Note:You will erase the set speed if you switch the system off.
Press and releaseOFFor switch the ignition off.
Cruise Control141
2014 Econoline(eco)
Owners Guide gf, 1st Printing, November 2012
USA(fus)
Page 143 of 438

STEERING
To help prevent damage to the power steering system:
•Never hold the steering wheel at its furthest turning points (until it
stops) for more than a few seconds when the engine is running.
•Do not operate the vehicle with a low power steering pump fluid level
(If the fluid level is below the MIN line mark on the dipstick).
•Some noise is normal during operation. If the noise is excessive, check
for low power steering pump fluid level before seeking service by your
authorized dealer.
•Heavy or uneven steering efforts may be caused by low power steering
pump fluid level. Check for low power steering pump fluid level before
seeking service by your authorized dealer.
•Do not fill the power steering pump reservoir above the MAX line
mark, as this may result in leaks from the reservoir.
If the power steering system breaks down (or if the engine is turned
off), you can steer the vehicle manually, but it takes more effort.
If the steering wanders or pulls, check for:
•an improperly inflated tire.
•uneven tire wear.
•loose or worn suspension components.
•loose or worn steering components.
•improper steering alignment.
A high crown in the road or high crosswinds may also make the steering
seem to wander/pull.
142Driving Aids
2014 Econoline(eco)
Owners Guide gf, 1st Printing, November 2012
USA(fus)
Page 144 of 438

LOAD LIMIT
Vehicle Loading – With and Without a Trailer
This section will guide you in the proper loading of your vehicle and/or
trailer, to keep your loaded vehicle weight within its design rating
capability, with or without a trailer. Properly loading your vehicle will
provide maximum return of vehicle design performance. Before loading
your vehicle, familiarize yourself with the following terms for determining
your vehicle’s weight ratings, with or without a trailer, from the vehicle’s
Tire Label or Safety Compliance Certification Label:
Base Curb Weight– is the weight of the vehicle including a full tank of
fuel and all standard equipment. It does not include passengers, cargo, or
optional equipment.
Vehicle Curb Weight– is the weight of your new vehicle when you
picked it up from your authorized dealer plus any aftermarket
equipment.
Payload– is the combined weight of cargo and passengers that the
vehicle is carrying. The maximum payload for your vehicle can be found
on the Tire Label on the B-Pillar or the edge of the driver’s door
(vehicles exported outside the US and Canada may not have a Tire
Label). Look for“THE COMBINED WEIGHT OF OCCUPANTS AND
CARGO SHOULD NEVER EXCEED XXX kg OR XXX lb.”for
maximum payload. The payload listed on the Tire Label is the maximum
payload for the vehicle as built by the assembly plant. If any aftermarket
or authorized-dealer installed equipment has been installed on the
vehicle, the weight of the equipment must be subtracted from the
payload listed on the Tire Label in order to determine the new payload.
Load Carrying143
2014 Econoline(eco)
Owners Guide gf, 1st Printing, November 2012
USA(fus)