Page 200 of 367

FIX&GO
AUTOMATIC QUICK
TYRE REPAIR KIT(for versions/markets, where provided)
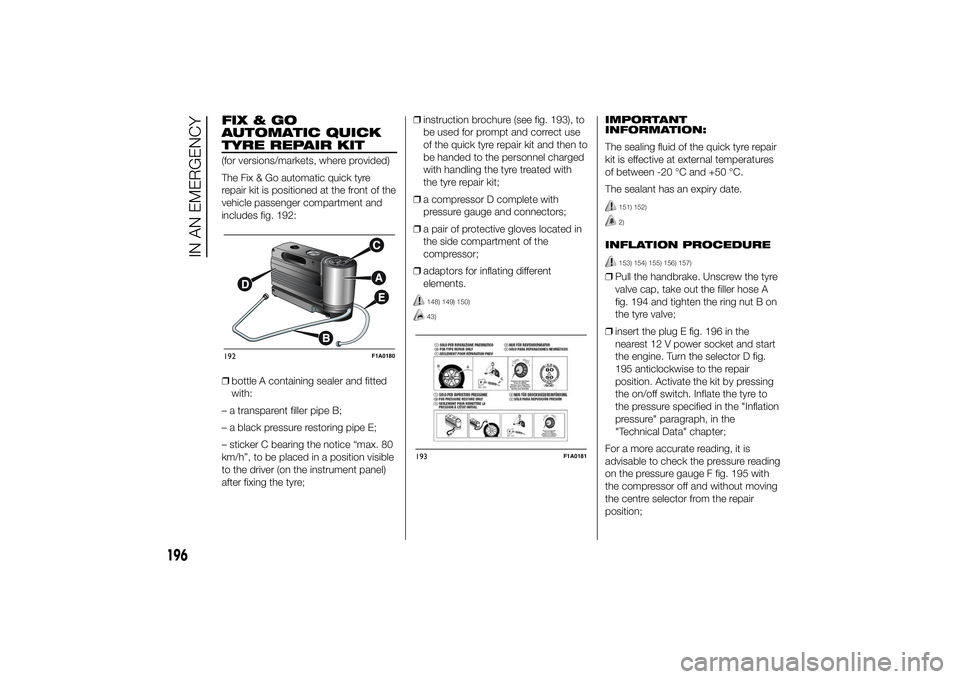
The Fix & Go automatic quick tyre
repair kit is positioned at the front of the
vehicle passenger compartment and
includes fig. 192:
❒bottle A containing sealer and fitted
with:
– a transparent filler pipe B;
– a black pressure restoring pipe E;
– sticker C bearing the notice “max. 80
km/h”, to be placed in a position visible
to the driver (on the instrument panel)
after fixing the tyre;❒instruction brochure (see fig. 193), to
be used for prompt and correct use
of the quick tyre repair kit and then to
be handed to the personnel charged
with handling the tyre treated with
the tyre repair kit;
❒a compressor D complete with
pressure gauge and connectors;
❒a pair of protective gloves located in
the side compartment of the
compressor;
❒adaptors for inflating different
elements.
148) 149) 150)43)
IMPORTANT
INFORMATION:
The sealing fluid of the quick tyre repair
kit is effective at external temperatures
of between -20 °C and +50 °C.
The sealant has an expiry date.
151) 152)2)
INFLATION PROCEDURE
153) 154) 155) 156) 157)
❒Pull the handbrake. Unscrew the tyre
valve cap, take out the filler hose A
fig. 194 and tighten the ring nut B on
the tyre valve;
❒insert the plug E fig. 196 in the
nearest 12 V power socket and start
the engine. Turn the selector D fig.
195 anticlockwise to the repair
position. Activate the kit by pressing
the on/off switch. Inflate the tyre to
the pressure specified in the "Inflation
pressure" paragraph, in the
"Technical Data" chapter;
For a more accurate reading, it is
advisable to check the pressure reading
on the pressure gauge F fig. 195 with
the compressor off and without moving
the centre selector from the repair
position;
192
F1A0180
193
F1A0181
196
IN AN EMERGENCY
Page 201 of 367

❒if after 10 minutes it is still impossible
to reach at least 3 bar, release the
transparent filler pipe from the valve
and take out the 12 V plug, then
move the vehicle forwards by about
10 metres in order to distribute
the sealing fluid inside the tyre evenly,
then repeat the inflation operation;❒if after this operation you still cannot
reach at least 3 bar after 10 minutes,
do not resume driving because the
tyre is too damaged and the quick
tyre repair kit cannot guarantee
suitable sealing. Contact a Fiat
Dealership;
❒if the tyre reaches the pressure
specified in “Inflation pressure”
paragraph in the "Technical Data"
section, start driving immediately;
❒after having driven for about
10 minutes, stop and recheck the
tyre pressure; remember to apply the
handbrake;❒if a pressure value of at least 3 bar is
detected, restore the correct
pressure prescribed in the paragraph
“Inflation pressure” in “Technical
specification” (with the engine
running and the handbrake
engaged), resume driving and drive
with care to nearest Fiat Dealership.194
F1A0182
195
F1A0183
196
F1A0335
197
Page 202 of 367

FOR CHECKING AND
RESTORING PRESSURE
ONLY
The compressor can also be used
solely for restoring pressure.
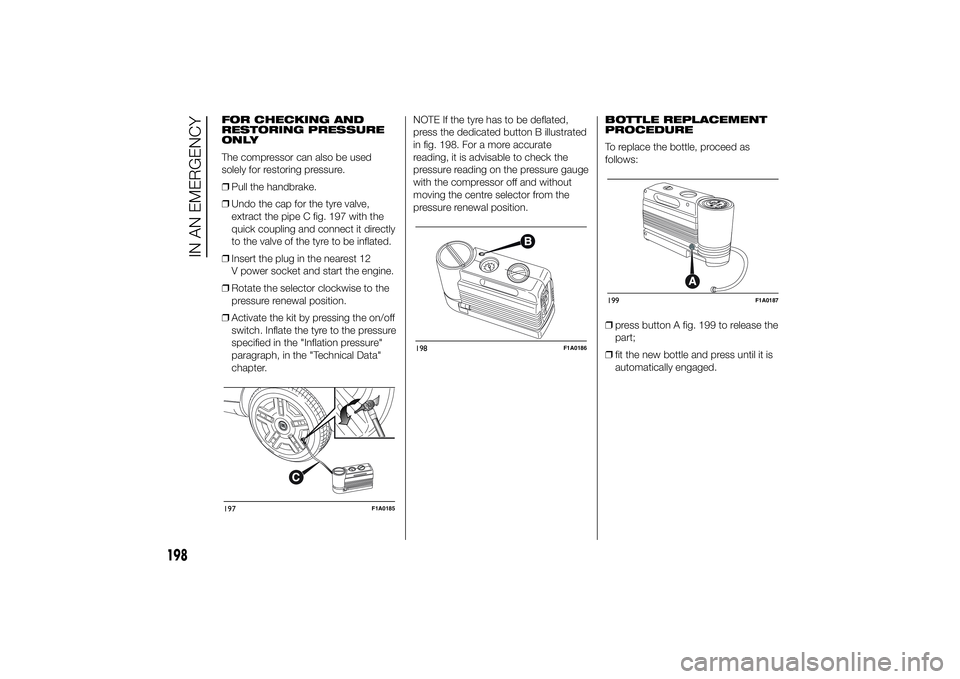
❒Pull the handbrake.
❒Undo the cap for the tyre valve,
extract the pipe C fig. 197 with the
quick coupling and connect it directly
to the valve of the tyre to be inflated.
❒Insert the plug in the nearest 12
V power socket and start the engine.
❒Rotate the selector clockwise to the
pressure renewal position.
❒Activate the kit by pressing the on/off
switch. Inflate the tyre to the pressure
specified in the "Inflation pressure"
paragraph, in the "Technical Data"
chapter.NOTE If the tyre has to be deflated,
press the dedicated button B illustrated
in fig. 198. For a more accurate
reading, it is advisable to check the
pressure reading on the pressure gauge
with the compressor off and without
moving the centre selector from the
pressure renewal position.BOTTLE REPLACEMENT
PROCEDURE
To replace the bottle, proceed as
follows:
❒press button A fig. 199 to release the
part;
❒fit the new bottle and press until it is
automatically engaged.197
F1A0185
198
F1A0186
199
F1A0187
198
IN AN EMERGENCY
Page 203 of 367

WARNING
148) Give the instruction booklet to
the tyre repair workshop
personnel.
149) Punctures on the sides of the
tyre cannot be repaired. Do not
use the quick tyre repair kit if the
damage is due to running with flat
tyre.
150) If the wheel rim has been
damaged (bent so as to cause air
to leak), the wheel cannot be
repaired. Do not remove the
foreign body (screws or nails)
from the tyre.
151) Do not use the compressor for
more than 20 consecutive
minutes. Risk of overheating.
Tyres repaired with the quick tyre
repair kit must only be used
temporarily, as the kit is not
suitable for a definitive repair.152) The bottle contains ethylene
glycol. It contains latex that might
cause allergic reactions. It is
harmful if swallowed. It is irritant
for the eyes. It may cause
sensitisation if inhaled or on
contact. Avoid contact with eyes,
skin and clothes. In the event of
contact, wash immediately with
plenty of water. Do not induce
vomiting if swallowed. Rinse your
mouth and drink plenty of water.
Call a doctor immediately. Keep
out of the reach of children. The
product must not be used by
asthmatics. Do not breathe in the
vapours during insertion and
suction. Call a doctor immediately
if allergic reactions are noted.
Store the bottle in its proper
compartment, away from sources
of heat. The sealant has an expiry
date. Replace the bottle if the
sealant has expired.
153) Wear the protective gloves
provided together with the quick
tyre repair kit.
154) affix the adhesive label in an
easy-to-see position for the driver
as a reminder that the tyre has
been treated with the quick tyre
repair kit. Drive carefully,
particularly on bends. Do not
exceed 80 km/h. Do not
accelerate or brake suddenly.155) If the pressure falls below 3
bars, do not drive any further: the
Fix & Go automatic quick tyre
repair kit cannot guarantee proper
hold because the tyre is too much
damaged. Contact a Fiat
Dealership.
156) You must inform the dealership
that the tyre has been repaired
using the quick tyre repair kit.
Give the booklet to the personnel
who will be handling the tyre
treated with the repair kit.
157) If different tyres from the ones
supplied with the vehicle are
used, it may not be possible to
carry out the repair. If the tyres
are replaced, it is advisable to use
those approved by the
manufacturer. Consult a Fiat
Dealership.
199
Page 207 of 367
BulbsBulbs Type Power Figure ref.Main beam headlights H7 55 W D
Dipped beam headlights H7 55 W D
Front side lights/day lights W21/5W - LED (#) - -
Fog lights(*) H11 55 W -
Front direction indicators WY21W 21 W B
Side direction indicatorsW16WF(**) / WY5W
(***)16W (**) / 5W (***) A
Rear direction indicators PY2IW 21 W B
Side lights W5W 5 W A
Rear side lights P21/5 W 21/5W B
Rear side lights/Brake lights P21W 21 W B
3rd brake light W5W 5 W B
Reverse W16W 16 W B
Rear fog light W16W 16 W B(#) where provided, instead of bulb W21/5W
(*)for versions/markets, where provided
(**)XL and recreational versions
(***)all other versions
203
Page 212 of 367
FOG LIGHTS
(for versions/markets, where provided)
To replace the front fog light bulbs,
proceed as follows:
❒steer the wheel completely inwards;
❒undo the screw A and remove the
flap B fig. 209;
❒adjust the catch C fig. 210 and
disconnect the electrical connector
D;
❒turn and remove the bulb holder E;
❒release the bulb and replace it;
❒refit the new bulb and carry out the
procedure described previously in
reverse.REAR LIGHT CLUSTERS
The bulbs are arranged inside the light
cluster as follows fig. 211:
A brake/side lights
B side light
C direction indicators
D reverse lights.
E rear fog lightsTo change the bulb, proceed as follows
fig. 212, fig. 213:
❒open the rear wing door.
❒undo the 7 fixing screws A of the
plastic cover;
❒undo the two fixing screws B;
❒extract the unit outwards and
disconnect the electrical connector;209
F1A0361
210
F1A0362
211
F1A0318
212
F1A0319
208
IN AN EMERGENCY
Page 213 of 367
❒unscrew the screws C using the
screwdriver provided and remove the
bulb holder;
❒remove the bulb D, E, F pushing it
gently and turning it anticlockwise
(“bayonet” locking), then replace
it; remove the bulb G, H pulling
outwards;
❒refit the bulb holder and tighten the
screws C;❒reconnect the electrical connector,
correctly reposition the unit on the
body of the vehicle and then tighten
the fixing screws B;
❒refit the plastic cover fastening it with
the 7 fixing screws A.
For truck and chassis
cab versions:
Undo the four screws H fig. 214 and
replace the bulbs:I bulb for rear fog light
L bulb for reversing light
M bulb for side light
N bulb for brake light
O bulb for side light.213
F1A0320
214
F1A0200
209
Page 214 of 367

THIRD BRAKE LIGHTS
To replace the bulb proceed as follows:
❒undo the two fixing screws fig. 215;
❒extract the lens unit;
❒press in the tabs B fig. 216 and
remove the bulb holder;
❒remove the snap-fitted bulb and
replace.NUMBER PLATE LIGHTS
To replace the bulb proceed as follows:
❒operate in the point indicated by
the arrow and remove the lens unit A
fig. 217;
❒change the bulb releasing it from the
side contacts and making sure the
new bulb is correctly fastened
between the contacts;
❒refit the snap-fitted lens unit.
SIDE LIGHTS
(for versions/markets, where provided)
To replace the bulb proceed as follows:
❒for extra-long van:
– undo the two fixing screws C fig. 218
and remove the light cluster;– remove the bulb holder D on the rear
of the light cluster, turning it through
a 1/4 turn;
– remove the snap-fitted bulb and
replace.
❒for chassis cabs with platform:
– remove the bulb-holder on the rear of
the light cluster, turning through 1/4
turn;
– remove the snap-fitted bulb and
replace.215
F1A0204
216
F1A0205
217
F1A0206
218
F1A0207
210
IN AN EMERGENCY