2014 FIAT BRAVO maintenance
[x] Cancel search: maintenancePage 20 of 275

IGNITION SWITCHThe key can be turned to 3 different positionsfig. 13:
❒STOP: engine off, key can be removed, steering
column locked. Some electrical devices (e.g. radio,
central door locking system, electronic alarm,
etc.) are enabled.
❒MAR-ON: driving position. All electrical devices
are enabled.
❒AVV: engine start-up.
The ignition switch is fitted with a safety system that
requires the ignition key to be turned back to STOP
if the engine does not start, before the starting
operation can be repeated.
WARNING
If the ignition switch is tampered with
(e.g. attempted theft), have it checked
over by a Fiat Dealership before driving again.
WARNING
Always remove the key when you leave
your car to prevent someone from
accidentally operating the controls. Remember
to engage the handbrake. If the car is parked on
uphill slope, engage the first gear; if the car is
facing downhill, engage the reverse gear. Never
leave children unattended in the car.STEERING LOCK
Engagement
When at STOP, remove the key and turn the steering
wheel until it locks.
Disengagement
Move the steering wheel slightly as you turn the
ignition key to MAR-ON.
IMPORTANT In some parking conditions (e.g.:
wheels turned) the effort required to move the
steering wheel and disengage the steering lock may
be increased.
fig. 13
F0Q0642
16GETTING TO
KNOW YOUR CAR
SAFETY
STARTING AND
DRIVING
WARNING LIGHTS
AND MESSAGES
IN AN EMERGENCY
SERVICING AND
MAINTENANCE
TECHNICAL
SPECIFICATIONS
INDEX
Page 21 of 275

WARNING
It is absolutely forbidden to carr y out
any aftermarket operation involving
steering system or steering column
modifications (e.g.: installation of anti-theft
device) that could badly affect performance and
safety, invalidate the warranty and also result
in non-compliance of the car with type-
approval requirements.
WARNING
Never remove the key while the car is
moving.The steering wheel will lock
as soon as it is turned.This holds true for cars
being towed as well.
DISPLAYThe car is equipped with a multifunction display that,
according to the previously applied settings, will
show useful driving information.
When one of the front doors is opened, the display
is activated, showing the time and mileage for a
few seconds.
NoteWith a low outside temperature (below 0°C)
it may take longer than normal for information to
appear on the display.
17GETTING TO
KNOW YOUR CARSAFETY
STARTING AND
DRIVING
WARNING LIGHTS
AND MESSAGES
IN AN EMERGENCY
SERVICING AND
MAINTENANCE
TECHNICAL
SPECIFICATIONS
INDEX
Page 22 of 275

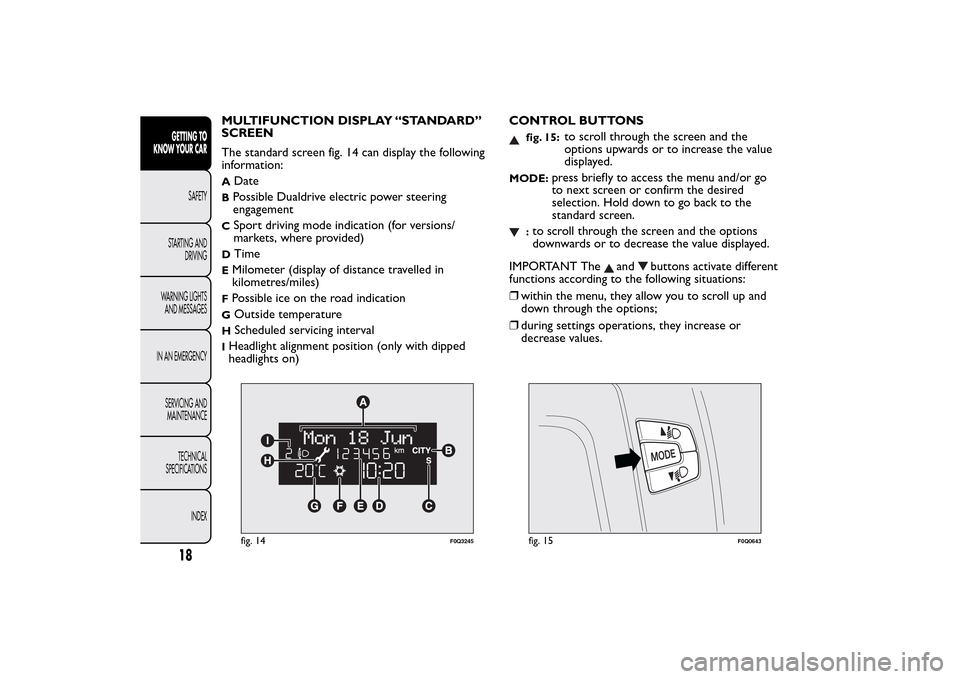
MULTIFUNCTION DISPLAY “STANDARD”
SCREEN
The standard screen fig. 14 can display the following
information:A
Date
BPossible Dualdrive electric power steering
engagementC
Sport driving mode indication (for versions/
markets, where provided)
D
Time
EMilometer (display of distance travelled in
kilometres/miles)FPossible ice on the road indicationG
Outside temperature
H
Scheduled servicing interval
IHeadlight alignment position (only with dipped
headlights on)CONTROL BUTTONS
fig. 15:
to scroll through the screen and the
options upwards or to increase the value
displayed.
MODE:
press briefly to access the menu and/or go
to next screen or confirm the desired
selection. Hold down to go back to the
standard screen.
:to scroll through the screen and the options
downwards or to decrease the value displayed.
IMPORTANT The
and
buttons activate different
functions according to the following situations:
❒within the menu, they allow you to scroll up and
down through the options;
❒during settings operations, they increase or
decrease values.
fig. 14
F0Q3245
fig. 15
F0Q0643
18GETTING TO
KNOW YOUR CAR
SAFETY
STARTING AND
DRIVING
WARNING LIGHTS
AND MESSAGES
IN AN EMERGENCY
SERVICING AND
MAINTENANCE
TECHNICAL
SPECIFICATIONS
INDEX
Page 23 of 275

IMPORTANT When one of the front doors is
opened, the display is activated, showing the time
and mileage for a few seconds.
SETUP MENU
The menu comprises a series of functions which can
be selected using the
and
buttons to access
the different selection and setting (setup) operations
indicated below.
Some options have a submenu.
The Setup Menu can be activated by pressing the
MODE button briefly.
If the Radionavigator is installed, only the following
functions can be adjusted/set from the instrument
panel: "Lighting", “Speed beep”, "Headlight sensor"
(for versions/markets, where provided), "Belt buzzer"
and "Passenger airbag". The other functions are
shown on the Radionavigator display. You can set and
adjust them there.
The menu comprises the following options:
❒LIGHTING
❒SPEED BEEP
❒HEADLIGHT SENSOR (for versions/markets,
where provided)
❒TRIP B ACTIVATION/DATA
❒SET TIME
❒SET DATE
❒FIRST PAGE (for versions/markets, where
provided)❒SEE RADIO
❒AUTOCLOSE
❒UNITS OF MEASUREMENT
❒LANGUAGE
❒WARNINGS VOLUME
❒BUTTON VOLUME
❒SEAT BELT BEEP/BUZZ.
❒SERVICE
❒AIRBAG/PASSENGER BAG
❒CORNERING LIGHTS (for versions/markets,
where provided)
❒EXIT MENU
Selecting an option from the main menu
without a submenu:
❒briefly press the MODE button to select the main
menu option that needs to be changed;
❒press buttons
or
(with single presses) to
select the new setting;
❒briefly press the MODE button to store the new
setting and at the same time go back to the
previously selected menu option.
19GETTING TO
KNOW YOUR CARSAFETY
STARTING AND
DRIVING
WARNING LIGHTS
AND MESSAGES
IN AN EMERGENCY
SERVICING AND
MAINTENANCE
TECHNICAL
SPECIFICATIONS
INDEX
Page 24 of 275

Selecting an option from the main menu with
a submenu:
❒briefly press the MODE button to display the first
submenu option;
❒press buttons
or
(with single presses) to
scroll through all the submenu options;
❒briefly press the MODE button to select the
displayed submenu option and to open the
relevant settings menu;
❒press buttons
or
(with single presses) to
select the new setting for this submenu option;
❒briefly press the MODE button to store the new
setting and at the same time go back to the
previously selected submenu option.
MENU ITEMSLighting (Interior light adjustment)
With the side lights on, this function is used to set
the brightness of the instrument panel, radio
controls and dual zone automatic climate control
system controls (for versions/markets where
provided) to 8 levels.
Proceed as follows to adjust the brightness:
❒briefly press the MODE button: the previously set
level flashes on the display;
❒press button
or
to set the required brightness
level;
❒briefly press the MODE button to return to the
menu screen or hold the button down to return
to the standard screen without storing.
Speed Beep (Speed limit)
This function is used to set the car speed limit (km/h
or mph); the driver is immediately alerted when
this limit is exceeded (see section “Warning lights
and messages”).
To set the desired speed limit, proceed as follows:
❒press the MODE button briefly, the display shows
the dedicated message;
❒press the
or
button to select speed limit
activation (On) or deactivation (Off );
❒if the function has been activated (On), press the
or
buttons to select the desired speed limit
and then press MODE to confirm.
20GETTING TO
KNOW YOUR CAR
SAFETY
STARTING AND
DRIVING
WARNING LIGHTS
AND MESSAGES
IN AN EMERGENCY
SERVICING AND
MAINTENANCE
TECHNICAL
SPECIFICATIONS
INDEX
Page 25 of 275

IMPORTANT Setting is possible between 30 and 200
km/h, or 20 and 125 mph, according to the
previously set unit. See the "Units of measurement
adjustment (Units of measurement)" paragraph
described below. The setting will increase/decrease
by 5 units each time button
/
is pressed. Hold
down the
/
button to automatically increase/
decrease the setting rapidly. Complete the
adjustment with single presses of the button when
you approach the desired value.
Briefly press the MODE button to return to the
menu screen or hold the button down to return to
the standard screen without storing.
To cancel the setting, proceed as follows:
❒briefly press button MODE, (On) will flash on the
display;
❒press button, (Off ) will flash on the display;
❒press the MODE button briefly to return to the
menu screen or hold the button down to return
to the standard screen without storing.
Headlight sensor (Automatic headlight/dusk
sensor sensitivity adjustment)
(for versions/markets, where provided)
This function is used to turn the headlights on or off
according to external lighting conditions.
The headlight sensor sensitivity can be adjusted
according to 3 levels (level 1 = minimum sensitivity,
level2=average sensitivity, level 3 = maximum
sensitivity). The higher the sensitivity set, the lesser
is the external light variation needed to switchthe lights on (e.g. with a setting on level 3 at sunset
the headlights come on in advance in relation to
levels 1 and 2).
Proceed as follows to set the desired adjustment:
❒briefly press the MODE button: the previously set
level flashes on the display;
❒press
or
to make your choice;
❒press the MODE button briefly to return to the
menu screen or hold the button down to return
to the standard screen without storing.
Cornering lights (Activation/deactivation of
“Cornering lights”)
(fog light with cornering function)
(for versions/markets where provided)
This function activates/deactivates the cornering
lights.
To activate/deactivate (On/Off ) the lights, proceed as
follows:
❒press the MODE button briefly, the display will
show “On” or “Off ” flashing depending on the
previous setting;
❒press
or
to make your choice;
❒briefly press the MODE button to return to the
menu screen or hold the button down to return
to the standard screen without storing.
21GETTING TO
KNOW YOUR CARSAFETY
STARTING AND
DRIVING
WARNING LIGHTS
AND MESSAGES
IN AN EMERGENCY
SERVICING AND
MAINTENANCE
TECHNICAL
SPECIFICATIONS
INDEX
Page 26 of 275

Activation/Trip B data (Activating Trip B)
This function can be used to activate (On) or
deactivate (Off ) the Trip B display (partial trip). For
further information see “Trip computer” in this
section.
Proceed as follows to switch the function on/off:
❒briefly press the MODE button: On or Off flashes
on the display (according to the previous setting);
❒press
or
to make your choice;
❒briefly press the MODE button to return to the
menu screen or hold the button down to return
to the standard screen without storing.
Time adjustment (Clock adjustment)
This function enables to set the clock through two
submenus: “Time” and “Format”.
To carry out the adjustment, proceed as follows:
❒briefly press the MODE button and two
submenus, "Time" and "Format", are displayed;
❒press theor
button to switch between the
two submenus;
❒once you have selected the submenu to be
changed, press the MODE button briefly;
❒when you select “Time”, briefly pressing the
MODE button makes the hours flash on the
display;
❒press the
or
button to make the adjustment;❒briefly press the MODE button: “minutes” starts
flashing on the display;
❒press the button
or
for setting.
IMPORTANT The setting will increase or decrease
by one unit each time the button
or
is pressed.
Hold down the button to increase/decrease the
setting rapidly and automatically. Complete the
adjustment with single presses of the button when
you approach the desired value.
If you enter the "Format" submenu, pressing the
MODE button briefly makes the display format flash
on the display;
❒Press button
or
to select “24h” or “12h”.
❒when you have made the adjustment, briefly press
the MODE button to go back to the submenu
screen or hold the button down to go back to the
main menu screen without storing.
❒hold down the MODE button again to return to
the standard screen or to the main menu
according to where you are in the menu.
When you have made the adjustment, briefly press
the MODE button to go back to the submenu screen
or hold the button down to go back to the main
menu screen without storing.
22GETTING TO
KNOW YOUR CAR
SAFETY
STARTING AND
DRIVING
WARNING LIGHTS
AND MESSAGES
IN AN EMERGENCY
SERVICING AND
MAINTENANCE
TECHNICAL
SPECIFICATIONS
INDEX
Page 27 of 275

Set date (Setting the date)
Using this function it is possible to update the date
(day - month - year).
Proceed as follows to start the update:
❒briefly press the SET button: the “year” will flash
on the display;
❒press the
or
button to make the adjustment;
❒briefly press the SET button: the “month” will flash
on the display;
❒press the
or
button to make the adjustment;
❒briefly press the SET button: the “day” will flash on
the display;
❒press the buttonor
for setting.
IMPORTANT The setting will increase or decrease
by one unit each time the button
or
is pressed.
Hold down the button to increase/decrease the
setting rapidly and automatically. Complete the
adjustment with single presses of the button when
you approach the desired value.
Briefly press the MODE button to return to the
menu screen or hold the button down to return to
the standard screen without storing.First page (display of information on the main
screen)
(for versions/markets, where provided)
This function allows you to choose the information
you would like to display on the main screen.
You can choose to display the date or the
turbocharger boost pressure.
To make your choice, proceed as follows:
❒briefly press the MODE button: "First page" will
appear on the display;
❒briefly press the MODE button again to display the
"Date" and "Engine info" options;
❒press
or
to select the information you wish to
see on the main page of the display;
❒press the MODE button briefly to return to the
menu screen or hold the button down to return
to the standard screen without storing.
When the key is turned to MAR-ON and the initial
check stage is over, the display will show the
information set previously via the “First page” menu
function.
23GETTING TO
KNOW YOUR CARSAFETY
STARTING AND
DRIVING
WARNING LIGHTS
AND MESSAGES
IN AN EMERGENCY
SERVICING AND
MAINTENANCE
TECHNICAL
SPECIFICATIONS
INDEX