2014 FIAT BRAVO engine
[x] Cancel search: enginePage 57 of 275

DIRECTION INDICATORS
Place the stalk in the (stable) position fig. 34:
❒up (position 1): activates the right direction
indicator
❒down (position 2): activates the left direction
indicator
Warning light
or
will flash in the instrument
panel.
Direction indicators are switched off automatically
when the steering wheel is straightened.
Lane change function
If you wish to signal a lane change, put the left stalk
in the unstable position for less than half a second.
The direction indicator on the side selected will flash
five times and then switch off automatically.“Cornering lights”
When the dipped headlights are on and the speed is
below 40 km/h, if the steering wheel rotation angle is
large or the direction indicators are on, a light
(incorporated in the fog light) will come on on the
relevant side to improve visibility at nighttime.
"FOLLOW ME HOME" DEVICE
This allows the space in front of the car to be lit up
for a certain period of time.
Activation
With the ignition key turned to STOP or removed,
pull the stalk fig. 35 towards the steering wheel
within 2 minutes from when the engine is turned off.
At each single movement of the stalk, the lights
will remain on for an extra 30 seconds up to a
maximum of 210 seconds; then the lights are
switched off automatically.
Each action of the stalk corresponds with the lighting
of the
warning light in the instrument panel
(along with a message shown on the display) (see
"Warning lights and messages" chapter).
Deactivation
Keep the stalk pulled towards the steering wheel for
more than 2 seconds.
fig. 34
F0Q0650
53GETTING TO
KNOW YOUR CARSAFETY
STARTING AND
DRIVING
WARNING LIGHTS
AND MESSAGES
IN AN EMERGENCY
SERVICING AND
MAINTENANCE
TECHNICAL
SPECIFICATIONS
INDEX
Page 65 of 275

ROOF LIGHTSFRONT ROOF LIGHT WITH SPOT LIGHTS
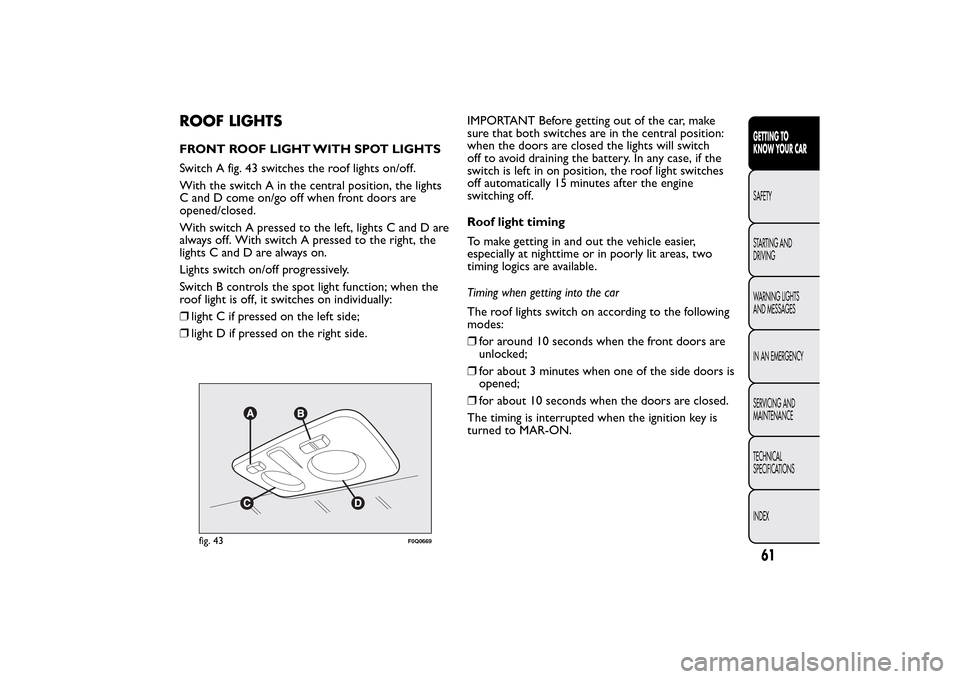
Switch A fig. 43 switches the roof lights on/off.
With the switch A in the central position, the lights
C and D come on/go off when front doors are
opened/closed.
With switch A pressed to the left, lights C and D are
always off. With switch A pressed to the right, the
lights C and D are always on.
Lights switch on/off progressively.
Switch B controls the spot light function; when the
roof light is off, it switches on individually:
❒light C if pressed on the left side;
❒light D if pressed on the right side.IMPORTANT Before getting out of the car, make
sure that both switches are in the central position:
when the doors are closed the lights will switch
off to avoid draining the battery. In any case, if the
switch is left in on position, the roof light switches
off automatically 15 minutes after the engine
switching off.
Roof light timing
To make getting in and out the vehicle easier,
especially at nighttime or in poorly lit areas, two
timing logics are available.
Timing when getting into the car
The roof lights switch on according to the following
modes:
❒for around 10 seconds when the front doors are
unlocked;
❒for about 3 minutes when one of the side doors is
opened;
❒for about 10 seconds when the doors are closed.
The timing is interrupted when the ignition key is
turned to MAR-ON.
fig. 43
F0Q0669
61GETTING TO
KNOW YOUR CARSAFETY
STARTING AND
DRIVING
WARNING LIGHTS
AND MESSAGES
IN AN EMERGENCY
SERVICING AND
MAINTENANCE
TECHNICAL
SPECIFICATIONS
INDEX
Page 66 of 275

Timing when getting out of the car
After removing the key from the ignition switch, the
roof lights switch on as follows:
❒within 2 minutes of the engine being switched off
for a period of around 10 seconds;
❒when one of the side doors is opened for a period
of around 3 minutes;
❒when one of the doors is closed for a period of
about 10 seconds.
❒if the fuel cut-off switch operates, they are on for
about 15 minutes, then they switch off
automatically.
Door locking switches the lights off immediately
(unless the fuel cut-off switch is operating).
REAR ROOF LIGHT
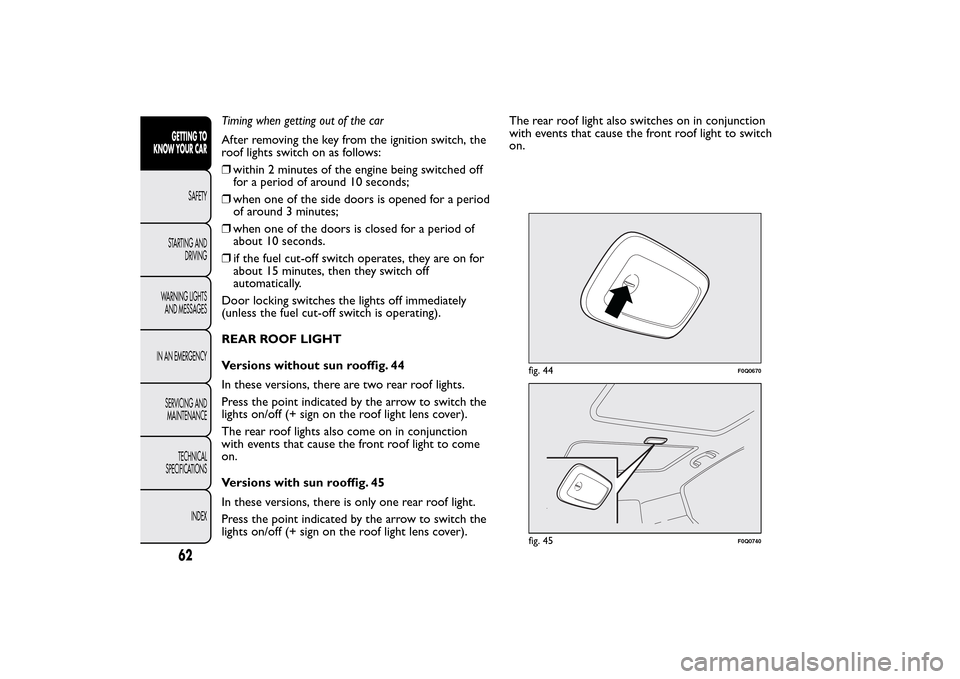
Versions without sun rooffig. 44
In these versions, there are two rear roof lights.
Press the point indicated by the arrow to switch the
lights on/off (+ sign on the roof light lens cover).
The rear roof lights also come on in conjunction
with events that cause the front roof light to come
on.
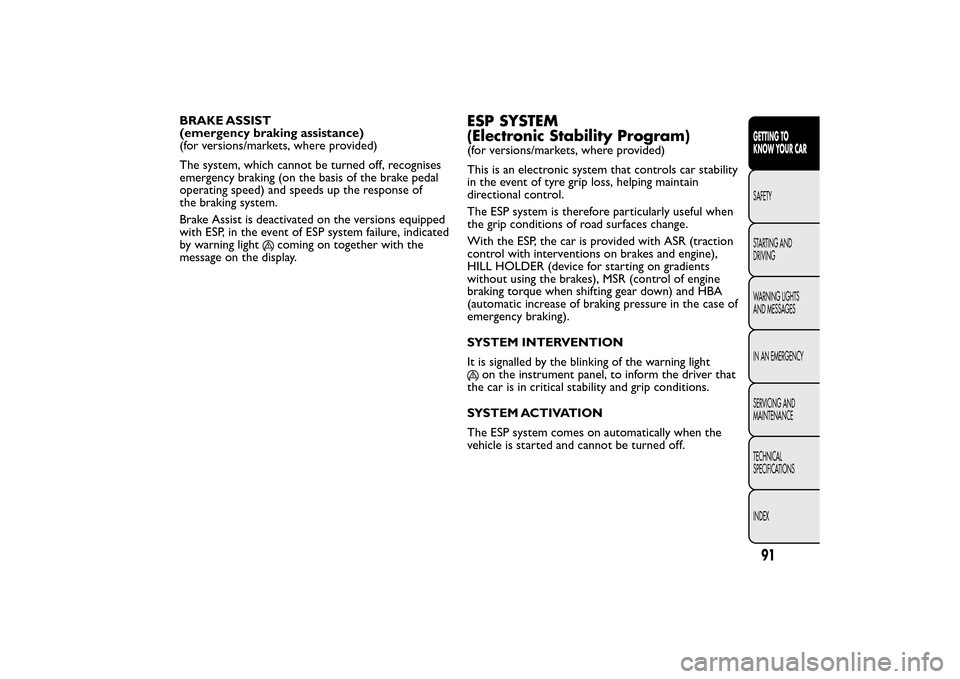
Versions with sun rooffig. 45
In these versions, there is only one rear roof light.
Press the point indicated by the arrow to switch the
lights on/off (+ sign on the roof light lens cover).The rear roof light also switches on in conjunction
with events that cause the front roof light to switch
on.
fig. 44
F0Q0670
fig. 45
F0Q0740
62GETTING TO
KNOW YOUR CAR
SAFETY
STARTING AND
DRIVING
WARNING LIGHTS
AND MESSAGES
IN AN EMERGENCY
SERVICING AND
MAINTENANCE
TECHNICAL
SPECIFICATIONS
INDEX
Page 68 of 275

FUEL CUT-OFF SWITCH
(as an alternative to the fuel cut-off system, for
versions/markets where provided)
It is located in the bottom, near the passenger side
pillar fig. 48. It is triggered in the event of an impact,
causing:
❒the fuel supply cut-off with the engine
consequently switching off;
❒the automatic unlocking of the doors;
❒the interior lights being switched on (for about 15
minutes).
The intervention of the switch is indicated by the
switching on of the
warning light on the
instrument panel or the
symbol on the display
(together with a message) (see “Warning lights and
messages” section).Carefully check the car for fuel leaks, for instance in
the engine compartment, under the car or near
the tank area.
If no fuel leaks are found and the car can be started
again, press button A to reactivate the fuel system
and the lights.
After a collision, turn the ignition key to STOP to
prevent the battery from running down.
WARNING
If, after a collision, you smell fuel or
notice leaks from the fuel supply system,
do not reset the switch to avoid fire risk.
fig. 48
F0Q0638
64GETTING TO
KNOW YOUR CAR
SAFETY
STARTING AND
DRIVING
WARNING LIGHTS
AND MESSAGES
IN AN EMERGENCY
SERVICING AND
MAINTENANCE
TECHNICAL
SPECIFICATIONS
INDEX
Page 69 of 275

FUEL CUT-OFF SYSTEM
(as an alternative to the fuel cut-off switch, for
versions/markets where provided)
It is triggered in the event of a collision, causing:
❒the fuel supply cut-off with the engine
consequently switching off;
❒the automatic unlocking of the doors;
❒the interior lights being switched on.
The intervention of the system is indicated by a
message shown on the display.
Carefully check the car for fuel leaks, for instance in
the engine compartment, under the car or near
the tank area.
After a collision, turn the ignition key to STOP to
prevent the battery from running down.The following procedure should be carried out to
restore the correct operation of the vehicle:
❒turn the ignition key to the MAR-ON position;
❒turn on the right direction indicator;
❒turn off the right direction indicator;
❒turn on the left direction indicator;
❒turn off the left direction indicator;
❒turn on the right direction indicator;
❒turn off the right direction indicator;
❒turn on the left direction indicator;
❒turn off the left direction indicator;
❒turn the ignition key to the OFF position;
❒turn the ignition key to the MAR-ON position.
WARNING
If, after an impact , you smell fuel or
notice leaks from the fuel supply system,
do not reactivate the system to avoid the risk of
fire.
65GETTING TO
KNOW YOUR CARSAFETY
STARTING AND
DRIVING
WARNING LIGHTS
AND MESSAGES
IN AN EMERGENCY
SERVICING AND
MAINTENANCE
TECHNICAL
SPECIFICATIONS
INDEX
Page 90 of 275

Use both hands to lift the bonnet . Before
lifting, check that the windscreen wiper
arms are not raised from the windscreen,
that the car is stationary and that the handbrake
is engaged.CLOSING
Proceed as follows:
❒hold the bonnet up with one hand and with the
other remove the stay C fig. 86 from the housing
D and fit it back in its locking device;
❒lower the bonnet to approximately 20 centimetres
from the engine compartment and let it drop.
Make sure that the bonnet is completely closed
and not only fastened by the safety catch by trying
to open it. If it is not perfectly closed, do not try
to press the bonnet lid down but open it and
repeat the procedure.
If the bonnet is not closed properly, the warning light
or the symbol
switch on in the instrument
panel (together with the dedicated message on the
display) (see “Warning lights and messages” chapter).
IMPORTANT Always check that the bonnet is closed
correctly to avoid it opening while the car is
travelling.
WARNING
Perform these operations only when the
car is stationary.
fig. 85
F0Q0690
fig. 86
F0Q0748
86GETTING TO
KNOW YOUR CAR
SAFETY
STARTING AND
DRIVING
WARNING LIGHTS
AND MESSAGES
IN AN EMERGENCY
SERVICING AND
MAINTENANCE
TECHNICAL
SPECIFICATIONS
INDEX
Page 95 of 275

BRAKE ASSIST
(emergency braking assistance)
(for versions/markets, where provided)
The system, which cannot be turned off, recognises
emergency braking (on the basis of the brake pedal
operating speed) and speeds up the response of
the braking system.
Brake Assist is deactivated on the versions equipped
with ESP, in the event of ESP system failure, indicated
by warning light
coming on together with the
message on the display.
ESP SYSTEM
(Electronic Stability Program)(for versions/markets, where provided)
This is an electronic system that controls car stability
in the event of tyre grip loss, helping maintain
directional control.
The ESP system is therefore particularly useful when
the grip conditions of road surfaces change.
With the ESP, the car is provided with ASR (traction
control with interventions on brakes and engine),
HILL HOLDER (device for starting on gradients
without using the brakes), MSR (control of engine
braking torque when shifting gear down) and HBA
(automatic increase of braking pressure in the case of
emergency braking).
SYSTEM INTERVENTION
It is signalled by the blinking of the warning light
on the instrument panel, to inform the driver that
the car is in critical stability and grip conditions.
SYSTEM ACTIVATION
The ESP system comes on automatically when the
vehicle is started and cannot be turned off.
91GETTING TO
KNOW YOUR CARSAFETY
STARTING AND
DRIVING
WARNING LIGHTS
AND MESSAGES
IN AN EMERGENCY
SERVICING AND
MAINTENANCE
TECHNICAL
SPECIFICATIONS
INDEX
Page 96 of 275

ESP SYSTEM FAILURE INDICATIONS
In the event of a failure, the ESP system will be
automatically switched off and warning light
will
switch on constantly on the instrument panel (on
some versions along with a message on the display,
see “Warning lights and messages” chapter). In
this case, contact a Fiat Dealership.
WARNING
Do not take unnecessary risks, even if
your vehicle is fitted with an ESP
system.Your driving style must always be suited
to the road conditions, visibility and traffic .
The driver is always responsible for road safety.
HILL HOLDER SYSTEM
(for versions/markets, where provided)
It's integral to the ESP system. It automatically
activates with the following conditions:
❒uphill: vehicle stationary on a road with a gradient
higher than 5%, engine running, clutch and brake
pedals pressed and gearbox in neutral or gear
other than reverse engaged;
❒downhill: car stationary on a road with a gradient
higher than 5%, engine running, clutch and brake
pedal pressed and reverse gear engaged.
When setting off the ESP system control unit will
keep brake force on wheels until the torque
necessary for starting is reached, or in any case formax. 2 seconds in order to pass easily from the
brake pedal to the accelerator pedal.
When two seconds have elapsed, without starting,
the system is automatically deactivated, gradually
releasing the braking pressure. During this release
stage, the typical mechanical brake release noise can
be heard, indicating that the car is about to move.
HILL HOLDER SYSTEM FAILURE
INDICATIONS
A possible system failure is indicated by the
warning light on the instrument panel - together
with the dedicated message in the multifunction
display (for versions/markets, where provided) -
coming on (see "Warning lights and messages"
chapter).
IMPORTANT The Hill Holder system is not a parking
brake, therefore do not leave the car without
activating the handbrake, switching off the engine and
engaging first gear.
WARNING
If the space-saver wheel is used, the ESP
system keeps operating. Always
remember that the space-saver wheel, being
smaller than the original wheel, provides less
grip. For the correct operation of the ESP and
ASR systems it is vital that the tyres are the
same make and the same type on all the
wheels, in perfect condition and, above all, the
recommended type, make and size.
92GETTING TO
KNOW YOUR CAR
SAFETY
STARTING AND
DRIVING
WARNING LIGHTS
AND MESSAGES
IN AN EMERGENCY
SERVICING AND
MAINTENANCE
TECHNICAL
SPECIFICATIONS
INDEX