Page 46 of 476

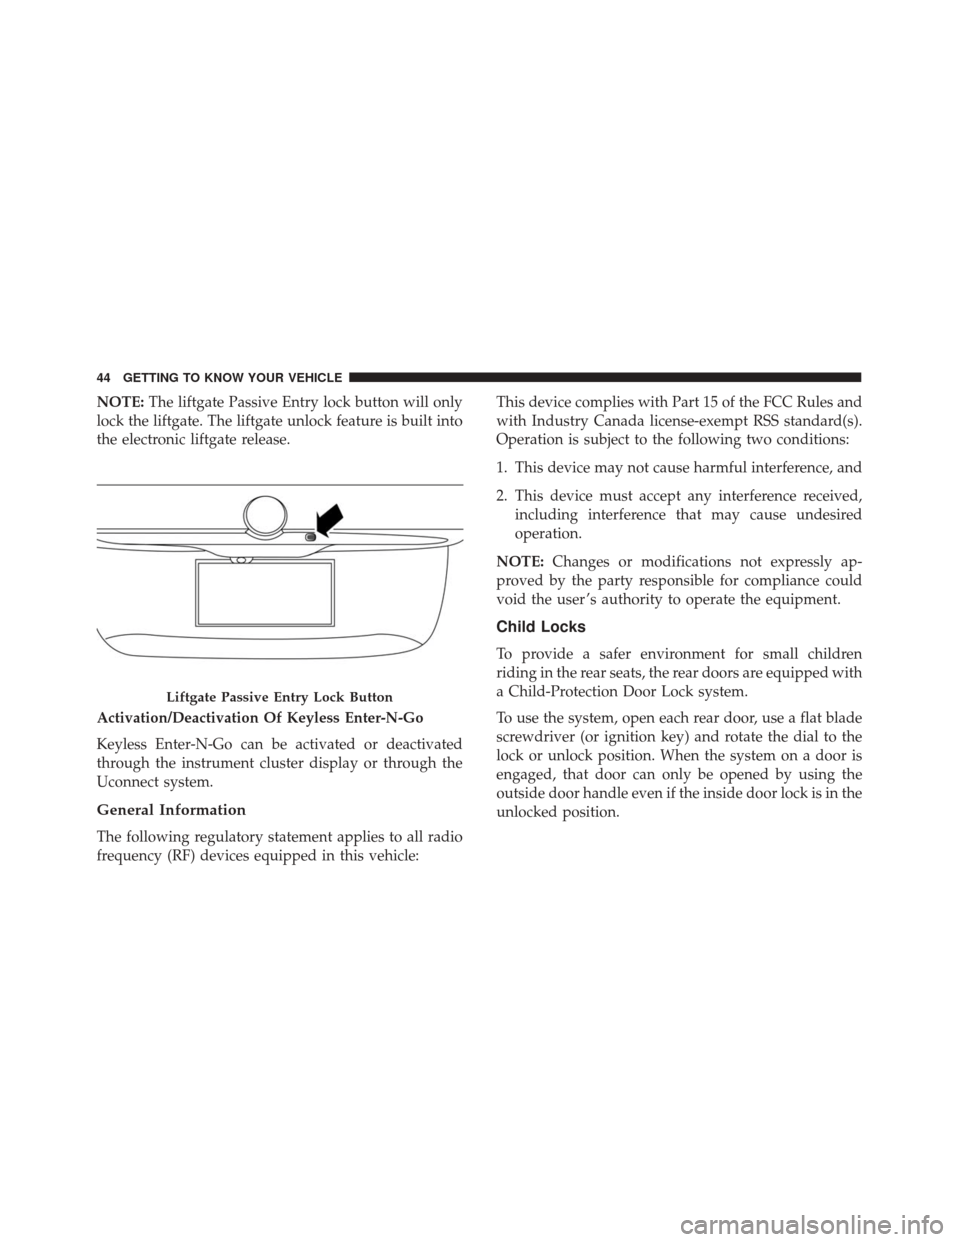
NOTE:The liftgate Passive Entry lock button will only
lock the liftgate. The liftgate unlock feature is built into
the electronic liftgate release.
Activation/Deactivation Of Keyless Enter-N-Go
Keyless Enter-N-Go can be activated or deactivated
through the instrument cluster display or through the
Uconnect system.
General Information
The following regulatory statement applies to all radio
frequency (RF) devices equipped in this vehicle: This device complies with Part 15 of the FCC Rules and
with Industry Canada license-exempt RSS standard(s).
Operation is subject to the following two conditions:
1. This device may not cause harmful interference, and
2. This device must accept any interference received,
including interference that may cause undesired
operation.
NOTE: Changes or modifications not expressly ap-
proved by the party responsible for compliance could
void the user ’s authority to operate the equipment.
Child Locks
To provide a safer environment for small children
riding in the rear seats, the rear doors are equipped with
a Child-Protection Door Lock system.
To use the system, open each rear door, use a flat blade
screwdriver (or ignition key) and rotate the dial to the
lock or unlock position. When the system on a door is
engaged, that door can only be opened by using the
outside door handle even if the inside door lock is in the
unlocked position.
Liftgate Passive Entry Lock Button
44 GETTING TO KNOW YOUR VEHICLE
Page 51 of 476

Power Lumbar Adjustment
Push the switch forward or rearward to increase or
decrease the lumbar support. Push the switch upward
or downward to raise or lower the lumbar support.
Heated Seats — If Equipped
The heated seat switches are located on the instrument
panel.
You can choose between two heating levels:
•Push the heated seat button
once to turn the HI
setting on.
• Push the heated seat buttona second time to
turn the LO setting on.
• Push the heated seat buttona third time to turn
the heating elements off.
If the HI-level setting is selected, the system will
automatically switch to LO-level after approximately
145 minutes of continuous operation. At that time, the
display will change from HI to LO, indicating the
change. The LO-level setting will turn off automatically
after approximately 60 minutes.
NOTE: The engine must be running for the heated
seats to operate. Vehicles Equipped With Remote Start
Vehicles equipped with Remote Start, the heated seats
can be programmed to come on during a Remote Start
until the ignition switch is cycled to the RUN position.
Auto On Comfort — If Equipped
If the external temperature is below 40 °F (5 °C) at each
start-up of the vehicle the heated seat functionality of
the driver’s seat is turned on to HI-level.
WARNING!
•
Persons who are unable to feel pain to the skin
because of advanced age, chronic illness, diabe-
tes, spinal cord injury, medication, alcohol use,
exhaustion or other physical condition must exer-
cise care when using the seat heater. It may cause
burns even at low temperatures, especially if used
for long periods of time.
• Do not place anything on the seat or seatback that
insulates against heat, such as a blanket or cush-
ion. This may cause the seat heater to overheat.
Sitting in a seat that has been overheated could
cause serious burns due to the increased surface
temperature of the seat.
4
GETTING TO KNOW YOUR VEHICLE 49
Page 60 of 476
when the dimming feature is activated. The sensor to
the right of the button does not illuminate.
NOTE:This feature is disabled when the vehicle is
moving in reverse.
Outside Mirrors
Power Adjustment Mirrors
The power mirror switch is located on the driver ’s door
panel.
To adjust the mirror, push the mirror adjustment switch
in the four directions indicated by arrows. NOTE:
•
To adjust the power mirrors, the ignition must be in
RUN mode.
• Once the mirror is adjusted, rotate the control to the
neutral position to avoid accidental movements.
Dimming Mirror
Power Mirror Switch
1 — Mirror Adjustment Switch
2 — Mirror Selector Switch
58 GETTING TO KNOW YOUR VEHICLE
Page 69 of 476

operation of the headlights, side marker lights, daytime
running lights, fog lights and the dimming of the
instrument cluster and interior lighting.
Turning on the headlights will illuminate the instru-
ment cluster and the controls located on the instrument
panel.Automatic Lighting — If Equipped
Light Sensor
The light sensor is equipped with an infrared LED,
located on the windshield. It detects changes in light
intensity outside the vehicle, based on the sensitivity of
light set by using the Menu on the display or on the
Uconnect system.
The higher the sensitivity, the lesser the amount of
external light required for controlling the lighting.
Automatic Headlights
Turn the headlight switch to the AUTO position.
When the automatic headlights are enabled, the head-
light time delay is active. After the ignition switch is
placed in the STOP mode, the headlights will automati-
cally turn off after approximately 90 seconds depending
on the settings of the feature.
The timing of the headlights is adjustable between 0, 30,
60 and 90 seconds. Refer to “Uconnect Settings” in
“Multimedia” for further information.
NOTE:The engine must be running before the head-
lights will come on in the automatic mode.
Headlight Switch
1 — Rotate Headlight Switch
2 — Ambient Light Dimmer
3 — Instrument Panel Dimmer
4 — Push Fog Light Switch
4
GETTING TO KNOW YOUR VEHICLE 67
Page 70 of 476

Daytime Running Lights (DRL) — If Equipped
The Daytime Running Lights (DRLs) will turn on when
the engine is started and remain on unless the head-
lights are turned on or the engine is shut off.
The DRLs will be disabled during turn signal operation
and resume operation when the turn signal operation
has ended.
Front Fog Lights — If Equipped
The front fog light switch is built into the headlight
switch.To activate the front fog lights, turn on the
parking lights or the low beam headlights and
push the headlight switch. To turn off the front fog
lights, push the headlight switch a second time or turn
off the headlight switch.
An indicator light in the instrument cluster illuminates
when the fog lights are turned on. NOTE:
•
The fog lights will operate with the low beam head-
lights or parking lights on. Selecting the high beam
headlights will turn off the fog lights.
• The fog lights also function as cornering lights.
Therefore there will be times when only one light is
on.
Parking Lights
Rotate the headlight switch to the first position to turn
on the parking lights. The parking light indicator in the
cluster will illuminate.
Headlight Delay
This feature provides the safety of headlight illumina-
tion for up to 90 seconds when leaving your vehicle in
an unlit area.
The time delay of the headlights is programmable
between 0, 30, 60 and 90 seconds. Refer to “Uconnect
Settings” in “Multimedia” for further information.
Headlight Delay Activation
To activate the delay feature, place the ignition in the
STOP position while the headlights are still on. Then,
68 GETTING TO KNOW YOUR VEHICLE
Page 71 of 476
turn off the headlights within two minutes. The delay
interval begins when the headlight switch is turned off.
Headlight Delay Disable
The feature is disabled by turning on the headlights, the
parking lights or by placing the ignition in RUN mode.
If you shut off the lights before the ignition is turned on,
they will turn off in the normal manner.
NOTE:The lights must be turned off within two
minutes of placing the ignition in STOP mode to
activate this feature.
High Beams
To turn on the high beam headlights, push the turn
signal lever forward (toward the front of the vehicle)
and an indicator will illuminate in the cluster. To turn
off the high beams, pull the turn signal lever rearward
(toward the rear of the vehicle). NOTE:
The headlights must be on for the high beams to
activate.
High Beam And Turn Signal Controls
4
GETTING TO KNOW YOUR VEHICLE 69
Page 73 of 476

NOTE:
•Before exiting the vehicle, make sure that the interior
lights are turned off. This will prevent the battery
from discharging once the doors are closed.
• If a light is left on it will automatically be turned off
after approximately 15 minutes after the ignition is in
STOP mode.
Dome Light Timing
The Dome Light will automatically illuminate when the
doors are unlocked, the doors are opened or after the
doors are closed.
Timing Entering The Vehicle
The dome lights illuminate in the following ways:
• When the doors are unlocked, the dome light will
illuminate for approximately 27 seconds.
• When one of the doors is opened, the dome light will
illuminate for approximately three minutes.
• When the doors are closed, the dome light will
automatically shut off after approximately 27 sec-
onds. NOTE:
The timing stops once the ignition is placed in
the RUN or START mode.
The dome light will turn off under any of the following
conditions:
• The dome light is disabled when the ignition is
placed in the RUN or START mode.
• The dome lights will turn off automatically when the
doors are locked.
• The dome lights will automatically turn off after
approximately fifteen minutes of inactivity to pre-
serve the battery.
Timing Exiting The Vehicle
The dome light will illuminate under the following
conditions when the ignition is turned to the STOP
mode:
• The dome light will illuminate for 27 seconds after
the key is removed from the vehicle.
• The opening of one of the doors (approximately three
minutes).
• After closing a door (approximately 27 seconds).
4
GETTING TO KNOW YOUR VEHICLE 71
Page 74 of 476
The dome light timing is disabled when the doors are
locked.
Illuminated Vanity Mirrors — If Equipped
An illuminated vanity mirror is located on each sun
visor. To use the mirror, rotate the sun visor down and
swing the mirror cover upward. The lights will turn on
automatically. Closing the mirror cover will turn the
light off.
Lower Glove Compartment Light
An interior light is located is the lower glove compart-
ment.
This light automatically turn on/off when the glove
compartment is opened and closed, regardless of the
position of the ignition.
NOTE:In order to preserve the life of the battery, the
light will turn off after 15 minutes.
Vanity Mirror Light
Lower Glove Compartment Light
72 GETTING TO KNOW YOUR VEHICLE