2014 FIAT 500L instrument panel
[x] Cancel search: instrument panelPage 6 of 116

DRIVER COCKPIT
1.Power Mirrors
2.Uconnect® Phone (Bluetooth® Hands Free Calling) pg.32
3.Turn Signals/Lights/High Beam Lever pg.19
4.Instrument Cluster pg.6
5.Electronic Vehicle Information Center (EVIC) Display pg.62
6.Speed Control pg.22
7.Wiper/Washer Lever (behind steering wheel) pg.21
8.Ignition Switch
9.Audio System pg.32
10.Switch Panel
•Hazard Switch
•Fog Lights pg.20
•Electronic Vehicle Information Center (EVIC) Controls pg.63
CONTROLS AT A GLANCE
4
Page 11 of 116

To Arm:
•Press the Key Fob LOCK button.
To Disarm The System:
•Push the Key Fob UNLOCK button or cycle the ignition to the ON/RUN position.
The Vehicle Security Alarm is designed to protect your vehicle; however, you can create
conditions where the Vehicle Security Alarm will give you a false alarm.If one of the pre-
viously described arming sequences has occurred, the Vehicle Security Alarm will arm re-
gardless of whether you are in the vehicle or not.If you remain in the vehicle and open
a door, the alarm will sound.If this occurs, disarm the Vehicle Security Alarm.
If the Vehicle Security Alarm is armed and the battery becomes disconnected the Vehicle
Security Alarm will remain armed when the battery is reconnected.The exterior lights
will flash, and the horn will sound.If this occurs, disarm the Vehicle Security Alarm.
POWER DOOR LOCKS
•Press the central LOCK/UNLOCK button located on the instrument panel, in the
switch bank below the radio.The button has an LED that indicates whether the doors
are locked or unlocked.
•LED ON:doors locked.Pressing the central LOCK/UNLOCK button once will unlock
all doors.The LED will switch off once the doors are unlocked.
•LED OFF:doors unlocked.Pressing the central LOCK/UNLOCK button once will lock
all doors.The LED will switch on once the doors are locked.
•Once the doors have been locked with the RKE transmitter, it will no longer be pos-
sible to unlock them by pressing central LOCK/UNLOCK button.
NOTE:
With central locking active (LED ON), opening one of the front doors, it is possible to
perform a central unlocking (LED OFF).With central locking active (LED ON), in order
to open one of the rear passenger doors, it is necessary pulling the internal door handle
twice.With one of the rear door open (LED OFF), the unlocking is performed only for
that door, not for all the vehicle.
•To unlock the front doors, pull the inside door handle to the first detent.If the rear
doors are locked, you must pull the door handle once to unlock the door and pull the
door handle a second time to open the door.
CAUTION!
An unlocked vehicle is an invitation to thieves.Always remove the key from the ignition
and lock all of the doors when leaving the vehicle unattended.
GETTING STARTED
9
Page 14 of 116

WARNING!
•Relying on the air bags alone could lead to more severe injuries in a collision.
The air bags work with your seat belt to restrain you properly.In some collisions,
the air bags won't deploy at all.Always wear your seat belts even though you have
air bags.
•Being too close to the steering wheel or instrument panel during Advanced Front
Air Bag deployment could cause serious injury, including death.Air bags need
room to inflate.Sit back, comfortably extending your arms to reach the steering
wheel or instrument panel.
•Supplemental Side Air Bag Inflatable Curtains and Supplemental Seat-Mounted
Side Air Bags need room to inflate.Do not lean against the door or window.
Sit upright in the center of the seat.
•Being too close to the Supplemental Side Air Bag Inflatable Curtain and/or Seat-
Mounted Side Air Bag during deployment could cause you to be severely injured
or killed.
•Do not drive your vehicle after the air bags have deployed.If you are involved in
another collision, the air bags will not be in place to protect you.
•
After any collision, the vehicle should be taken to an authorized dealer immediately.
CHILD RESTRAINTS
•Children 12 years or younger should ride properly buckled up in a rear seat, if avail-
able.According to crash statistics, children are safer when properly restrained in the
rear seats rather than in the front.
•
Every state in the United States and all Canadian provinces require that small children ride
in proper restraint systems.This is the law, and you can be prosecuted for ignoring it.
NOTE:
•For additional information, refer to www.seatcheck.org or call 1–866–SEAT-CHECK
(1–866–732–8243).
•Canadian residents, should refer to Transport Canada’s website for additional informa-
tion: http://www.tc.gc.ca/eng/roadsafety/safedrivers-childsafety-index-53.htm
GETTING STARTED
12
Page 22 of 116

High Beams
•Pull the lever rearward to activate the high beams.
•A high beam symbol will illuminate in the cluster to indicate the high beams are on.
NOTE:
For safe driving, turn off the high beams when oncoming traffic is present to prevent
headlight glare and as a courtesy to other motorists.
Flash To Pass
•Pull the lever toward you to activate the high beams.The high beams will remain on
until the lever is released.
Headlight Delay (Follow Me Home)
•Within two minutes of the ignition switch being turned to the OFF/LOCK position or
the ignition key being removed from the ignition, pull the turn signal lever toward the
steering wheel.
•Each movement of the lever toward the steering wheel will increase the illumination
period by 30 seconds, up to a maximum of 210 seconds.
•To deactivate, pull the multifunction lever toward the steering wheel and hold it for
more than two seconds.
NOTE:
Activation of Follow Me Home is only enabled once per key cycle and the steps outlined
above must be repeated each time you want to activate it.
Fog Lights
•Push the fog light button, located on the center stack of the instrument panel just be-
low the radio, once to turn on the fog lights.
•Push the button a second time to turn the fog lights off.
OPERATING YOUR VEHICLE
20
Page 40 of 116

USB/Audio Jack (AUX)/Bluetooth® Operation
USB/iPod®
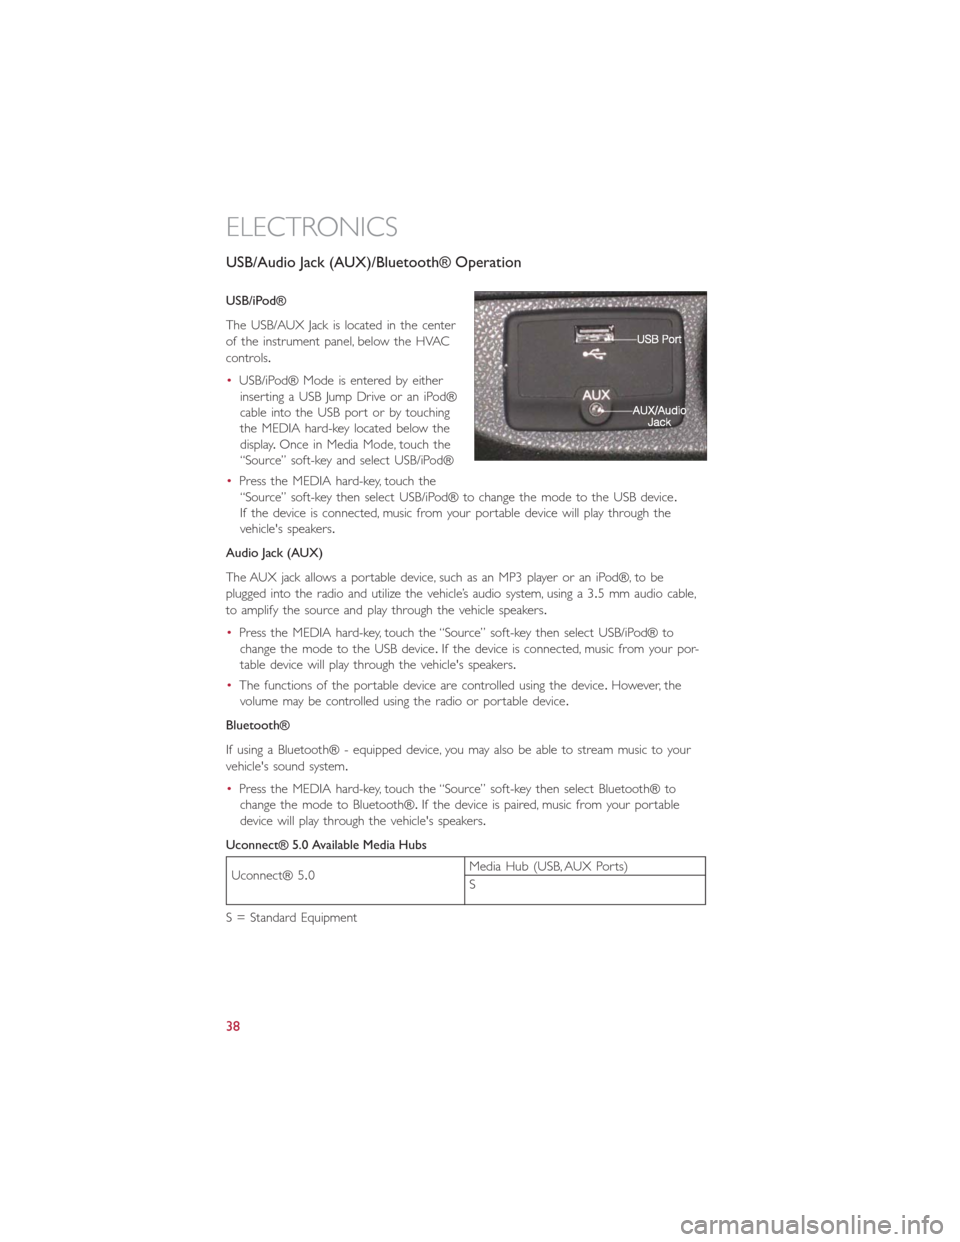
The USB/AUX Jack is located in the center
of the instrument panel, below the HVAC
controls.
•USB/iPod® Mode is entered by either
inserting a USB Jump Drive or an iPod®
cable into the USB port or by touching
the MEDIA hard-key located below the
display.Once in Media Mode, touch the
“Source” soft-key and select USB/iPod®
•Press the MEDIA hard-key, touch the
“Source” soft-key then select USB/iPod® to change the mode to the USB device.
If the device is connected, music from your portable device will play through the
vehicle's speakers.
Audio Jack (AUX)
The AUX jack allows a portable device, such as an MP3 player or an iPod®, to be
plugged into the radio and utilize the vehicle’s audio system, using a 3.5 mm audio cable,
to amplify the source and play through the vehicle speakers.
•Press the MEDIA hard-key, touch the “Source” soft-key then select USB/iPod® to
change the mode to the USB device.If the device is connected, music from your por-
table device will play through the vehicle's speakers.
•The functions of the portable device are controlled using the device.However, the
volume may be controlled using the radio or portable device.
Bluetooth®
If using a Bluetooth® - equipped device, you may also be able to stream music to your
vehicle's sound system.
•Press the MEDIA hard-key, touch the “Source” soft-key then select Bluetooth® to
change the mode to Bluetooth®.If the device is paired, music from your portable
device will play through the vehicle's speakers.
Uconnect® 5.0 Available Media Hubs
Uconnect® 5.0Media Hub (USB, AUX Ports)
S
S = Standard Equipment
ELECTRONICS
38
Page 65 of 116

EVIC Control Buttons
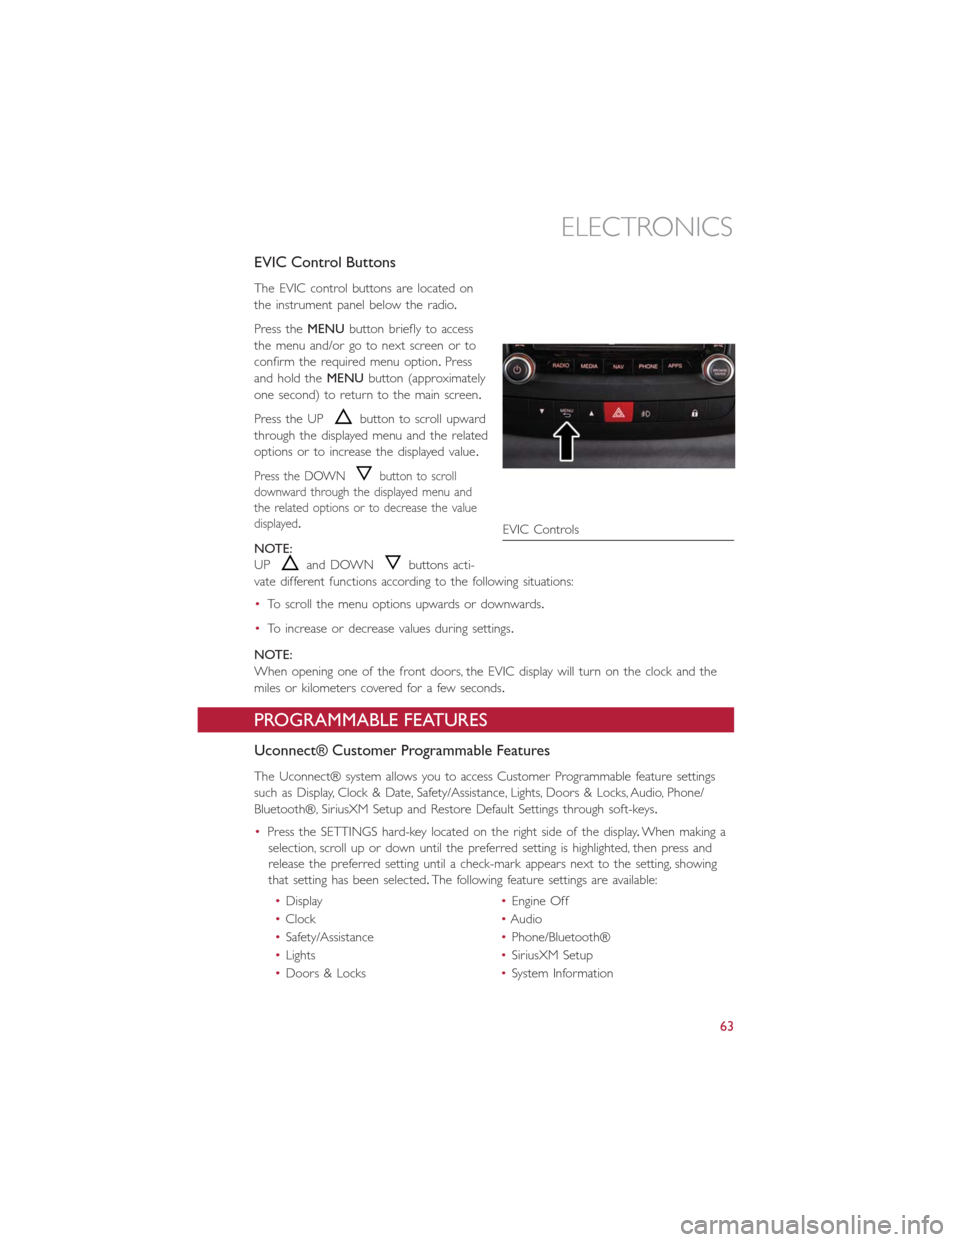
The EVIC control buttons are located on
the instrument panel below the radio.
Press theMENUbutton briefly to access
the menu and/or go to next screen or to
confirm the required menu option.Press
and hold theMENUbutton (approximately
one second) to return to the main screen.
Press the UP
button to scroll upward
through the displayed menu and the related
options or to increase the displayed value.
Press the DOWNbutton to scroll
downward through the displayed menu and
the related options or to decrease the value
displayed.
NOTE:
UP
and DOWNbuttons acti-
vate different functions according to the following situations:
•To scroll the menu options upwards or downwards.
•To increase or decrease values during settings.
NOTE:
When opening one of the front doors, the EVIC display will turn on the clock and the
miles or kilometers covered for a few seconds.
PROGRAMMABLE FEATURES
Uconnect® Customer Programmable Features
The Uconnect® system allows you to access Customer Programmable feature settings
such as Display, Clock & Date, Safety/Assistance, Lights, Doors & Locks, Audio, Phone/
Bluetooth®, SiriusXM Setup and Restore Default Settings through soft-keys.
•Press the SETTINGS hard-key located on the right side of the display.When making a
selection, scroll up or down until the preferred setting is highlighted, then press and
release the preferred setting until a check-mark appears next to the setting, showing
that setting has been selected.The following feature settings are available:
•Display•Engine Off
•Clock•Audio
•Safety/Assistance•Phone/Bluetooth®
•Lights•SiriusXM Setup
•Doors & Locks•System Information
EVIC Controls
ELECTRONICS
63
Page 86 of 116

If the tire does not inflate to at least 26 psi (1.8 Bar) pressure within 15 minutes:
The tire is too badly damaged.Do not attempt to drive the vehicle further.Call for assis-
tance.
NOTE:
If the tire becomes over-inflated, press the Deflation Button to reduce the tire pressure
to the recommended inflation pressure before continuing.
If the tire inflates to the recommended pressure or is at least 26 psi (1.8 Bar) pressure
within 15 minutes:
1.Press the Power Button (4) to turn off the TIREFIT kit.
2.Remove the Speed Limit sticker from the top of the Sealant Bottle (1) and place the
sticker on the instrument panel.
3.Immediately disconnect the Sealant Hose (6) from the valve stem, reinstall the cap
on the fitting at the end of the hose, and place the TIREFIT kit in the vehicle storage
location.Quickly proceed to (D) “Drive Vehicle.”
(D) Drive Vehicle:
Immediately after injecting sealant and inflating the tire, drive the vehicle 5 miles (8 km)
or 10 minutes to ensure distribution of the TIREFIT Sealant within the tire.Do not
exceed 55 mph (88 km/h).
(E) After Driving:
Pull over to a safe location.Refer to “Whenever You Stop to Use TIREFIT” before continuing.
1.Turn the Mode Select Knob (5) to the Air Mode position.
2.Uncoil the Air Pump Hose (7) (black in color) and screw the fitting at the end of
hose (7) onto the valve stem.
3.Uncoil the power plug and insert the plug into the vehicles 12 Volt power outlet.
4.Check the pressure in the tire by reading the Pressure Gauge (3).
If tire pressure is less than 19 psi (1.3 Bar), the tire is too badly damaged. Do not
attempt to drive the vehicle further. Call for assistance.
If the tire pressure is 19 psi (1.3 Bar) or higher:
1.Press the Power Button (4) to turn on TIREFIT and inflate the tire to the pressure
indicated on the tire and loading information label on the driver-side door opening.
2.Disconnect the TIREFIT kit from the valve stem, reinstall the cap on the valve stem
and unplug from 12 Volt outlet.
3.Place the TIREFIT kit in its proper storage area in the vehicle.
4.Have the tire inspected and repaired or replaced at the earliest opportunity at an
authorized dealer or tire service center.
5.Replace the Sealant Bottle (1) and Sealant Hose (6) assembly at your authorized
dealer as soon as possible.Refer to “(F) Sealant Bottle and Hose Replacement.”
WHAT TO DO IN EMERGENCIES
84
Page 95 of 116

OPENING THE HOOD
•Pull the red release lever located below
the instrument panel and in front of the
driver’s door.
•Raise the hood and locate the safety
latch in the middle of the hood opening.
•Move the safety latch while lifting the
hood at the same time.
•Insert the support rod into the slot on
the hood.
•To close the hood, remove the support
rod and place it in the retaining clip, then
lower the hood slowly.
WARNING!
Be sure the hood is fully latched before driving your vehicle.If the hood is not fully
latched, it could open when the vehicle is in motion and block your vision.Failure to
follow this warning could result in serious injury or death.
MAINTAINING YOUR VEHICLE
93